手動釋放Linux服務器內存
在服務器運行過程中,使用free -m查看服務器內存時,經常會發現free值很小,有些同學就會很緊張,總想采取一些措施,使得free值看起來高一點,心里就比較爽一點。其實,個人覺得這完全是圖一時之快,沒什么實質性用途。
一、大眾釋放內存方法
1. 首先使用free -m查看剩余內存
view plaincopy to clipboardprint?
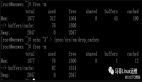
linux-8v2i:~ # free -m
total used free shared buffers cached
Mem: 3952 2773 178 0 130 1097
-/+ buffers/cache: 1545 2406
Swap: 2055 0 2055
linux-8v2i:~ # free -m
total used free shared buffers cached
Mem: 3952 2773 178 0 130 1097
-/+ buffers/cache: 1545 2406
Swap: 2055 0 2055
2. 執行sync命令
使用sync命令以確保文件系統的完整性,sync 命令運行 sync 子例程,將所有未寫的系統緩沖區寫到磁盤中,包含已修改的 i-node、已延遲的塊 I/O 和讀寫映射文件。
view plaincopy to clipboardprint?
linux-8v2i:~ # sync
linux-8v2i:~ # sync
3. 修改/proc/sys/vm/drop_caches
view plaincopy to clipboardprint?
echo 3 > /proc/sys/vm/drop_caches
echo 3 > /proc/sys/vm/drop_caches
說明:
1>. /proc是一個虛擬文件系統,我們可以通過對它的讀寫操作作為與kernel實體間進行通信的一種手段。也就是說可以通過修改/proc中的文件,來對當前kernel的行為做出調整。也就是說我們可以通過調整/proc/sys/vm/drop_caches來釋放內存。
2>. 關于drop_caches的官方說明如下:
Writing to this file causes the kernel to drop clean caches,dentries and inodes from memory, causing that memory to becomefree.
To free pagecache, use echo 1 > /proc/sys/vm/drop_caches;
to free dentries and inodes, use echo 2 > /proc/sys/vm/drop_caches;
to free pagecache, dentries and inodes, use echo 3 >/proc/sys/vm/drop_caches.
Because this is a non-destructive operation and dirty objects are not freeable, the user should run sync first.
3>. Linux內核會將它最近訪問過的文件頁面緩存在內存中一段時間,這個文件緩存被稱為pagecache。
4.再使用free -m查看剩余內存,情況如下:
view plaincopy to clipboardprint?
linux-8v2i:~ # free -m
total used free shared buffers cached
Mem: 3952 1773 2325 0 0 80
-/+ buffers/cache: 1545 2406
Swap: 2055 0 2055
linux-8v2i:~ # free -m
total used free shared buffers cached
Mem: 3952 1773 2325 0 0 80
-/+ buffers/cache: 1545 2406
Swap: 2055 0 2055
二、Linux內存分析
1. 首先對free -m查看結果進行分析
view plaincopy to clipboardprint?
linux-8v2i:~ # free -m
total used free shared buffers cached
Mem: 3952 2773 178 0 130 1097
-/+ buffers/cache: 1545 2406
Swap: 2055 0 2055
linux-8v2i:~ # free -m
total used free shared buffers cached
Mem: 3952 2773 178 0 130 1097
-/+ buffers/cache: 1545 2406
Swap: 2055 0 2055
各參數含義:
total:總物理內存
used:已使用內存
free:完全未被使用的內存
shared:應用程序共享內存
buffers:緩存,主要用于目錄方面,inode值等
cached:緩存,用于已打開的文件
-buffers/cache:應用程序使用的內存大小,used減去緩存值
+buffers/cache:所有可供應用程序使用的內存大小,free加上緩存值
其中:
total = used + free
-buffers/cache=used-buffers-cached,這個是應用程序真實使用的內存大小
+buffers/cache=free+buffers+cached,這個是服務器真實還可利用的內存大小
2. Linux的內存分配方式
大家都知道,Linux服務器為了提高效率,會提前申請內存,即使這些內存沒有被具體應用使用,Linux也會提前申請這些內存,然后利用這些內存做緩存用,即將剛打開的文件系統存入cache中,這樣對應的服務器free值會越來越少,buffers和cached會越來越大,因此給大家表象就是內存越來越少了,大家就緊張了;其實,大家完全不用緊張,Linux服務器在發現內存不足時,會自動清理cached區域,釋放內存,然后繼續增大cache,free繼續減少。因此,那樣手動降低內存使用率的方法,其實就是圖一時之快,呵呵。
【編輯推薦】