Windows Phone開發(40):漫談關鍵幀動畫中篇
作者:junwong
盡管前面介紹的幾種動畫會讓覺得很好玩了,但是,不知道你是否發現,在前面說到的一系列XXXAnimation中,都有一個共同點,那就是僅僅針對兩個值的目標值之間產生動畫,如果使用By,將在原值和加上By后的目標值之間進行動畫處理;如果使用From,To,那就更好理解了,就是首尾兩個值之間值的動畫。
一、DiscreteDoubleKeyFrame
離散型關鍵幀動畫,重點,我們理解一下“離散”的意思,其實你查一下《新華字典》,“離”和“散”的意思相近。我們可以這樣解釋:每個關鍵幀之間是直接過渡,其間不經過動畫插補。似乎這樣理解有點苦澀難懂,所以,我們還是從實例入手。
請參考以下XAML代碼寫一個示例:
- <Grid Loaded="OnGridLoaded">
- <Rectangle Width="100" Height="100" Fill="Green" VerticalAlignment="Top">
- <Rectangle.RenderTransform>
- <TranslateTransform x:Name="trm"/>
- </Rectangle.RenderTransform>
- </Rectangle>
- <Grid.Resources>
- <Storyboard x:Name="std">
- <DoubleAnimationUsingKeyFrames Duration="0:0:5" RepeatBehavior="15"
- Storyboard.TargetName="trm"
- Storyboard.TargetProperty="Y">
- <DiscreteDoubleKeyFrame KeyTime="0:0:2" Value="150"/>
- <DiscreteDoubleKeyFrame KeyTime="0:0:3" Value="280"/>
- <DiscreteDoubleKeyFrame KeyTime="0:0:5" Value="380"/>
- </DoubleAnimationUsingKeyFrames>
- </Storyboard>
- </Grid.Resources>
- </Grid>
在后臺的C#代碼中,千萬不要記了啟動動畫,等下運行后發現動不了就麻煩了。
- private void OnGridLoaded(object sender, RoutedEventArgs e)
- {
- this.std.Begin();
- }
然后你可以運行了,注意認真觀察動畫的演變過程。

不知道你觀察到了什么?你是否發現,矩形向下運動的過程是直接跳躍式的,每個關鍵之間沒有創建過渡效果,而且直接跳到對應值。
二、DiscreteColorKeyFrame
這也是一個離散型關鍵幀動畫,從名字上我們知道,它是針對顏色進行動畫處理的。還是看例子吧。
請參考下面XAML代碼寫一個測試程序:
- <Grid Loaded="OnGridLoaded">
- <Ellipse Width="250" Height="250">
- <Ellipse.Fill>
- <SolidColorBrush x:Name="brush" Color="Blue"/>
- </Ellipse.Fill>
- </Ellipse>
- <Grid.Resources>
- <Storyboard x:Name="std">
- <ColorAnimationUsingKeyFrames Duration="0:0:8"
- RepeatBehavior="20"
- Storyboard.TargetName="brush"
- Storyboard.TargetProperty="Color">
- <DiscreteColorKeyFrame KeyTime="0:0:2" Value="Yellow"/>
- <DiscreteColorKeyFrame KeyTime="0:0:5" Value="Gray"/>
- <DiscreteColorKeyFrame KeyTime="0:0:7" Value="Red"/>
- </ColorAnimationUsingKeyFrames>
- </Storyboard>
- </Grid.Resources>
- </Grid>
后臺代碼就不帖了,都懂得寫什么了。
然后運行一下,查看效果。
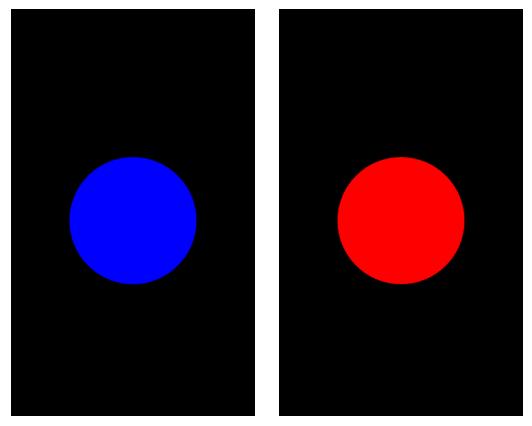
從效果中可以看到,顏色的改變是沒有平滑的過渡效果的,而是當時間線的播放時間到了關鍵幀所在的位置時,顏色是直接改變的。
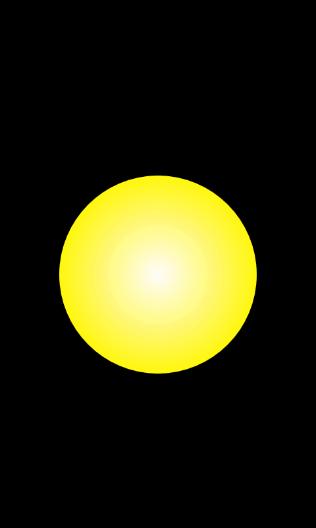
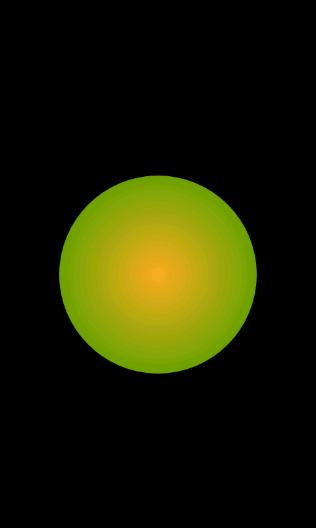
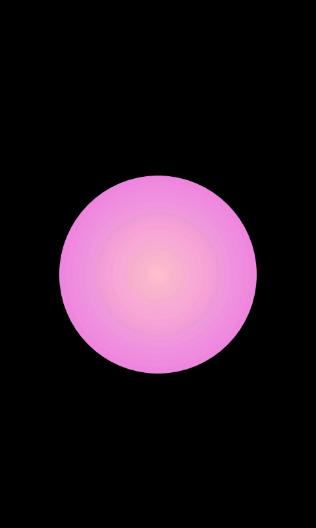
三、LinearColorKeyFrame
線性顏色的關鍵幀與離散型動畫相反,每個關鍵幀之間都創建平滑的過渡效果,讓人看起來有連續感。
請參考以下XAML代碼寫一個測試程序。
- <Grid Loaded="onGridLoaded">
- <Ellipse Width="300" Height="300" >
- <Ellipse.Fill>
- <RadialGradientBrush x:Name="rdGradientBrush" Center="0.5, 0.5"
- RadiusX="0.5" RadiusY="0.5">
- <GradientStop Color="LightGreen" Offset="0"/>
- <GradientStop Color="DarkGreen" Offset="1"/>
- </RadialGradientBrush>
- </Ellipse.Fill>
- </Ellipse>
- <Grid.Resources>
- <Storyboard x:Name="std">
- <ColorAnimationUsingKeyFrames Duration="0:0:6"
- RepeatBehavior="Forever"
- Storyboard.TargetName="rdGradientBrush"
- Storyboard.TargetProperty="(RadialGradientBrush.GradientStops)[0].(GradientStop.Color)">
- <LinearColorKeyFrame KeyTime="0:0:1" Value="Orange"/>
- <LinearColorKeyFrame KeyTime="0:0:3" Value="White"/>
- <LinearColorKeyFrame KeyTime="0:0:6" Value="Pink"/>
- </ColorAnimationUsingKeyFrames>
- <ColorAnimationUsingKeyFrames Duration="0:0:6"
- RepeatBehavior="Forever"
- Storyboard.TargetName="rdGradientBrush"
- Storyboard.TargetProperty="(RadialGradientBrush.GradientStops)[1].(GradientStop.Color)">
- <LinearColorKeyFrame KeyTime="0:0:3" Value="Yellow"/>
- <LinearColorKeyFrame KeyTime="0:0:6" Value="Violet"/>
- <LinearColorKeyFrame KeyTime="0:0:7" Value="SeaGreen"/>
- </ColorAnimationUsingKeyFrames>
- </Storyboard>
- </Grid.Resources>
- </Grid>
頁面上的正圓是使用徑向漸變填充的,漸變顏色點有兩個,我們分別對這兩個漸變點的顏色進行線性動畫處理,這樣就會做出很漂亮的效果,如下面圖片所示。
責任編輯:閆佳明
來源:
oschina