iOS開發筆記
作者:佚名
作為iOS開發者,大家獲取對它的基礎知識有了些了解,但是對于它所深入的東西或許有的還接觸不到,下面,就將技術大牛整理好的開發筆記奉獻給大家。
退回輸入鍵盤:
- - (BOOL) textFieldShouldReturn:(id)textField{
- [textField resignFirstResponder];
- }
CGRect

CGPoint & CGSize
- CGPoint aPoint = CGPointMake(x, y); CGSize aSize = CGSizeMake(width, height);
設置透明度
- [myView setAlpha:value]; (0.0 < value < 1.0)
設置背景色
- [myView setBackgroundColor:[UIColor redColor]];
- (blackColor;darkGrayColor;lightGrayColor;whiteColor;grayColor; redColor; greenColor; blueColor; cyanColor;yellowColor;magentaColor;
- orangeColor;purpleColor;brownColor; clearColor; )
自定義顏色:
- UIColor *newColor = [[UIColor alloc] initWithRed:(float) green:(float) blue:(float) alpha:(float)]; 0.0~1.0
寬度和高度
|
1
|
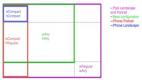
768X1024 1024X768 狀態欄高 20 像素高 導航欄 工具欄 44像素高
|
隱藏狀態欄:
- [[UIApplication shareApplication] setStatusBarHidden: YES animated:NO]
橫屏:
- [[UIApplication shareApplication] setStatusBarOrientation:UIInterfaceOrientationLandscapeRight].
- orientation == UIInterfaceOrientationLandscapeLeft
- window=[[UIWindow alloc] initWithFrame:[UIScreen mainScreen] bounds];全屏
自動適應父視圖大小:
- aView.autoresizingSubviews = YES;
- aView.autoresizingMask = (UIViewAutoresizingFlexibleWidth | UIViewAutoresizingFlexibleHeight);
定義按鈕
- UIButton *scaleUpButton = [UIButton buttonWithType:UIButtonTypeRoundedRect];
- [scaleUpButton setTitle:@"放 大"forState:UIControlStateNormal];
- scaleUpButton.frame = CGRectMake(40, 420, 100, 40);
- [scaleUpButton addTarget:self action:@selector(scaleUp) forControlEvents:UIControlEventTouchUpInside];
設置視圖背景圖片
- UIImageView *aView;
- [aView setImage:[UIImage imageNamed:@”name.png”]];
- view1.backgroundColor = [UIColor colorWithPatternImage:[UIImage imageNamed:@"image1.png"]];
- UISlider *slider = (UISlider *) sender;
- NSString *newText = [[NSString alloc] initWithFormat:@”%d”, (int)(slider.value + 0.5f)];
- label.text = newText;
活動表單 <UIActionSheetDelegate>
- - (IBActive) someButtonPressed:(id) sender
- {
- UIActionSheet *actionSheet = [[UIActionSheet alloc]
- initWithTitle:@”Are you sure?”
- delegate:self
- cancelButtonTitle:@”No way!”
- destructiveButtonTitle:@”Yes, I’m Sure!”
- otherButtonTitles:nil];
- [actionSheet showInView:self.view];
- [actionSheet release];
- }
警告視圖 <UIAlertViewDelegate>
- - (void) actionSheet:(UIActionSheet *)actionSheet didDismissWithButtonIndex:(NSInteger) buttonIndex
- {
- if(buttonIndex != [actionSheet cancelButtonIndex])
- {
- NSString *message = [[NSString alloc] initWithFormat:@”You can
- breathe easy, everything went OK.”];
- UIAlertView *alert = [[UIAlertView alloc]
- initWithTitle:@”Something was done”
- message:message
- delegate:self
- cancelButtonTitle:@”OK”
- otherButtonTitles:nil];
- [alert show];
- [alert release];
- [message release];
- }
- }
動畫效果
- -(void)doChange:(id)sender
- {
- if(view2 == nil)
- {
- [self loadSec];
- }
- [UIView beginAnimations:nil context:NULL];
- [UIView setAnimationDuration:1];
- [UIView setAnimationTransition:([view1 superview] ? UIViewAnimationTransitionFlipFromLeft : UIViewAnimationTransitionFlipFromRight)forView : self.view cache:YES];
- if([view1 superview]!= nil)
- {
- [view1 removeFromSuperview];
- [self.view addSubview:view2];
- }else{
- [view2 removeFromSuperview];
- [self.view addSubview:view1];
- }
- [UIView commitAnimations];
- }
Table View <UITableViewDateSource>
- #pragma mark -
- #pragma mark Table View Data Source Methods
- //指定分區中的行數,默認為1
- - (NSInteger)tableView:(UITableView *)tableView
- numberOfRowsInSection:(NSInteger)section
- {
- return[self.listDatacount];
- }
- //設置每一行cell顯示的內容
- - (UITableViewCell *)tableView:(UITableView *)tableView
- cellForRowAtIndexPath:(NSIndexPath *)indexPath
- {
- staticNSString *SimpleTableIndentifier = @"SimpleTableIndentifier";
- UITableViewCell *cell = [tableView dequeueReusableCellWithIdentifier:SimpleTableIndentifier];
- if(cell == nil) {
- cell = [[[UITableViewCell alloc]
- initWithStyle:UITableViewCellStyleSubtitle
- reuseIdentifier:SimpleTableIndentifier]
- autorelease];
- }
- UIImage *image = [UIImage imageNamed:@"13.gif"];
- cell.imageView.image = image;
- NSUInteger row = [indexPath row];
- cell.textLabel.text = [listData objectAtIndex:row];
- cell.textLabel.font = [UIFont boldSystemFontOfSize:20];
- if(row < 5)
- cell.detailTextLabel.text = @"Best friends";
- else
- cell.detailTextLabel.text = @"friends";
- returncell;
- }
圖像:如果設置圖像,則它顯示在文本的左側
文本標簽:這是單元的主要文本(UITableViewCellStyleDefault 只顯示文本標簽)
詳細文本標簽:這是單元的輔助文本,通常用作解釋性說明或標簽
- UITableViewCellStyleSubtitle
- UITableViewCellStyleDefault
- UITableViewCellStyleValue1
- UITableViewCellStyleValue2
- <UITableViewDelegate>
- #pragma mark -
- #pragma mark Table View Delegate Methods
- //把每一行縮進級別設置為其行號
- - (NSInteger)tableView:(UITableView *)tableView indentationLevelForRowAtIndexPath:(NSIndexPath *)indexPath
- {
- NSUInteger row = [indexPath row];
- returnrow;
- }
- //獲取傳遞過來的indexPath值
- - (NSIndexPath *)tableView:(UITableView *)tableView willSelectRowAtIndexPath:(NSIndexPath *)indexPath
- {
- NSUInteger row = [indexPath row];
- if(row == 0)
- returnnil;
- returnindexPath;
- }
- - (void)tableView:(UITableView *)tableView didSelectRowAtIndexPath:(NSIndexPath *)indexPath
- {
- NSUInteger row = [indexPath row];
- NSString *rowValue = [listData objectAtIndex:row];
- NSString *message = [[NSString alloc] initWithFormat:@"You selected %@",rowValue];
- UIAlertView *alert = [[UIAlertView alloc] initWithTitle:@"Row Selected"
- message:message
- delegate:nil
- cancelButtonTitle:@"Yes, I did!"
- otherButtonTitles:nil];
- [alert show];
- [alert release];
- [message release];
- [tableView deselectRowAtIndexPath:indexPath animated:YES];
- }
- //設置行的高度
- - (CGFloat)tableView:(UITableView *)tableView heightForRowAtIndexPath:(NSIndexPath *)indexPath
- {
- return40;
- }
隨機數的使用
- 頭文件的引用
- #import <time.h>
- #import <mach/mach_time.h>
- srandom()的使用
- srandom((unsigned)(mach_absolute_time() & 0xFFFFFFFF));
- 直接使用 random() 來調用隨機數
在UIImageView 中旋轉圖像
- float rotateAngle = M_PI;
- CGAffineTransform transform =CGAffineTransformMakeRotation(rotateAngle);
- imageView.transform = transform;
以上代碼旋轉imageView, 角度為rotateAngle, 方向可以自己測試哦!
在Quartz中如何設置旋轉點
- UIImageView *imageView = [[UIImageView alloc] initWithImage:[UIImage imageNamed:@"bg.png"]];
- imageView.layer.anchorPoint = CGPointMake(0.5, 1.0);
這個是把旋轉點設置為底部中間。記住是在QuartzCore.framework中才得到支持。
#p#
創建.plist文件并存儲
- NSString *errorDesc; //用來存放錯誤信息
- NSMutableDictionary *rootObj = [NSMutableDictionary dictionaryWithCapacity:4];//NSDictionary, NSData等文件可以直接轉化為plist文件
- NSDictionary *innerDict;
- NSString *name;
- Player *player;
- NSInteger saveIndex;
- for(int i = 0; i < [playerArraycount]; i++) {
- player = nil;
- player = [playerArray objectAtIndex:i];
- if(player == nil)
- break;
- name = player.playerName;// This “Player1″ denotes the player name could also be the computer name
- innerDict = [self getAllNodeInfoToDictionary:player];
- [rootObj setObject:innerDict forKey:name];// This “Player1″ denotes the person who start this game
- }
- player = nil;
- NSData *plistData = [NSPropertyListSerialization dataFromPropertyList:(id)rootObj format:NSPropertyListXMLFormat_v1_0 errorDescription:&errorDesc];
***2行可以忽略,只是給rootObj添加一點內容。這個plistData為創建好的plist文件,用其writeToFile方法就可以寫成文件。下面是代碼:
- 17 /*得到移動設備上的文件存放位置*/
- NSString *documentsPath = [self getDocumentsDirectory];
- NSString *savePath = [documentsPath stringByAppendingPathComponent:@"save.plist"];
- /*存文件*/
- if(plistData) {
- [plistData writeToFile:savePath atomically:YES];
- }
- else{
- NSLog(errorDesc);
- [errorDesc release];
- }
- - (NSString *)getDocumentsDirectory {
- NSArray *paths = NSSearchPathForDirectoriesInDomains(NSDocumentDirectory, NSUserDomainMask, YES);
- return[paths objectAtIndex:0];
- }
讀取plist文件并轉化為NSDictionary
- NSString *documentsPath = [self getDocumentsDirectory];
- NSString *fullPath = [documentsPath stringByAppendingPathComponent:@"save.plist"];
- NSMutableDictionary* plistDict = [[NSMutableDictionary alloc] initWithContentsOfFile:fullPath];
讀取一般性文檔文件
- NSString *tmp;
- NSArray *lines;/*將文件轉化為一行一行的*/
- lines = [[NSString stringWithContentsOfFile:@"testFileReadLines.txt"]
- componentsSeparatedByString:@”\n”];
- NSEnumerator *nse = [lines objectEnumerator];
- // 讀取<>里的內容
- while(tmp = [nse nextObject]) {
- NSString *stringBetweenBrackets = nil;
- NSScanner *scanner = [NSScanner scannerWithString:tmp];
- [scanner scanUpToString:@"<"intoString:nil];
- [scanner scanString:@"<"intoString:nil];
- [scanner scanUpToString:@">"intoString:&stringBetweenBrackets];
- NSLog([stringBetweenBrackets description]);
- }
對于讀寫文件,還有補充,暫時到此。隨機數和文件讀寫在游戲開發中經常用到。所以把部分內容放在這,以便和大家分享,也當記錄,便于查找。
隱藏NavigationBar
- [self.navigationController setNavigationBarHidden:YES animated:YES];
在想隱藏的ViewController中使用就可以了。
如果無法保證子類行為的一致性,那么就用委托
- If the subClass cann’t keep with superClass,use delegate rather than inheritance.
屏幕上看到的,都是UIVew
- Everything you see on Screen is UIView.
如果對性能要求高,慎用Interface Build
- if application’s performance is important,be discreet for the interface build.
copy是創建,retain是引用
- the copy operation is create a new one,but the retain operation is just a reference.
alloc需要release,convenient不需要release
- alloc method need corresponding release method,but convenient method not.
加載到NSArray/NSMutableArray里的對象,不需要負責release
- The objects added to NSArray/NSMutableArray need not to be released.
IBOutlet,IBAction為你開啟了訪問Interface Build中對象的大門
- IBOutlet and IBAction open the door to access the objects in Interface build.
UIApplicationDelegate負責應用程序的生命周期,而UIViewController負責View的生命周期
- UIApplicationDelegate is responsible for the application life cycle,but UIViewController for the UIView.
為了程序的健壯性,請盡量實現Delegate的生命周期函數
- if you want to develop a robust application,implement the life cycle methods as more as possbile.
you觸摸的不是UIEvent,而是NSSet的UIView
- what you touch on screen is not UIEvent but UIView
UITextField不響應鍵盤:
- 方法1: TextField的的Touch Cancel響應中,添加[textFied resignFirstResponder];
- 方法: - (BOOL)textFieldShouldBeginEditing:(UITextField *)textField{
- [textFied resignFirstResponder]; }
更改響應鍵盤return按鈕:
- TextField.returnKeyType=UIReturnKeyDone;
- select:
- UIReturnKeyDefault,
- UIReturnKeyGo,
- UIReturnKeyGoogle,
- UIReturnKeyJoin,
- UIReturnKeyNext,
- UIReturnKeyRoute,
- UIReturnKeySearch,
- UIReturnKeySend,
- UIReturnKeyYahoo,
- UIReturnKeyDone,
- UIReturnKeyEmergencyCall,
尺寸問題:
- iPhone應用程序圖標大小:57*57;
- iPhone全屏UIView大小:320*460 添加UITabBar后大小:320*411
- UITabelViewCell默認大小: 320*44
繪制控件方法
- //--alloc
- -(UITextField *)GetDefaultTextField:(CGRect)frame{
- UITextField *textField=[[UITextField alloc] initWithFrame:frame];
- textField.borderStyle=UITextBorderStyleRoundedRect;
- textField.font=[UIFont fontWithName:@"Arial"size:12.0];
- textField.textAlignment=UITextAlignmentCenter;
- textField.contentVerticalAlignment=UIControlContentVerticalAlignmentCenter;
- textField.keyboardType=UIKeyboardTypeNumbersAndPunctuation;
- textField.returnKeyType=UIReturnKeyDone;
- textField.delegate=self;
- returntextField;
- }
- //--alloc
- -(UILabel *)GetDefaultLabel:(CGRect)frame{
- UILabel *label = [[UILabel alloc] initWithFrame: frame];
- label.textAlignment=UITextAlignmentCenter;
- label.textColor=[UIColor blackColor];
- label.backgroundColor=[UIColor clearColor];
- label.font=[UIFont boldSystemFontOfSize:12.0];
- returnlabel;
- }
- //--alloc
- -(UIButton *)GetDefaultButton:(CGRect)frame{
- UIButton *button=[[UIButton alloc] initWithFrame:frame];
- [button setTitleColor:[UIColor blueColor] forState:UIControlStateNormal];
- [button setTitleColor:[UIColor blackColor] forState:UIControlStateHighlighted];
- [button setContentHorizontalAlignment:UIControlContentHorizontalAlignmentLeft];
- [button.titleLabel setFont:[UIFont boldSystemFontOfSize:14.0]];
- [button.titleLabel setLineBreakMode:UILineBreakModeCharacterWrap];
- [button addTarget:self action:@selector(btnTradeTouchUpInside:) forControlEvents:UIControlEventTouchUpInside];
- [button setContentHorizontalAlignment:UIControlContentHorizontalAlignmentCenter];
- [button setBackgroundImage:[UIImage imageNamed:@"png1.png"] forState:UIControlStateNormal];
- [button setBackgroundColor:[UIColor lightGrayColor]];
- button.tag=kButtonTag;
- returnbutton;}
多使用宏定義常量。tag,frame大小,一些判斷標志位。
|
1
|
#define kIndexValueTag 1
|
蘋果屏幕截圖快捷鍵
一般在Mac上用Command-Shif-3/4來截圖。注:Command=蘋果鍵 其實還有幾個輔助鍵,來起到不同的截圖功能……
- 1)Command-Shift-3(適用于OS9,10.1X和10.2)
- 將整個屏幕拍下并保存到桌面。
- 2)Command-Shift-4(適用于OS9,10.1X和10.2)
- 將屏幕的一部分拍下并保存到桌面。當按下著幾個鍵后,光標會變為一個十字,可以拖拉來選取拍報區域。
- 3)Command-Shift-Control-3(適用于OS9和10.2)
- 將整個屏幕拍下并保存到剪貼板,可以Command+V直接粘貼到如Photoshop等軟件中編輯。
- 4)Command-Shift-Control-4(適用于OS9和10.2)
- 將屏幕的一部分拍下并保存到剪貼板。
- 5)Command-Shift-4再按空格鍵(適用于10.2)
- 光標會變成一個照相機,點擊可拍下當前窗口或菜單或Dock以及圖標等,只要將照相機移動到不用區域(有效區域會顯示為淺藍色)點擊。
- 6)Command-Shift-Control-4再按空格鍵(適用于10.2)
- 將選取的窗口或其他區域的快照保存到剪貼板。
- 7)Command-Shift-Capslock-4(適用于OS9)
- 將當前的窗口拍下并保存到桌面。
- 8)Command-Shift-Capslock-Control-4(適用于OS9)
- 將當前的窗口拍下并保存到剪貼板。
責任編輯:張葉青
來源:
開源社區