Nginx + LibreSSL : 嘗鮮測試
tl;dr: 用上 LibreSSL 已經第二個夜晚了 ... 依然運行良好
7月11日,LibreSSL團隊發布 LibreSSL 的可移植版本,這是第一個可在 OpenBSD, Linux, OSX, Solaris 和 FreeBSD 上運行的版本。 [1,2,5,8]
本文會介紹一些 Nginx 與 Libressl 一起使用實踐經驗。
本文所用軟件的版本
-
nginx 1.6.0
-
libressl 2.0.0
在reddit-discussion [11]中有描述一些使用最新開發版本(1.7 分支)會出現的問題。
安裝
直接從源碼編譯LibreSSL,構建過程的輸出非常簡潔,源碼還附帶測試用例及提供并行構建支持(見附錄)。
- # 用于構建及安裝 libressl 的選項 [7]
- $ ./configure --prefix=/usr LDFLAGS=-lrt && make check && sudo make install
新安裝的 LibreSSL 可替代openssl以相同的方式運行,但要注意:正如 sabotage-linux 的 spencerjohn 和 Gentoo 的 Hanno Böck 所說的那樣,用libressl完全替代操作系統中的openssl會很麻煩。[3,4]
LibreSSL 會報告其版本為 LibreSSL 2.0, openssl命令的使用方法與openssl一樣:
- $ which openssl
- /usr/bin/openssl
- $ openssl version
- LibreSSL 2.0
- $ openssl s_client -host www.openssl.org -port 443
- CONNECTED(00000003)
- depth=2 C = BE, O = GlobalSign nv-sa, OU = Root CA, CN = GlobalSign Root CA
- verify error:num=19:self signed certificate in certificate chain
- verify return:0
- ---
- Certificate chain
- 0 s:/C=GB/OU=Domain Control Validated/CN=*.openssl.org
- i:/C=BE/O=GlobalSign nv-sa/CN=GlobalSign Domain Validation CA - G2
- 1 s:/C=BE/O=GlobalSign nv-sa/OU=Root CA/CN=GlobalSign Root CA
- i:/C=BE/O=GlobalSign nv-sa/OU=Root CA/CN=GlobalSign Root CA
- 2 s:/C=BE/O=GlobalSign nv-sa/CN=GlobalSign Domain Validation CA - G2
- i:/C=BE/O=GlobalSign nv-sa/OU=Root CA/CN=GlobalSign Root CA
- ---
- Server certificate
- -----BEGIN CERTIFICATE-----
- ... skip
- -----END CERTIFICATE-----
- subject=/C=GB/OU=Domain Control Validated/CN=*.openssl.org
- issuer=/C=BE/O=GlobalSign nv-sa/CN=GlobalSign Domain Validation CA - G2
- ---
- No client certificate CA names sent
- ---
- SSL handshake has read 4136 bytes and written 707 bytes
- ---
- New, TLSv1/SSLv3, Cipher is DHE-RSA-AES256-GCM-SHA384
- Server public key is 2048 bit
- Secure Renegotiation IS supported
- Compression: NONE
- Expansion: NONE
- SSL-Session:
- Protocol : TLSv1.2
- Cipher : DHE-RSA-AES256-GCM-SHA384
- TLS session ticket lifetime hint: 300 (seconds)
- TLS session ticket:
確認了 libressl 能夠使用后,我便動手讓 nginx 來使用 libressl 。盡管在仍然使用 openssl 0.9.x 的舊系統中,通常我都會靜態構建 nginx+openssl 以使最新和最好的 tls 版本可用。第一次嘗試,只使用 ./configure --with-openssl=/path/to/libressl 就大錯特錯了,因為 nginx 已經完全與 openssl 的構建過程融合了:
-
可使用名為./config的腳本來替代./configure(容易解決)
-
openssl 會收集在 .openssl/lib 下的 objects(.obj) 文件和其他文件來鏈接進二進制文件和庫文件,而 libressl 將這些文件分開存放在 crypto/.libs 和 ssl/.libs。
嘗試通過手工建立目錄層次(.openssl/lib)及根據 libressl 成功構建后出現的錯誤提示(見下面的錯誤信息)來復制文件以解決這些問題;在編譯 libressl 時,我看到一個類似可以通過使用 LDFLAGS=-lrt 選項來解決問題的錯誤提示,但在嘗試編譯nginx并鏈接到已靜態編譯過的libressl庫時仍然無法修復這個問題(但我依然繼續):
- ...
- objs/addon/nginx-upstream-fair/ngx_http_upstream_fair_module.o \
- objs/addon/src/ngx_http_headers_more_filter_module.o \
- objs/addon/src/ngx_http_headers_more_headers_out.o \
- objs/addon/src/ngx_http_headers_more_headers_in.o \
- objs/addon/src/ngx_http_headers_more_util.o \
- objs/addon/src/ngx_http_encrypted_session_module.o \
- objs/addon/src/ngx_http_encrypted_session_cipher.o \
- objs/ngx_modules.o \
- -Wl,-E -lpthread -lcrypt -L/usr/lib -lm -llua5.1 -lpcre /data/builds/froggstack/nginx_modules/openssl/.openssl/lib/libssl.a /data/builds/froggstack/nginx_modules/openssl/.openssl/lib/libcrypto.a -ldl -lz
- /data/builds/froggstack/nginx_modules/openssl/.openssl/lib/libcrypto.a(libcompat_la-getentropy_linux.o): In function `getentropy_fallback':
- /data/builds/froggstack/nginx_modules/openssl/crypto/compat/getentropy_linux.c:324: undefined reference to `clock_gettime'
- /data/builds/froggstack/nginx_modules/openssl/crypto/compat/getentropy_linux.c:395: undefined reference to `clock_gettime'
- collect2: error: ld returned 1 exit status
- make[1]: *** [objs/nginx] Error 1
- make[1]: Leaving directory `/data/builds/froggstack/src_nginx/nginx-1.6.0'
- make: *** [build] Error 2
下一個嘗試是在安裝了 libressl 的前提下通過鏈接到 libressl 的動態庫來構建 nginx,最終成功了(完整的nginx ./configure 選項參數見附錄)。 運行 nginx-libressl -t 測試成功,并將 /usr/bin/nginx 替換成新的二進制可執行文件和運行 /etc/init.d/nginx restart,更新后的 nginx + libressl 上線了。任何配置文件和 nginx 的 ssl 配置都不需要修改,非常好!
測試
感興趣并想測試的朋友可以訪問: www.mare-system.de,網站從2014-07-12開始運行在 libressl 上。如你發現任何不兼容的問題,請通過 atsecurity@mare-system.de 給我留言。
在各種 Linux 和 Android 的瀏覽器上測試都沒有發現問題;甚至在一臺已被遺忘的裝有2007年10月發布并已過時的附帶 OpenSSL 0.9.8g 19 的 debian 5 上使用像 w3m 這樣的控制臺瀏覽器上瀏覽也沒有問題。
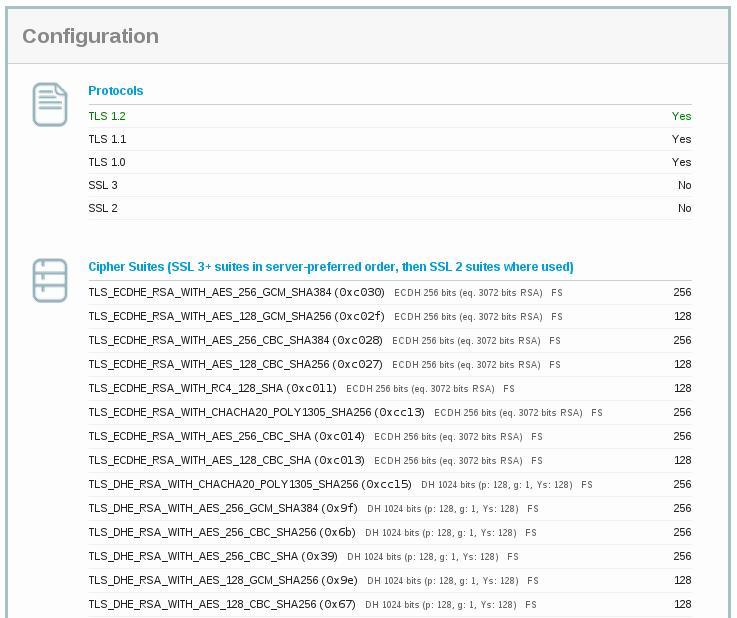
在 ssllabs.com 上測試的得分為 A+,成績與之前的配置一樣;在使用了 libressl 后,唯一給出的提示是加密算法 ChaCha20-Poly1305 還處于實驗階段。

做了一個小小的性能測試,結果顯示沒有什么大問題;LibreSSL 與平均水平相比慢了 4%。原因可能是 openssl 是靜態鏈接到 nginx 的,而 libressl 則是動態鏈接到 nginx 的,所以會產生更多的資源開銷。
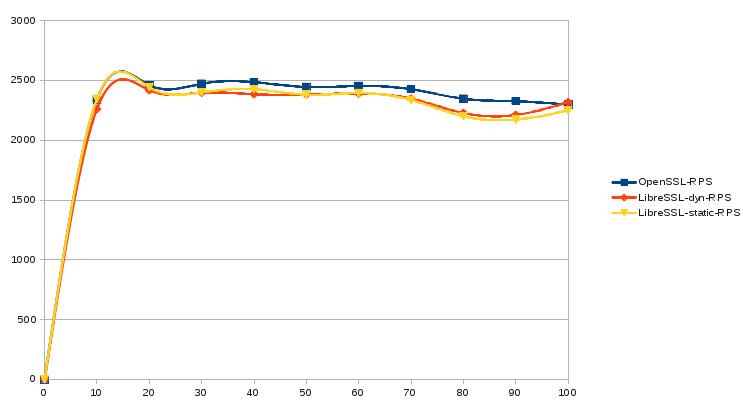
純數字的測試結果:
- | Parallel Requests | OpenSSL-RPS | LibreSSL-RPS
- | 10 | 2341.75 | 2260.5
- | 20 | 2459.75 | 2418.25
- | 30 | 2472 | 2397
- | 40 | 2485 | 2384.5
- | 50 | 2445 | 2382.25
- | 60 | 2453.25 | 2390.75
- | 70 | 2426.25 | 2347.25
- | 80 | 2346.5 | 2227.5
- | 90 | 2325.5 | 2211
- | 100 | 2297.75 | 2318.25
性能測試方式的一些說明可能在附錄中找到。
#p#
結論
此法可行。
雖然不建議在這個階段使用 LibreSSL 來代替 OpenSSL,但我只想測試其可行性。結果證明這是可行的。 從我的測試來看,沒有任何功能上或性能的問題,而且只要你找到方法,構建 nginx + libressl 就容易了。依我所見,長期使用 LibreSSL 的好處是:
-
干凈的代碼
-
更少的漏洞
-
更多人參與
在我撰寫本文的時候,我收到新的 LibreSSL 版本發布的消息,新版本解決了一些新的問題。所以,再回頭使用 OpenSSL 就顯得有點不理智了:
做得好,LibreSSL 團隊,再次感謝
參考
附錄
SSL 配置和使用的加密算法
- server {
- listen 443 ssl spdy;
- server_name www.mare-system.de;
- ...
- # ssl
- ssl_session_cache shared:SSL:10m;
- ssl_session_timeout 10m;
- # older protos for browsercompatibility
- ssl_protocols TLSv1 TLSv1.1 TLSv1.2;
- ssl_prefer_server_ciphers on;
- # suggestion from sslabs / including PFS
- ssl_ciphers EECDH+ECDSA+AESGCM:EECDH+aRSA+AESGCM:EECDH+ECDSA+SHA384:EECDH+ECDSA+SHA256:EECDH+aRSA+SHA384:EECDH+aRSA+SHA256:EECDH+aRSA+RC4:EECDH:EDH+aRSA:RC4:!aNULL:!eNULL:!LOW:!3DES:!MD5:!EXP:!PSK:!SRP:!DSS;
- # excluding subDomain on purpose
- add_header Strict-Transport-Security "max-age=31536000";
- ...
- }
Nginx 用于動態鏈接到 LibreSSL 的 Configure 選項
- nginx_libressl_opts = """ --conf-path=/etc/nginx/nginx.conf
- --sbin-path=/usr/sbin/nginx
- --prefix=
- --error-log-path=/var/log/nginx/error.log
- --http-log-path=/var/log/nginx/access.log
- --http-client-body-temp-path=/var/run/nginx/client_temp
- --http-proxy-temp-path=/var/run/nginx/proxy_temp
- --http-fastcgi-temp-path=/var/run/nginx/fastcgi_temp
- --with-file-aio
- --with-http_gzip_static_module
- --with-http_ssl_module
- --with-http_spdy_module
- --with-http_stub_status_module
- --with-debug
- --without-mail_pop3_module
- --without-mail_smtp_module
- --without-mail_imap_module
- --without-http_uwsgi_module
- --without-http_scgi_module
- --without-http_ssi_module
- --add-module=$nmd/nginx-openssl-version
- --add-module=$nmd/naxsi
- --add-module=$nmd/lua-nginx-module
- --add-module=$nmd/ngx_devel_kit
- --add-module=$nmd/echo-nginx-module
- --add-module=$nmd/nginx-accesskey
- --add-module=$nmd/ngx_http_log_request_speed
- --add-module=$nmd/set-misc-nginx-module
- --add-module=$nmd/nginx-sticky-module-ng
- --add-module=$nmd/ngx_cache_purge
- --add-module=$nmd/memc-nginx-module
- --add-module=$nmd/nginx-upstream-fair
- --add-module=$nmd/headers-more-nginx-module
- --add-module=$nmd/encrypted-session-nginx-module
LibreSSL - 構建時間和輸出
- # libressl
- $ make check
- real 1m58.610s
- user 1m24.517s
- sys 0m11.477s
- $ make check -j4
- real 0m34.231s
- user 1m28.626s
- sys 0m11.357s
- # make check output
- $ make check
- ============================================================================
- Testsuite summary for libressl 2.0.0
- ============================================================================
- # TOTAL: 41
- # PASS: 41
- # SKIP: 0
- # XFAIL: 0
- # FAIL: 0
- # XPASS: 0
- # ERROR: 0
- ============================================================================
性能測試方法
-
小服務器,雙核,2GB內存,沒有特別的調整
-
從另一臺服務器發起性能測試,使用 automake ab(abmeter)腳本
-
打開 keepalive
-
url: / (由 nginx 緩存)
-
測試了 10,20,30...100 個并發連接, 每次100.000 個請求
-
每個配置測試 4 輪
-
累積結果 / 4 -> 每次運行的值
-
https://www.ssllabs.com/ssltest/analyze.html?d=mare-system.de
英文原文:Nginx + LibreSSL - a first test
譯文鏈接:http://www.oschina.net/translate/nginx-libressl-first-test