iOS:聊聊Designated Initializer(指定初始化函數)
一、iOS的對象創(chuàng)建和初始化
iOS 中對象創(chuàng)建是分兩步完成:
分配內存
初始化對象的成員變量
我們最熟悉的創(chuàng)建NSObject對象的過程:

蘋果官方有一副圖片更生動的描述了這個過程:

對象的初始化是一個很重要的過程,通常在初始化的時候我們會支持成員變量的初始狀態(tài),創(chuàng)建關聯(lián)的對象等。例如對于如下對象:
- @interface ViewController : UIViewController
- @end
- @interface ViewController () {
- XXService *_service;
- }
- @end
- @implementation ViewController
- - (instancetype)initWithNibName:(NSString *)nibNameOrNil bundle:(NSBundle *)nibBundleOrNil
- {
- self = [super initWithNibName:nibNameOrNil bundle:nibBundleOrNil];
- if (self) {
- _service = [[XXService alloc] init];
- }
- return self;
- }
- - (void)viewWillAppear:(BOOL)animated
- {
- [super viewWillAppear:animated];
- [_service doRequest];
- }
- ...
- @end
- Test ViewController
面的VC中有一個成員變量XXService,在viewWillAppear的時候發(fā)起網絡請求獲取數據填充VC。
大家覺得上面的代碼有沒有什么問題?
帶著這個問題我們繼續(xù)往下看,上面只有VC的實現代碼,VC通過什么姿勢創(chuàng)建,我們不得而知,下面分兩種情況:
1. 手動創(chuàng)建
通常為了省事,我們創(chuàng)建VC的時候經常使用如下方式
- ViewController *vc = [ViewController alloc] init];
- ViewController *vc = [ViewController alloc] initWithNibName:nil bundle:nil];
使用如上兩種方式創(chuàng)建,我們上面的那一段代碼都可以正常運行,因為成員變量_service被正確的初始化了。
2. 從storyboard加載或者反序列化而來
先來看一段蘋果官方的文案:
| When using a storyboard to define your view controller and its associated views, you never initialize your view controller class directly. Instead, view controllers are instantiated by the storyboard €”either automatically when a segue is triggered or programmatically when your app calls the instantiateViewControllerWithIdentifier: method of a storyboard object. When instantiating a view controller from a storyboard, iOS initializes the new view controller by calling its initWithCoder: method instead of this method and sets the nibName property to a nib file stored inside the storyboard. |
從Xcode5以后創(chuàng)建新的工程默認都是Storyboard的方式管理和加載VC,對象的初始化壓根不會調用 initWithNibName:bundle: 方法,而是調用了 initWithCoder: 方法。對照上面VC的實現,可以看出_service對象沒有被正確初始化,所以請求無法發(fā)出。
至此***個問題大家心中應該已經有了答案,下面讓我們再去看看問題背后的更深層的原因。
正確的運行結果并不代表正確的執(zhí)行邏輯,有時候可能正好是巧合而已
二、Designated Initializer (指定初始化函數)
在UIViewController的頭文件中我們可以看到如下兩個初始化方法:
- - (instancetype)initWithNibName:(nullable NSString *)nibNameOrNil bundle:(nullable NSBundle *)nibBundleOrNil NS_DESIGNATED_INITIALIZER;
- - (nullable instancetype)initWithCoder:(NSCoder *)aDecoder NS_DESIGNATED_INITIALIZER;
細心的同學可能已經發(fā)現了一個宏 “NS_DESIGNATED_INITIALIZER”, 這個宏定義在NSObjCRuntime.h這個頭文件中,定義如下:
- #ifndef NS_DESIGNATED_INITIALIZER
- #if __has_attribute(objc_designated_initializer)
- #define NS_DESIGNATED_INITIALIZER __attribute__((objc_designated_initializer))
- #else
- #define NS_DESIGNATED_INITIALIZER
- #endif
- #endif
"__has_attribute"是Clang 的一個用于檢測當前編譯器是否支持某一特性的一個宏,對你沒有聽錯,"__has_attribute" 也是一個宏。
通過上面的定義,我們可以看到"NS_DESIGNATED_INITIALIZER"其實是給初始化函數聲明的后面加上了一個編譯器可見的標記,不要小看這個標記,他可以在編譯時就幫我們找出一些潛在的問題,避免程序運行時出現一些奇奇怪怪的行為。
聽著神乎其神,編譯器怎么幫我們避免呢?
答案是:⚠️⚠️⚠️警告
如下圖:
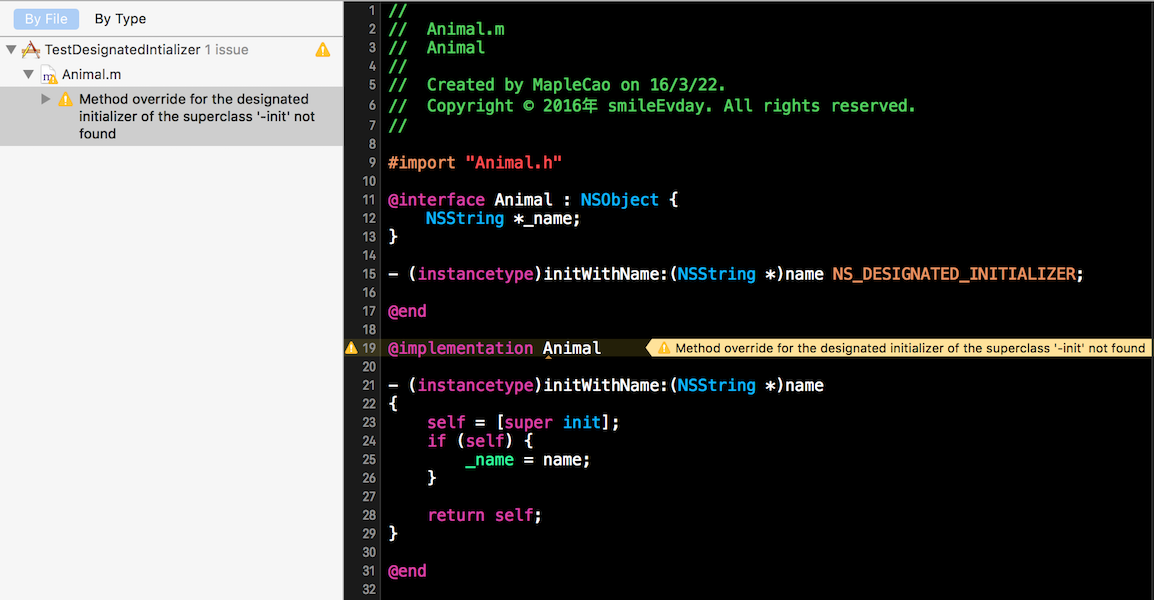
編譯器出現警告,說明我們寫的代碼不夠規(guī)范。Xcode自帶的Analytics工具可以幫助我們找出程序的潛在的問題,多花點時間規(guī)范自己的代碼,消除項目中的警告,避免后面項目上線后出現奇奇怪怪的問題。
三、NS_DESIGNATED_INITIALIZER 正確使用姿勢是什么?
指定初始化函數 Vs 便利初始化函數
指定初始化函數對一個類來說非常重要,通常參數也是最多的,試想每次我們需要創(chuàng)建一個自定義類都需要一堆參數,那豈不是很痛苦。便利初始化函數就是用來幫我們解決這個問題的,可以讓我們比較的創(chuàng)建對象,同時又可以保證類的成員變量被設置為默認的值。
不過需要注意,為了享受這些“便利”,我們需要遵守一些規(guī)范,官方文檔鏈接如下:
Swift和Objective-C略有不同,下面我們以Objective-C的規(guī)范為例。
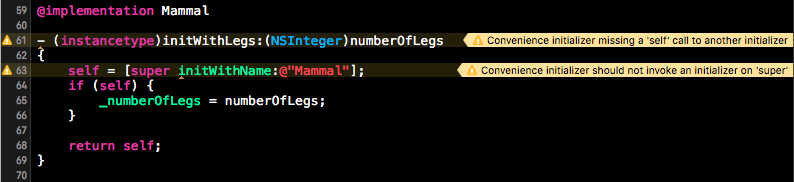
1. 子類如果有指定初始化函數,那么指定初始化函數實現時必須調用它的直接父類的指定初始化函數。

2. 如果子類有指定初始化函數,那么便利初始化函數必須調用自己的其它初始化函數(包括指定初始化函數以及其他的便利初始化函數),不能調用super的初始化函數。
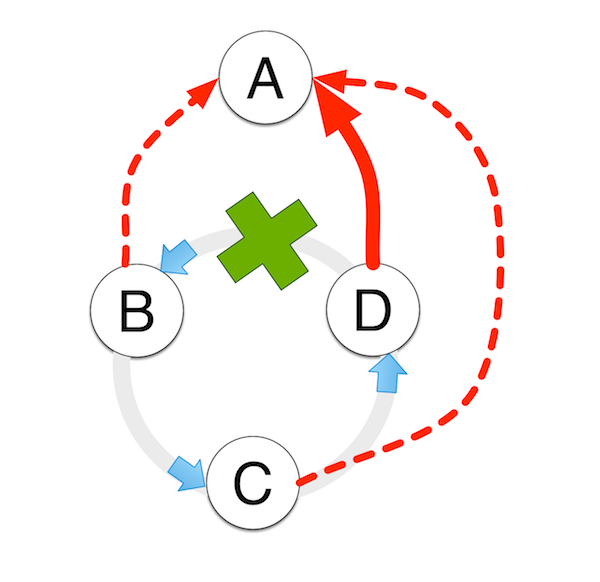
基于第2條的定義我們可以推斷出:所有的便利初始化函數最終都會調到該類的指定初始化函數
原因:所有的便利初始化函數必須調用的其他初始化函數,如果程序能夠正常運行,那么一定不會出現直接遞歸,或者間接遞歸的情況。那么假設一個類有指定函數A,便利初始化函數B,C,D,那么B,C,D三者之間無論怎么調用總的有一個人打破這個循環(huán),那么必定會有一個調用指向了A,從而其他兩個也最終會指向A。
示意圖如下(圖畫的比較丑,大家明白意思就好):
3. 如果子類提供了指定初始化函數,那么一定要實現所有父類的指定初始化函數。
![]()
當子類定義了自己的指定初始化函數之后,父類的指定初始化函數就“退化”為子類的便利初始化函數。這一條規(guī)范的目的是: “保證子類新增的變量能夠被正確初始化。”
因為我們沒法限制使用者通過什么什么方式創(chuàng)建子類,例如我們在創(chuàng)建UIViewController的時候可以使用如下三種方式:
- UIViewController *vc = [[UIViewController alloc] init];
- UIViewController *vc = [[UIViewController alloc] initWithNibName:nil bundle:nil];
- UIViewController *vc = [[UIViewController alloc] initWithCoder:xxx];
四、舉個栗子
以上三條規(guī)范理解起來可能有點兒繞,我寫了個簡單的例子有助于理解該規(guī)范,代碼如下:
- @interface Animal : NSObject {
- NSString *_name;
- }
- - (instancetype)initWithName:(NSString *)name NS_DESIGNATED_INITIALIZER;
- @end
- @implementation Animal
- - (instancetype)initWithName:(NSString *)name
- {
- self = [super init];
- if (self) {
- _name = name;
- }
- return self;
- }
- - (instancetype)init
- {
- return [self initWithName:@"Animal"];
- }
- @end
- @interface Mammal : Animal {
- NSInteger _numberOfLegs;
- }
- - (instancetype)initWithName:(NSString *)name andLegs:(NSInteger)numberOfLegs NS_DESIGNATED_INITIALIZER;
- - (instancetype)initWithLegs:(NSInteger)numberOfLegs;
- @end
- @implementation Mammal
- - (instancetype)initWithLegs:(NSInteger)numberOfLegs
- {
- self = [self initWithName:@"Mammal"];
- if (self) {
- _numberOfLegs = numberOfLegs;
- }
- return self;
- }
- - (instancetype)initWithName:(NSString *)name andLegs:(NSInteger)numberOfLegs
- {
- self = [super initWithName:name];
- if (self) {
- _numberOfLegs = numberOfLegs;
- }
- return self;
- }
- - (instancetype)initWithName:(NSString *)name
- {
- return [self initWithName:name andLegs:4];
- }
- @end
- @interface Whale : Mammal {
- BOOL _canSwim;
- }
- - (instancetype)initWhale NS_DESIGNATED_INITIALIZER;
- @end
- @implementation Whale
- - (instancetype)initWhale
- {
- self = [super initWithName:@"Whale" andLegs:0];
- if (self) {
- _canSwim = YES;
- }
- return self;
- }
- - (instancetype)initWithName:(NSString *)name andLegs:(NSInteger)numberOfLegs
- {
- return [self initWhale];
- }
- - (NSString *)description
- {
- return [NSString stringWithFormat:@"Name: %@, Numberof Legs %zd, CanSwim %@", _name, _numberOfLegs, _canSwim ? @"YES" : @"NO"];
- }
- @end
- TestDesignatedInitializer
配套上面的代碼,我還畫了一張類調用圖幫助大家理解,如下:
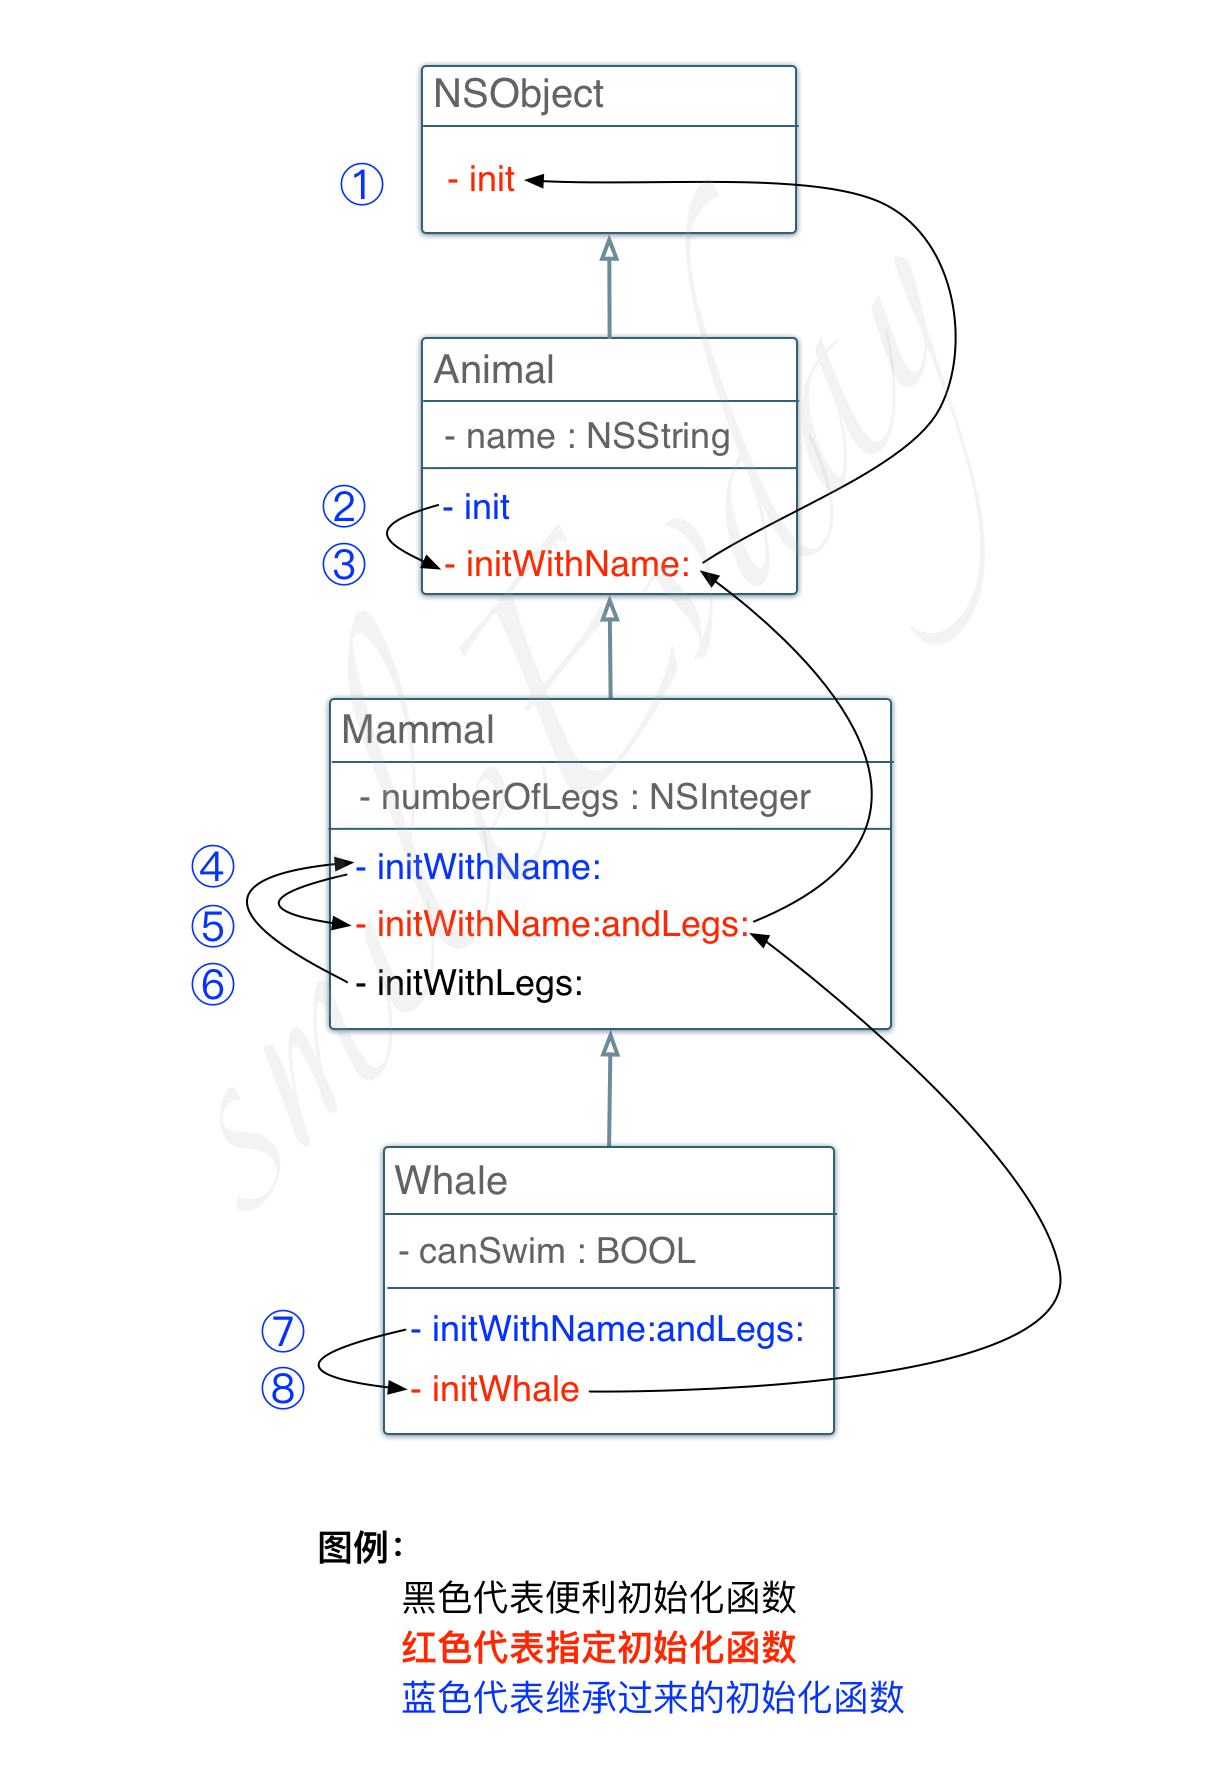
我們聲明了三個類:Animal(動物),Mammal(哺乳動物),Whale(鯨魚),并且按照指定初始化函數的規(guī)范實現了所有的初始化函數。
下面我們創(chuàng)建一些Whale(鯨魚),測試一下健壯性,代碼如下:
- Whale *whale1 = [[Whale alloc] initWhale]; // 1
- NSLog(@"whale1 %@", whale1);
- Whale *whale2 = [[Whale alloc] initWithName:@"Whale"]; // 2
- NSLog(@"whale2 %@", whale2);
- Whale *whale3 = [[Whale alloc] init]; // 3
- NSLog(@"whale3 %@", whale3);
- Whale *whale4 = [[Whale alloc] initWithLegs:4]; // 4
- NSLog(@"whale4 %@", whale4);
- Whale *whale5 = [[Whale alloc] initWithName:@"Whale" andLegs:8]; // 5
- NSLog(@"whale5 %@", whale5);
執(zhí)行結果為:
- whale1 Name: Whale, Numberof Legs 0, CanSwim YES
- whale2 Name: Whale, Numberof Legs 0, CanSwim YES
- whale3 Name: Whale, Numberof Legs 0, CanSwim YES
- whale4 Name: Whale, Numberof Legs 4, CanSwim YES
- whale5 Name: Whale, Numberof Legs 0, CanSwim YES
分析可以得出:
whale1 使用 Whale 的指定初始化函數創(chuàng)建,初始化調用順序為: ⑧ -> ⑤ -> ③ -> ①,初始化方法的實際執(zhí)行順序恰好相反: ① -> ③ -> ⑤ -> ⑧,即從根類的開始初始化,初始化的順序正好和類成員變量的布局順序相同,有興趣的可以自行上網查查。
whale5 使用Whale的父類Mammal的指定初始化函數創(chuàng)建實例,初始化調用順序為: ⑦ -> ⑧ -> ⑤ -> ③ -> ①,創(chuàng)建出來的對象符合預期。
注:⑦ 代表 Whale 類的實現,其內部實現調用了自己類的指定初始化函數 initWhale。 ⑤ 代表 Mammal 類的實現。
細心地朋友可能已經發(fā)我們創(chuàng)建的第四條鯨魚,神奇的長了4條腿,讓我們看看創(chuàng)建過程的調用順序: ⑥ -> ④ -> ⑦ -> ⑧ -> ⑤ -> ③ -> ①, 可以看到對象的初始化也是完全從跟到當前類的順序依次初始化的,那么問題出在哪兒呢?
Mammal 類的 initWithLegs:函數,除了正常的初始化函數調用棧,它還一段函數體,對已經初始化好的對象的成員變量_numberOfLegs 重新設置了值,這就導致了鯨魚長出了4條腿。
- - (instancetype)initWithLegs:(NSInteger)numberOfLegs
- {
- self = [self initWithName:@"Mammal"];
- if (self) {
- _numberOfLegs = numberOfLegs;
- }
- return self;
- }
細心的同學會發(fā)現,無論你使用父類的還是爺爺類的初始化函數創(chuàng)建子類的對象,***四個調用順序都為:⑧ -> ⑤ -> ③ -> ①。
指定初始化函數規(guī)則只能用來保證對象的創(chuàng)建過程是從跟類到子類依次初始化所有成員變量,無法解決業(yè)務問題。
五、當 initWithCoder: 遇到 NS_DESIGNATED_INITIALIZER
NSCoding協(xié)議的定義如下:
- @protocol NSCoding
- - (void)encodeWithCoder:(NSCoder *)aCoder;
- - (nullable instancetype)initWithCoder:(NSCoder *)aDecoder; // NS_DESIGNATED_INITIALIZER
- @end
蘋果官方文檔Decoding an Object中明確規(guī)定:
| In the implementation of an initWithCoder: method, the object should first invoke its superclass’s designated initializer to initialize inherited state, and then it should decode and initialize its state. If the superclass adopts the NSCoding protocol, you start by assigning of the return value of initWithCoder: to self. |
翻譯一下:
如父類沒有實現NSCoding協(xié)議,那么應該調用父類的指定初始化函數。
如果父類實現了NSCoing協(xié)議,那么子類的 initWithCoder: 的實現中需要調用父類的initWithCoder:方法,
根據上面的第三部分闡述的指定初始化函數的三個規(guī)則,而NSCoding實現的兩個原則都需要父類的初始化函數,這違反了指定初始化實現的第二條原則。
怎么辦?
仔細觀察NSCoding協(xié)議中 initWithCoder: 的定義后面有一個注釋掉的 NS_DESIGNATED_INITIALIZER,是不是可以找到一點兒靈感呢!
實現NSCoding協(xié)議的時候,我們可以顯示的聲明 initWithCoder: 為指定初始化函數(一個類可以有多個指定初始化函數,比如UIViewController)即可***解決問題,既滿足了指定初始化函數的三個規(guī)則,又滿足了NSCoding協(xié)議的三條原則。
六、總結
上面關于指定初始化的規(guī)則講了那么多,其實可以歸納為兩點:
- 便利初始化函數只能調用自己類中的其他初始化方法
- 指定初始化函數才有資格調用父類的指定初始化函數
蘋果官方有個圖,有助于我們理解這兩點:
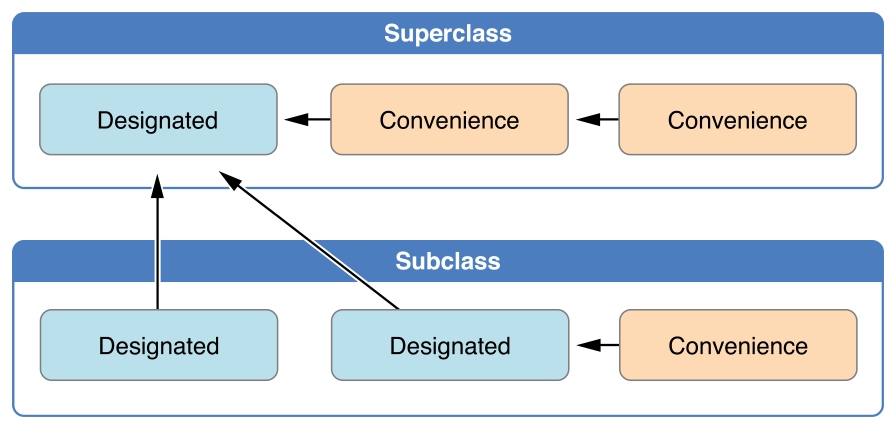
當我們?yōu)樽约簞?chuàng)建的類添加指定初始化函數時,必須準確的識別并覆蓋直接父類所有的指定初始化函數,這樣才能保證整個子類的初始化過程可以覆蓋到所有繼承鏈上的成員變量得到合適的初始化。
NS_DESIGNATED_INITIALIZER 是一個很有用的宏,充分發(fā)揮編譯器的特性幫我們找出初始化過程中可能存在的漏洞,增強代碼的健壯性。