React Native入門項目與解析

通過React Native 環境搭建和創建項目(Mac)可以成功創建一個新項目,即直接利用以下語句創建:
- //命令行創建項目:
- react-native init AwesomeProject
創建成功后,剛入門的我們主要關注兩個文件:
1)iOS項目目錄下的AppDelegate.m
為將iOS項目連接js文件的入口,以及相關初始化操作。
2)根目錄下的index.ios.js
為iOS對應的js入口文件。
一、 解析iOS項目中的AppDelegate.m
1. AppDelegate.m 代碼如下:
- #import "AppDelegate.h"
- // React Native相關頭文件
- #import "RCTBundleURLProvider.h"
- #import "RCTRootView.h"
- @implementation AppDelegate
- - (BOOL)application:(UIApplication *)application didFinishLaunchingWithOptions:(NSDictionary *)launchOptions
- {
- NSURL *jsCodeLocation;
- /*
- 當應用開始運行的時候,RCTRootView將會從以下的URL中加載應用:(本地調試的時候是直接在本地服務器中的index.ios加載,發布時設置有所不同)
- 重新調用了你在運行這個App時打開的終端窗口,它開啟了一個 packager 和 server 來處理上面的請求。
- 在 Safari 中打開那個 URL;你將會看到這個 App 的 JavaScript 代碼
- */
- [[RCTBundleURLProvider sharedSettings] setDefaults];
- jsCodeLocation = [[RCTBundleURLProvider sharedSettings] jsBundleURLForBundleRoot:@"index.ios" fallbackResource:nil];
- // RCTRootView是一個UIView容器,承載著React Native應用。同時它也提供了一個聯通原生端和被托管端的接口。
- RCTRootView *rootView = [[RCTRootView alloc] initWithBundleURL:jsCodeLocation
- moduleName:@"AwesomeProject"
- initialProperties:nil
- launchOptions:launchOptions];
- rootView.backgroundColor = [[UIColor alloc] initWithRed:1.0f green:1.0f blue:1.0f alpha:1];
- self.window = [[UIWindow alloc] initWithFrame:[UIScreen mainScreen].bounds];
- UIViewController *rootViewController = [UIViewController new];
- rootViewController.view = rootView;
- self.window.rootViewController = rootViewController;
- [self.window makeKeyAndVisible];
- return YES;
- }
- @end
2. RCTRootView
RCTRootView將React Natvie視圖封裝到原生組件中。(用戶能看到的一切內容都來源于這個RootView,所有的初始化工作也都在這個方法內完成。)
解析:
通過RCTRootView的初始化函數你可以將任意屬性傳遞給React Native應用。
參數initialProperties必須是NSDictionary的一個實例。
這一字典參數會在內部被轉化為一個可供JS組件調用的JSON對象。
- NSArray *imageList = @[@"http://foo.com/bar1.png",
- @"http://foo.com/bar2.png"];
- NSDictionary *propsDict = @{@"images" : imageList};
- RCTRootView *rootView = [[RCTRootView alloc] initWithBundleURL:jsCodeLocation
- moduleName:@"AwesomeProject"
- initialProperties: propsDict
- launchOptions:launchOptions];
在js文件中,則是通過this.props.images調用上面定義的參數。
this為AppRegistry.registerComponent注冊的組件(下面會講到)
RCTRootView同樣提供了一個可讀寫的屬性appProperties。在appProperties設置之后,React Native應用將會根據新的屬性重新渲染。當然,只有在新屬性和之前的屬性有區別時更新才會被觸發。
(注意:1.可以隨時更新屬性,但是更新必須在主線程中進行,讀取則可以在任何線程中進行。2.更新屬性時并不能做到只更新一部分屬性)
- NSArray *imageList = @[@"http://foo.com/bar3.png",
- @"http://foo.com/bar4.png"];
- rootView.appProperties = @{@"images" : imageList};
二、解析js入口文件(index.ios.js)
1. index.ios.js 代碼如下:
- 'use strict'; // 全局進入嚴格模式(目前發現不用也行)
- /**<
- 消除Javascript語法的一些不合理、不嚴謹之處,減少一些怪異行為;
- 消除代碼運行的一些不安全之處,保證代碼運行的安全;
- 提高編譯器效率,增加運行速度;
- 為未來新版本的Javascript做好鋪墊。
- */
- //導入一些必要的模塊
- //React Native內置的組件可以直接通過import { xxx } from 'react-native' 進行導入,當然也可以自定義組件。
- import React, { Component } from 'react';
- import {
- AppRegistry,
- StyleSheet,
- Text,
- View,
- TouchableOpacity
- } from 'react-native';
- //類,這是默認的載入類,繼承自Component,Component類(組件)似于Android和iOS中的View
- //這里為創建一個組件
- class AwesomeProject extends Component {
- //構造器 ,每個組件都擁有自己的屬性(props)和狀態(state)
- //調用this.setState更改狀態text或者isTouchDown時,組件會觸發render函數進行渲染更新
- constructor(props) {
- super(props);
- this.state = {
- text:'Welcome to React Native!',
- isTouchDown:false
- };
- }
- //在最初的渲染之前調用一次,可在里面進行預處理操作
- //在React中,設置this.state會導致重新渲染,但是componentWillMount設置this.state并不會對導致render調用多次
- //之后會對component的生命周期進一步解釋
- componentWillMount() {
- }
- //渲染函數,用來渲染實際的Component可視部分
- render() {
- //var定義變量,根據狀態值改變對應值
- var welcomeText = this.state.text;
- var bgcolor;
- if (this.state.isTouchDown) {
- bgcolor = '#c5c5ab';
- } else {
- bgcolor = '#F5FCFF';
- }
- console.log('testtststststts');
- //返回的即界面顯示內容
- return (
- <View style={[styles.container, {backgroundColor: bgcolor}]}>
- <Text style={styles.welcome}>
- {welcomeText}
- </Text>
- <Text style={styles.instructions}>
- To get started, edit index.android.js
- </Text>
- <Text style={styles.instructions}>
- Shake or press menu button for dev menu
- </Text>
- <TouchableOpacity onPress={this.touchDown.bind(this)}>
- <Text style={[styles.instructions, {backgroundColor: 'green'}]}>
- test touch Me
- </Text>
- </TouchableOpacity>
- </View>
- );
- }
- // 自定義函數
- touchDown() {
- // console.log 控制臺打印,可打印值,多用于調試
- console.log('>>', this.isTouchDown);
- if (!this.state.isTouchDown) {
- this.setState({
- text:'Test Touch Down Success',
- isTouchDown:true
- });
- } else {
- this.setState({
- text:'Test Touch Down Again Success',
- isTouchDown:false
- });
- }
- }
- }
- //定義樣式
- const styles = StyleSheet.create({
- container: {
- flex: 1,
- justifyContent: 'center',
- alignItems: 'center',
- backgroundColor: '#F5FCFF',
- },
- welcome: {
- fontSize: 20,
- textAlign: 'center',
- margin: 10,
- },
- instructions: {
- textAlign: 'center',
- color: '#333333',
- marginBottom: 5,
- },
- });
- //AppRegistry 定義了App的入口,并提供了根組件。
- //***個'AwesomeProject'要與AppDelegate里注冊的moduleName一致
- //第二個AwesomeProject則是入口組件,即上面定義的Component類
- AppRegistry.registerComponent('AwesomeProject', () => AwesomeProject);
2. 運行效果:
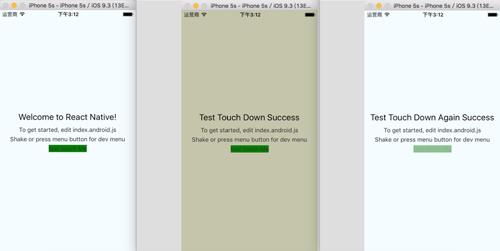
簡單運行效果.png
3. 基礎概念解釋
1)組件
代碼中的 Text, View, TouchableOpacity均為基礎組件。AwesomeProject則是自己創建的組件,也作為項目的入口組件。
在React Native項目中,所有展示的界面,都可以看做是一個組件(Component)只是功能和邏輯上的復雜程度不同。每一個是許許多多小的組件拼成的,每個小的組件也有自己對應的邏輯。
2)組件的狀態與屬性
組件本質上是狀態機,輸入確定,輸出一定確定。組件把狀態與結果一一對應起來,組件中有state與prop(狀態與屬性)。
屬性(props)是標簽里面的屬性, 組件之前通過標簽的屬性來傳遞數據,由父組件傳遞給子組件(單向的屬性傳遞)。
如果component的某些狀態由外部所決定,并且會影響到component的render,那么這些狀態就應該用props表示。
例如:一個下拉菜單的component,有哪些菜單項,是由這個component的使用者和使用場景決定的,那么“菜單項”這個狀態,就應該用props表示,并且由外部傳入。
狀態(state)是子組中的狀態,內部的事件方法或者生命周期方法都可以調用this.setState來變更,當狀態發生變化的同時,組件也會觸發render函數進行渲染更新。
如果component的某些狀態需要被改變,并且會影響到component的render,那么這些狀態就應該用state表示。
例如:一個購物車的component,會根據用戶在購物車中添加的產品和產品數量,顯示不同的價格,那么“總價”這個狀態,就應該用state表示。