創建和發布Android開發庫的終極指南
我經常被 android 開發社區中如此多而且好用的第三方庫所震驚。有很長的一段時間,我想貢獻一些東西,但我不知道如何去做。在瀏覽了其他很多關于如何發布一個 android 開發庫的文章后,我仍然發現缺失了一些細節,而且,所有的信息都是在不同的地方。所以,我將完整的走過這個過程,向大家展示我的做法。
對新手來說,我推薦使用 Android Studio 來創建所有的 Android 項目,Android Studio官方使用 Gradle 構建系統。請確保你下載了 Android Studio 的最新版。
相關術語介紹
在我們開始之前,還有一些術語,需要熟悉下。
項目(Project) — 在 Android Studio 中,一個 項目 就是一個完整的 Android app。Android Studio 項目包含了一個或多個模塊。 在 Android Studio 中,一個 項目 類似于在 Eclipse 的一個工作區間( workspace )。
模塊( Module) – 一個 模塊 是 app 中的一個組件,它可以單獨的進行構建、測試和調試。模塊包含了 app 的源代碼和資源文件。在 Android Studio 中,一個 模塊 類似于在 Eclipse 的一個項目。
AAR – ‘aar’ 套件是 Android 開發庫項目的二進制的分發形式。(AAR 格式)開發庫項目的主要產出就是 .aar 包(意思是 Android 壓縮包)。它是由編譯后的代碼(如 jar 文件或者 .so 文件)和資源文件(如 manifest 文件、res 文件、asset 文件)組合而成的。
Maven 中央倉庫 – 由 Maven 社區提供的倉庫。它包含了很多我們常用的開發庫。 Search Maven 網站可用來瀏覽 maven 中央倉庫的內容。Gradle, Please 網站是另一個可用來搜索中央倉庫的工具。如果你在項目配置文件的倉庫配置部分添加了 jCenter() ,那么 Gradle 將使用 jCenter 倉庫( jCenter 的說明)。Maven 中央倉庫也經常被稱作 Maven 中心或者中央倉庫。
Sonatype — Sonatype的開源軟件倉庫托管(OSSRH)服務是項目作者和貢獻者們發布他們的組件到中央倉庫的主要途徑。它是 Sonatype Nexus Professional 組織利用 Nexus Staging Suite 工具,對開源項目提供部署托管服務,該服務主要用來處理部署和驗證操作,也提供同步操作將內容通過網絡投遞到中央倉庫。
GPG – GNU 隱私保護組織 (也稱為 GPG 或者 GnuPG),這個 GNU 項目是一個加密軟件,遵循 OpenPGP (RFC4880)標準,是 PGP 的免費替代品。使用 GPG 你可以加密(解密)包含敏感數據的文件,比如那些由健康保險攜帶和責任法案 (HIPAA) 制定的受保護的隱私和安全方面的電子健康信息。想了解 GPG 的更多信息,請訪問 GNU Privacy Guard website。
準備好你的 Android 開發庫
我將使用我的 Trestle 開發庫作例子來講解。在你的項目中,需要修改一些地方,來準備作為一個開發庫發布到 Maven 中央倉庫中。
- 將開發庫的核心代碼和示例代碼區分開來。在我的項目中,我將他們分成 library 和 sample 兩個模塊。請仔細閱讀關于創建一個開發庫模塊的技巧。你也可能需要重命名你的模塊。
- 在 sample 模塊的 build.gradle 文件中,請確保包含以下內容:
- apply plugin: 'com.android.application'
- dependencies {
- compile project(':library')
- }
- 在 library 模塊的 build.gradle 文件中,請確保包含以下內容:
- apply plugin: 'com.android.library'
- apply from: 'maven-push.gradle'
- 在 library 模塊中,增加 gradle.properties 文件,請確保在該文件中包含以下內容:
- POM_NAME=ProjectName
- POM_ARTIFACT_ID=projectname
- POM_PACKAGING=aar
- 在 library 模塊中,增加 maven-push.gradle 文件,請確保在該文件中包含以下內容:
- /*
- * Copyright 2013 Chris Banes
- *
- * Licensed under the Apache License, Version 2.0 (the "License");
- * you may not use this file except in compliance with the License.
- * You may obtain a copy of the License at
- *
- * http://www.apache.org/licenses/LICENSE-2.0
- *
- * Unless required by applicable law or agreed to in writing, software
- * distributed under the License is distributed on an "AS IS" BASIS,
- * WITHOUT WARRANTIES OR CONDITIONS OF ANY KIND, either express or implied.
- * See the License for the specific language governing permissions and
- * limitations under the License.
- */
- apply plugin: 'maven'
- apply plugin: 'signing'
- def isReleaseBuild() {
- return VERSION_NAME.contains("SNAPSHOT") == false
- }
- def getReleaseRepositoryUrl() {
- return hasProperty('RELEASE_REPOSITORY_URL') ? RELEASE_REPOSITORY_URL
- : "https://oss.sonatype.org/service/local/staging/deploy/maven2/"
- }
- def getSnapshotRepositoryUrl() {
- return hasProperty('SNAPSHOT_REPOSITORY_URL') ? SNAPSHOT_REPOSITORY_URL
- : "https://oss.sonatype.org/content/repositories/snapshots/"
- }
- def getRepositoryUsername() {
- return hasProperty('NEXUS_USERNAME') ? NEXUS_USERNAME : ""
- }
- def getRepositoryPassword() {
- return hasProperty('NEXUS_PASSWORD') ? NEXUS_PASSWORD : ""
- }
- afterEvaluate { project ->
- uploadArchives {
- repositories {
- mavenDeployer {
- beforeDeployment { MavenDeployment deployment -> signing.signPom(deployment) }
- pom.groupId = GROUP
- pom.artifactId = POM_ARTIFACT_ID
- pom.version = VERSION_NAME
- repository(url: getReleaseRepositoryUrl()) {
- authentication(userName: getRepositoryUsername(), password: getRepositoryPassword())
- }
- snapshotRepository(url: getSnapshotRepositoryUrl()) {
- authentication(userName: getRepositoryUsername(), password: getRepositoryPassword())
- }
- pom.project {
- name POM_NAME
- packaging POM_PACKAGING
- description POM_DESCRIPTION
- url POM_URL
- scm {
- url POM_SCM_URL
- connection POM_SCM_CONNECTION
- developerConnection POM_SCM_DEV_CONNECTION
- }
- licenses {
- license {
- name POM_LICENCE_NAME
- url POM_LICENCE_URL
- distribution POM_LICENCE_DIST
- }
- }
- developers {
- developer {
- id POM_DEVELOPER_ID
- name POM_DEVELOPER_NAME
- }
- }
- }
- }
- }
- }
- signing {
- required { isReleaseBuild() && gradle.taskGraph.hasTask("uploadArchives") }
- sign configurations.archives
- }
- //task androidJavadocs(type: Javadoc) {
- //source = android.sourceSets.main.allJava
- //}
- //task androidJavadocsJar(type: Jar, dependsOn: androidJavadocs) {
- //classifier = 'javadoc'
- //from androidJavadocs.destinationDir
- //}
- task androidSourcesJar(type: Jar) {
- classifier = 'sources'
- from android.sourceSets.main.java.sourceFiles
- }
- artifacts {
- archives androidSourcesJar
- }
- }
- 修改在項目根目錄的 .gitignore 文件
- # [Android] ========================
- # Built application files
- *.apk
- *.ap_
- # Files for the Dalvik VM
- *.dex
- # Java class files
- *.class
- # Generated files
- bin/
- gen/
- # Gradle files
- .gradle/
- build/
- # Local configuration file (sdk path, etc)
- local.properties
- # Proguard folder generated by Eclipse
- proguard/
- # Log Files
- *.log
- ## Directory-based project format:
- .idea/
- ## File-based project format:
- *.ipr
- *.iws
- ## Plugin-specific files:
- # IntelliJ
- out/
- # mpeltonen/sbt-idea plugin
- .idea_modules/
- # JIRA plugin
- atlassian-ide-plugin.xml
- # Crashlytics plugin (for Android Studio and IntelliJ)
- com_crashlytics_export_strings.xml
- # [Maven] ========================
- target/
- pom.xml.tag
- pom.xml.releaseBackup
- pom.xml.versionsBackup
- pom.xml.next
- release.properties
- # [Gradle-Android] ========================
- # Ignore Gradle GUI config
- gradle-app.setting
- # Gradle Signing
- signing.properties
- trestle.keystore
- # Mobile Tools for Java (J2ME)
- .mtj.tmp/
- # Package Files #
- *.jar
- *.war
- *.ear
- # virtual machine crash logs, see http://www.java.com/en/download/help/error_hotspot.xml
- hs_err_pid*
- # Misc
- /.idea/workspace.xml
- .DS_Store
- /captures
- **/*.iml
- *.class
- 修改在項目根目錄的 settings.gradle 文件
- include ':sample', ':library'
- 修改在項目根目錄的 gradle.properties 文件
- # Project-wide Gradle settings.
- # IDE (e.g. Android Studio) users:
- # Gradle settings configured through the IDE *will override*
- # any settings specified in this file.
- # For more details on how to configure your build environment visit
- # http://www.gradle.org/docs/current/userguide/build_environment.html
- # Specifies the JVM arguments used for the daemon process.
- # The setting is particularly useful for tweaking memory settings.
- # Default value: -Xmx10248m -XX:MaxPermSize=256m
- # org.gradle.jvmargs=-Xmx2048m -XX:MaxPermSize=512m -XX:+HeapDumpOnOutOfMemoryError -Dfile.encoding=UTF-8
- # When configured, Gradle will run in incubating parallel mode.
- # This option should only be used with decoupled projects. More details, visit
- # http://www.gradle.org/docs/current/userguide/multi_project_builds.html#sec:decoupled_projects
- # org.gradle.parallel=true
- VERSION_NAME=0.0.1
- VERSION_CODE=1
- GROUP=com.github.github_username
- POM_DESCRIPTION=A library that does X, Y, and Z
- POM_URL=https://github.com/github_username/ProjectName
- POM_SCM_URL=https://github.com/github_username/ProjectName
- POM_SCM_CONNECTION=scm:git@github.com:github_username/ProjectName.git
- POM_SCM_DEV_CONNECTION=scm:git@github.com:github_username/ProjectName.git
- POM_LICENCE_NAME=The Apache Software License, Version 2.0
- POM_LICENCE_URL=http://www.apache.org/licenses/LICENSE-2.0.txt
- POM_LICENCE_DIST=repo
- POM_DEVELOPER_ID=github_username
- POM_DEVELOPER_NAME=GitHub FullName
- 增加 README.md 文件,向其他開發者介紹你的開發庫以及如何使用它。如果你想在你的 README.md 文件中增加些截圖,我極力推薦一款叫做Screenr的app。
安裝 GPG
如果你的機器上還沒安裝 GPG,你需要下載安裝它。如果你是 MacOSX 系統,安裝手冊在這里。
如果你從未使用過 GPG – 首先,請創建 GPG 密鑰:
- $ gpg --gen-key
在你創建 GPG 密鑰的時候,如果你不確定該如何回答問題, 這篇指南(Creating an encryption key)可以幫上忙。
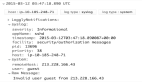
接下來,找到你的密鑰 ID:
- $ gpg --list-keys
第一行像是 pub XXXXX/YYYYYYYY <日期>的。切記,’YYYYYYYY’ 部分,就是你的密鑰 ID。
現在,發布你的密鑰:
- $ gpg --keyserver hkp://keyserver.ubuntu.com --send-keys YYYYYYYY
- $ gpg --keyserver hkp://pgp.mit.edu --send-keys YYYYYYYY
你當然也可以使用其他密鑰服務器,你也可以通過如下命令確認你的密鑰是否已經發布:
- $ gpg --keyserver hkp://pgp.mit.edu --search-keys johndoe@example.com # 使用你的郵箱
為了使你的開發庫在 Gradle, Please網站上列出(也為了其他人方便的引用你的開發庫),請上傳你的項目到 Maven Central。 最簡單的上傳項目的方法是使用 Sonatype。
Sonatype
- 在Sonatype 創建一個 JIRA 帳號。
- 登錄成功后,創建一個 new issue。
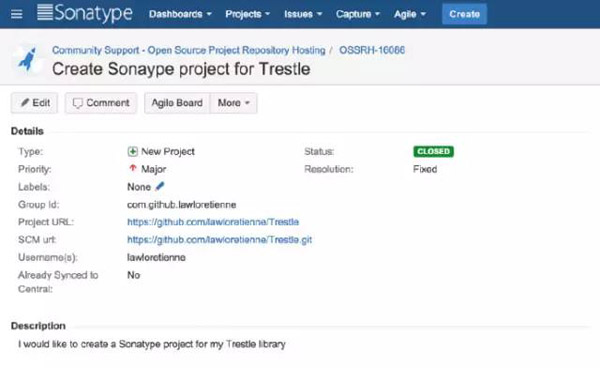
我為我的 Trestle 項目創建了一個 GitHub 倉庫。所以我在 new issue 上填寫的字段大概如此:
Group Id : com.github.<github_username>
Project URL : https://github.com/<github_username>/<project_name>
SCM url : https://github.com/<github_username>/<project_name>.git
Username : <sonatype_username>
Already Synced to Central : No
注意:我在你需要填寫的字段上增加了括號作為占位符。你需要將它們替換成合適的值。
當你準備提交 issue 的時候,issue 的細節應該要和上面的截圖差不多。當你提交完成后,Sonatype 將用 2 個工作日來處理你的 issue。接著,你將收到一份確認郵件,告知你的配置已經準備好了,你可以發布你的開源庫了。
不要部署你的開源庫,直到你接收到一封表明你的票據已經 OK 了的郵件。 對新項目來說,一個通病就是過早的部署。這將會誤使你的構件(artifacts)變成一個人人都能獲得的倉庫。
最后,如果你的組件已經在中央倉庫中了,請在你的票據中添加以下信息,并參考這篇文章,如何遷移到 OSSRH。
修改你本機上的 ~/.gradle/gradle.properties 文件,包含以下內容:
- NEXUS_USERNAME=sonatype_username
- NEXUS_PASSWORD=sonatype_password
- signing.keyId=gpg_key_id
- signing.password=gpg_password
- signing.secretKeyRingFile=/Users/username/.gnupg/secring.gpg
- org.gradle.daemon=true
當你發布開發庫的時候,身份認證信息已經在 gradle.properties 文件中提供了。請確保提供了正確的 nexus 用戶名和密碼(也就是 Sonatype 的用戶名和密碼),否則你將得到未授權的 401 錯誤。
注意:如果你之前已經發布過一個開發庫,那么你不需要在 JIRA(Sonatype) 上創建一個新的 issue。每個頂級的 groupId 對應一個 JIRA issue。你應該已經有了部署任何新構件到你的 groupId 或者下屬 group 應需要的所有權限。中央倉庫的同步操作遵循從上到下的過程,所以任何下屬組的發布版本都將會自動同步。當你發布新組件,你不需要告訴 Sonatype,因為當你進行倉庫同步工作的時候,沒有什么需要 Sonatype 去配置或者檢查的, Sonatype 僅僅會在第一次進行同步操作的時候,發布一條 twitter。
發布
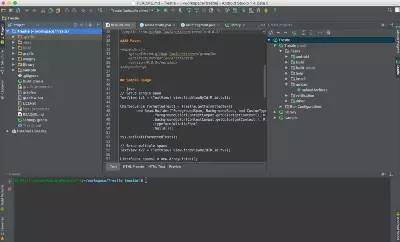
一旦你準備發布你的開發庫,在 Android Studio 中, 打開右側的 Gradle 視圖,在 Tasks > upload 下,點擊 uploadArchives,將會上傳你的開發庫到 Sonatype Staging Repositories。
在 Sonatype Staging Repositories 網頁上,登陸你的 Sonatype 賬號,查找你的 “staging” 開發庫,它應該在列表的最后,選中它,并按下 “關閉” 按鈕。關閉一個開發庫實際上意味著你準備發布它。如果關閉操作一切順利 – 你應該會看到一個激活了的 ‘發布’ 按鈕。你可能需要刷新下頁面。請按下發布按鈕。請閱讀關于使用 Nexus 管理倉庫的幫助文檔。如果這是你發布的第一個開發庫,返回到 JIRA,在 JIRA 上發表一條你已經改進了你的開發庫的評論,如果不是第一個,就沒必要告訴 Sonatype 你改進了你的開發庫。然后,你應該會收到來自 Sonatype 的一條回復信息,信息上說你的開發庫在 10 分鐘內能準備好,將會在接下來的幾個小時同步到 Maven 中央倉庫。幾個小時之后,它將展示在 Gradle, Please 網站上。
使用你的開發庫
對其他開發者來說,想要使用你的開發庫,他們需要在 Android 項目的 build.gradle 文件中添加一條依賴, 如下所示:
- apply plugin: 'android'
- dependencies {
- compile 'com.github.lawloretienne:trestle:0.0.3'
- }
特別感謝
非常感謝 Chris Banes,Jonathan Le,Serge Zaitsev 以及其他發表博客的人們,你們的文章幫助我得以走過這個復雜的過程。
我的開發庫
QuickReturn — https://github.com/lawloretienne/QuickReturn
Trestle — https://github.com/lawloretienne/Trestle
ImageGallery — https://github.com/lawloretienne/ImageGallery