可以完成 Android UI 自動化的 Python 庫
uiautomator2
Android Uiautomator2 Python Wrapper 這是一個可以完成Android的UI自動化的python庫。 該項目還在火熱的開發(fā)中
google提供的uiautomator庫功能做起安卓自動化來非常強大,唯獨有兩個缺點:1. 只能在手機上運行 2. 只能使用java語言。 所以為了能更簡單快捷的使用uiautomator,這個項目通過在手機上運行了一個http服務(wù)的方法,將uiautomator中的函數(shù)開放了出來。然后再將這些http接口,封裝成了python庫。這里要非常感謝 Xiaocong He ( @xiaocong ),他將這個想法實現(xiàn)了出來,uiautomator2這個項目則是對原有xiaocong的項目 uiautomator 進行了bug的修改,功能進行了加強。具體有以下
- 修復(fù)uiautomator經(jīng)常性退出的問題
- 代碼進行了重構(gòu)和精簡,方便維護
- 增加了脫離數(shù)據(jù)線運行測試的功能
- 通過 minicap 加快截圖速度
雖然我說的很簡單,但是實現(xiàn)起來用到了很多的技術(shù)和技巧,功能非常強,唯獨文檔有點少。哈哈
Installation
-
Install python library
# Since uiautomator2 is still developing, you have to add --pre to install development version
pip install --pre uiautomator2

# Or you can install from source
git clone https://github.com/openatx/uiautomator2
pip install -e uiautomator2
Optional, used in screenshot()
pip install pillow
-
Push and install (apk, atx-agent, minicap, minitouch) to device
電腦連接上一個手機或多個手機, 確保adb已經(jīng)添加到環(huán)境變量中,執(zhí)行下面的命令會自動安裝 uiautomator-apk 以及 atx-agent
python -m uiautomator2 init
安裝提示 success 即可
Usage 使用指南
下文中我們用 device_ip 這個變量來定義手機的IP,通常來說安裝完 atx-agent 的時候會自動提示你手機的IP是多少。
如果手機的WIFI跟電腦不是一個網(wǎng)段的,需要先通過數(shù)據(jù)線將手機連接到電腦上,使用命令 adb forward tcp:7912 tcp:7912 將手機上的服務(wù)端口7912轉(zhuǎn)發(fā)到PC上。這個時候連接地址使用 127.0.0.1 即可。
命令行使用
-
init: 初始化設(shè)備的atx-agent等
Installation部分已經(jīng)介紹過,這里就不寫了
-
install: 通過URL安裝應(yīng)用
$ python -m uiautomator2 install $device_ip https://example.org/some.apk
MainThread: 15:37:55,731 downloading 80.4 kB / 770.6 kB
MainThread: 15:37:56,763 installing 770.6 kB / 770.6 kB
MainThread: 15:37:58,780 success installed 770.6 kB / 770.6 kB
-
clear-cache: 清空緩存
$ python -m uiautomator2 clear-cache
-
app-stop-all : 停止所有應(yīng)用
$ python -m uiautomator2 app-stop-all $device_ip
QUICK START
Open python, input with the following code
There are two ways to connect to the device.
- Through WIFI (recommend) Suppose device IP is 10.0.0.1 and your PC is in the same network.
import uiautomator2 as u2

d = u2.connect('10.0.0.1') # same as call with u2.connect_wifi('10.0.0.1')
print(d.info)
- Through USB Suppose device serial is 123456f
import uiautomator2 as u2

d = u2.connect('123456f') # same as call with u2.connect_usb('123456f')
print(d.info)
If just call u2.connect() with no arguments, env-var ANDROID_DEVICE_IP will first check. if env-var is empty, connect_usb will be called. you need to make sure there is only one device connected with your computer.
一些常用但是不知道歸到什么類里的函數(shù)
先中文寫著了,國外大佬們先用Google Translate頂著
檢查并維持uiautomator處于運行狀態(tài)
d.healthcheck()
連接本地的設(shè)備
需要設(shè)備曾經(jīng)使用 python -muiautomator2 init 初始化過
d = u2.connect_usb("{Your-Device-Serial}")
一定時間內(nèi),出現(xiàn)則點擊
10s內(nèi)如果出現(xiàn)Skip則點擊
clicked = d(text='Skip').click_exists(timeout=10.0)
打開調(diào)試開關(guān)
用于開發(fā)者或有經(jīng)驗的使用者定位問題
>>> d.debug = True
>>> d.info
12:32:47.182 $ curl -X POST -d '{"jsonrpc": "2.0", "id": "b80d3a488580be1f3e9cb3e926175310", "method": "deviceInfo", "params": {}}' 'http://127.0.0.1:54179/jsonrpc/0'
12:32:47.225 Response >>>
{"jsonrpc":"2.0","id":"b80d3a488580be1f3e9cb3e926175310","result":{"currentPackageName":"com.android.mms","displayHeight":1920,"displayRotation":0,"displaySizeDpX":360,"displaySizeDpY":640,"displayWidth":1080,"productName"
:"odin","screenOn":true,"sdkInt":25,"naturalOrientation":true}}
<<< END
Notes:In below examples, we use d represent the uiautomator2 connect object
Table of Contents
- Retrive the device info
- Key Event Actions of the device
- Gesture interaction of the device
- Screen Actions of the device
- Child and sibling UI object
- Get the selected ui object status and its information
- Perform the click action on the seleted ui object
- Gesture action for the specific ui object
TODO
Basic API Usages
This part show the normal actions of the device through some simple examples
Retrive the device info
d.info
Below is a possible result:
{
    u'displayRotation': 0,
    u'displaySizeDpY': 640,
    u'displaySizeDpX': 360,
    u'currentPackageName': u'com.android.launcher',
    u'productName': u'takju',
    u'displayWidth': 720,
    u'sdkInt': 18,
    u'displayHeight': 1184,
    u'naturalOrientation': True
}
Key Event Actions of the device
-
Tun on/off screen
d.screen_on() # turn on screen
d.screen_off() # turn off screen
-
Get screen on/off status
d.info.get('screenOn') # require android >= 4.4 -
Press hard/soft key
d.press("home") # press home key d.press("back") # the normal way to press back key d.press(0x07, 0x02) # press keycode 0x07('0') with META ALT(0x02) -
Next keys are currently supported:
- home
- back
- left
- right
- up
- down
- center
- menu
- search
- enter
- delete ( or del)
- recent (recent apps)
- volume_up
- volume_down
- volume_mute
- camera
- power
You can find all key code definitions at Android KeyEvnet
-
Unlock screen
d.unlock()
# 1. launch activity: com.github.uiautomator.ACTION_IDENTIFY
# 2. press "home"
Gesture interaction of the device
-
Click the screen
d.click(x, y)
-
Long click the screen
d.long_click(x, y)
d.long_click(x, y, 0.5) # long click 0.5s (default)
-
Swipe
d.swipe(sx, sy, ex, ey)
d.swipe(sx, sy, ex, ey, 0.5) # swipe for 0.5s(default)
-
Drag
d.drag(sx, sy, ex, ey)
d.drag(sx, sy, ex, ey, 0.5) # swipe for 0.5s(default)
Note: click, swipe, drag support percent position. Example:
d.long_click(0.5, 0.5) means long click center of screen
Screen Actions of the device
-
Retrieve/Set Orientation
The possible orientation is:
- natural or n
- left or l
- right or r
- upsidedown or u (can not be set)
# retrieve orientation, it may be "natural" or "left" or "right" or "upsidedown" orientation = d.orientation # WARNING: not pass testing in my TT-M1 # set orientation and freeze rotation. # notes: "upsidedown" can not be set until Android 4.3. d.set_orientation('l') # or "left" d.set_orientation("l") # or "left" d.set_orientation("r") # or "right" d.set_orientation("n") # or "natural" -
Freeze/Un-Freeze rotation
# freeze rotation
d.freeze_rotation()
# un-freeze rotation
d.freeze_rotation(False)
-
Take screenshot
# take screenshot and save to local file "home.jpg", can not work until Android 4.2. d.screenshot("home.jpg") # get PIL.Image format, need install pillow first image = d.screenshot() image.save("home.jpg") # or home.png # get opencv format, need install numpy and cv2 import cv2 image = d.screenshot(format='opencv') cv2.imwrite('home.jpg', image) -
Dump Window Hierarchy
# or get the dumped content(unicode) from return.
xml = d.dump_hierarchy()
-
Open notification or quick settings
d.open_notification()
d.open_quick_settings()
Push and pull file
-
push file into device
# push into a folder d.push("foo.txt", "/sdcard/") # push and rename d.push("foo.txt", "/sdcard/bar.txt") # push fileobj with open("foo.txt", 'rb') as f: d.push(f, "/sdcard/") # push and change file mode d.push("foo.sh", "/data/local/tmp/", mode=0o755) -
pull file from device
d.pull("/sdcard/tmp.txt", "tmp.txt")

# FileNotFoundError will raise if file not found in device
d.pull("/sdcard/some-file-not-exists.txt", "tmp.txt")
App management
Include app install, launch and stop
App install
Only support install from url for now.
d.app_install('http://some-domain.com/some.apk')
App launch
d.app_start("com.example.hello_world") # start with package name
App stop
# perform am force-stop
d.app_stop("com.example.hello_world")
# perform pm clear
d.app_clear('com.example.hello_world')
App stop all the runnings
# stop all
d.app_stop_all()
# stop all app except com.examples.demo
d.app_stop_all(excludes=['com.examples.demo'])
Selector
Selector is to identify specific ui object in current window.
# To seleted the object ,text is 'Clock' and its className is 'android.widget.TextView'
d(text='Clock', className='android.widget.TextView')
Selector supports below parameters. Refer to UiSelector java doc for detailed information.
- text , textContains , textMatches , textStartsWith
- className , classNameMatches
- description , descriptionContains , descriptionMatches , descriptionStartsWith
- checkable , checked , clickable , longClickable
- scrollable , enabled , focusable , focused , selected
- packageName , packageNameMatches
- resourceId , resourceIdMatches
- index , instance
Child and sibling UI object
-
child
# get the child or grandchild
d(className="android.widget.ListView").child(text="Bluetooth")
-
sibling
# get sibling or child of sibling
d(text="Google").sibling(className="android.widget.ImageView")
-
child by text or description or instance
# get the child match className="android.widget.LinearLayout" # and also it or its child or grandchild contains text "Bluetooth" d(className="android.widget.ListView", resourceId="android:id/list") \ .child_by_text("Bluetooth", className="android.widget.LinearLayout") # allow scroll search to get the child d(className="android.widget.ListView", resourceId="android:id/list") \ .child_by_text( "Bluetooth", allow_scroll_search=True, className="android.widget.LinearLayout" )-
child_by_description is to find child which or which's grandchild contains the specified description, others are the same as child_by_text .
-
child_by_instance is to find child which has a child UI element anywhere within its sub hierarchy that is at the instance specified. It is performed on visible views without scrolling.
See below links for detailed information:
- UiScrollable , getChildByDescription , getChildByText , getChildByInstance
- UiCollection , getChildByDescription , getChildByText , getChildByInstance
Above methods support chained invoking, e.g. for below hierarchy
<node index="0" text="" resource-id="android:id/list" class="android.widget.ListView" ...>
  <node index="0" text="WIRELESS & NETWORKS" resource-id="" class="android.widget.TextView" .../>
  <node index="1" text="" resource-id="" class="android.widget.LinearLayout" ...>
    <node index="1" text="" resource-id="" class="android.widget.RelativeLayout" ...>
      <node index="0" text="Wi‑Fi" resource-id="android:id/title" class="android.widget.TextView" .../>
    </node>
    <node index="2" text="ON" resource-id="com.android.settings:id/switchWidget" class="android.widget.Switch" .../>
  </node>
  ...
</node>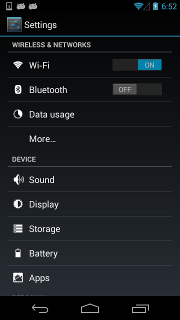
We want to click the switch at the right side of text 'Wi‑Fi' to turn on/of Wi‑Fi. As there are several switches with almost the same properties, so we can not use like d(className="android.widget.Switch") to select the ui object. Instead, we can use code below to select it.
d(className="android.widget.ListView", resourceId="android:id/list") \ .child_by_text("Wi‑Fi", className="android.widget.LinearLayout") \ .child(className="android.widget.Switch") \ .click() -
-
relative position
Also we can use the relative position methods to get the view: left , right , top , bottom.
- d(A).left(B) , means selecting B on the left side of A.
- d(A).right(B) , means selecting B on the right side of A.
- d(A).up(B) , means selecting B above A.
- d(A).down(B) , means selecting B under A.
So for above case, we can write code alternatively:
## select "switch" on the right side of "Wi‑Fi"
d(text="Wi‑Fi").right(className="android.widget.Switch").click()
-
Multiple instances
Sometimes the screen may contain multiple views with the same e.g. text, then you will have to use "instance" properties in selector like below:
d(text="Add new", instance=0) # which means the first instance with text "Add new"
However, uiautomator provides list like methods to use it.
# get the count of views with text "Add new" on current screen
d(text="Add new").count

# same as count property
len(d(text="Add new"))

# get the instance via index
d(text="Add new")[0]
d(text="Add new")[1]
...

# iterator
for view in d(text="Add new"):
    view.info  # ...
Notes: when you are using selector like a list, you must make sure the screen keep unchanged, else you may get ui not found error.
Get the selected ui object status and its information
-
Check if the specific ui object exists
d(text="Settings").exists # True if exists, else False
d.exists(text="Settings") # alias of above property.
-
Retrieve the info of the specific ui object
d(text="Settings").info
Below is a possible result:
{ u'contentDescription': u'', u'checked': False, u'scrollable': False, u'text': u'Settings', u'packageName': u'com.android.launcher', u'selected': False, u'enabled': True, u'bounds': {u'top': 385, u'right': 360, u'bottom': 585, u'left': 200}, u'className': u'android.widget.TextView', u'focused': False, u'focusable': True, u'clickable': True, u'chileCount': 0, u'longClickable': True, u'visibleBounds': {u'top': 385, u'right': 360, u'bottom': 585, u'left': 200}, u'checkable': False } -
Set/Clear text of editable field
d(text="Settings").clear_text()  # clear the text
d(text="Settings").set_text("My text...")  # set the text
Perform the click action on the seleted ui object
-
Perform click on the specific ui object
# click on the center of the specific ui object
d(text="Settings").click()
# wait element show for 10 seconds(Default)
d(text="Settings").click(timeout=10)
# alias of click
# short name for quick type with keyboard
d(text="Settings").tap()
# wait element show for 0 seconds
d(text="Settings").tap_nowait()
-
Perform long click on the specific ui object
# long click on the center of the specific ui object
d(text="Settings").long_click()
Gesture action for the specific ui object
-
Drag the ui object to another point or ui object
# notes : drag can not be set until Android 4.3.
# drag the ui object to point (x, y)
d(text="Settings").drag_to(x, y, duration=0.5)
# drag the ui object to another ui object(center)
d(text="Settings").drag_to(text="Clock", duration=0.25)
-
Two point gesture from one point to another
d(text="Settings").gesture((sx1, sy1), (sx2, sy2), (ex1, ey1), (ex2, ey2))
-
Two point gesture on the specific ui object
Supports two gestures:
- In , from edge to center
- Out , from center to edge
# notes : pinch can not be set until Android 4.3.
# from edge to center. here is "In" not "in"
d(text="Settings").pinch_in(percent=100, steps=10)
# from center to edge
d(text="Settings").pinch_out()
-
Wait until the specific ui appears or gone
# wait until the ui object appears
d(text="Settings").wait(timeout=3.0) # return bool
# wait until the ui object gone
d(text="Settings").wait_gone(timeout=1.0)
Default timeout is 20s. see global settings for more details
-
Perform fling on the specific ui object(scrollable)
Possible properties:
- horiz or vert
- forward or backward or toBeginning or toEnd
# fling forward(default) vertically(default)
d(scrollable=True).fling()
# fling forward horizentally
d(scrollable=True).fling.horiz.forward()
# fling backward vertically
d(scrollable=True).fling.vert.backward()
# fling to beginning horizentally
d(scrollable=True).fling.horiz.toBeginning(max_swipes=1000)
# fling to end vertically
d(scrollable=True).fling.toEnd()
-
Perform scroll on the specific ui object(scrollable)
Possible properties:
- horiz or vert
- forward or backward or toBeginning or toEnd , or to
# scroll forward(default) vertically(default)
d(scrollable=True).scroll(steps=10)
# scroll forward horizentally
d(scrollable=True).scroll.horiz.forward(steps=100)
# scroll backward vertically
d(scrollable=True).scroll.vert.backward()
# scroll to beginning horizentally
d(scrollable=True).scroll.horiz.toBeginning(steps=100, max_swipes=1000)
# scroll to end vertically
d(scrollable=True).scroll.toEnd()
# scroll forward vertically until specific ui object appears
d(scrollable=True).scroll.to(text="Security")
Watcher
You can register watcher to perform some actions when a selector can not find a match.
-
Register Watcher
When a selector can not find a match, uiautomator will run all registered watchers.
- Click target when conditions match
d.watcher("AUTO_FC_WHEN_ANR").when(text="ANR").when(text="Wait") \ .click(text="Force Close") # d.watcher(name) ## creates a new named watcher. # .when(condition) ## the UiSelector condition of the watcher. # .click(target) ## perform click action on the target UiSelector.- Press key when conditions match
d.watcher("AUTO_FC_WHEN_ANR").when(text="ANR").when(text="Wait") \ .press("back", "home") # d.watcher(name) ## creates a new named watcher. # .when(condition) ## the UiSelector condition of the watcher. # .press(<keyname>, ..., <keyname>.() ## press keys one by one in sequence. -
Check if the named watcher triggered
A watcher is triggered, which means the watcher was run and all its conditions matched.
d.watcher("watcher_name").triggered # true in case of the specified watcher triggered, else false -
Remove named watcher
# remove the watcher d.watcher("watcher_name").remove() -
List all watchers
d.watchers
# a list of all registered wachers' names
-
Check if there is any watcher triggered
d.watchers.triggered
#  true in case of any watcher triggered
-
Reset all triggered watchers
# reset all triggered watchers, after that, d.watchers.triggered will be false.
d.watchers.reset()
-
Remvoe watchers
# remove all registered watchers d.watchers.remove() # remove the named watcher, same as d.watcher("watcher_name").remove() d.watchers.remove("watcher_name") -
Force to run all watchers
# force to run all registered watchers
d.watchers.run()
另外文檔還是有很多沒有寫,推薦直接去看源碼 init .py
Global settings
# set delay 1.5s after each UI click and click
d.click_post_delay = 1.5 # default no delay

# set default element wait timeout (seconds)
d.wait_timeout = 30.0 # default 20.0
中文字符的輸入
這種方法通常用于不知道控件的情況下的輸入。第一步需要切換輸入法,然后發(fā)送adb廣播命令,具體使用方法如下
d.set_fastinput_ime(True) # 切換成FastInputIME輸入法
d.send_keys("你好123abcEFG") # adb廣播輸入
d.set_fastinput_ime(False) # 切換成正常的輸入法
測試方法
$ adb forward tcp:9008 tcp:9008
$ curl 127.0.0.1:9008/ping
# expect: pong

$ curl -d '{"jsonrpc":"2.0","method":"deviceInfo","id":1}' 127.0.0.1:9008/jsonrpc/0
# expect JSON output
Uiautomator與Uiautomator2的區(qū)別
- api不同但也差不多
- Uiautomator2是安卓項目,而Uiautomator是java項目
- Uiautomator2可以輸入中文,而Uiautomator的java工程需借助utf7輸入法才能輸入中文
- Uiautomator2必須明確EditText框才能向里面輸入文字,Uiautomator直接指定父類也可以在子類中輸入文字
- Uiautomator2獲取控件速度快寫,而Uiautomator獲取速度慢一些;
常見問題
-
提示 502 錯誤
嘗試手機連接PC,然后運行下面的命令
adb shell am instrument -w -r  -e debug false -e class com.github.uiautomator.stub.Stub \
	com.github.uiautomator.test/android.support.test.runner.AndroidJUnitRunner
如果運行正常,啟動測試之前增加一行代碼 d.healthcheck()
如果報錯,可能是缺少某個apk沒有安裝,使用下面的命令重新初始化 python -m uiautomator2 init --reinstall
嘗鮮功能
手機 python -muiautomator2 init 之后,瀏覽器輸入 <手機IP:7912>,會發(fā)現(xiàn)一個遠程控制功能,延遲非常低噢。^_^
ABOUT
項目重構(gòu)自 https://github.com/openatx/atx-uiautomator
CHANGELOG
Auto generated by pbr: CHANGELOG
依賴項目
- uiautomator守護程序 https://github.com/openatx/atx-agent
- uiautomator jsonrpc server https://github.com/openatx/android-uiautomator-server/
Contributors
- codeskyblue ( @codeskyblue )
- Xiaocong He ( @xiaocong )
- Yuanyuan Zou ( @yuanyuan )
- Qian Jin ( @QianJin2013 )
- Xu Jingjie ( @xiscoxu )
- Xia Mingyuan ( @mingyuan-xia )
- Artem Iglikov, Google Inc. ( @artikz )
Others contributors
LICENSE
Under MIT