Android消息機制Handler,有必要再講一次
我們在日常開發中,總是不可避免的會用到 Handler,雖說 Handler 機制并不等同于 Android 的消息機制,但 Handler 的消息機制在 Android 開發中早已諳熟于心,非常重要!
通過本文,你可以非常容易得到一下問題的答案:
- Handler、Looper、Message 和 MessageQueue 的原理以及它們之間的關系到底是怎樣的?
- MessageQueue 存儲結構是什么?
- 子線程為啥一定要調用 Looper.prepare() 和 Looper.loop()?
Handler 的簡單使用
相信應該沒有人不會使用 Handler 吧?假設在 Activity 中處理一個耗時任務,需要更新 UI,簡單看看我們平時是怎么處理的。
- override fun onCreate(savedInstanceState: Bundle?) {
- super.onCreate(savedInstanceState)
- setContentView(R.layout.activity_main3)
- // 請求網絡
- subThread.start()
- }
- override fun onDestroy() {
- subThread.interrupt()
- super.onDestroy()
- }
- private val handler by lazy(LazyThreadSafetyMode.NONE) { MyHandler() }
- private val subThread by lazy(LazyThreadSafetyMode.NONE) { SubThread(handler) }
- private class MyHandler : Handler() {
- override fun handleMessage(msg: Message) {
- super.handleMessage(msg)
- // 主線程處理邏輯,一般這里需要使用弱引用持有 Activity 實例,以免內存泄漏
- }
- }
- private class SubThread(val handler: Handler) : Thread() {
- override fun run() {
- super.run()
- // 耗時操作 比如做網絡請求
- // 網絡請求完畢,咱們就得嘩嘩嘩通知 UI 刷新了,直接直接考慮 Handler 處理,其他方案暫時不做考慮
- // 第一種方法,一般這個 data 是請求結果解析的內容
- handler.obtainMessage(1,data).sendToTarget()
- // 第二種方法
- val message = Message.obtain() // 盡量使用 Message.obtain() 初始化
- message.what = 1
- message.obj = data // 一般這個 data 是請求結果解析的內容
- handler.sendMessage(message)
- // 第三種方法
- handler.post(object : Thread() {
- override fun run() {
- super.run()
- // 處理更新操作
- }
- })
- }
- }
上述代碼非常簡單,因為網絡請求是一個耗時任務,所以我們新開了一個線程,并在網絡請求結束解析完畢后通過 Handler 來通知主線程去更新 UI,簡單采用了 3 種方式,細心的小伙伴可能會發現,其實第一種和第二種方法是一樣的。就是利用 Handler 來發送了一個攜帶了內容 Message 對象,值得一提的是:我們應該盡可能地使用 Message.obtain() 而不是 new Message() 進行 Message 的初始化,主要是 Message.obtain() 可以減少內存的申請。
受到大家在前面文章提出的建議,我們就盡量地少貼一些源碼了,大家可以直接很容易發現,上述的所有方法最終都會調用這個方法:
- public boolean sendMessageAtTime(Message msg, long uptimeMillis) {
- MessageQueue queue = mQueue;
- if (queue == null) {
- RuntimeException e = new RuntimeException(
- this + " sendMessageAtTime() called with no mQueue");
- Log.w("Looper", e.getMessage(), e);
- return false;
- }
- return enqueueMessage(queue, msg, uptimeMillis);
- }
- private boolean enqueueMessage(MessageQueue queue, Message msg, long uptimeMillis) {
- msg.target = this;
- if (mAsynchronous) {
- msg.setAsynchronous(true);
- }
- return queue.enqueueMessage(msg, uptimeMillis);
- }
上面的代碼出現了一個 MessageQueue,并且最終調用了 MessageQueue#enqueueMessage 方法進行消息的入隊,我們不得不簡單說一下 MessageQueue 的基本情況。
MessageQueue
顧名思義,MessageQueue 就是消息隊列,即存放多條消息 Message 的容器,它采用的是單向鏈表數據結構,而非隊列。它的 next() 指向鏈表的下一個 Message 元素。
- boolean enqueueMessage(Message msg, long when) {
- // ... 省略一些檢查代碼
- synchronized (this) {
- // ... 省略一些檢查代碼
- msg.markInUse();
- msg.when = when;
- Message p = mMessages;
- boolean needWake;
- if (p == null || when == 0 || when < p.when) {
- // New head, wake up the event queue if blocked.
- msg.next = p;
- mMessages = msg;
- needWake = mBlocked;
- } else {
- // Inserted within the middle of the queue. Usually we don't have to wake
- // up the event queue unless there is a barrier at the head of the queue
- // and the message is the earliest asynchronous message in the queue.
- needWake = mBlocked && p.target == null && msg.isAsynchronous();
- Message prev;
- for (;;) {
- prev = p;
- p = p.next;
- if (p == null || when < p.when) {
- break;
- }
- if (needWake && p.isAsynchronous()) {
- needWake = false;
- }
- }
- msg.next = p; // invariant: p == prev.next
- prev.next = msg;
- }
- // We can assume mPtr != 0 because mQuitting is false.
- if (needWake) {
- nativeWake(mPtr);
- }
- }
- return true;
- }
從入隊消息 enqueueMessage() 的實現來看,它的主要操作其實就是單鏈表的插入操作,這里就不做過多的解釋了,我們可能應該更多的關心它的出隊操作方法 next():
- Message next() {
- // ...
- int nextPollTimeoutMillis = 0;
- for (;;) {
- // ...
- nativePollOnce(ptr, nextPollTimeoutMillis);
- synchronized (this) {
- // Try to retrieve the next message. Return if found.
- final long now = SystemClock.uptimeMillis();
- Message prevMsg = null;
- Message msg = mMessages;
- if (msg != null && msg.target == null) {
- // Stalled by a barrier. Find the next asynchronous message in the queue.
- do {
- prevMsg = msg;
- msg = msg.next;
- } while (msg != null && !msg.isAsynchronous());
- }
- if (msg != null) {
- if (now < msg.when) {
- // Next message is not ready. Set a timeout to wake up when it is ready.
- nextPollTimeoutMillis = (int) Math.min(msg.when - now, Integer.MAX_VALUE);
- } else {
- // Got a message.
- mBlocked = false;
- if (prevMsg != null) {
- prevMsg.next = msg.next;
- } else {
- mMessages = msg.next;
- }
- msg.next = null;
- if (DEBUG) Log.v(TAG, "Returning message: " + msg);
- msg.markInUse();
- return msg;
- }
- } else {
- // No more messages.
- nextPollTimeoutMillis = -1;
- }
- //...
- }
- //...
- // While calling an idle handler, a new message could have been delivered
- // so go back and look again for a pending message without waiting.
- nextPollTimeoutMillis = 0;
- }
- }
next() 方法其實很長,不過我們僅僅貼了極少的一部分,可以看到,里面不過是有一個 for (;;) 的無限循環,循環體內部調用了一個 nativePollOnce(long, int) 方法。這是一個 Native 方法,實際作用是通過 Native 層的 MessageQueue 阻塞當前調用棧線程 nextPollTimeoutMillis 毫秒的時間。
下面是 nextPollTimeoutMillis 取值的不同情況的阻塞表現:
- 小于 0,一直阻塞,直到被喚醒;
- 等于 0,不會阻塞;
- 大于 0,最長阻塞 nextPollTimeoutMillis 毫秒,期間如被喚醒會立即返回。
可以看到,最開始 nextPollTimeoutMillis 的初始化值是 0,所以不會阻塞,會直接去取 Message 對象,如果沒有取到 Message 對象數據,則直接會把 nextPollTimeoutMillis 置為 -1,此時滿足小于 0 的條件,會被一直阻塞,直到其他地方調用另外一個 Native 方法 nativeWake(long) 進行喚醒。如果取到值的話,會直接把得到的 Message 對象進行返回。
原來,nativeWake(long) 方法在前面的 MessageQueue#enqueueMessage 方法有個調用,調用時機是在 MessageQueue 入隊消息的過程中。
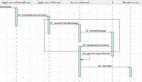
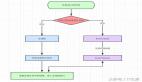
現在已經知道:Handler 發送了 Message,消息用 MessageQueue 進行存儲,使用 MessageQueue#enqueueMessage 方法進行入隊,使用 MessageQueue#next 方法進行輪訓消息。這就不免拋出了一個問題,MessageQueue#next 方法是誰調用的?沒錯,就是 Looper。
Looper
Looper 在 Android 的消息機制中扮演著消息循環的角色,具體來說就是它會不停地從 MessageQueue 通過 next() 查看是否有新消息,如果有新消息就立刻處理,否則就任由 MessageQueue 阻塞在那里。
我們直接看看 Looper 最重要的方法:loop():
- public static void loop() {
- final Looper me = myLooper();
- if (me == null) {
- throw new RuntimeException("No Looper; Looper.prepare() wasn't called on this thread.");
- }
- // ...
- for (;;) {
- Message msg = queue.next(); // might block
- if (msg == null) {
- // No message indicates that the message queue is quitting.
- return;
- }
- //...
- try {
- // 分發消息給 handler 處理
- msg.target.dispatchMessage(msg);
- dispatchEnd = needEndTime ? SystemClock.uptimeMillis() : 0;
- } finally {
- // ...
- }
- // ...
- }
- }
方法省去了大量的代碼,只保留了核心邏輯。可以看到,首先會通過 myLooper() 方法得到 Looper 對象,如果這個 Looper 返回為空的話,則直接拋出異常。否則進入到一個 for (;;) 循環中,調用 MessageQueue#next() 方法進行輪訓獲取 Message 對象,如果獲取的 Message 對象為空,則直接退出 loop() 方法。否則直接通過 msg.target 拿到 Handler 對象,并調用 Handler#dispatchMessage() 方法。
我們先來看看Handler#dispatchMessage() 方法實現:
- public void dispatchMessage(Message msg) {
- if (msg.callback != null) {
- handleCallback(msg);
- } else {
- if (mCallback != null) {
- if (mCallback.handleMessage(msg)) {
- return;
- }
- }
- handleMessage(msg);
- }
- }
- private static void handleCallback(Message message) {
- message.callback.run();
- }
代碼比較簡單,如果 Message 設置了 callback 則,直接調用 message.callback.run(),否則判斷是否初始化了 `m
再來看看 myLooper() 方法:
- public static @Nullable Looper myLooper() {
- return sThreadLocal.get();
- }
看看 sThreadLocal 是什么:
- static final ThreadLocal sThreadLocal = new ThreadLocal();
這個 ThreadLocal 是什么呢?
ThreadLocal
關于 ThreadLocal,我們直接采取 嚴振杰文章 中的內容。
看到 ThreadLocal 的第一感覺就是該類和線程有關,確實如此,但是要注意它不是線程,否則它就該叫 LocalThread 了。
ThreadLocal 是用來存儲指定線程的數據的,當某些數據的作用域是該指定線程并且該數據需要貫穿該線程的所有執行過程時就可以使用 ThreadnLocal 存儲數據,當某線程使用 ThreadnLocal 存儲數據后,只有該線程可以讀取到存儲的數據,除此線程之外的其他線程是沒辦法讀取到該數據的。
一些讀者看完上面這段話應該還是不理解 ThreadLocal 的作用,我們舉個栗子:
- ThreadLocal<Boolean> local = new ThreadLocal<>();
- // 設置初始值為true.
- local.set(true);
- Boolean bool = local.get();
- Logger.i("MainThread讀取的值為:" + bool);
- new Thread() {
- @Override
- public void run() {
- Boolean bool = local.get();
- Logger.i("SubThread讀取的值為:" + bool);
- // 設置值為false.
- local.set(false);
- }
- }.start():
- // 主線程睡1秒,確保上方子線程執行完畢再執行下面的代碼。
- Thread.sleep(1000);
- Boolean newBool = local.get();
- Logger.i("MainThread讀取的新值為:" + newBool);
代碼沒什么好說的吧,打印出來的日志,你會看到是這樣的:
- MainThread讀取的值為:trueSubThread讀取的值為:nullMainThread讀取的值為:true
第一條 Log 無可置疑,因為設置了值為 true,因為打印結果沒什么好說的。對于第二條 Log,根據上方介紹,某線程使用 ThreadLocal 存儲的數據,只能被該線程讀取,因此第二條 Log 的結果是:null。緊接著在子線程中設置了 ThreadLocal 的值為 false,然后第三條 Log 將被打印,原理同上,子線程中設置了 ThreadLocal 的值并不影響主線程的數據,所以打印是 true。
實驗結果證實:就算是同一個 ThreadLocal 對象,任一線程對其的 set() 和 get() 方法的操作都是相互獨立互不影響的。
Looper.myLooper()
我們回到 Looper.myLooper():
- static final ThreadLocal<Looper> sThreadLocal = new ThreadLocal<Looper>();
我們看看是在哪兒對 sThreadLocal 操作的。
- public static void prepare() {
- prepare(true);
- }
- private static void prepare(boolean quitAllowed) {
- if (sThreadLocal.get() != null) {
- throw new RuntimeException("Only one Looper may be created per thread");
- }
- sThreadLocal.set(new Looper(quitAllowed));
- }
所以知道了吧,這就是在子線程中使用 Handler 前,必須要調用 Looper.prepare() 的原因。
可能你會疑問,我在主線程使用的時候,沒有要求 Looper.prepare() 呀。
原來,我們在 ActivityThread 中,有去顯示調用 Looper.prepareMainLooper():
- public static void main(String[] args) {
- // ...
- Looper.prepareMainLooper();
- // ...
- if (sMainThreadHandler == null) {
- sMainThreadHandler = thread.getHandler();
- }
- //...
- Looper.loop();
- // ...
- }
我們看看 Looper.prepareMainLooper():
- public static void prepareMainLooper() {
- prepare(false);
- synchronized (Looper.class) {
- if (sMainLooper != null) {
- throw new IllegalStateException("The main Looper has already been prepared.");
- }
- sMainLooper = myLooper();
- }
- }