手把手教你從0手寫(xiě)一個(gè)力導(dǎo)向關(guān)系圖
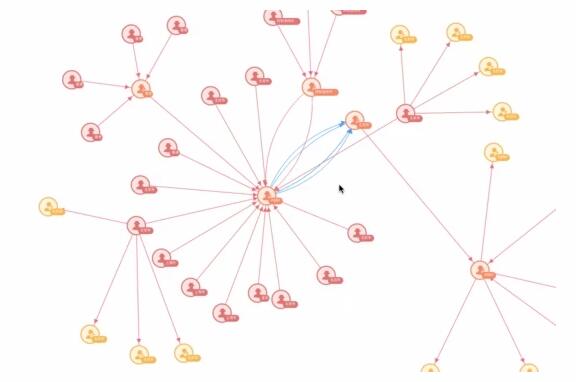
下圖,是本次要講的項(xiàng)目動(dòng)態(tài)實(shí)例:
前言
力導(dǎo)向圖大家都不陌生,力導(dǎo)向圖缺少不了力,而在數(shù)據(jù)量很大的情況下初始化節(jié)點(diǎn)以及對(duì)節(jié)點(diǎn)進(jìn)行拖動(dòng)時(shí)會(huì)導(dǎo)致整個(gè)力導(dǎo)圖都在一直在動(dòng),密集的情況會(huì)更加嚴(yán)重,并且本著可以對(duì)點(diǎn)更好,靈活的控制,滿(mǎn)足不同的需求,所以打算自己實(shí)現(xiàn)一個(gè)簡(jiǎn)單的力導(dǎo)向圖,并在過(guò)程中對(duì)碰撞檢測(cè)進(jìn)行一次探索。
內(nèi)容包括
整體內(nèi)容分為兩個(gè)部分
使用d3.js 開(kāi)發(fā)力導(dǎo)向圖出現(xiàn)的問(wèn)題
-
兩點(diǎn)之間多條邊的處理
-
點(diǎn)的框選
-
點(diǎn)的刪除
-
縮略圖
-
主圖的拖拽、縮放與縮略圖
自己實(shí)現(xiàn)一個(gè)簡(jiǎn)單的拓?fù)鋱D
-
碰撞檢測(cè)
-
矩形與矩形的檢測(cè)
-
圓形與圓形
-
圓形與矩形
-
點(diǎn)的分配
-
碰撞后點(diǎn)的移動(dòng)
-
拖動(dòng)
一 使用d3.js 開(kāi)發(fā)力導(dǎo)向圖出現(xiàn)的問(wèn)題
兩點(diǎn)之間多條邊的處理
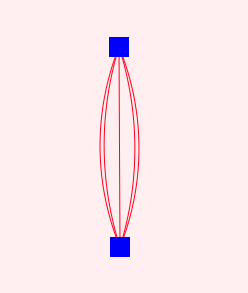
思路為 ,將兩點(diǎn)之間的線進(jìn)行分組,中間,左右分別為三組,分好組后,當(dāng)tick 進(jìn)行渲染時(shí),通過(guò)分組內(nèi)容的數(shù)量,對(duì)分組內(nèi)容改變path 的彎曲程度。
點(diǎn)的框選
拖拽中創(chuàng)建一個(gè)矩形框,拖拽后判斷中心點(diǎn)是否在矩形框中則為被框選中. 注: 位置需要與d3 縮放的scale 配合計(jì)算
刪除
點(diǎn)的刪除實(shí)際上 就是把 相關(guān)點(diǎn)與線全部刪除, 并且清空畫(huà)布后, 重新用刪除后的數(shù)據(jù)重新繪制。
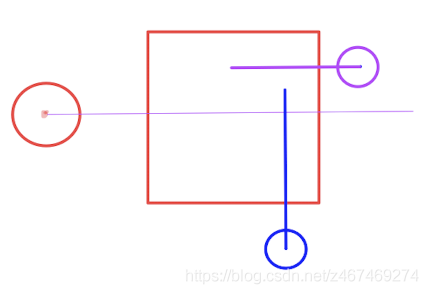
縮略圖
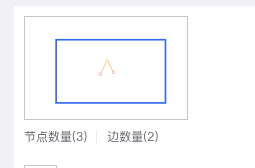
縮略圖目前的邏輯是主圖的最大倍數(shù)作為背景,主圖的寬高作為縮略圖視野(藍(lán)框)的寬高。因?yàn)榭s略圖的dom 的寬高是css 定死的,viewbox 是實(shí)際寬高,所以給定主圖(正常)的寬高 會(huì)自動(dòng)縮放。在拖拽主圖的點(diǎn)與相應(yīng)操作時(shí),對(duì)縮略圖的點(diǎn)也進(jìn)行相應(yīng)的變動(dòng),實(shí)際上就是在縮略圖中又畫(huà)了一遍主圖的內(nèi)容
- /**
- * @params
- * width 縮略圖寬度
- * height 縮略圖高度
- * mainWidth 主圖的寬度
- * mainHeight 主圖的高度
- * zoomMax 最大縮放比例
- *
- */
- thumbSvg.attr('width', width)
- .attr('height', height).attr('viewBox', () => {
- // 縮略圖的寬高為 主圖的 最大縮略比例
- w = mainWidth * zoomMax;
- h = mainHeight * zoomMax;
- // 設(shè)置偏移 讓背景圖移至中心,縮略圖與主圖的差/ 2 就是需要移動(dòng)的距離
- x = -(w - mainWidth) / 2;
- y = -(h - mainHeight) / 2;
- return `${x} ${y} ${w} ${h}`;
- });
- dragThumb.attr('width', mainWidth)
- .attr('height', mainHeight);
主圖的拖拽、縮放與縮略圖
調(diào)用主圖的縮放時(shí)(zoom) 會(huì)得到縮放以及拖拽信息,縮略圖使用拖拽的信息,因?yàn)関iewbox 的原因,拖拽信息會(huì)自動(dòng)縮放。但是需要注意主圖的縮放會(huì)對(duì)translate 進(jìn)行變化 所以需要自己去處理 縮放過(guò)程中產(chǎn)生的位移
因?yàn)榭s放會(huì)造成 主圖的 translate 發(fā)生變化 與手動(dòng)拖拽造成的translate 會(huì)有差 所以 要扣除縮放造成的偏移
- /**
- * @params
- * innerZoomInfo 縮略圖的縮放信息
- * mainTransform 主圖的縮放信息
- * mainWidth,mainHeight 主圖的寬高
- */
- const {
- innerZoomInfo, mainWidth, mainHeight,
- } = this;
- // 如果傳入的 縮放值與之前記錄的縮放值不一致 則認(rèn)為發(fā)生了縮放 記錄發(fā)生縮放后偏移值
- if (!innerZoomInfo || innerZoomInfo.k !== mainTransform.k) {
- this.moveDiff = {
- x: (mainWidth - innerZoomInfo.k * mainWidth) / 2, //縮放產(chǎn)生的 位移
- y: (mainHeight - innerZoomInfo.k * mainHeight) / 2,
- };
- }
- const { x: diffX, y: diffY } = this.moveDiff;
- const { x, y, k } = mainTransform; // 主圖偏移以及縮放數(shù)據(jù)
- this.dragThumb
- .attr('width', mainWidth / k)
- .attr('height', mainHeight / k)
- .attr('transform', () => setTransform({
- x: -((x - diffX) / k), // 這個(gè)地方應(yīng)該不能直接 除 k 這里的x,y 應(yīng)該是放大后的x,y應(yīng)該減去縮放的差值 再 除K
- y: -((y - diffY) / k),
- }));
自己實(shí)現(xiàn)一個(gè)簡(jiǎn)單的拓?fù)鋱D
碰撞檢測(cè)
矩形與矩形的檢測(cè)
矩形與矩形的碰撞是最好檢測(cè)的
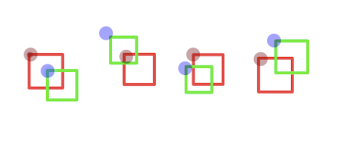
通過(guò)上面的圖基本就涵蓋了規(guī)則矩形相交的情況 圖可以得知 A:紅色矩形 B:綠色矩形 上下是通過(guò)Y,左右是通過(guò)X
- A.x < B.x + B.width &&
- A.x + A.width > B.x &&
- A.y < B.y + B.h &&
- A.h + A.y > B.y
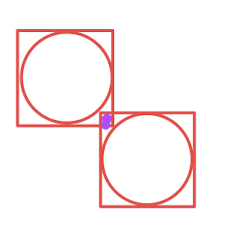
但是如果內(nèi)部是一個(gè)圓形的話(huà),那么如果 紫色的區(qū)域則會(huì)被判定為碰撞則 則準(zhǔn)確性有一定的偏差,需要有圓形的檢測(cè)
圓形與圓形
圓形與圓形的邏輯也比較簡(jiǎn)單,就是兩點(diǎn)之間的距離小于兩點(diǎn)半徑之和 則為碰撞
- var a = dot2.x-dot1.x;
- var b = dot2.y-dot1.y;
- return Math.sqrt(a*a+b*b) < a.radius + b.radius;
圓形與矩形
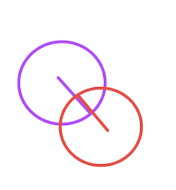
首先來(lái)看 矩形與圓形相交是什么樣,從圖所知矩形與圓形相交,表現(xiàn)為圓點(diǎn)距離矩形最近的點(diǎn)小于圓點(diǎn)半徑 則為相交 那么如何得到圓點(diǎn)距離矩形最近的點(diǎn)
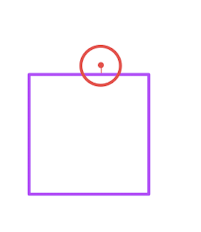
從下圖就知道了 圓點(diǎn)的延伸是圓點(diǎn)邊的一點(diǎn)。crashX = 如果 圓點(diǎn)位于矩形 左側(cè) 矩形(rect).x; 右側(cè) = rect.x + rect.w 上下 圓點(diǎn)(circle).x
crashY = 如果 圓點(diǎn)位于矩形 左右 circle.y; 上 rect.y 上下 rect.y + h
那么兩點(diǎn)有了,可以得出兩點(diǎn)之間的距離套用圓與圓的公式
- var a = crash.x-dot1.x;
- var b = crash.y-dot1.y;
- return Math.sqrt(a*a+b*b) < a.radius;
上面就是基本的碰撞邏輯,更復(fù)雜的邏輯可以看下面參考文章 [1]
點(diǎn)的分配
點(diǎn)的位置的分配 就是確定中心點(diǎn)后,將關(guān)系最多的點(diǎn)作為中心點(diǎn),其關(guān)系點(diǎn)向四周分散,沒(méi)有關(guān)系的同級(jí)點(diǎn),則向中心點(diǎn)四周進(jìn)行分散,其關(guān)系點(diǎn)以確定后位置的點(diǎn)的坐標(biāo)向周?chē)稚ⅰ?/p>
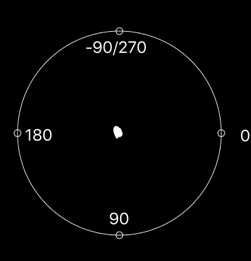
根據(jù)三角形的正玄、余弦來(lái)得值;假設(shè)一個(gè)圓的圓心坐標(biāo)是(a,b),半徑為r,角度為d 則圓上每個(gè)點(diǎn)的坐標(biāo)可以通過(guò)下面的公式得到
- /*
- * @params
- * d 角度
- * r 半徑長(zhǎng)度
- */
- X = a + Math.cos(((Math.PI * 2) / 360) * d) * r;
- Y = b + Math.sin(((Math.PI * 2) / 360) * d) * r;
角度可以通過(guò) 關(guān)系邊進(jìn)行得到. d = 360/關(guān)系邊的數(shù)量,確定第一圈點(diǎn)的角度。拿到角度后 ,維持一個(gè)所有點(diǎn)坐標(biāo)的對(duì)象,再結(jié)合圓形與圓形碰撞檢測(cè),我們就可以遍歷 獲取所有點(diǎn)的坐標(biāo)了
- /*
- * @params
- * dotsLocations 所有點(diǎn)的坐標(biāo)信息
- */
- initNodes() {
- const { x: centerX, y: centerY } = this.center;
- const { distance } = this;
- const getDeg = (all, now) => 360 / (all - (now || 0));
- // 把中心點(diǎn)分配給線最多的點(diǎn)
- const centerdot = this.dots[0];
- centerdot.x = centerX;
- centerdot.y = centerY;
- this.dotsLocations[centerdot.id] = { x: centerX, y: centerY };
- this.dots.forEach((dot) => {
- const { x: outx, y: outy } = dot;
- if (!outx && !outy) {
- // 兄弟點(diǎn) (無(wú)關(guān)系的點(diǎn)) 默認(rèn)以中心店的10度進(jìn)行遍歷
- dot = this.getLocation(dot, centerX, centerY,10, distance).dot;
- }
- const { x: cx, y: cy } = dot;
- const dotsLength = dot.relationDots.length;
- let { distance: innerDistance } = this;
- // 獲取剩余點(diǎn)的角度
- let addDeg = getDeg(dotsLength);
- dot.relationDots.forEach((relationId, index) => {
- let relationDot = this.findDot(relationId);
- if (!relationDot.x && !relationDot.y) {
- const {
- dot: resultDot,
- isPlus,
- outerR,
- } = this.getLocation(relationDot, cx, cy, addDeg, innerDistance);
- if (isPlus) {
- // 如果第一圈遍歷完畢,則開(kāi)始以 半徑 * 2 為第二圈開(kāi)始遍歷
- innerDistance = outerR;
- addDeg = getDeg(dotsLength, index);
- addDeg += randomNumber(5, 9); //防止第一圈與第二圈的點(diǎn)所生成的角度一致 造成鏈接的線重疊在一起
- }
- relationDot = resultDot;
- }
- });
- });
- }
- // 分配位置
- getLocation(dot, cx, cy, addDeg, distance) {
- // 由第一張圖 得知 -90度為最上面 從最上面開(kāi)始循環(huán)
- let outerDeg = -90;
- let outerR = distance;
- const { distance: addDistance } = this;
- let firsted; // 用于分布完后一周
- while (Object.keys(this.checkDotLocation(dot)).length !== 0) {
- outerDeg += addDeg;
- if (outerDeg > 360) {
- // 轉(zhuǎn)完一圈 隨機(jī)生成第二圈的角度再開(kāi)始對(duì)當(dāng)前點(diǎn)進(jìn)行定位
- addDeg = randomNumber(10, 35);
- outerDeg = addDeg;
- if (firsted) {
- outerR += addDistance;
- }
- firsted = true;
- }
- const innerLocation = getDegXy(cx, cy, outerDeg, outerR);
- dot = Object.assign(dot, innerLocation);
- }
- this.dotsLocations[dot.id] = { x: dot.x, y: dot.y };
- return {
- dot,
- isPlus: firsted,
- outerR,
- };
- }
- // 碰撞檢測(cè)
- checkDotLocation(circleA) {
- let repeat = false;
- if (!circleA.x || !circleA.y) return true;
- const { forceCollide } = this;
- console.log(this.dotsLocations)
- Object.keys(this.dotsLocations).forEach((key) => {
- if (key === circleA.id) {
- return;
- }
- const circleB = this.dotsLocations[key];
- let isRepeat = Math.sqrt(Math.pow(circleA.x - circleB.x, 2) + Math.pow(circleA.y - circleB.y, 2)) < forceCollide * 2;
- if(isRepeat)repeat = true;
- });
- return repeat;
- }
- }
生成時(shí)間與D3 的差不多
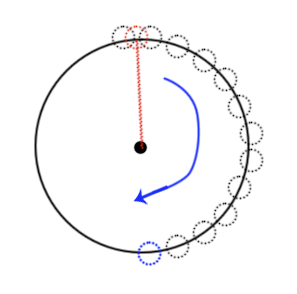
碰撞后點(diǎn)的移動(dòng) (力?)
碰撞后的邏輯呢 簡(jiǎn)單的就是已拖動(dòng)點(diǎn)為圓點(diǎn),計(jì)算碰撞點(diǎn)與圓點(diǎn)的夾角,再通過(guò)角度與距離得出碰撞后被碰撞點(diǎn)的x,y的坐標(biāo)
- changeLocation(data, x, y, eliminate) {
- // 先對(duì)原來(lái)的點(diǎn)進(jìn)行賦值
- data.x = x;
- data.y = y;
- // 對(duì)點(diǎn)的坐標(biāo)進(jìn)行賦值,使之后的碰撞使用新值進(jìn)行計(jì)算
- this.dotsLocations[data.id] = { x, y };
- let crashDots = this.checkDotLocation(data);
- // 獲得所有被碰撞的點(diǎn)
- Object.keys(crashDots).forEach((crashId) => {
- if (eliminate === crashId) return; // 碰撞后的碰撞防止 更改當(dāng)前拖拽元素
- const crashDot = this.findDot(crashId);
- // 獲取被碰撞的x,y 值
- const { x: crashX, y: crashY } = crashDot;
- // 此處的角度是要移動(dòng)的方向的角度
- let deg = getDeg(crashDot.x,crashDot.y,data.x,data.y);
- // - 180 的目的是為了 與上面的黑圖角度一致
- // 2是碰撞后 移動(dòng)2個(gè)像素的半徑
- const {x:endX,y:endY} = getDegXy(crashDot.x, crashDot.y, deg - 180, 2);
- // 講被碰撞的點(diǎn)作為圓點(diǎn) 改變值 并進(jìn)行碰撞點(diǎn)的碰撞的碰撞檢測(cè)(禁止套娃 )
- this.changeLocation(crashDot, endX, endY, data.id);
- });
- }
獲取夾角角度
- function getDeg(x1,y1,x2,y2){
- //中心點(diǎn)
- let cx = x1;
- let cy = y1;
- //2個(gè)點(diǎn)之間的角度獲取
- let c1 = Math.atan2(y1 - cy, x1 - cx) * 180 / (Math.PI);
- let c2 = Math.atan2(y2 - cy, x2 - cx) * 180 / (Math.PI);
- let angle;
- c1 = c1 <= -90 ? (360 + c1) : c1;
- c2 = c2 <= -90 ? (360 + c2) : c2;
- //夾角獲取
- angle = Math.floor(c2 - c1);
- angle = angle < 0 ? angle + 360 : angle;
- return angle;
- }
到此實(shí)現(xiàn)一個(gè)簡(jiǎn)單的拓?fù)鋱D就搞定了。使用我們自己的force 代替 d3.js 的效果,后期想要什么效果就可以自己再加了 如 拖動(dòng)主點(diǎn)相關(guān)點(diǎn)動(dòng),其他關(guān)聯(lián)點(diǎn)不動(dòng)的需求。tick方法需要自己手動(dòng)去調(diào)用了
- let force = new Force({
- x: svgW / 2,
- y: svgH / 2,
- distance: 200,
- forceCollide:30,
- });
- force.nodes(dot);
- force.initLines(line);
拖動(dòng)
這邊的tick 是當(dāng) 點(diǎn)的xy 發(fā)生變化的時(shí)候 自己去重新構(gòu)建點(diǎn)和線。再實(shí)際項(xiàng)目中每一次拖動(dòng)就會(huì)構(gòu)建,會(huì)比較卡,可以丟到requestAnimationFrame 去調(diào)用
- dotDoms.on("mousedown", function (d) {
- dragDom = {
- data: d,
- dom: this,
- };
- });
- d3.select("svg").on("mousemove", function (d) {
- if (!dragDom) return;
- const { offsetX: x, offsetY: y } = d3.event;
- if (x < -1 || y < -1 || x >= svgH - 10 || y >= svgH - 10) {
- //邊界
- dragDom = null;
- return;
- }
- force.changeLocation(dragDom.data, x, y);
- tick();
- });
- d3.select("svg").on("mouseup", function (d) {
- dragDom = null;
- });
小結(jié)
本章主要講述了使用d3 對(duì)力導(dǎo)向圖進(jìn)行開(kāi)發(fā)過(guò)程中,出現(xiàn)的問(wèn)題。以及以碰撞為基礎(chǔ)開(kāi)發(fā)的簡(jiǎn)單的力導(dǎo)向圖