從0到1部署一套TiDB本地集群
本文轉載自微信公眾號「 jinjunzhu」,作者 jinjunzhu 。轉載本文請聯系 jinjunzhu公眾號。
TiDB是一款開源的NewSQL數據庫,我們看一下官方的描述:
TiDB 是 PingCAP 公司自主設計、研發的開源分布式關系型數據庫,是一款同時支持在線事務處理與在線分析處理 (Hybrid Transactional and Analytical Processing, HTAP)的融合型分布式數據庫產品,具備水平擴容或者縮容、金融級高可用、實時 HTAP、云原生的分布式數據庫、兼容 MySQL 5.7 協議和 MySQL 生態等重要特性。目標是為用戶提供一站式 OLTP (Online Transactional Processing)、OLAP (Online Analytical Processing)、HTAP 解決方案。TiDB 適合高可用、強一致要求較高、數據規模較大等各種應用場景。
這里面有幾個關鍵點:
- 分布式關系型數據庫
- 兼容MySQL5.7
- 支持HTAP(在線事務處理和在線分析處理)
- 對金融行業支持很好,支持高可用、強一致和大數據場景
基本概念
這里介紹一下TiDB中的幾個重要概念:
- PD:Placement Driver,是TiDB的一個總控節點,負責集群的整體調度外,全局ID生成,以及全局時間戳TSO(中心化授時)的生成。也就是說全局時鐘在這個節點實現。
- TiKV:TiDB 的存儲層,是一個分布式事務型的鍵值數據庫,滿足ACID事務,使用Raft協議保證多副本一致性,還存儲統計數據,
- TiFlash:HTAP形態的關鍵組件,它是TiKV的列存擴展,在提供了良好的隔離性的同時,也兼顧了強一致性。
- Monitor:TiDB監控組件
實驗環境
由于我本地資源的限制,我們使用快速部署的方式。
TiDB快速部署的方式有2種:
第一種:使用 TiUP Playground 快速部署本地測試環境
適用場景:利用本地 Mac 或者單機 Linux 環境快速部署 TiDB 集群。可以體驗 TiDB 集群的基本架構,以及 TiDB、TiKV、PD、監控等基礎組件的運行。
第二種:使用TiUP cluster在單機上模擬生產環境部署步驟
希望用單臺Linux服務器,體驗TiDB最小的完整拓撲的集群,并模擬生產的部署步驟。
這里我采用第二種方式。
據官方描述,TiDB在CentOS 7.3做過大量的測試,建議在CentOS 7.3以上部署。
本地環境:VMware虛擬機,操作系統CentOS7.6
開始部署
我們按照官方的步驟來安裝
1.關閉防火墻
- systemctl stop firewalld
- service iptables stop
2.下載并安裝 TiUP,命令和結果如下
- [root@master ~]# curl --proto '=https' --tlsv1.2 -sSf https://tiup-mirrors.pingcap.com/install.sh | sh
- % Total % Received % Xferd Average Speed Time Time Time Current
- Dload Upload Total Spent Left Speed
- 100 8697k 100 8697k 0 0 4316k 0 0:00:02 0:00:02 --:--:-- 4318k
- WARN: adding root certificate via internet: https://tiup-mirrors.pingcap.com/root.json
- You can revoke this by remove /root/.tiup/bin/7b8e153f2e2d0928.root.json
- Set mirror to https://tiup-mirrors.pingcap.com success
- Detected shell: bash
- Shell profile: /root/.bash_profile
- /root/.bash_profile has been modified to add tiup to PATH
- open a new terminal or source /root/.bash_profile to use it
- Installed path: /root/.tiup/bin/tiup
- ===============================================
- Have a try: tiup playground
- ===============================================
3.安裝 TiUP 的 cluster 組件
首先聲明全局的環境變量,不然找不到tiup命令:
- source .bash_profile
執行安裝cluster命令:
- tiup cluster
輸出如下:
- [root@master ~]# tiup cluster
- The component `cluster` is not installed; downloading from repository.
- download https://tiup-mirrors.pingcap.com/cluster-v1.3.1-linux-amd64.tar.gz 10.05 MiB / 10.05 MiB 100.00% 13.05 MiB p/s
- Starting component `cluster`: /root/.tiup/components/cluster/v1.3.1/tiup-cluster
- Deploy a TiDB cluster for production
- Usage:
- tiup cluster [command]
- Available Commands:
- check Perform preflight checks for the cluster.
- deploy Deploy a cluster for production
- start Start a TiDB cluster
- stop Stop a TiDB cluster
- restart Restart a TiDB cluster
- scale-in Scale in a TiDB cluster
- scale-out Scale out a TiDB cluster
- destroy Destroy a specified cluster
- clean (EXPERIMENTAL) Cleanup a specified cluster
- upgrade Upgrade a specified TiDB cluster
- exec Run shell command on host in the tidb cluster
- display Display information of a TiDB cluster
- prune Destroy and remove instances that is in tombstone state
- list List all clusters
- audit Show audit log of cluster operation
- import Import an exist TiDB cluster from TiDB-Ansible
- edit-config Edit TiDB cluster config.
- Will use editor from environment variable `EDITOR`, default use vi
- reload Reload a TiDB cluster's config and restart if needed
- patch Replace the remote package with a specified package and restart the service
- rename Rename the cluster
- enable Enable a TiDB cluster automatically at boot
- disable Disable starting a TiDB cluster automatically at boot
- help Help about any command
- Flags:
- -h, --help help for tiup
- --ssh string (EXPERIMENTAL) The executor type: 'builtin', 'system', 'none'.
- --ssh-timeout uint Timeout in seconds to connect host via SSH, ignored for operations that don't need an SSH connection. (default 5)
- -v, --version version for tiup
- --wait-timeout uint Timeout in seconds to wait for an operation to complete, ignored for operations that don't fit. (default 120)
- -y, --yes Skip all confirmations and assumes 'yes'
- Use "tiup cluster help [command]" for more information about a command.
4.調大sshd服務的連接數限制
這里需要使用root權限,具體修改/etc/ssh/sshd_config文件下面的參數配置:
- MaxSessions 20
改完后重啟sshd:
- [root@master ~]# service sshd restart
- Redirecting to /bin/systemctl restart sshd.service
5.編輯集群配置模板文件
這個文件我們命名為topo.yaml,內容如下:
- # # Global variables are applied to all deployments and used as the default value of
- # # the deployments if a specific deployment value is missing.
- global:
- user: "tidb"
- ssh_port: 22
- deploy_dir: "/tidb-deploy"
- data_dir: "/tidb-data"
- # # Monitored variables are applied to all the machines.
- monitored:
- node_exporter_port: 9100
- blackbox_exporter_port: 9115
- server_configs:
- tidb:
- log.slow-threshold: 300
- tikv:
- readpool.storage.use-unified-pool: false
- readpool.coprocessor.use-unified-pool: true
- pd:
- replication.enable-placement-rules: true
- replication.location-labels: ["host"]
- tiflash:
- logger.level: "info"
- pd_servers:
- - host: 192.168.59.146
- tidb_servers:
- - host: 192.168.59.146
- tikv_servers:
- - host: 192.168.59.146
- port: 20160
- status_port: 20180
- config:
- server.labels: { host: "logic-host-1" }
- # - host: 192.168.59.146
- # port: 20161
- # status_port: 20181
- # config:
- # server.labels: { host: "logic-host-2" }
- # - host: 192.168.59.146
- # port: 20162
- # status_port: 20182
- # config:
- # server.labels: { host: "logic-host-3" }
- tiflash_servers:
- - host: 192.168.59.146
這里有2點需要注意:
- 文件中的host是部署TiDB的服務器ip
- ssh_port默認是22
官方文件的tikv_servers是3個節點,我這里設置成了只有1個節點,原因是本地配置多個節點時只有1個節點能啟動成功
6.部署集群
部署集群的命令如下:
- tiup cluster deploy <cluster-name> <tidb-version> ./topo.yaml --user root -p
上面的cluster-name是集群名稱,tidb-version是指TiDB版本號,可以通過tiup list tidb這個命令來查看,這里使用v3.1.2,集群名稱叫mytidb-cluster,命令如下:
- tiup cluster deploy mytidb-cluster v3.1.2 ./topo.yaml --user root -p
下面是部署時輸出的日志:
- [root@master ~]# tiup cluster deploy mytidb-cluster v3.1.2 ./topo.yaml --user root -p
- Starting component `cluster`: /root/.tiup/components/cluster/v1.3.1/tiup-cluster deploy mytidb-cluster v3.1.2 ./topo.yaml --user root -p
- Please confirm your topology:
- Cluster type: tidb
- Cluster name: mytidb-cluster
- Cluster version: v3.1.2
- Type Host Ports OS/Arch Directories
- ---- ---- ----- ------- -----------
- pd 192.168.59.146 2379/2380 linux/x86_64 /tidb-deploy/pd-2379,/tidb-data/pd-2379
- tikv 192.168.59.146 20160/20180 linux/x86_64 /tidb-deploy/tikv-20160,/tidb-data/tikv-20160
- tidb 192.168.59.146 4000/10080 linux/x86_64 /tidb-deploy/tidb-4000
- tiflash 192.168.59.146 9000/8123/3930/20170/20292/8234 linux/x86_64 /tidb-deploy/tiflash-9000,/tidb-data/tiflash-9000
- prometheus 192.168.59.146 9090 linux/x86_64 /tidb-deploy/prometheus-9090,/tidb-data/prometheus-9090
- grafana 192.168.59.146 3000 linux/x86_64 /tidb-deploy/grafana-3000
- Attention:
- 1. If the topology is not what you expected, check your yaml file.
- 2. Please confirm there is no port/directory conflicts in same host.
- Do you want to continue? [y/N]: y
- Input SSH password:
- + Generate SSH keys ... Done
- + Download TiDB components
- - Download pd:v3.1.2 (linux/amd64) ... Done
- - Download tikv:v3.1.2 (linux/amd64) ... Done
- - Download tidb:v3.1.2 (linux/amd64) ... Done
- - Download tiflash:v3.1.2 (linux/amd64) ... Done
- - Download prometheus:v3.1.2 (linux/amd64) ... Done
- - Download grafana:v3.1.2 (linux/amd64) ... Done
- - Download node_exporter:v0.17.0 (linux/amd64) ... Done
- - Download blackbox_exporter:v0.12.0 (linux/amd64) ... Done
- + Initialize target host environments
- - Prepare 192.168.59.146:22 ... Done
- + Copy files
- - Copy pd -> 192.168.59.146 ... Done
- - Copy tikv -> 192.168.59.146 ... Done
- - Copy tidb -> 192.168.59.146 ... Done
- - Copy tiflash -> 192.168.59.146 ... Done
- - Copy prometheus -> 192.168.59.146 ... Done
- - Copy grafana -> 192.168.59.146 ... Done
- - Copy node_exporter -> 192.168.59.146 ... Done
- - Copy blackbox_exporter -> 192.168.59.146 ... Done
- + Check status
- Enabling component pd
- Enabling instance pd 192.168.59.146:2379
- Enable pd 192.168.59.146:2379 success
- Enabling component node_exporter
- Enabling component blackbox_exporter
- Enabling component tikv
- Enabling instance tikv 192.168.59.146:20160
- Enable tikv 192.168.59.146:20160 success
- Enabling component tidb
- Enabling instance tidb 192.168.59.146:4000
- Enable tidb 192.168.59.146:4000 success
- Enabling component tiflash
- Enabling instance tiflash 192.168.59.146:9000
- Enable tiflash 192.168.59.146:9000 success
- Enabling component prometheus
- Enabling instance prometheus 192.168.59.146:9090
- Enable prometheus 192.168.59.146:9090 success
- Enabling component grafana
- Enabling instance grafana 192.168.59.146:3000
- Enable grafana 192.168.59.146:3000 success
- Cluster `mytidb-cluster` deployed successfully, you can start it with command: `tiup cluster start mytidb-cluster`
7.啟動集群
命令如下:
- tiup cluster start mytidb-cluster
啟動成功日志如下:
- [root@master ~]# tiup cluster start mytidb-cluster
- Starting component `cluster`: /root/.tiup/components/cluster/v1.3.1/tiup-cluster start mytidb-cluster
- Starting cluster mytidb-cluster...
- + [ Serial ] - SSHKeySet: privateKey=/root/.tiup/storage/cluster/clusters/mytidb-cluster/ssh/id_rsa, publicKey=/root/.tiup/storage/cluster/clusters/mytidb-cluster/ssh/id_rsa.pub
- + [Parallel] - UserSSH: user=tidb, host=192.168.59.146
- + [Parallel] - UserSSH: user=tidb, host=192.168.59.146
- + [Parallel] - UserSSH: user=tidb, host=192.168.59.146
- + [Parallel] - UserSSH: user=tidb, host=192.168.59.146
- + [Parallel] - UserSSH: user=tidb, host=192.168.59.146
- + [Parallel] - UserSSH: user=tidb, host=192.168.59.146
- + [ Serial ] - StartCluster
- Starting component pd
- Starting instance pd 192.168.59.146:2379
- Start pd 192.168.59.146:2379 success
- Starting component node_exporter
- Starting instance 192.168.59.146
- Start 192.168.59.146 success
- Starting component blackbox_exporter
- Starting instance 192.168.59.146
- Start 192.168.59.146 success
- Starting component tikv
- Starting instance tikv 192.168.59.146:20160
- Start tikv 192.168.59.146:20160 success
- Starting component tidb
- Starting instance tidb 192.168.59.146:4000
- Start tidb 192.168.59.146:4000 success
- Starting component tiflash
- Starting instance tiflash 192.168.59.146:9000
- Start tiflash 192.168.59.146:9000 success
- Starting component prometheus
- Starting instance prometheus 192.168.59.146:9090
- Start prometheus 192.168.59.146:9090 success
- Starting component grafana
- Starting instance grafana 192.168.59.146:3000
- Start grafana 192.168.59.146:3000 success
- + [ Serial ] - UpdateTopology: cluster=mytidb-cluster
- Started cluster `mytidb-cluster` successfully
8.訪問數據庫
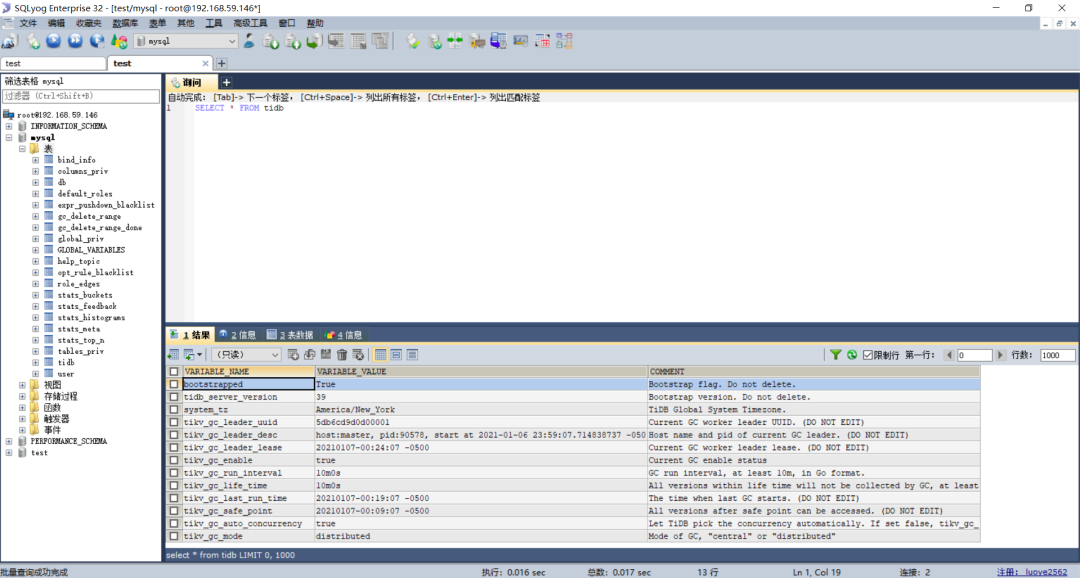
因為TiDB支持mysql客戶端訪問,我們使用sqlyog登錄TiDB,用戶名root,密碼空,地址192.168.59.149,端口4000,如下圖:

登錄成功如下圖,左側我們可以看到TiDB自帶的一些表:
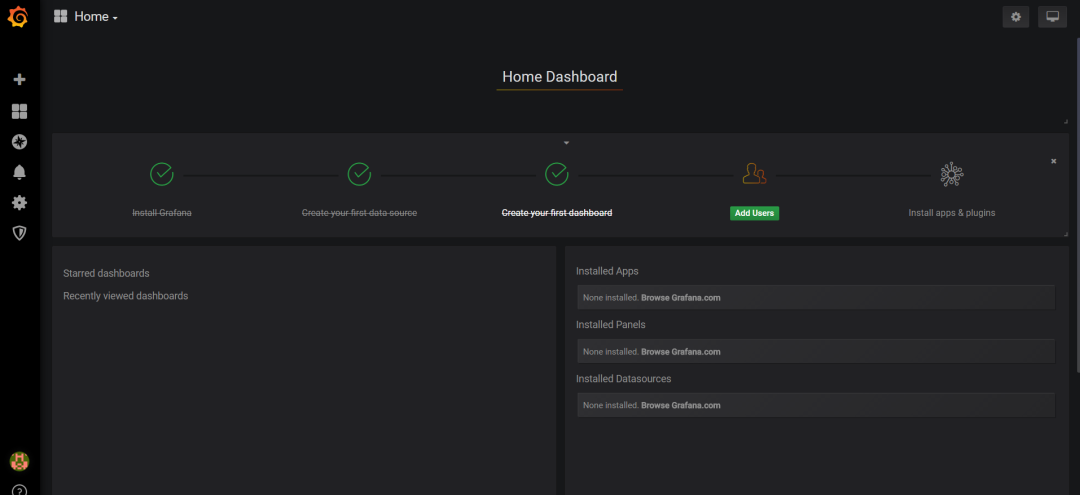
9.訪問TiDB的Grafana監控
訪問地址如下:
- http://192.168.59.146:3000/login
初始用戶名/密碼:admin/admin,登錄進去后修改密碼,成功后頁面如下:
10.dashboard
TiDB v3.x版本沒有dashboard,v4.0開始加入,訪問地址如下:
- http://192.168.59.146:2379/dashboard
11.查看集群列表
命令:tiup cluster list,結果如下:
- [root@master /]# tiup cluster list
- Starting component `cluster`: /root/.tiup/components/cluster/v1.3.1/tiup-cluster list
- Name User Version Path PrivateKey
- ---- ---- ------- ---- ----------
- mytidb-cluster tidb v3.1.2 /root/.tiup/storage/cluster/clusters/mytidb-cluster /root/.tiup/storage/cluster/clusters/mytidb-cluster/ssh/id_rsa
12.查看集群拓撲結構
命令如下:
- tiup cluster list
輸入命令后,我本地集群的輸出如下:
- [root@master /]# tiup cluster list
- Starting component `cluster`: /root/.tiup/components/cluster/v1.3.1/tiup-cluster list
- Name User Version Path PrivateKey
- ---- ---- ------- ---- ----------
- mytidb-cluster tidb v3.1.2 /root/.tiup/storage/cluster/clusters/mytidb-cluster /root/.tiup/storage/cluster/clusters/mytidb-cluster/ssh/id_rsa
- You have new mail in /var/spool/mail/root
- [root@master /]# tiup cluster display mytidb-cluster
- Starting component `cluster`: /root/.tiup/components/cluster/v1.3.1/tiup-cluster display mytidb-cluster
- Cluster type: tidb
- Cluster name: mytidb-cluster
- Cluster version: v3.1.2
- SSH type: builtin
- ID Role Host Ports OS/Arch Status Data Dir Deploy Dir
- -- ---- ---- ----- ------- ------ -------- ----------
- 192.168.59.146:3000 grafana 192.168.59.146 3000 linux/x86_64 Up - /tidb-deploy/grafana-3000
- 192.168.59.146:2379 pd 192.168.59.146 2379/2380 linux/x86_64 Up|L /tidb-data/pd-2379 /tidb-deploy/pd-2379
- 192.168.59.146:9090 prometheus 192.168.59.146 9090 linux/x86_64 Up /tidb-data/prometheus-9090 /tidb-deploy/prometheus-9090
- 192.168.59.146:4000 tidb 192.168.59.146 4000/10080 linux/x86_64 Up - /tidb-deploy/tidb-4000
- 192.168.59.146:9000 tiflash 192.168.59.146 9000/8123/3930/20170/20292/8234 linux/x86_64 Up /tidb-data/tiflash-9000 /tidb-deploy/tiflash-9000
- 192.168.59.146:20160 tikv 192.168.59.146 20160/20180 linux/x86_64 Up /tidb-data/tikv-20160 /tidb-deploy/tikv-20160
- Total nodes: 6
遇到的問題
安裝TiDB v4.0.9版本,可以部署成功,但是啟動報錯,如果topo.yaml中配置了3個節點,啟動報錯,tikv只能啟動成功一個,日志如下:
- [root@master ~]# tiup cluster start mytidb-cluster
- Starting component `cluster`: /root/.tiup/components/cluster/v1.3.1/tiup-cluster start mytidb-cluster
- Starting cluster mytidb-cluster...
- + [ Serial ] - SSHKeySet: privateKey=/root/.tiup/storage/cluster/clusters/mytidb-cluster/ssh/id_rsa, publicKey=/root/.tiup/storage/cluster/clusters/mytidb-cluster/ssh/id_rsa.pub
- + [Parallel] - UserSSH: user=tidb, host=192.168.59.146
- + [Parallel] - UserSSH: user=tidb, host=192.168.59.146
- + [Parallel] - UserSSH: user=tidb, host=192.168.59.146
- + [Parallel] - UserSSH: user=tidb, host=192.168.59.146
- + [Parallel] - UserSSH: user=tidb, host=192.168.59.146
- + [Parallel] - UserSSH: user=tidb, host=192.168.59.146
- + [Parallel] - UserSSH: user=tidb, host=192.168.59.146
- + [Parallel] - UserSSH: user=tidb, host=192.168.59.146
- + [ Serial ] - StartCluster
- Starting component pd
- Starting instance pd 192.168.59.146:2379
- Start pd 192.168.59.146:2379 success
- Starting component node_exporter
- Starting instance 192.168.59.146
- Start 192.168.59.146 success
- Starting component blackbox_exporter
- Starting instance 192.168.59.146
- Start 192.168.59.146 success
- Starting component tikv
- Starting instance tikv 192.168.59.146:20162
- Starting instance tikv 192.168.59.146:20160
- Starting instance tikv 192.168.59.146:20161
- Start tikv 192.168.59.146:20162 success
- Error: failed to start tikv: failed to start: tikv 192.168.59.146:20161, please check the instance's log(/tidb-deploy/tikv-20161/log) for more detail.: timed out waiting for port 20161 to be started after 2m0s
- Verbose debug logs has been written to /root/.tiup/logs/tiup-cluster-debug-2021-01-05-19-58-46.log.
- Error: run `/root/.tiup/components/cluster/v1.3.1/tiup-cluster` (wd:/root/.tiup/data/SLGrLJI) failed: exit status 1
查看日志文件/tidb-deploy/tikv-20161/log/tikv.log,提示下面2個目錄下找不到文件:
- [2021/01/06 05:48:44.231 -05:00] [FATAL] [lib.rs:482] ["called `Result::unwrap()` on an `Err` value: Os { code: 2, kind: NotFound, message: \"No such file or directory\" }"] [backtrace="stack backtrace:\n 0: tikv_util::set_panic_hook::{{closure}}\n at components/tikv_util/src/lib.rs:481\n 1: std::panicking::rust_panic_with_hook\n at src/libstd/panicking.rs:475\n 2: rust_begin_unwind\n at src/libstd/panicking.rs:375\n 3: core::panicking::panic_fmt\n at src/libcore/panicking.rs:84\n 4: core::result::unwrap_failed\n at src/libcore/result.rs:1188\n 5: core::result::Result<T,E>::unwrap\n at /rustc/0de96d37fbcc54978458c18f5067cd9817669bc8/src/libcore/result.rs:956\n cmd::server::TiKVServer::init_fs\n at cmd/src/server.rs:310\n cmd::server::run_tikv\n at cmd/src/server.rs:95\n 6: tikv_server::main\n at cmd/src/bin/tikv-server.rs:166\n 7: std::rt::lang_start::{{closure}}\n at /rustc/0de96d37fbcc54978458c18f5067cd9817669bc8/src/libstd/rt.rs:67\n 8: main\n 9: __libc_start_main\n 10: <unknown>\n"] [location=src/libcore/result.rs:1188] [thread_name=main]
如果配置一個節點,啟動還是失敗,啟動日志我們截取后半段:
- Starting component pd
- Starting instance pd 192.168.59.146:2379
- Start pd 192.168.59.146:2379 success
- Starting component node_exporter
- Starting instance 192.168.59.146
- Start 192.168.59.146 success
- Starting component blackbox_exporter
- Starting instance 192.168.59.146
- Start 192.168.59.146 success
- Starting component tikv
- Starting instance tikv 192.168.59.146:20160
- Start tikv 192.168.59.146:20160 success
- Starting component tidb
- Starting instance tidb 192.168.59.146:4000
- Start tidb 192.168.59.146:4000 success
- Starting component tiflash
- Starting instance tiflash 192.168.59.146:9000
- Error: failed to start tiflash: failed to start: tiflash 192.168.59.146:9000, please check the instance's log(/tidb-deploy/tiflash-9000/log) for more detail.: timed out waiting for port 9000 to be started after 2m0s
- Verbose debug logs has been written to /root/.tiup/logs/tiup-cluster-debug-2021-01-06-20-02-13.log.
在/tidb-deploy/tiflash-9000/log中文件如下:
- [2021/01/06 20:06:26.207 -05:00] [INFO] [mod.rs:335] ["starting working thread"] [worker=region-collector-worker]
- [2021/01/06 20:06:27.130 -05:00] [FATAL] [lib.rs:482] ["called `Result::unwrap()` on an `Err` value: Os { code: 2, kind: NotFound, message: \"No such file or directory\" }"] [backtrace="stack backtrace:\n 0: tikv_util::set_panic_hook::{{closure}}\n 1: std::panicking::rust_panic_with_hook\n at src/libstd/panicking.rs:475\n 2: rust_begin_unwind\n at src/libstd/panicking.rs:375\n 3: core::panicking::panic_fmt\n at src/libcore/panicking.rs:84\n 4: core::result::unwrap_failed\n at src/libcore/result.rs:1188\n 5: cmd::server::run_tikv\n 6: run_proxy\n 7: operator()\n at /home/jenkins/agent/workspace/optimization-build-tidb-linux-amd/tics/dbms/src/Server/Server.cpp:415\n 8: execute_native_thread_routine\n at ../../../../../libstdc++-v3/src/c++11/thread.cc:83\n 9: start_thread\n 10: __clone\n"] [location=src/libcore/result.rs:1188] [thread_name=<unnamed>]
試了v4.0.1版本,也是一樣的問題,都是報找不到文件的錯誤。
總結
TiDB部署相對容易,但是如果部署失敗,比如本文的V4.0.x版本,不太好解決,因為網上相關的經驗很少,官網也找不到,只能翻源代碼來解決了。