長文干貨丨一文搞懂IoC的依賴注入
一、注解驅動IoC
xml驅動的IoC容器使用的是ClassPathXmlApplicationContext讀取xml內bean信息
注解驅動的IoC容器使用的是AnnotationConfigApplicationContext讀取Java類中的bean信息
1. AnnotationConfigApplicationContext 的注冊使用
相比于xml文件作為驅動, 注解驅動需要指明配置類 一個配置類可以理解為"相當于"一個xml 配置類只需要在類上標注注解 @Configuration
- @Configuration
- public class DemoConfiguration {
- }
在xml中聲明bean的方式
在配置類中使用的是@Bean注解
- <bean id="person" class="com.huodd.bean.Person"></bean>
說明: 向IoC容器注冊一個類型為Persion,id為Person的Bean
方法名表示的是bean的id 返回值表示的是注冊的bean的類型
@Bean注解也可以顯示的聲明bean的id 如 @Bean("person1")
- @Bean
- public Person person() {
- return new Person();
- }
2. 注解IoC容器的初始化
- public class AnnotationConfigApplication {
- public static void main(String[] args) {
- ApplicationContext ctx = new AnnotationConfigApplicationContext(DemoConfiguration.class);
- Person person = ctx.getBean(Person.class);
- System.out.println(person);
- }
- }
運行后Person控制臺打印結果
- com.huodd.bean.Person@55536d9e
3. 組件的注冊和掃描
上述初始化時 我們在使用AnnotationConfigApplicationContext時傳遞了參數 Class... componentClasses
翻看AnnotationConfigApplicationContext的構造方法可以發現還可以傳遞參數的參數類型還有 String... basePackages
這里就涉及到組件的注冊和掃描
- 這里可以思考一個問題, 如果我們要注冊的組件特別多, 那進行編寫這些@Bean的時候代碼工作量也會特別多,這時候該如何解決呢?
Spring 給我們提供了幾個注解,可以幫助我們快速注冊需要的組件, 這些注解被稱為模式注解(stereotype annotations)
@Component
@Component可以說是所有組件注冊的根源 在類上標注 @Component 代表該類被注冊到IoC容器中作為一個Bean
- @Component
- public class Person {
- }
如果未指定 Bean 的名稱 默認規則是 "類名稱首字母小寫" 上面的bean名稱默認會是 person
如果要自定義bean的名稱 可以在@Component聲明value的值即可 如
- @Component("person1")
- public class Person {
- }
在xml中相當于
- <bean id="person1" class="com.huodd.bean.Person"/>
@ComponentScan
這個時候 如果我們直接運行啟動類 獲取Person的bean對象,會報錯NoSuchBeanDefinitionException 這是為什么呢?
因為我們只是聲明了組件,而后直接啟動了IoC容器,這樣容器是感知不到有@Component存在的,
解決方案1:
我們需要在寫配置類時再額外標注一個新的注解@ComponentScan
目的是告訴IoC容器 我要掃描哪個包下面的帶有@Component注解的類
- @Configuration
- @ComponentScan("com.huodd.bean")
- public class DemoComponentScanConfiguration {
- }
注: 如果不指定掃描路徑, 則默認掃描本類所在包及所有子包下帶有@Component的組件
啟動類代碼如下:
- public class AnnotationConfigApplication {
- public static void main(String[] args) {
- ApplicationContext ctx = new AnnotationConfigApplicationContext(DemoComponentScanConfiguration.class);
- Person person = ctx.getBean(Person.class);
- System.out.println(person);
- }
- }
解決方案2:
這里也可以不寫@ComponentScan 而直接在AnnotationConfigApplicationContext方法參數內傳入String類型的包掃描路徑 代碼如下
- public class AnnotationConfigApplication {
- public static void main(String[] args) {
- ApplicationContext ctx = new AnnotationConfigApplicationContext("com.huodd.bean");
- Person person = ctx.getBean(Person.class);
- System.out.println(person);
- }
- }
PS: 組件掃描并非是注解驅動IoC所特有的, 其實在xml驅動的IoC模式下 同樣可以啟用組件掃描, 只需要在xml中聲明一個標簽即可
- <context:component-scan base-package="com.huodd.bean"/>
這里需要注意下: 如需要掃描多個路徑,需要寫多個標簽 也就是 一個標簽只能聲明一個根包
組件注冊的補充
SpringFramework 提供了在進行Web開發三層架構時的擴展注解: 分別為 @Controller、 @Service 、@Repository 小伙伴有沒有很熟悉?
分別代表 表現層、業務層、持久層 這三個注解的作用與 @Component完全一樣 扒開源碼我們可以看到 底層在這三個注解類上又添加了 @Component
- @Target({ElementType.TYPE})
- @Retention(RetentionPolicy.RUNTIME)
- @Documented
- @Component
- public @interface Service {
- }
這樣 我們在進行符合三層架構的開發時 對于相應的如 ServiceImpl等 就可以直接標注 @Service 等注解了
@Configuration
@Configuration 底層也有標注@Component
- @Target({ElementType.TYPE})
- @Retention(RetentionPolicy.RUNTIME)
- @Documented
- @Component
- public @interface Configuration { ... }
由此可以說明,配置類不是向我們所想的那樣,只是單純的做一個配置而已, 它也會被視為 bean,也被注冊到IoC容器里面
4. 注解驅動與xml驅動互相引用
4.1 xml引用注解
需開啟注解配置 再注冊相應配置類
- <?xml version="1.0" encoding="UTF-8"?>
- <beans xmlns="http://www.springframework.org/schema/beans"
- xmlns:xsi="http://www.w3.org/2001/XMLSchema-instance"
- xmlns:context="http://www.springframework.org/schema/context"
- xsi:schemaLocation="http://www.springframework.org/schema/beans
- https://www.springframework.org/schema/beans/spring-beans.xsd
- http://www.springframework.org/schema/context
- https://www.springframework.org/schema/context/spring-context.xsd">
- <!-- 開啟注解配置 -->
- <context:annotation-config />
- <!-- 注冊配置類 -->
- <bean class="com.huodd.config.AnnotationConfigConfiguration"/>
- </beans>
4.2 注解引用XMl
- @Configuration
- @ImportResource("classpath:annotation/demo-beans.xml")
- public class ImportXmlAnnotationConfiguration {
- }
二、IoC的依賴注入
1.Setter屬性注入
創建對象 將屬性值set進去 之后返回對象
- @Bean
- public Person person() {
- Person person = new Person();
- person.setId(1);
- person.setName("PoXing");
- person.setAge(18);
- return person;
- }
xml中的setter注入
- <bean id="person" class="com.huodd.bean.Person">
- <property name="id" value="1"/>
- <property name="name" value="PoXing"/>
- <property name="age" value="18"/>
- </bean>
2. 構造器注入
使用構造器注入,需要在bean本身添加有參構造方法, 如在Person中添加有參構造方法如下
- public Person(Integer id, String name, Integer age) {
- this.id = id;
- this.name = name;
- this.age = age;
- }
注解驅動中,我們創建bean的時候注入屬性時 就需要同時指定參數值
- @Bean
- public Person person() {
- return new Person(1, "PoXing", 18);
- }
xml驅動中如下
- <bean id="person" class="com.huodd.bean.Person">
- <!--
- index: 表示構造器的參數索引
- value: 表示對應的參數值
- -->
- <constructor-arg index="0" value="1"/>
- <constructor-arg index="1" value="PoXing"/>
- <constructor-arg index="2" value="18"/>
- </bean>
3. 注解式屬性注入
這里先說明一下,為何會有注解式屬性值注入. 細心的小伙伴可能會發現 上面我們談到的 Setter屬性注入、構造器注入 好像在只能是在使用 @Bean注解的時候時候使用, 但是 如果是通過標注 @Component注解的組件呢(像前面我們的Person類中標注了@Component注解),怎么給它設定屬性值, 該節主要就是說一下這部分
@Component 下的屬性注入
這里我們使用Dog類做為演示(這里我悄悄的添加了@Component注解 自己嘗試的小伙伴要注意哦 否則會報錯的)
- @Component
- public class Dog {
- private Integer id;
- private String name;
- private Integer age;
- ... 省略 Getter、Setter
- ... 省略 toString
- }
這里要實現注解式屬性注入,可以直接在要注入的字段上標注 @Value注解 如
- @Value("1")
- private Integer id;
- @Value("wangcai")
- private String name;
- @Value("3")
- private Integer age;
啟動類代碼如下
- public class DiApplication {
- public static void main(String[] args) {
- ApplicationContext ctx = new AnnotationConfigApplicationContext("com.huodd.bean");
- Dog dog = ctx.getBean(Dog.class);
- System.out.println(dog);
- }
- }
控制臺打印結果
- Dog{id=1, name='wangcai', age=3}
外部配置文件(@PropertySource)
這里主要是解決上面的@Value中注入 我們把屬性值直接固定寫死了,如果要修改 還要去Java代碼中去修改,很不符合開發規范,
SpringFramework為我們擴展了新的注解@PropertySource 主要用來導入外部配置文件
1.這里我們創建一個 dog.properties
- dog.id=1
- dog.name=wangcai
- dog.age=3
2.引入配置文件
- @PropertySource("classpath:di/dog.properties")
- @ComponentScan("com.huodd.bean")
- @Configuration
- public class DemoComponentScanConfiguration {
- }
3.Dog類中屬性注入 這里@Value需要配合占位符 來獲取properties配置文件中的內容
- @Value("${dog.id}")
- private Integer id;
- @Value("${dog.name}")
- private String name;
- @Value("${dog.age}")
- private Integer age;
4.修改一下啟動類
- public class DiApplication {
- public static void main(String[] args) {
- ApplicationContext ctx = new AnnotationConfigApplicationContext(DemoComponentScanConfiguration.class);
- Dog dog = ctx.getBean(Dog.class);
- System.out.println(dog);
- }
- }
控制臺打印結果如下
- Dog{id=1, name='wangcai', age=3}
此時配置文件的屬性已經注入成功
4.自動注入
在xml模式中有ref屬性 可以將一個bean注入到另外一個bean中, 注解模式中也同樣可以
@Autowired
給Dog的bean中注入 Person的Bean (即 給dog指定它的主人)
方法1 → 在屬性上標注
- @Component
- public class Dog {
- // ......
- @Autowired
- private Person person;
- }
方法2 → 使用構造器注入方式
- @Component
- public class Dog {
- // ......
- private Person person;
- @Autowired
- public Dog(Person person) {
- this.person = person;
- }
- }
方法3 → 使用setter方法注入
- @Component
- public class Dog {
- // ......
- private Person person;
- @Autowired
- public void setPerson(Person person) {
- this.person = person;
- }
- }
JSR250規范下的@Resource
@Resource也是用來屬性注入的注解
它與@Autowired的區別是:
- @Autowired是按照類型注入
- @Resource是按照屬性名(也就是bean的名稱)注入
@Resource 注解相當于標注 @Autowired 和 @Qualifier
@Qualifier這里簡要說明下,為指定bean的名稱而存在,如果存在多個相同的bean,而bean的名稱不同,我們可以使用@Autowired 配置 @Qualifier注解
如: 下面表示該Dog類注入的主人Bean是名稱為 xiaowang的, 而當前容器內可能存在多個 主人bean對象 比如 xiaoli、xiaoming ....
- @Component
- public class Dog {
- // ......
- @Autowired
- @Qualifier("xiaowang")
- private Person person;
- }
下面如果使用@Resource 可以更方便些 代碼如下
- @Component
- public class Dog {
- // ......
- @Resource(name="xiaowang")
- private Person person;
- }
JSR330規范下的@Inject
@Inject注解也是按照類型注入,與@Autowire的策略一樣, 不過如要使用@Inject 需要額外的導入依賴
- <!-- jsr330 -->
- <dependency>
- <groupId>javax.inject</groupId>
- <artifactId>javax.inject</artifactId>
- <version>1</version>
- </dependency>
后面的使用方法就與SpringFramework 原生的 @Autowire + @Qualifier 相同了
- @Component
- public class Dog {
- @Inject // 等同于@Autowired
- @Named("xiaowang") // 等同于@Qualifier
- private Person person;
它與@Autowired的區別是:
- @Autowired所在的包為 org.springframework.beans.factory.annotation.Autowired 即為 SpringFramework 提供的
- @Inject所在的包為 javax.inject.Inject 屬于JSR的規范 也就是說如果不使用SpringFramework時可以使用該注解
5. 復雜類型注入
Array注入
- <property name="names">
- <array>
- <value>PoXing</value>
- <value>LaoWang</value>
- </array>
- </property>
List注入
- <property name="tels">
- <list>
- <value>13000000000</value>
- <value>13000000001</value>
- </list>
- </property>
Set注入-
- <!-- 已經提前聲明好的Dog -->
- <bean id="wangcai" class="com.huodd.bean.ext.Dog"/>
- ---
- <property name="dogs">
- <set>
- <bean class="com.huodd.bean.Dog"/>
- <ref bean="wangcai"/>
- </set>
- </property>
Map注入
- <property name="homesMap">
- <map>
- <entry key="1" value="main">
- <ref bean="myHome1" />
- </entry>
- <entry key="2" value="other">
- <ref bean="myHome2" />
- </entry>
- </map>
- </property>
Properties注入
- <property name="props">
- <props>
- <prop key="sex">男</prop>
- <prop key="age">18</prop>
- </props>
- </property>
面試題
1.@Autowired注入原理是什么?
- 先拿屬性對應的類型,去IoC容器中找相應的Bean
- 如果沒有找到 直接拋出NoUniqueBeanDefinitionException異常
- 如果找到一個 直接返回
- 如果找到多個相同類型的bean 再拿屬性名去與這多個bean的id進行對比
- 如果有多個或者沒有 則會拋出NoUniqueBeanDefinitionException異常
- 如果只有一個 直接返回
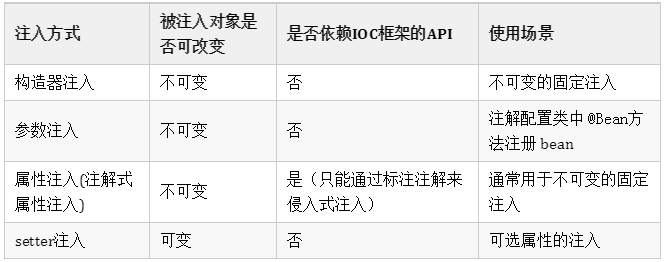
2.依賴注入的方式有哪些,都有什么區別
3.自動注入的注解對比
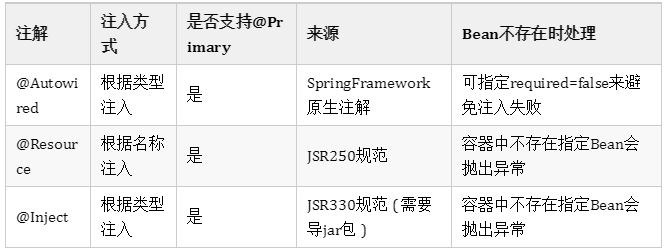
@Qualifier :如果被標注的成員/方法在根據類型注入時發現有多個相同類型的 Bean ,則會根據該注解聲明的 name 尋找特定的 bean
@Primary :如果有多個相同類型的 Bean 同時注冊到 IOC 容器中,使用 “根據類型注入” 的注解時會注入標注 @Primary 注解的 bean 即默認策略
4.使用依賴注入有什么優缺點
依賴注入作為 IOC 的實現方式之一,目的就是解耦,我們不需要直接去 new 那些依賴的類對象就可以直接從容器中去取來使用, 如果組件存在多級依賴,依賴注入可以將這些依賴的關系簡化。
依賴對象的可配置:通過 xml 或者注解聲明,可以指定和調整組件注入的對象,借助 Java 的多態特性,可以不需要大批量的修改就完成依賴注入的對象替換