Vue 3.0 進(jìn)階之應(yīng)用掛載的過程之一
本文轉(zhuǎn)載自微信公眾號「全棧修仙之路」,作者阿寶哥。轉(zhuǎn)載本文請聯(lián)系全棧修仙之路公眾號。
本文是 Vue 3.0 進(jìn)階系列 的第八篇文章,在這篇文章中,阿寶哥將帶大家一起探索 Vue 3 中應(yīng)用掛載的過程。在開始介紹應(yīng)用掛載的過程之前,我們先來簡單回顧一下第七篇介紹的 應(yīng)用創(chuàng)建的過程:

一、應(yīng)用掛載
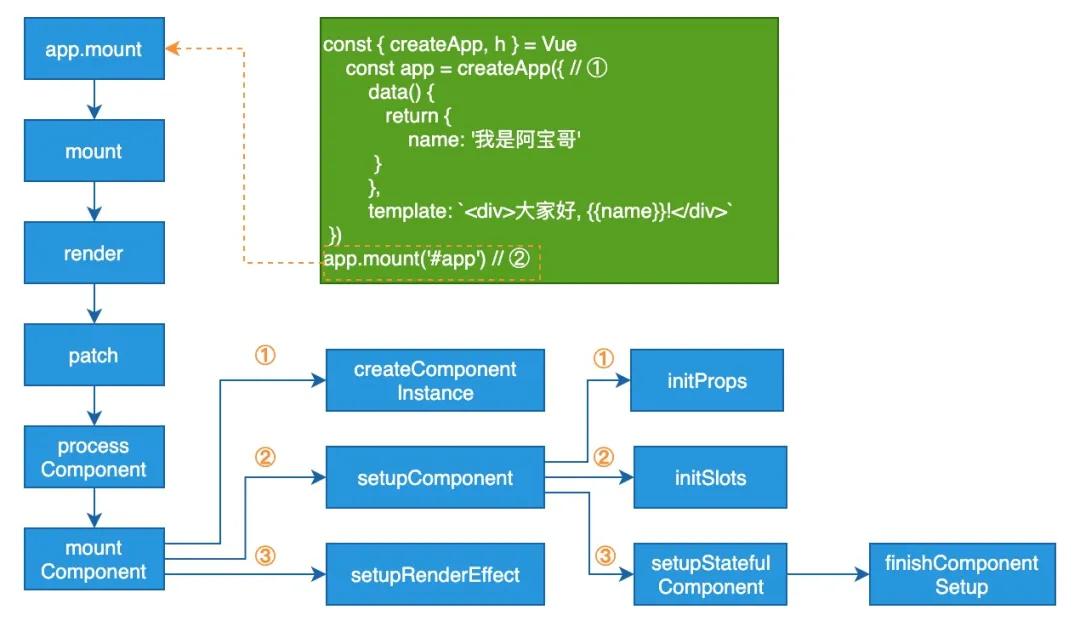
在創(chuàng)建完 app 對象之后,就會調(diào)用 app.mount 方法執(zhí)行應(yīng)用掛載操作:
- <div id="app"></div>
- <script>
- const { createApp, h } = Vue
- const app = createApp({ // ①
- data() {
- return {
- name: '我是阿寶哥'
- }
- },
- template: `<div>大家好, {{name}}!</div>`
- })
- app.mount('#app') // ②
- </script>
雖然 app.mount 方法用起來很簡單,但它內(nèi)部涉及的處理邏輯還是蠻復(fù)雜的。這里阿寶哥利用 Chrome 開發(fā)者工具的 Performance 標(biāo)簽欄,記錄了應(yīng)用掛載的主要過程:
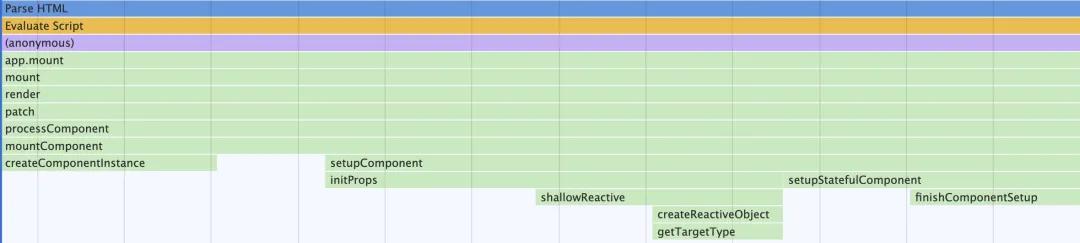
接下來,阿寶哥就會以前面的示例為例,來詳細(xì)分析一下應(yīng)用掛載過程中涉及的主要函數(shù)。
1.1 app.mount
app.mount 被定義在 runtime-dom/src/index.ts 文件中,具體實(shí)現(xiàn)如下所示:
- // packages/runtime-dom/src/index.ts
- app.mount = (containerOrSelector: Element | ShadowRoot | string): any => {
- const container = normalizeContainer(containerOrSelector) // ① 同時支持字符串和DOM對象
- if (!container) return
- const component = app._component
- // 若根組件非函數(shù)對象且未設(shè)置render和template屬性,則使用容器的innerHTML作為模板的內(nèi)容
- if (!isFunction(component) && !component.render && !component.template) { // ②
- component.template = container.innerHTML
- }
- container.innerHTML = '' // 在掛載前清空容器內(nèi)容
- const proxy = mount(container, false, container instanceof SVGElement) // ③
- if (container instanceof Element) {
- container.removeAttribute('v-cloak') // 避免在網(wǎng)絡(luò)不好或加載數(shù)據(jù)過大的情況下,頁面渲染的過程中會出現(xiàn)Mustache標(biāo)簽
- container.setAttribute('data-v-app', '')
- }
- return proxy
- }
在 app.mount 方法內(nèi)部主要分為以下 3 個流程:
- 規(guī)范化容器,normalizeContainer 函數(shù)參數(shù) container 的類型是一個聯(lián)合類型:Element | ShadowRoot | string,如果傳入?yún)?shù)是字符串類型的話,會通過 document.querySelector API 來獲取選擇器對應(yīng)的 DOM 元素。而對于其他類型的話,會直接返回傳入的參數(shù)。
- 設(shè)置根組件的 template 屬性,當(dāng)根組件不是函數(shù)組件且根組件配置對象上沒有 render 和 template 屬性,則會使用容器元素上 innerHTML 的值作為根組件 template 屬性的屬性值。
- 調(diào)用 mount 方法執(zhí)行真正的掛載操作。
1.2 mount
對于 app.mount 方法來說,最核心的流程是 mount 方法,所以下一步我們就來分析 mount 方法。
- // packages/runtime-core/src/apiCreateApp.ts
- export function createAppAPI<HostElement>(
- render: RootRenderFunction,
- hydrate?: RootHydrateFunction
- ): CreateAppFunction<HostElement> {
- return function createApp(rootComponent, rootProps = null) {
- const app: App = (context.app = {
- _container: null,
- _context: context,
- // 省略部分代碼
- mount(
- rootContainer: HostElement,
- isHydrate?: boolean,
- isSVG?: boolean
- ): any {
- if (!isMounted) {
- const vnode = createVNode( // ① 創(chuàng)建根組件對應(yīng)的VNode對象
- rootComponent as ConcreteComponent,
- rootProps
- )
- vnode.appContext = context // ② 設(shè)置VNode對象上的應(yīng)用上下文屬性
- // 省略部分代碼
- if (isHydrate && hydrate) {
- hydrate(vnode as VNode<Node, Element>, rootContainer as any)
- } else {
- render(vnode, rootContainer, isSVG) // ③ 執(zhí)行渲染操作
- }
- isMounted = true
- app._container = rootContainer
- ;(rootContainer as any).__vue_app__ = app
- return vnode.component!.proxy
- }
- },
- })
- return app
- }
- }
1.3 render
觀察以上的 mount 函數(shù)可知,在 mount 方法內(nèi)部會調(diào)用繼續(xù)調(diào)用 render 函數(shù)執(zhí)行渲染操作,該函數(shù)的具體實(shí)現(xiàn)如下:
- const render: RootRenderFunction = (vnode, container) => {
- if (vnode == null) {
- if (container._vnode) {
- unmount(container._vnode, null, null, true)
- }
- } else {
- patch(container._vnode || null, vnode, container)
- }
- flushPostFlushCbs()
- container._vnode = vnode
- }
對于首次渲染來說,此時的 vnode 不為 null(基于根組件創(chuàng)建的 VNode 對象),所以會執(zhí)行 else 分支的流程,即調(diào)用 patch 函數(shù)。
1.4 patch
patch 函數(shù)被定義在 runtime-core/src/renderer.ts 文件中,該函數(shù)的簽名如下所示:
- // packages/runtime-core/src/renderer.ts
- const patch: PatchFn = (
- n1, // old VNode
- n2, // new VNode
- container,
- anchor = null,
- parentComponent = null,
- parentSuspense = null,
- isSVG = false,
- slotScopeIds = null,
- optimized = false
- ) => { //...}
在 patch 函數(shù)內(nèi)部,會根據(jù) VNode 對象的類型執(zhí)行不同的處理邏輯:

在上圖中,我們看到了 Text、Comment 、Static 和 Fragment 這些類型,它們的定義如下:
- // packages/runtime-core/src/vnode.ts
- export const Text = Symbol(__DEV__ ? 'Text' : undefined)
- export const Comment = Symbol(__DEV__ ? 'Comment' : undefined)
- export const Static = Symbol(__DEV__ ? 'Static' : undefined)
- export const Fragment = (Symbol(__DEV__ ? 'Fragment' : undefined) as any) as {
- __isFragment: true
- new (): {
- $props: VNodeProps
- }
- }
除了上述的類型之外,在 default 分支,我們還看到了 ShapeFlags,該對象是一個枚舉:
- // packages/shared/src/shapeFlags.ts
- export const enum ShapeFlags {
- ELEMENT = 1,
- FUNCTIONAL_COMPONENT = 1 << 1,
- STATEFUL_COMPONENT = 1 << 2,
- TEXT_CHILDREN = 1 << 3,
- ARRAY_CHILDREN = 1 << 4,
- SLOTS_CHILDREN = 1 << 5,
- TELEPORT = 1 << 6,
- SUSPENSE = 1 << 7,
- COMPONENT_SHOULD_KEEP_ALIVE = 1 << 8,
- COMPONENT_KEPT_ALIVE = 1 << 9,
- COMPONENT = ShapeFlags.STATEFUL_COMPONENT | ShapeFlags.FUNCTIONAL_COMPONENT
- }
那么 ShapeFlags 標(biāo)志是什么時候設(shè)置的呢?其實(shí)在創(chuàng)建 VNode 對象時,就會設(shè)置該對象的 shapeFlag 屬性,對應(yīng)的判斷規(guī)則如下所示:
- // packages/runtime-core/src/vnode.ts
- function _createVNode(
- type: VNodeTypes | ClassComponent | typeof NULL_DYNAMIC_COMPONENT,
- props: (Data & VNodeProps) | null = null,
- children: unknown = null,
- patchFlag: number = 0,
- dynamicProps: string[] | null = null,
- isBlockNode = false
- ): VNode {
- // 省略大部分方法
- const shapeFlag = isString(type)// 字符串類型
- ? ShapeFlags.ELEMENT
- : __FEATURE_SUSPENSE__ && isSuspense(type) // SUSPENSE類型
- ? ShapeFlags.SUSPENSE
- : isTeleport(type) // TELEPORT類型
- ? ShapeFlags.TELEPORT
- : isObject(type) // 對象類型
- ? ShapeFlags.STATEFUL_COMPONENT
- : isFunction(type) // 函數(shù)類型
- ? ShapeFlags.FUNCTIONAL_COMPONENT
- : 0
- const vnode: VNode = {
- __v_isVNode: true,
- [ReactiveFlags.SKIP]: true,
- // 省略大部分屬性
- shapeFlag,
- appContext: null
- }
- normalizeChildren(vnode, children)
- return vnode
- }
1.5 processComponent
由以上代碼可知,對于我們示例來說,根組件對應(yīng)的 VNode 對象上 shapeFlag 的值為 ShapeFlags.STATEFUL_COMPONENT。因此,在執(zhí)行 patch 方法時,將會調(diào)用 processComponent 函數(shù):
- // packages/runtime-core/src/renderer.ts
- const processComponent = (
- n1: VNode | null,
- n2: VNode,
- container: RendererElement,
- anchor: RendererNode | null,
- parentComponent: ComponentInternalInstance | null,
- parentSuspense: SuspenseBoundary | null,
- isSVG: boolean, optimized: boolean
- ) => {
- if (n1 == null) { // 首次渲染
- if (n2.shapeFlag & ShapeFlags.COMPONENT_KEPT_ALIVE) {
- // 處理keep-alive組件
- } else {
- mountComponent(
- n2, container, anchor,
- parentComponent, parentSuspense,
- isSVG, optimized
- )
- }
- } else { // 更新操作
- updateComponent(n1, n2, optimized)
- }
- }
1.6 mountComponent
對于首次渲染的場景,n1 的值為 null,我們的組件又不是 keep-alive 組件,所以會調(diào)用 mountComponent 函數(shù)掛載組件:
- // packages/runtime-core/src/renderer.ts
- const mountComponent: MountComponentFn = (
- initialVNode, container, anchor,
- parentComponent, parentSuspense, isSVG, optimized
- ) => {
- // 省略部分代碼
- // ① 創(chuàng)建組件實(shí)例
- const instance: ComponentInternalInstance = (initialVNode.component = createComponentInstance(
- initialVNode, parentComponent, parentSuspense
- ))
- // ② 初始化組件實(shí)例
- setupComponent(instance)
- // ③ 設(shè)置渲染副作用函數(shù)
- setupRenderEffect(
- instance, initialVNode, container,
- anchor, parentSuspense, isSVG, optimized
- )
- }
在 mountComponent 函數(shù)內(nèi)部,主要含有 3 個步驟:
- 調(diào)用 createComponentInstance 函數(shù)創(chuàng)建組件實(shí)例;
- 調(diào)用 setupComponent 函數(shù)初始化組件實(shí)例;
- 調(diào)用 setupRenderEffect 函數(shù),設(shè)置渲染副作用函數(shù)。
1.7 createComponentInstance
下面我們將會逐一分析上述的 3 個步驟:
- // packages/runtime-core/src/component.ts
- export function createComponentInstance(
- vnode: VNode,
- parent: ComponentInternalInstance | null,
- suspense: SuspenseBoundary | null
- ) {
- const type = vnode.type as ConcreteComponent
- // inherit parent app context - or - if root, adopt from root vnode
- const appContext =
- (parent ? parent.appContext : vnode.appContext) || emptyAppContext
- const instance: ComponentInternalInstance = { // 創(chuàng)建組件實(shí)例
- uid: uid++, vnode, type, parent, appContext,
- root: null!, next: null, subTree: null!, update: null!,
- render: null, proxy: null, exposed: null, withProxy: null, effects: null,
- provides: parent ? parent.provides : Object.create(appContext.provides),
- // ...
- }
- if (__DEV__) {
- instance.ctx = createRenderContext(instance)
- } else {
- instance.ctx = { _: instance } // 設(shè)置實(shí)例上的上下文屬性ctx
- }
- instance.root = parent ? parent.root : instance
- instance.emit = emit.bind(null, instance) // 設(shè)置emit屬性,用于派發(fā)自定義事件
- return instance
- }
調(diào)用 createComponentInstance 函數(shù)后,會返回一個包含了多種屬性的組件實(shí)例對象。
1.8 setupComponent
此外,在創(chuàng)建完組件實(shí)例后,會調(diào)用 setupComponent 函數(shù)執(zhí)行組件初始化操作:
- // packages/runtime-core/src/component.ts
- export function setupComponent(
- instance: ComponentInternalInstance,
- isSSR = false
- ) {
- isInSSRComponentSetup = isSSR
- const { props, children } = instance.vnode
- const isStateful = isStatefulComponent(instance) // 判斷是否狀態(tài)組件
- initProps(instance, props, isStateful, isSSR) // 初始化props屬性
- initSlots(instance, children) // 初始化slots
- const setupResult = isStateful
- ? setupStatefulComponent(instance, isSSR) // 初始化有狀態(tài)組件
- : undefined
- isInSSRComponentSetup = false
- return setupResult
- }
在 setupComponent 函數(shù)中,會分別調(diào)用 initProps 和 initSlots 函數(shù)來初始化組件實(shí)例的 props 屬性和 slots 屬性。之后會通過 isStatefulComponent 函數(shù)來判斷組件的類型:
- // packages/runtime-core/src/component.ts
- export function isStatefulComponent(instance: ComponentInternalInstance) {
- return instance.vnode.shapeFlag & ShapeFlags.STATEFUL_COMPONENT
- }
- // 在createVNode函數(shù)內(nèi)部,會根據(jù)組件的type類型設(shè)置ShapeFlags標(biāo)識
- const shapeFlag = isString(type)
- ? ShapeFlags.ELEMENT
- : __FEATURE_SUSPENSE__ && isSuspense(type)
- ? ShapeFlags.SUSPENSE
- : isTeleport(type)
- ? ShapeFlags.TELEPORT
- : isObject(type) // ComponentOptions 類型
- ? ShapeFlags.STATEFUL_COMPONENT
- : isFunction(type) // 函數(shù)式組件
- ? ShapeFlags.FUNCTIONAL_COMPONENT
- : 0
很明顯,如果 type 是對象類型,則組件是有狀態(tài)組件。而如果 type 是函數(shù)類型的話,則組件是函數(shù)組件。
1.9 setupStatefulComponent
對于有狀態(tài)組件來說,還會繼續(xù)調(diào)用 setupStatefulComponent 函數(shù)來初始化有狀態(tài)組件:
- // packages/runtime-core/src/component.ts
- function setupStatefulComponent(
- instance: ComponentInternalInstance,
- isSSR: boolean
- ) {
- const Component = instance.type as ComponentOptions // 組件配置對象
- // 0. create render proxy property access cache
- instance.accessCache = Object.create(null)
- // 1. create public instance / render proxy
- // also mark it raw so it's never observed
- instance.proxy = new Proxy(instance.ctx, PublicInstanceProxyHandlers) // instance.ctx = { _: instance }
- // 2. call setup()
- const { setup } = Component // 組合式API中配置的setup函數(shù)
- if (setup) {
- // 處理組合式API的setup函數(shù)
- } else {
- finishComponentSetup(instance, isSSR)
- }
- }
在 setupStatefulComponent 函數(shù)內(nèi)部,主要也可以分為 3 個步驟:
- 在組件實(shí)例上設(shè)置 accessCache 屬性,即創(chuàng)建 render proxy 屬性的訪問緩存;
- 使用 Proxy API 設(shè)置組件實(shí)例的 render proxy 屬性;
- 判斷組件配置對象上是否設(shè)置了 setup 屬性,如果當(dāng)前組件配置對象不包含 setup 屬性,則會走 else 分支,即調(diào)用 finishComponentSetup 函數(shù)。
接下來,我們來重點(diǎn)分析后面 2 個步驟。首先,我們先來分析 instance.proxy 屬性。如果你對 Proxy API 不了解的話,可以看一下 你不知道的 Proxy 這篇文章。至于 proxy 屬性有什么的作用,阿寶哥將在后續(xù)的文章中介紹。下面我們來回顧一下 Proxy 構(gòu)造函數(shù):
- const p = new Proxy(target, handler)
Proxy 構(gòu)造函數(shù)支持兩個參數(shù):
- target:要使用 Proxy 包裝的目標(biāo)對象(可以是任何類型的對象,包括原生數(shù)組,函數(shù),甚至另一個代理)。
- handler:一個通常以函數(shù)作為屬性的對象,各屬性中的函數(shù)分別定義了在執(zhí)行各種操作時代理 p 的行為。
對于 setupStatefulComponent 函數(shù)來說,target 參數(shù)指向的是組件實(shí)例 ctx 屬性,即 { _: instance } 對象。而 handler 參數(shù)指向的是 PublicInstanceProxyHandlers 對象,該對象內(nèi)部包含了 3 種類型的捕捉器:
- // vue-next/packages/runtime-core/src/componentPublicInstance.ts
- export const PublicInstanceProxyHandlers: ProxyHandler<any> = {
- // 屬性讀取操作的捕捉器。
- get({ _: instance }: ComponentRenderContext, key: string) {
- // ...
- },
- // 屬性設(shè)置操作的捕捉器。
- set(
- { _: instance }: ComponentRenderContext,
- key: string,
- value: any
- ): boolean {
- // ...
- },
- // in 操作符的捕捉器。
- has(
- {
- _: { data, setupState, accessCache, ctx, appContext, propsOptions }
- }: ComponentRenderContext,
- key: string
- ) {
- // ...
- }
- }
這里我們只要先知道 PublicInstanceProxyHandlers 對象中,包含了 get、set 和 has 這 3 種類型的捕捉器即可。至于捕捉器的內(nèi)部處理邏輯,阿寶哥將在 Vue 3.0 進(jìn)階之應(yīng)用掛載的過程下篇 中詳細(xì)介紹。
1.10 finishComponentSetup
在設(shè)置好 instance.proxy 屬性之后,會判斷組件配置對象上是否設(shè)置了 setup 屬性。對于前面的示例來說,會走 else 分支,即調(diào)用 finishComponentSetup 函數(shù),該函數(shù)的具體實(shí)現(xiàn)如下:
- // packages/runtime-core/src/component.ts
- function finishComponentSetup(
- instance: ComponentInternalInstance,
- isSSR: boolean
- ) {
- const Component = instance.type as ComponentOptions
- // template / render function normalization
- if (__NODE_JS__ && isSSR) { // 服務(wù)端渲染的場景
- if (Component.render) {
- instance.render = Component.render as InternalRenderFunction
- }
- } else if (!instance.render) { // 組件實(shí)例中不包含render方法
- // could be set from setup()
- if (compile && Component.template && !Component.render) {
- // 編譯組件的模板生成渲染函數(shù)
- Component.render = compile(Component.template, {
- isCustomElement: instance.appContext.config.isCustomElement,
- delimiters: Component.delimiters
- })
- }
- // 把渲染函數(shù)添加到instance實(shí)例的render屬性中
- instance.render = (Component.render || NOOP) as InternalRenderFunction
- // for runtime-compiled render functions using `with` blocks, the render
- // proxy used needs a different `has` handler which is more performant and
- // also only allows a whitelist of globals to fallthrough.
- if (instance.render._rc) {
- instance.withProxy = new Proxy(
- instance.ctx,
- RuntimeCompiledPublicInstanceProxyHandlers
- )
- }
- }
- }
在分析 finishComponentSetup 函數(shù)前,我們來回顧一下示例中的代碼:
- const app = createApp({
- data() {
- return {
- name: '我是阿寶哥'
- }
- },
- template: `<div>大家好, {{name}}!</div>`
- })
對于該示例而言,根組件配置對象并沒有設(shè)置 render 屬性。而且阿寶哥引入的是包含編譯器的 vue.global.js 文件,所以會走 else if 分支。即會調(diào)用 compile 函數(shù)來對模板進(jìn)行編譯。那么編譯后會生成什么呢?通過斷點(diǎn),我們可以輕易地看到模板編譯后生成的渲染函數(shù):
- (function anonymous() {
- const _Vue = Vue
- return function render(_ctx, _cache) {
- with (_ctx) {
- const { toDisplayString: _toDisplayString, createVNode: _createVNode,
- openBlock: _openBlock, createBlock: _createBlock } = _Vue
- return (_openBlock(), _createBlock("div", null, "大家好, " + _toDisplayString(name) + "!", 1))
- }
- }
- })
觀察以上的代碼可知,調(diào)用渲染函數(shù)之后會返回 createBlock 函數(shù)的調(diào)用結(jié)果,即 VNode 對象。另外,在 render 函數(shù)中,會通過 with 來設(shè)置渲染上下文。那么該渲染函數(shù)什么時候會被調(diào)用呢?對于這個問題,感興趣的小伙伴可以先自行研究一下。
出于篇幅考慮,阿寶哥把應(yīng)用掛載的過程分為上下兩篇,在下一篇文章中阿寶哥將重點(diǎn)介紹 setupRenderEffect 函數(shù)。介紹完該函數(shù)之后,你將會知道渲染函數(shù)什么時候會被調(diào)用,到時候也會涉及響應(yīng)式 API 的一些相關(guān)知識,對這部分內(nèi)容還不熟悉的小伙伴可以先看看 Vue 3 的官方文檔。
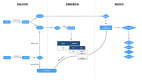
最后,阿寶哥用一張流程圖來總結(jié)一下本文介紹的主要內(nèi)容:
本文主要介紹了在 Vue 3 中組件掛載過程中涉及的一些核心函數(shù),出于篇幅考慮,阿寶哥只介紹其中的一部分函數(shù)。此外,為了讓大家能夠更深入地理解 App 掛載的過程,阿寶哥從源碼的角度分析了核心函數(shù)中的主要處理邏輯。
在下一篇文章中,阿寶哥將會繼續(xù)介紹應(yīng)用掛載過程中剩余的內(nèi)容,同時也會解答本文留下的問題,感興趣的小伙伴請繼續(xù)關(guān)注下一篇文章。
二、參考資源
- MDN - Proxy
- Vue 3 官網(wǎng) - 應(yīng)用 API