Vue Router 在實際項目中用到的 10 條高級技巧
前言
Vue Router 是 Vue.js 官方的路由管理器。
它和 Vue.js 的核心深度集成,讓構建單頁面應用變得易如反掌。
包含的功能有:
- 嵌套的路由/視圖表
- 模塊化的、基于組件的路由配置
- 路由參數、查詢、通配符
- 基于 Vue.js 過渡系統的視圖過渡效果
- 細粒度的導航控制
- 帶有自動激活的 CSS class 的鏈接
- HTML5 歷史模式或 hash 模式,在 IE9 中自動降級
- 自定義的滾動條行為
本文是作者是實際項目中遇到的一些總結,主要包括:
- 響應路由參數變化
- 路由匹配
- 高級匹配模式
- 匹配優先級
- push和replace的第二個第三個參數
- 路由視圖
- 重定向
- 使用props解耦$route
- 導航守衛
- 守衛的next方法
希望本文對你有所幫助。
正文
1. 響應路由參數變化
針對復用組件(只是路由參數發生改變),生命周期函數鉤子不會被調用,如何能刷新組件了?
watch監聽
- watch: {
- '$route' (to, from) {
- // 對路由變化作出響應...
- }
- }
beforeRouteUpdate
- beforeRouteUpdate (to, from, next) {
- // react to route changes...
- / / don't forget to call next()
- }
2. 路由匹配
- {
- // 會匹配所有路徑
- path: '*'
- }
- {
- // 會匹配以 `/user-` 開頭的任意路徑
- path: '/user-*'
- }
注意:當使用通配符路由時,請確保路由的順序是正確的,也就是說含有通配符的路由應該放在最后。路由 { path: '*' } 通常用于客戶端 404 錯誤。
如果你使用了History 模式,請確保正確配置你的服務器。
當使用一個通配符時,$route.params 內會自動添加一個名為 pathMatch 參數。
它包含了 URL 通過通配符被匹配的部分:
- // 給出一個路由 { path: '/user-*' }
- this.$router.push('/user-admin')
- this.$route.params.pathMatch // 'admin'
- // 給出一個路由 { path: '*' }
- this.$router.push('/non-existing')
- this.$route.params.pathMatch // '/non-existing'
3. 高級匹配模式
- // 命名參數必須有"單個字符"[A-Za-z09]組成
- // ?可選參數
- { path: '/optional-params/:foo?' }
- // 路由跳轉是可以設置或者不設置foo參數,可選
- <router-link to="/optional-params">/optional-params</router-link>
- <router-link to="/optional-params/foo">/optional-params/foo</router-link>
- // 零個或多個參數
- { path: '/optional-params/*' }
- <router-link to="/number">沒有參數</router-link>
- <router-link to="/number/foo000">一個參數</router-link>
- <router-link to="/number/foo111/fff222">多個參數</router-link>
- // 一個或多個參數
- { path: '/optional-params/:foo+' }
- <router-link to="/number/foo">一個參數</router-link>
- <router-link to="/number/foo/foo111/fff222">多個參數</router-link>
- // 自定義匹配參數
- // 可以為所有參數提供一個自定義的regexp,它將覆蓋默認值([^\/]+)
- { path: '/optional-params/:id(\\d+)' }
- { path: '/optional-params/(foo/)?bar' }
4. 匹配優先級
有時候一個路徑可能匹配多個路由。
此時,匹配的優先級就是按照路由的定義順序:先定義,優先級最高。
5. push和replace的第二個第三個參數
在 2.2.0+版本,可選的在 router.push 或 router.replace 中提供 onComplete 和 onAbort 回調作為第二個和第三個參數。
這些回調將會在導航成功完成 (在所有的異步鉤子被解析之后) 或終止 (導航到相同的路由、或在當前導航完成之前導航到另一個不同的路由) 的時候進行相應的調用。在 3.1.0+,可以省略第二個和第三個參數,此時如果支持 Promise,router.push 或 router.replace 將返回一個 Promise。
接下來看幾個例子來看看第二個第三個參數的調用時機:
1. 組件1跳轉組件2
- // 組件1
- this.$router.push({ name: 'number' }, () => {
- console.log('組件1:onComplete回調');
- }, () => {
- console.log('組件1:onAbort回調');
- });
- // 組件2
- beforeRouteEnter(to, from, next) {
- console.log('組件2:beforeRouteEnter');
- next();
- },
- beforeCreate() {
- console.log('組件2:beforeCreate');
- },
- created() {
- console.log('組件2:created');
- }

組件之間跳轉觸發onComplete回調。
2. 組件2跳轉組件2(不帶參數)
- this.$router.push({ name: 'number'}, () => {
- console.log('組件2:onComplete回調');
- }, () => {
- console.log('組件2,自我跳轉:onAbort回調');
- });

組件自我跳轉當不帶參數時觸發onAbort回調。但是當自我跳轉帶參數時可能情況就有點不一樣。
3. 組件2跳轉組件2(帶參數)
- this.$router.push({ name: 'number', params: { foo: this.number}}, () => {
- console.log('組件2:onComplete回調');
- }, () => {
- console.log('組件2,自我跳轉:onAbort回調');
- });

組件自我帶參數跳轉,onComplete回調、onAbort回調回調都不會觸發。
6. 路由視圖
有時候想同時 (同級) 展示多個視圖,而不是嵌套展示,例如創建一個布局,有 sidebar (側導航) 和 main (主內容) 兩個視圖,這個時候命名視圖就派上用場了。
你可以在界面中擁有多個單獨命名的視圖,而不是只有一個單獨的出口。
如果 router-view 沒有設置名字,那么默認為 default。
- <router-view class="view one"></router-view>
- <router-view class="view two" name="a"></router-view>
- <router-view class="view three" name="b"></router-view>
一個視圖使用一個組件渲染,因此對于同個路由,多個視圖就需要多個組件。
確保正確使用 components 配置 (帶上 s):
- const router = new VueRouter({
- routes: [
- {
- path: '/',
- components: {
- default: Foo,
- a: Bar,
- b: Baz
- }
- }
- ]
- });
7. 重定向
- { path: '/a', redirect: '/b' }
- { path: '/a', redirect: { name: 'foo' }}
- { path: '/a', redirect: to => {
- // 方法接收 目標路由 作為參數
- // return 重定向的 字符串路徑/路徑對象
- }}
注意:導航守衛并沒有應用在跳轉路由上,而僅僅應用在其目標上。
在上面這個例子中,為 /a 路由添加一個 beforeEach 或 beforeLeave 守衛并不會有任何效果。
8. 使用props解耦$route
在組件中使用 $route 會使之與其對應路由形成高度耦合,從而使組件只能在某些特定的 URL 上使用,限制了其靈活性。
- // router文件
- // 對于包含命名視圖的路由,你必須分別為每個命名視圖添加 `props` 選項:
- {
- path: '/number/:name',
- props: true,
- // 對象模式 props: { newsletterPopup: false }
- // 函數模式 props: (route) => ({ query: route.parmas.name })
- name: 'number',
- component: () => import( /* webpackChunkName: "number" */ './views/Number.vue')
- }
- // 組件獲取
- export default{
- props: ['name']
- }
9. 導航守衛
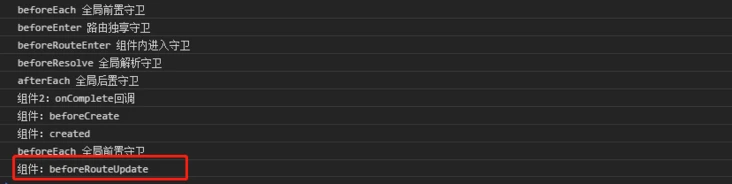
1. 三種全局守衛
- router.beforeEach 全局前置守衛 進入路由之前。
- router.beforeResolve 全局解析守衛2.5.0新增。在beforeRouteEnter調用之后調用。
- router.afterEach 全局后置鉤子 進入路由之后。
- // 入口文件
- import router from './router'
- // 全局前置守衛
- router.beforeEach((to, from, next) => {
- console.log('beforeEach 全局前置守衛');
- next();
- });
- // 全局解析守衛
- router.beforeResolve((to, from, next) => {
- console.log('beforeResolve 全局解析守衛');
- next();
- });
- // 全局后置守衛
- router.afterEach((to, from) => {
- console.log('afterEach 全局后置守衛');
- });
2. 路由獨享守衛
beforeEnter全局前置守衛進入路由之前。
- {
- path: '/number/:name',
- props: true,
- name: 'number',
- // 路由獨享守衛
- beforeEnter: (to, from, next) => {
- console.log('beforeEnter 路由獨享守衛');
- next();
- },
- component: () => import( /* webpackChunkName: "number" */ './views/Number.vue')
- }
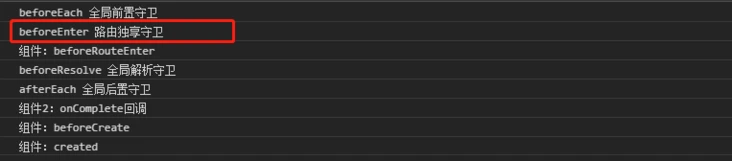
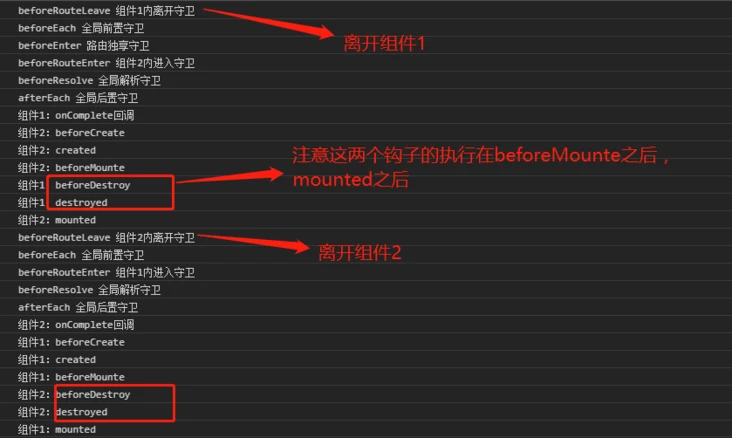
3. 組件內守衛
- beforeRouteEnter
- beforeRouteUpdate(2.2新增)
- beforeRouteLeave
- beforeRouteEnter(to, from, next) {
- // 在渲染該組件的對應路由被 confirm 前調用
- // 不!能!獲取組件實例 `this`
- // 因為當守衛執行前,組件實例還沒被創建
- console.log('beforeRouteEnter 組件內進入守衛');
- next();
- },
- beforeRouteUpdate(to, from, next) {
- // 在當前路由改變,但是該組件被復用時調用
- // 舉例來說,對于一個帶有動態參數的路徑 /foo/:id,在 /foo/1 和 /foo/2 之間跳轉的時候,
- // 由于會渲染同樣的 Foo 組件,因此組件實例會被復用。而這個鉤子就會在這個情況下被調用。
- // 可以訪問組件實例 `this`
- console.log('beforeRouteUpdate 組件內更新守衛');
- next();
- },
- beforeRouteLeave(to, from, next) {
- // 導航離開該組件的對應路由時調用
- // 可以訪問組件實例 `this`
- console.log('beforeRouteLeave 組件內離開守衛');
- next();
- }
- 組件1跳轉到組件2,然后組件2跳轉組件2本身
- 組件1跳轉到組件2,然后組件2跳轉組件1
10. 守衛的 next 方法
- next: 調用該方法 resolve 鉤子。
- next(): 進行管道中的下一個鉤子。如果全部鉤子執行完了,則導航的狀態就是 confirmed (確認的)。
- next(false): 中斷當前的導航。如果瀏覽器的 URL 改變了 (可能是用戶手動或者瀏覽器后退按鈕),那么 URL 地址會重置到 from 路由對應的地址。
- next('/') 或者 next({ path: '/' }): 跳轉到一個不同的地址。當前的導航被中斷,然后進行一個新的導航。你可以向 next 傳遞任意位置對象,且允許設置諸如 replace: true、name: 'home' 之類的選項以及任何用在 router-link 的 to prop 或 router.push 中的選項。
- next(error): (2.4.0+) 如果傳入 next 的參數是一個 Error 實例,則導航會被終止且該錯誤會被傳遞給 router.onError() 注冊過的回調。
最后
最終還是希望大家多看看文檔,理解了再去使用到項目中,不至于使用之后出現 bug,謝謝。