如何使用GPU改善JavaScript性能
本文轉載自微信公眾號「TianTianUp」,作者小弋。轉載本文請聯系TianTianUp公眾號。
正文
用 GPU.js 使你的應用程序快 10 倍。
作為開發者,我們總是尋找機會來提高應用程序的性能。當涉及到網絡應用時,我們主要在代碼中進行這些改進。
但是,你有沒有想過將 GPU 的力量結合到你的網絡應用中來提高性能?
本文將向你介紹一個名為 GPU.js 的 JavaScript 加速庫,并告訴你如何改進復雜的計算。
什么是 GPU.js
首先,官網地址:
https://gpu.rocks/#/

Source: https://gpu.rocks/#/
簡而言之,GPU.js 是一個 JavaScript 加速庫,可用于使用 JavaScript 在 GPU 上進行通用計算。它支持瀏覽器、Node.js 和 TypeScript。
除了性能提升外,我推薦使用 GPU.js 的原因還有以下幾點:
- GPU.js 使用 JavaScript 作為基礎,允許你使用 JavaScript 語法。
- 它承擔著將 JavaScript 自動轉譯為著色器語言的責任,并對它們進行編譯。
- 如果設備中沒有 GPU,它可以退回到普通的 JavaScript 引擎。因此,使用 GPU.js 不會有任何不利因素。
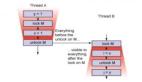
- GPU.js 也可以用于并行計算。此外,你可以同時在 CPU 和 GPU 上異步地進行多項計算。
所有這些東西加在一起,我不認為有理由不使用 GPU.js。因此,讓我們看看如何開始使用它。
如何設置 GPU.js?
為您的項目安裝 GPU.js 與其他的 JavaScript 庫類似。
對于 Node 項目
- npm install gpu.js --save
- or
- yarn add gpu.js
- import { GPU } from ('gpu.js')
- --- or ---
- const { GPU } = require('gpu.js')
- --- or ---
- import { GPU } from 'gpu.js'; // Use this for TypeScript
- const gpu = new GPU();
對于 Bowsers
在本地下載 GPU.js 或使用其 CDN。
- <script src="dist/gpu-browser.min.js"></script>
- --- or ---
- <script
- src="https://unpkg.com/gpu.js@latest/dist/gpu- browser.min.js">
- </script>
- <script
- rc="https://cdn.jsdelivr.net/npm/gpu.js@latest/dist/gpu-browser.min.js">
- </script>
- <script>
- const gpu = new GPU();
- ...
- </script>
注意:
如果你使用的是 Linux,你需要確保你安裝了正確的文件,運行:sudo apt install mesa-common-dev libxi-dev
這就是你需要知道的關于安裝和導入 GPU.js 的情況。
現在,你可以開始在你的應用程序中使用 GPU 編程。
此外,我強烈建議理解 GPU.js 的基本功能和概念。所以,讓我們從 GPU.js 的一些基礎知識開始。
創建函數
你可以在 GPU.js 中定義函數以在 GPU 中運行,使用一般的 JavaScript 語法。
- const exampleKernel = gpu.createKernel(function() {
- ...
- }, settings);
上面的代碼樣本顯示了一個 GPU.js 函數的基本結構。我將該函數命名為 exampleKernel。正如你所看到的,我使用了 createKernel 函數,利用 GPU 進行計算。
另外,定義輸出的大小是必須的。在上面的例子中,我使用了一個名為 settings 的參數來指定輸出大小。
- const settings = {
- output: [100]
- };
內核函數的輸出可以是 1D、2D 或 3D,這意味著它最多可以有 3 個線程。你可以使用 this.thread 命令在內核中訪問這些線程。
- 1D : [長度] - 值[this.thread.x]
- 2D : [寬度,高度] - 值[this.thread.y][this.thread.x]
- 3D: [寬度,高度,深度] - 值[this.thread.z][this.thread.y][this.thread.x]。
最后,創建的函數可以像其他的 JavaScript 函數一樣使用函數名來調用:exampleKernel()
內部支持的變量
Number
你可以在 GPU.js 函數中使用任何整數或浮點數。
- const exampleKernel = gpu.createKernel(function() {
- const number1 = 10;
- const number2 = 0.10;
- return number1 + number2;
- }, settings);
Boolean
GPU.js 中也支持布爾值,與 JavaScript 類似。
- const kernel = gpu.createKernel(function() {
- const bool = true;
- if (bool) {
- return 1;
- }else{
- return 0;
- }
- },settings);
Arrays
你可以在內核函數中定義任何大小的數字數組,并返回它們。
- const exampleKernel = gpu.createKernel(function() {
- const array1 = [0.01, 1, 0.1, 10];
- return array1;
- }, settings);
Functions
在內核函數中使用私有函數,在 GPU.js 中也是允許的。
- const exampleKernel = gpu.createKernel(function() {
- function privateFunction() {
- return [0.01, 1, 0.1, 10];
- }
- return privateFunction();
- }, settings);
支持的輸入類型
除了上述變量類型外,你還可以向內核函數傳遞幾種輸入類型。
Numbers
與變量聲明類似,你可以向內核函數傳遞整數或浮點數,如下所示。
- const exampleKernel = gpu.createKernel(function(x) {
- return x;
- }, settings);
- exampleKernel(25);
1D,2D, or 3D Array of Numbers
你可以將 Array、Float32Array、Int16Array、Int8Array、Uint16Array、uInt8Array 等數組類型傳入 GPU.js 內核。
- const exampleKernel = gpu.createKernel(function(x) {
- return x;
- }, settings);
- exampleKernel([1, 2, 3]);
預扁平化的 2D 和 3D 數組也被內核函數所接受。這種方法使上傳的速度更快,你必須使用 GPU.js 的輸入選項來實現這一點。
- const { input } = require('gpu.js');
- const value = input(flattenedArray, [width, height, depth]);
HTML Images
與傳統的 JavaScript 相比,將圖像傳遞到函數中是我們在 GPU.js 中可以看到的一個新東西。使用 GPU.js,你可以將一個或多個 HTML 圖像作為數組傳遞給內核函數。
- //Single Image
- const kernel = gpu.createKernel(function(image) {
- ...
- })
- .setGraphical(true)
- .setOutput([100, 100]);
- const image = document.createElement('img');
- image.src = 'image1.png';
- image.onload = () => {
- kernel(image);
- document.getElementsByTagName('body')[0].appendChild(kernel.canvas);
- };
- //Multiple Images
- const kernel = gpu.createKernel(function(image) {
- const pixel = image[this.thread.z][this.thread.y][this.thread.x];
- this.color(pixel[0], pixel[1], pixel[2], pixel[3]);
- })
- .setGraphical(true)
- .setOutput([100, 100]);
- const image1 = document.createElement('img');
- image1.src = 'image1.png';
- image1.onload = onload;
- ....
- //add another 2 images
- ....
- const totalImages = 3;
- let loadedImages = 0;
- function onload() {
- loadedImages++;
- if (loadedImages === totalImages) {
- kernel([image1, image2, image3]);
- document.getElementsByTagName('body')[0].appendChild(kernel.canvas);
- }
- };
除了上述配置外,還有許多令人興奮的事情可以用 GPU.js 進行實驗。你可以在其文檔中找到它們。既然你現在了解了幾種配置,讓我們用 GPU.js 寫一個函數并比較其性能。
使用 GPU.js 的第一個功能
通過結合我們之前討論的所有內容,我寫了一個小型的 angular 應用程序,通過將兩個有 1000 個元素的數組相乘來比較 GPU 和 CPU 的計算性能。
第 1 步,生成 1000 個元素的數組的函數
我將生成一個每個元素有 1000 個數字的 2D 數組,并在接下來的步驟中使用它們進行計算。
- generateMatrices() {
- this.matrices = [[], []];
- for (let y = 0; y < this.matrixSize; y++) {
- this.matrices[0].push([])
- this.matrices[1].push([])
- for (let x = 0; x < this.matrixSize; x++) {
- const value1 = parseInt((Math.random() * 10).toString())
- const value2 = parseInt((Math.random() * 10).toString())
- this.matrices[0][y].push(value1)
- this.matrices[1][y].push(value2)
- }
- }
- }
第 2 步,內核函數
這是這個應用程序中最關鍵的函數,因為所有的 GPU 計算都發生在這里。
在這里,multiplyMatrix 函數將接收兩個數字數組和矩陣的大小作為輸入。
然后,它將把兩個數組相乘并返回總和,同時使用性能 API 測量時間。
- gpuMultiplyMatrix() {
- const gpu = new GPU();
- const multiplyMatrix = gpu.createKernel(function (a: number[][], b: number[][], matrixSize: number) {
- let sum = 0;
- for (let i = 0; i < matrixSize; i++) {
- sum += a[this.thread.y][i] * b[i][this.thread.x];
- }
- return sum;
- }).setOutput([this.matrixSize, this.matrixSize])
- const startTime = performance.now();
- const resultMatrix = multiplyMatrix(this.matrices[0], this.matrices[1], this.matrixSize);
- const endTime = performance.now();
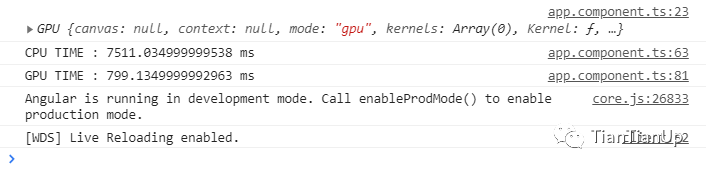
- this.gpuTime = (endTime - startTime) + " ms";
- console.log("GPU TIME : "+ this.gpuTime);
- this.gpuProduct = resultMatrix as number[][];
- }
步驟 3,CPU 乘法函數。
這是一個傳統的 TypeScript 函數,用于測量相同數組的計算時間。
- cpuMutiplyMatrix() {
- const startTime = performance.now();
- const a = this.matrices[0];
- const b = this.matrices[1];
- let productRow = Array.apply(null, new Array(this.matrixSize)).map(Number.prototype.valueOf, 0);
- let product = new Array(this.matrixSize);
- for (let p = 0; p < this.matrixSize; p++) {
- product[p] = productRow.slice();
- }
- for (let i = 0; i < this.matrixSize; i++) {
- for (let j = 0; j < this.matrixSize; j++) {
- for (let k = 0; k < this.matrixSize; k++) {
- product[i][j] += a[i][k] * b[k][j];
- }
- }
- }
- const endTime = performance.now();
- this.cpuTime = (endTime — startTime) + “ ms”;
- console.log(“CPU TIME : “+ this.cpuTime);
- this.cpuProduct = product;
- }
CPU vs GPU,性能比較
現在是時候看看圍繞著 GPU.js 和 GPU 計算的所有討論是否真實。由于我在上一節中創建了一個 Angular 應用程序,所以我用它來測量性能。
CPU vs GPU — Execution Time
你可以清楚地看到,GPU 編程的計算只花了 799ms,而 CPU 花了 7511ms,這幾乎是 10 倍的時間。
我沒有就此罷休,通過改變數組大小,對同樣的測試進行了幾個循環。
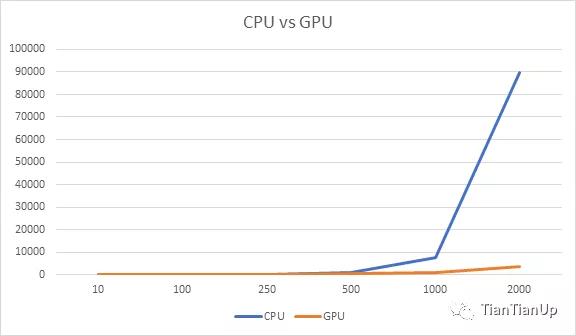
CPU vs GPU
首先,我試著用較小的數組大小,我注意到 CPU 比 GPU 花費的時間要少。例如,當我把數組大小減少到 10 個元素時,CPU 只花了 0.14ms,而 GPU 花了 108ms。
但隨著數組大小的增加,GPU 和 CPU 所花的時間有明顯的差距。正如你在上圖中看到的,GPU 是贏家。
結論
根據我使用 GPU.js 的實驗,它可以提高 JavaScript 應用程序的性能。
但是,我們必須注意只將 GPU 用于復雜的任務。否則,我們將浪費資源,最終會降低應用程序的性能,如上圖所示。不過,如果你還沒有嘗試過 GPU.js,我邀請大家使用它。