Webpack 原理系列八:產物轉譯打包邏輯

回顧一下,在之前的文章《有點難的 webpack 知識點:Dependency Graph 深度解析》已經聊到,經過 「構建(make)階段」 后,Webpack 解析出:
- module 內容
- module 與 module 之間的依賴關系圖

而進入 「生成(「「seal」」)階段」 后,Webpack 首先根據模塊的依賴關系、模塊特性、entry配置等計算出 Chunk Graph,確定最終產物的數量和內容,這部分原理在前文《有點難的知識點:Webpack Chunk 分包規則詳解》中也有較詳細的描述。
本文繼續聊聊 Chunk Graph 后面之后,模塊開始轉譯到模塊合并打包的過程,大體流程如下:
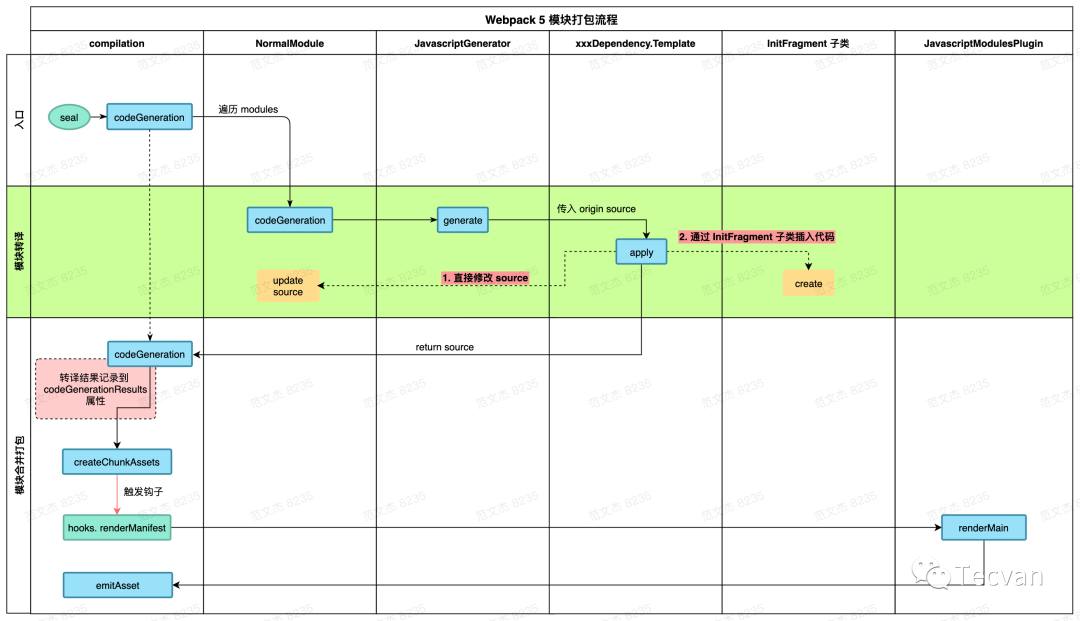
為了方便理解,我將打包過程橫向切分為三個階段:
- 「入口」:指代從 Webpack 啟動到調用 compilation.codeGeneration 之前的所有前置操作
- 「模塊轉譯」:遍歷 modules 數組,完成所有模塊的轉譯操作,并將結果存儲到 compilation.codeGenerationResults 對象
- 「模塊合并打包」:在特定上下文框架下,組合業務模塊、runtime 模塊,合并打包成 bundle ,并調用 compilation.emitAsset 輸出產物
這里說的 「業務模塊」 是指開發者所編寫的項目代碼;「runtime 模塊」 是指 Webpack 分析業務模塊后,動態注入的用于支撐各項特性的運行時代碼,在上一篇文章 Webpack 原理系列六:徹底理解 Webpack 運行時 已經有詳細講解,這里不贅述。
可以看到,Webpack 先將 modules 逐一轉譯為模塊產物 —— 「模塊轉譯」,再將模塊產物拼接成 bundle —— 「模塊合并打包」,我們下面會按照這個邏輯分開討論這兩個過程的原理。
一、模塊轉譯原理
1.1 簡介
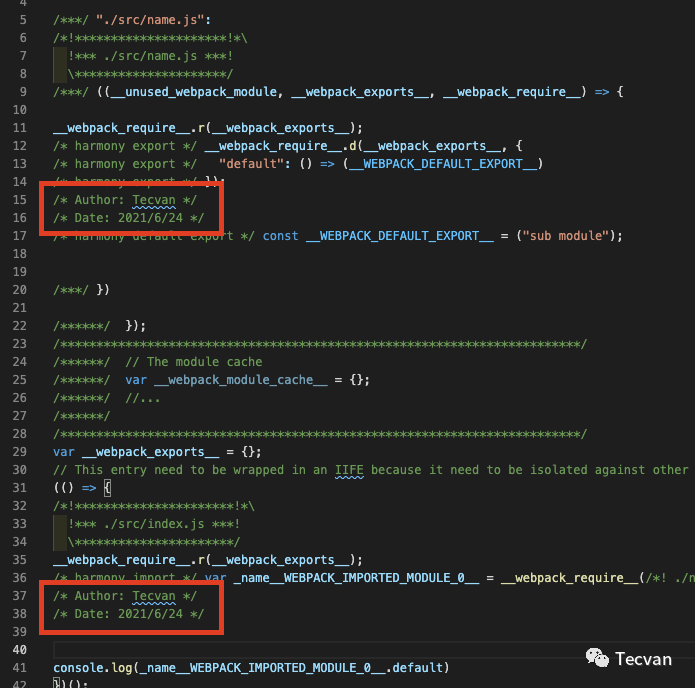
先回顧一下 Webpack 產物:

上述示例由 index.js / name.js 兩個業務文件組成,對應的 Webpack 配置如上圖左下角所示;Webpack 構建產物如右邊 main.js 文件所示,包含三塊內容,從上到下分別為:
- name.js 模塊對應的轉譯產物,函數形態
- Webpack 按需注入的運行時代碼
- index.js 模塊對應的轉譯產物,IIFE(立即執行函數) 形態
其中,運行時代碼的作用與生成邏輯在上篇文章 Webpack 原理系列六:徹底理解 Webpack 運行時 已有詳盡介紹;另外兩塊分別為 name.js 、index.js 構建后的產物,可以看到產物與源碼語義、功能均相同,但表現形式發生了較大變化,例如 index.js 編譯前后的內容:
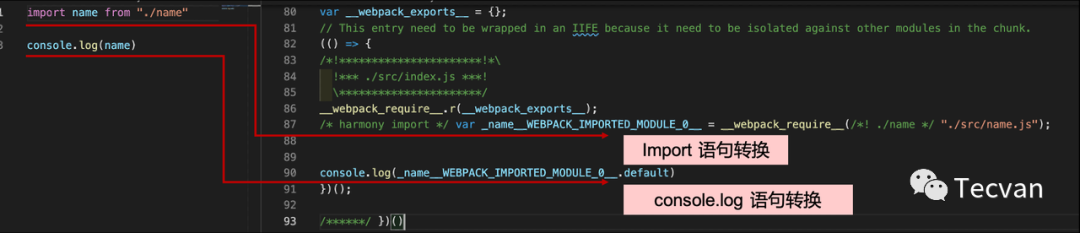
上圖右邊是 Webpack 編譯產物中對應的代碼,相對于左邊的源碼有如下變化:
- 整個模塊被包裹進 IIFE (立即執行函數)中
- 添加 __webpack_require__.r(__webpack_exports__); 語句,用于適配 ESM 規范
- 源碼中的 import 語句被轉譯為 __webpack_require__ 函數調用
- 源碼 console 語句所使用的 name 變量被轉譯為 _name__WEBPACK_IMPORTED_MODULE_0__.default
- 添加注釋
那么 Webpack 中如何執行這些轉換的呢?
1.2 核心流程
「模塊轉譯」操作從 module.codeGeneration 調用開始,對應到上述流程圖的:
總結一下關鍵步驟:
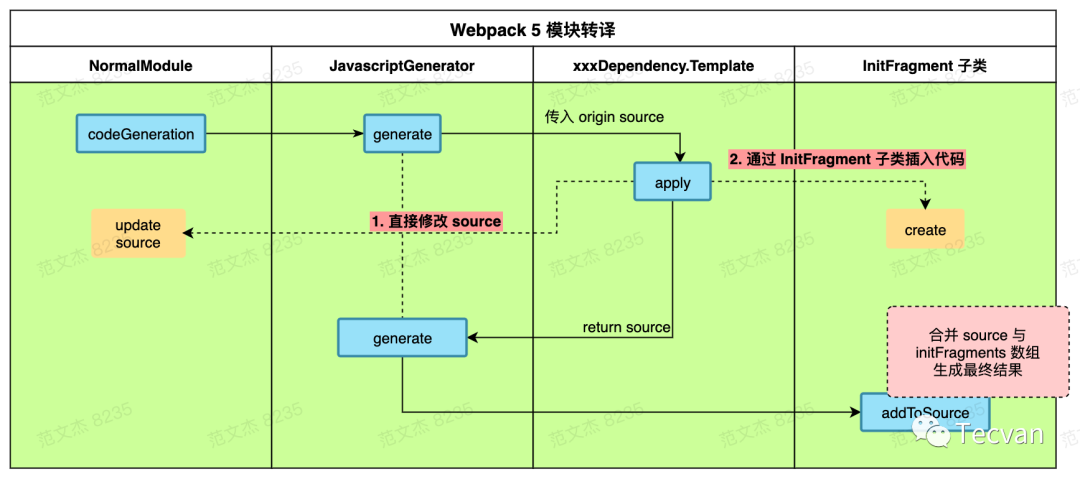
1.調用 JavascriptGenerator 的對象的 generate 方法,方法內部:
- 遍歷模塊的 dependencies 與 presentationalDependencies 數組
- 執行每個數組項 dependeny 對象的對應的 template.apply 方法,在 apply 內修改模塊代碼,或更新 initFragments 數組
2.遍歷完畢后,調用 InitFragment.addToSource 靜態方法,將上一步操作產生的 source 對象與 initFragments 數組合并為模塊產物
簡單說就是遍歷依賴,在依賴對象中修改 module 代碼,最后再將所有變更合并為最終產物。這里面關鍵點:
- 在 Template.apply 函數中,如何更新模塊代碼
- 在 InitFragment.addToSource 靜態方法中,如何將 Template.apply 所產生的 side effect 合并為最終產物
這兩部分邏輯比較復雜,下面分開講解。
1.3 Template.apply 函數
上述流程中,JavascriptGenerator 類是毋庸置疑的C位角色,但它并不直接修改 module 的內容,而是繞了幾層后委托交由 Template 類型實現。
Webpack 5 源碼中,JavascriptGenerator.generate 函數會遍歷模塊的 dependencies 數組,調用依賴對象對應的 Template 子類 apply 方法更新模塊內容,說起來有點繞,原始代碼更饒,所以我將重要步驟抽取為如下偽代碼:
- class JavascriptGenerator {
- generate(module, generateContext) {
- // 先取出 module 的原始代碼內容
- const source = new ReplaceSource(module.originalSource());
- const { dependencies, presentationalDependencies } = module;
- const initFragments = [];
- for (const dependency of [...dependencies, ...presentationalDependencies]) {
- // 找到 dependency 對應的 template
- const template = generateContext.dependencyTemplates.get(dependency.constructor);
- // 調用 template.apply,傳入 source、initFragments
- // 在 apply 函數可以直接修改 source 內容,或者更改 initFragments 數組,影響后續轉譯邏輯
- template.apply(dependency, source, {initFragments})
- }
- // 遍歷完畢后,調用 InitFragment.addToSource 合并 source 與 initFragments
- return InitFragment.addToSource(source, initFragments, generateContext);
- }
- }
- // Dependency 子類
- class xxxDependency extends Dependency {}
- // Dependency 子類對應的 Template 定義
- const xxxDependency.Template = class xxxDependencyTemplate extends Template {
- apply(dep, source, {initFragments}) {
- // 1. 直接操作 source,更改模塊代碼
- source.replace(dep.range[0], dep.range[1] - 1, 'some thing')
- // 2. 通過添加 InitFragment 實例,補充代碼
- initFragments.push(new xxxInitFragment())
- }
- }
從上述偽代碼可以看出,JavascriptGenerator.generate 函數的邏輯相對比較固化:
- 初始化一系列變量
- 遍歷 module 對象的依賴數組,找到每個 dependency 對應的 template 對象,調用 template.apply 函數修改模塊內容
- 調用 InitFragment.addToSource 方法,合并 source 與 initFragments 數組,生成最終結果
這里的重點是 JavascriptGenerator.generate 函數并不操作 module 源碼,它僅僅提供一個執行框架,真正處理模塊內容轉譯的邏輯都在 xxxDependencyTemplate 對象的 apply 函數實現,如上例偽代碼中 24-28行。
每個 Dependency 子類都會映射到一個唯一的 Template 子類,且通常這兩個類都會寫在同一個文件中,例如 ConstDependency 與 ConstDependencyTemplate;NullDependency 與 NullDependencyTemplate。Webpack 構建(make)階段,會通過 Dependency 子類記錄不同情況下模塊之間的依賴關系;到生成(seal)階段再通過 Template 子類修改 module 代碼。
綜上 Module、JavascriptGenerator、Dependency、Template 四個類形成如下交互關系:
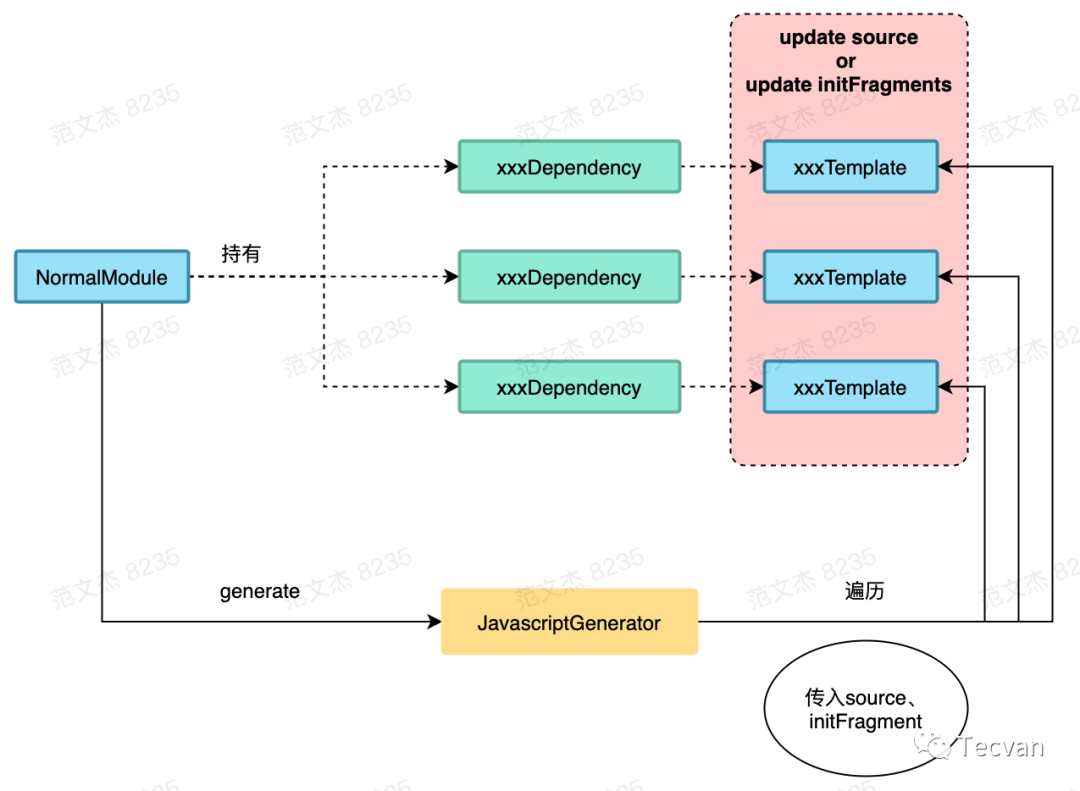
Template 對象可以通過兩種方法更新 module 的代碼:
- 直接操作 source 對象,直接修改模塊代碼,該對象最初的內容等于模塊的源碼,經過多個 Template.apply 函數流轉后逐漸被替換成新的代碼形式
- 操作 initFragments 數組,在模塊源碼之外插入補充代碼片段
這兩種操作所產生的 side effect,最終都會被傳入 InitFragment.addToSource 函數,合成最終結果,下面簡單補充一些細節。
1.3.1 使用 Source 更改代碼
Source 是 Webpack 中編輯字符串的一套工具體系,提供了一系列字符串操作方法,包括:
- 字符串合并、替換、插入等
- 模塊代碼緩存、sourcemap 映射、hash 計算等
Webpack 內部以及社區的很多插件、loader 都會使用 Source 庫編輯代碼內容,包括上文介紹的 Template.apply 體系中,邏輯上,在啟動模塊代碼生成流程時,Webpack 會先用模塊原本的內容初始化 Source 對象,即:
- const source = new ReplaceSource(module.originalSource());
之后,不同 Dependency 子類按序、按需更改 source 內容,例如 ConstDependencyTemplate 中的核心代碼:
- ConstDependency.Template = class ConstDependencyTemplate extends (
- NullDependency.Template
- ) {
- apply(dependency, source, templateContext) {
- // ...
- if (typeof dep.range === "number") {
- source.insert(dep.range, dep.expression);
- return;
- }
- source.replace(dep.range[0], dep.range[1] - 1, dep.expression);
- }
- };
上述 ConstDependencyTemplate 中,apply 函數根據參數條件調用 source.insert 插入一段代碼,或者調用 source.replace 替換一段代碼。
1.3.2 使用 InitFragment 更新代碼
除直接操作 source 外,Template.apply 中還可以通過操作 initFragments 數組達成修改模塊產物的效果。initFragments 數組項通常為 InitFragment 子類實例,它們通常帶有兩個函數:getContent、getEndContent,分別用于獲取代碼片段的頭尾部分。
例如 HarmonyImportDependencyTemplate 的 apply 函數中:
- HarmonyImportDependency.Template = class HarmonyImportDependencyTemplate extends (
- ModuleDependency.Template
- ) {
- apply(dependency, source, templateContext) {
- // ...
- templateContext.initFragments.push(
- new ConditionalInitFragment(
- importStatement[0] + importStatement[1],
- InitFragment.STAGE_HARMONY_IMPORTS,
- dep.sourceOrder,
- key,
- runtimeCondition
- )
- );
- //...
- }
- }
1.4 代碼合并
上述 Template.apply 處理完畢后,產生轉譯后的 source 對象與代碼片段 initFragments 數組,接著就需要調用 InitFragment.addToSource 函數將兩者合并為模塊產物。
addToSource 的核心代碼如下:
- class InitFragment {
- static addToSource(source, initFragments, generateContext) {
- // 先排好順序
- const sortedFragments = initFragments
- .map(extractFragmentIndex)
- .sort(sortFragmentWithIndex);
- // ...
- const concatSource = new ConcatSource();
- const endContents = [];
- for (const fragment of sortedFragments) {
- // 合并 fragment.getContent 取出的片段內容
- concatSource.add(fragment.getContent(generateContext));
- const endContent = fragment.getEndContent(generateContext);
- if (endContent) {
- endContents.push(endContent);
- }
- }
- // 合并 source
- concatSource.add(source);
- // 合并 fragment.getEndContent 取出的片段內容
- for (const content of endContents.reverse()) {
- concatSource.add(content);
- }
- return concatSource;
- }
- }
可以看到,addToSource 函數的邏輯:
- 遍歷 initFragments 數組,按順序合并 fragment.getContent() 的產物
- 合并 source 對象
- 遍歷 initFragments 數組,按順序合并 fragment.getEndContent() 的產物
所以,模塊代碼合并操作主要就是用 initFragments 數組一層一層包裹住模塊代碼 source,而兩者都在 Template.apply 層面維護。
1.5 示例:自定義 banner 插件
經過 Template.apply 轉譯與 InitFragment.addToSource 合并之后,模塊就完成了從用戶代碼形態到產物形態的轉變,為加深對上述 「模塊轉譯」 流程的理解,接下來我們嘗試開發一個 Banner 插件,實現在每個模塊前自動插入一段字符串。
實現上,插件主要涉及 Dependency、Template、hooks 對象,代碼:
- const { Dependency, Template } = require("webpack");
- class DemoDependency extends Dependency {
- constructor() {
- super();
- }
- }
- DemoDependency.Template = class DemoDependencyTemplate extends Template {
- apply(dependency, source) {
- const today = new Date().toLocaleDateString();
- source.insert(0, `/* Author: Tecvan */
- /* Date: ${today} */
- `);
- }
- };
- module.exports = class DemoPlugin {
- apply(compiler) {
- compiler.hooks.thisCompilation.tap("DemoPlugin", (compilation) => {
- // 調用 dependencyTemplates ,注冊 Dependency 到 Template 的映射
- compilation.dependencyTemplates.set(
- DemoDependency,
- new DemoDependency.Template()
- );
- compilation.hooks.succeedModule.tap("DemoPlugin", (module) => {
- // 模塊構建完畢后,插入 DemoDependency 對象
- module.addDependency(new DemoDependency());
- });
- });
- }
- };
示例插件的關鍵步驟:
編寫 DemoDependency 與 DemoDependencyTemplate 類,其中 DemoDependency 僅做示例用,沒有實際功能;DemoDependencyTemplate 則在其 apply 中調用 source.insert 插入字符串,如示例代碼第 10-14 行
- 使用 compilation.dependencyTemplates 注冊 DemoDependency 與 DemoDependencyTemplate 的映射關系
- 使用 thisCompilation 鉤子取得 compilation 對象
- 使用 succeedModule 鉤子訂閱 module 構建完畢事件,并調用 module.addDependency 方法添加 DemoDependency 依賴
完成上述操作后,module 對象的產物在生成過程就會調用到 DemoDependencyTemplate.apply 函數,插入我們定義好的字符串,效果如:
感興趣的讀者也可以直接閱讀 Webpack 5 倉庫的如下文件,學習更多用例:
- lib/dependencies/ConstDependency.js,一個簡單示例,可學習 source 的更多操作方法
- lib/dependencies/HarmonyExportSpecifierDependencyTemplate.js,一個簡單示例,可學習 initFragments 數組的更多用法
- lib/dependencies/HarmonyImportDependencyTemplate.js,一個較復雜但使用率極高的示例,可綜合學習 source、initFragments 數組的用法
二、模塊合并打包原理
2.1 簡介
講完單個模塊的轉譯過程后,我們先回到這個流程圖:
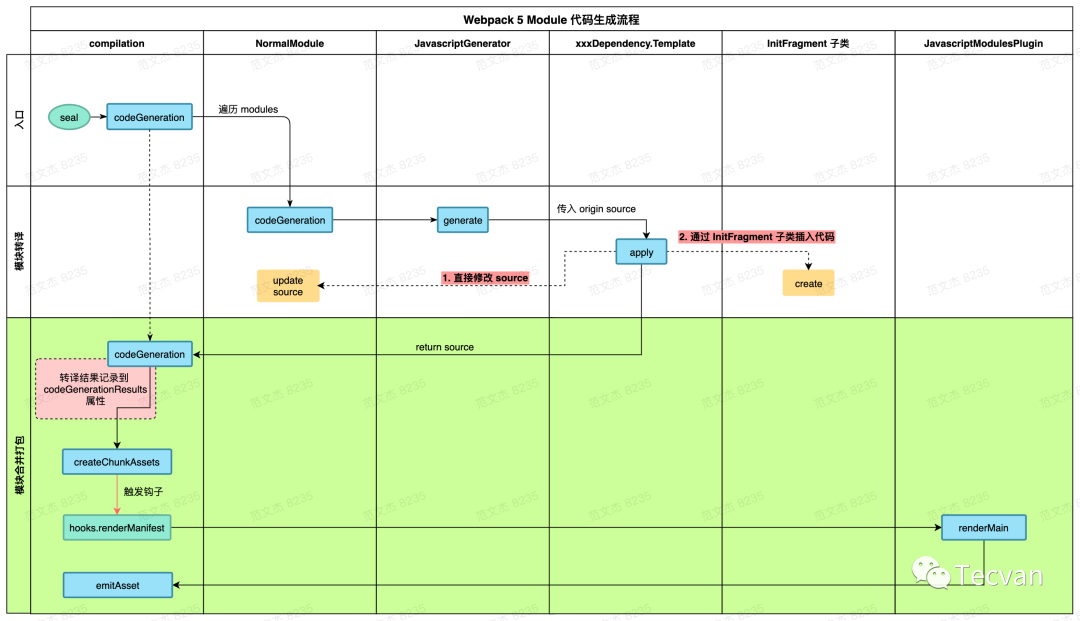
流程圖中,compilation.codeGeneration 函數執行完畢 —— 也就是模塊轉譯階段完成后,模塊的轉譯結果會一一保存到 compilation.codeGenerationResults 對象中,之后會啟動一個新的執行流程 —— 「模塊合并打包」。
「模塊合并打包」 過程會將 chunk 對應的 module 及 runtimeModule 按規則塞進 「模板框架」 中,最終合并輸出成完整的 bundle 文件,例如上例中:

示例右邊 bundle 文件中,紅框框出來的部分為用戶代碼文件及運行時模塊生成的產物,其余部分撐起了一個 IIFE 形式的運行框架即為 「模板框架」,也就是:
- (() => { // webpackBootstrap
- "use strict";
- var __webpack_modules__ = ({
- "module-a": ((__unused_webpack_module, __webpack_exports__, __webpack_require__) => {
- // ! module 代碼,
- }),
- "module-b": ((__unused_webpack_module, __webpack_exports__, __webpack_require__) => {
- // ! module 代碼,
- })
- });
- // The module cache
- var __webpack_module_cache__ = {};
- // The require function
- function __webpack_require__(moduleId) {
- // ! webpack CMD 實現
- }
- /************************************************************************/
- // ! 各種 runtime
- /************************************************************************/
- var __webpack_exports__ = {};
- // This entry need to be wrapped in an IIFE because it need to be isolated against other modules in the chunk.
- (() => {
- // ! entry 模塊
- })();
- })();
捋一下這里的邏輯,運行框架包含如下關鍵部分:
- 最外層由一個 IIFE 包裹
- 一個記錄了除 entry 外的其它模塊代碼的 __webpack_modules__ 對象,對象的 key 為模塊標志符;值為模塊轉譯后的代碼
- 一個極度簡化的 CMD 實現:__webpack_require__ 函數
- 最后,一個包裹了 entry 代碼的 IIFE 函數
「模塊轉譯」 是將 module 轉譯為可以在宿主環境如瀏覽器上運行的代碼形式;而 「模塊合并」 操作則串聯這些 modules ,使之整體符合開發預期,能夠正常運行整個應用邏輯。接下來,我們揭曉這部分代碼的生成原理。
2.2 核心流程
在 compilation.codeGeneration 執行完畢,即所有用戶代碼模塊與運行時模塊都執行完轉譯操作后,seal 函數調用 compilation.createChunkAssets 函數,觸發 renderManifest 鉤子,JavascriptModulesPlugin 插件監聽到這個鉤子消息后開始組裝 bundle,偽代碼:
- // Webpack 5
- // lib/Compilation.js
- class Compilation {
- seal() {
- // 先把所有模塊的代碼都轉譯,準備好
- this.codeGenerationResults = this.codeGeneration(this.modules);
- // 1. 調用 createChunkAssets
- this.createChunkAssets();
- }
- createChunkAssets() {
- // 遍歷 chunks ,為每個 chunk 執行 render 操作
- for (const chunk of this.chunks) {
- // 2. 觸發 renderManifest 鉤子
- const res = this.hooks.renderManifest.call([], {
- chunk,
- codeGenerationResults: this.codeGenerationResults,
- ...others,
- });
- // 提交組裝結果
- this.emitAsset(res.render(), ...others);
- }
- }
- }
- // lib/javascript/JavascriptModulesPlugin.js
- class JavascriptModulesPlugin {
- apply() {
- compiler.hooks.compilation.tap("JavascriptModulesPlugin", (compilation) => {
- compilation.hooks.renderManifest.tap("JavascriptModulesPlugin", (result, options) => {
- // JavascriptModulesPlugin 插件中通過 renderManifest 鉤子返回組裝函數 render
- const render = () =>
- // render 內部根據 chunk 內容,選擇使用模板 `renderMain` 或 `renderChunk`
- // 3. 監聽鉤子,返回打包函數
- this.renderMain(options);
- result.push({ render /* arguments */ });
- return result;
- }
- );
- });
- }
- renderMain() {/* */}
- renderChunk() {/* */}
- }
這里的核心邏輯是,compilation 以 renderManifest 鉤子方式對外發布 bundle 打包需求;JavascriptModulesPlugin 監聽這個鉤子,按照 chunk 的內容特性,調用不同的打包函數。
上述僅針對 Webpack 5。在 Webpack 4 中,打包邏輯集中在 MainTemplate 完成。JavascriptModulesPlugin 內置的打包函數有:
- renderMain:打包主 chunk 時使用
- renderChunk:打包子 chunk ,如異步模塊 chunk 時使用
兩個打包函數實現的邏輯接近,都是按順序拼接各個模塊,下面簡單介紹下 renderMain 的實現。
2.3renderMain函數
renderMain 函數涉及比較多場景判斷,原始代碼很長很繞,我摘了幾個重點步驟:
- class JavascriptModulesPlugin {
- renderMain(renderContext, hooks, compilation) {
- const { chunk, chunkGraph, runtimeTemplate } = renderContext;
- const source = new ConcatSource();
- // ...
- // 1. 先計算出 bundle CMD 核心代碼,包含:
- // - "var __webpack_module_cache__ = {};" 語句
- // - "__webpack_require__" 函數
- const bootstrap = this.renderBootstrap(renderContext, hooks);
- // 2. 計算出當前 chunk 下,除 entry 外其它模塊的代碼
- const chunkModules = Template.renderChunkModules(
- renderContext,
- inlinedModules
- ? allModules.filter((m) => !inlinedModules.has(m))
- : allModules,
- (module) =>
- this.renderModule(
- module,
- renderContext,
- hooks,
- allStrict ? "strict" : true
- ),
- prefix
- );
- // 3. 計算出運行時模塊代碼
- const runtimeModules =
- renderContext.chunkGraph.getChunkRuntimeModulesInOrder(chunk);
- // 4. 重點來了,開始拼接 bundle
- // 4.1 首先,合并核心 CMD 實現,即上述 bootstrap 代碼
- const beforeStartup = Template.asString(bootstrap.beforeStartup) + "\n";
- source.add(
- new PrefixSource(
- prefix,
- useSourceMap
- ? new OriginalSource(beforeStartup, "webpack/before-startup")
- : new RawSource(beforeStartup)
- )
- );
- // 4.2 合并 runtime 模塊代碼
- if (runtimeModules.length > 0) {
- for (const module of runtimeModules) {
- compilation.codeGeneratedModules.add(module);
- }
- }
- // 4.3 合并除 entry 外其它模塊代碼
- for (const m of chunkModules) {
- const renderedModule = this.renderModule(m, renderContext, hooks, false);
- source.add(renderedModule)
- }
- // 4.4 合并 entry 模塊代碼
- if (
- hasEntryModules &&
- runtimeRequirements.has(RuntimeGlobals.returnExportsFromRuntime)
- ) {
- source.add(`${prefix}return __webpack_exports__;\n`);
- }
- return source;
- }
- }
核心邏輯為:
1.先計算出 bundle CMD 代碼,即 __webpack_require__ 函數
2.計算出當前 chunk 下,除 entry 外其它模塊代碼 chunkModules計算出運行時模塊代碼
3.開始執行合并操作,子步驟有:
- 合并 CMD 代碼
- 合并 runtime 模塊代碼
- 遍歷 chunkModules 變量,合并除 entry 外其它模塊代碼
- 合并 entry 模塊代碼
4.返回結果
總結:先計算出不同組成部分的產物形態,之后按順序拼接打包,輸出合并后的版本。
至此,Webpack 完成 bundle 的轉譯、打包流程,后續調用 compilation.emitAsset ,按上下文環境將產物輸出到 fs 即可,Webpack 單次編譯打包過程就結束了。
三、總結
本文深入 Webpack 源碼,詳細討論了打包流程后半截 —— 從 chunk graph 生成一直到最終輸出產物的實現邏輯,重點:
- 首先遍歷 chunk 中的所有模塊,為每個模塊執行轉譯操作,產出模塊級別的產物
- 根據 chunk 的類型,選擇不同結構框架,按序逐次組裝模塊產物,打包成最終 bundle