OpenHarmony Neptune開發板PWM驅動 播放《小星星》
作者:顥穹
本文介紹如何在Neptune開發板上,使用openHarmony IoT硬件子系統的PWM接口 驅動蜂鳴器 播放音樂。
本文介紹如何在Neptune開發板上,使用openHarmony IoT硬件子系統的PWM接口 驅動蜂鳴器 播放音樂。
一、環境準備
1.1 開發環境、編譯環境搭建,參考官方文檔,參考鏈接如下:
1.2 Neptune開發板 openharmony V1.1.0 LTS 版本獲取:
- git clone https://gitee.com/hihopeorg_group/neptune-harmony-os1.1-iot.git
二、材料準備
1、Neptune HarmonyOS物聯網 IOT模組
2、無源蜂鳴器模塊
3、杜邦線若干
三、相關基礎知識介紹
鴻蒙系統IoT硬件子系統提供了一些外設相關的接口,目錄位于:
- base/iot_hardware/peripheral/interfaces/kits
PWM相關接口,接口頭文件為iot_pwm.h,其中用PWM輸出方波的API:
- unsigned int IoTPwmStart(unsigned int port, unsigned short duty, unsigned int freq);
接口參數介紹:(這里與HI3861不相同,其適配是使用W800 SDK中PWM接口,若需要了解可自行查看)
freq:IoTPwmStart接口中freq參數就是PWM實際輸出的方波頻率(頻率范圍0~65535)
duty:IoTPwmStart接口的duty參數是控制輸出方波的占空比的參數,占空比是指PWM輸出的方波波形的高電平時間占整個方波周期的比例,具體占空比值是 duty /256的比值,,例如想要輸出占空比50%的方波信號,那么duty填的值就要是128。
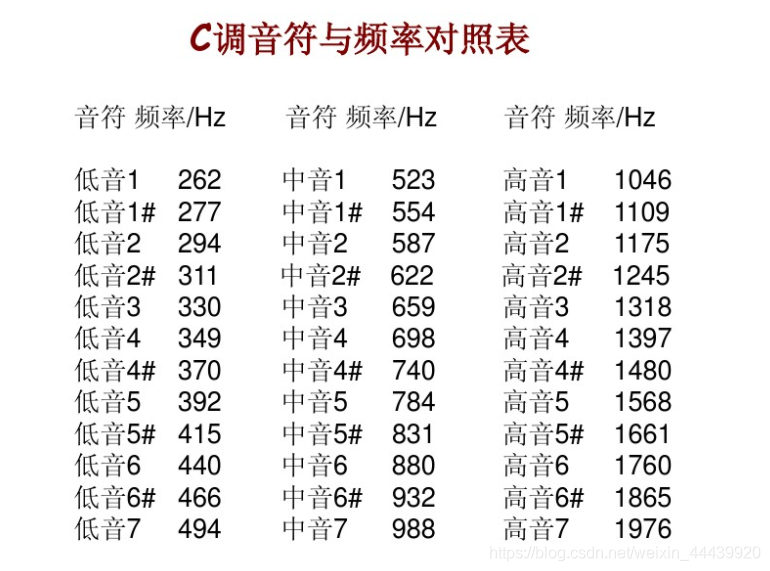
四、音符-頻率對應關系
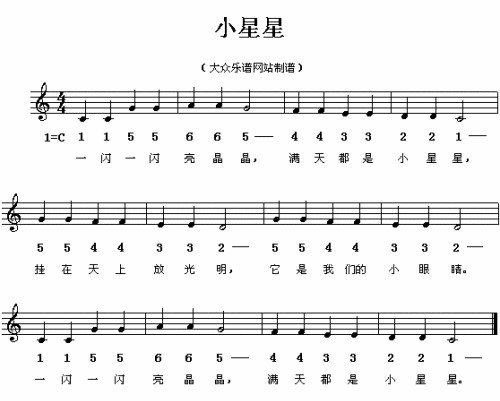
五、準備曲譜
為了代碼實現起來簡單,我選擇了《小星星》的曲譜作為素材,在簡譜網找到了簡譜:
六、簡譜說明------參考許思維老師用鴻蒙OS在蜂鳴器上播放一曲《兩只老虎》
七、編寫代碼
有了以上知識,我們就可以編寫代碼了,關鍵代碼如下:
- #define PWM_DUTY 128
- static const uint16_t g_tuneFreqs[] = { 523,587,659,698,784,880,988};
- // 曲譜音符
- static const uint8_t g_scoreNotes[] = {
- 1,1,5,5, 6,6,5, 4,4,3,3, 2,2,1, 5,5,4,4, 3,3,2,
- 5,5,4,4, 3,3,2, 1,1,5,5, 6,6,5, 4,4,3,3, 2,2,1,
- };
- // 曲譜時值
- static const uint8_t g_scoreDurations[] = {
- 4,4,4,4, 4,4,8, 4,4,4,4, 4,4,8, 4,4,4,4, 4,4,8,
- 4,4,4,4, 4,4,8, 4,4,4,4, 4,4,8, 4,4,4,4, 4,4,8,
- };
- static void *BeeperMusicTask(const char *arg)
- {
- (void)arg;
- printf("BeeperMusicTask start!\r\n");
- for (size_t i = 0; i < sizeof(g_scoreNotes)/sizeof(g_scoreNotes[0]); i++) {
- uint32_t tune = g_scoreNotes[i]; // 音符
- uint16_t freqDivisor = g_tuneFreqs[tune];
- uint32_t tuneInterval = g_scoreDurations[i] * (1000 *100); // 音符時間
- printf("%d %d %d %d\r\n", tune,freqDivisor, PWM_DUTY,tuneInterval);
- IoTPwmStart(0,PWM_DUTY,freqDivisor);
- tls_os_time_delay(tuneInterval/1000);
- IoTPwmStop(0);
- }
- return NULL;
- }
八、功能展示
以上都完成之后,就可以編譯、燒錄,并測試最后的完成效果。
文章相關附件可以點擊下面的原文鏈接前往下載:
https://harmonyos.51cto.com/resource/1091

責任編輯:jianghua
來源:
鴻蒙社區