HarmonyOS基礎之PageSlider和PageFlipper
前言
眾所周知,PageSlider是用于頁面之間切換的組件,它通過響應滑動事件完成頁面間的切換,而PageFlipper可能知道的人就比較少了,其實PageFlipper和PageSlider類似,都是視圖切換組件,它們都繼承自StackLayout,因此可以將多個component層疊在一起,每次只顯示一個組件,當視圖從一個component切換到另一個component時,PageFlipper支持指定動畫效果。
區別:PageFlipper通過addComponent()添加component,可使用動畫控制多個component之間的切換效果,是個輕量級的組件,適合展示少量靜態數據;而PageSlide是由provider來提供component的,更適用復雜的視圖切換,實現數據的動態加載。
下面是一個PageSlider和PageFlipper結合起來的使用效果,頁面中間的卡片使用的是PageSlider,背景圖片和底部的數字指示器用的是PageFlipper,通過回調將三個組件聯動起來就實現了這樣的效果:

正文
1.pageSlider
PageSlider可以說是鴻蒙中最常用的視圖切換組件了,使用方法不用多做介紹,官方文檔有詳細的說明,這里主要說一下一個特殊的效果。
一屏多頁效果
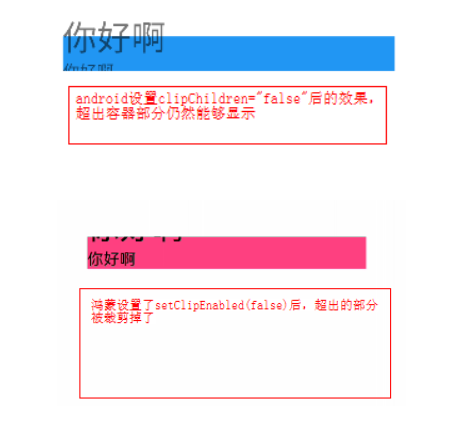
其實鴻蒙本身有提供一個setClipEnabled()的方法,作用是設置是否允許在組件超出其父布局時自動裁剪組件,理論上通過給pageSlider父布局設置setClipEnabled(false),加上給子組件設置合適的寬度可以實現一屏多頁效果,但是經過測試并沒達到效果,這個方法我也單獨拿出來在其他場景驗證過確實無效,下面是驗證的效果。
但是鴻蒙卻提供了另外一個方法setPageMargin(),它的作用是設置PageSlider中子組件邊距的,當傳入一個合適的負數時(必須是負數),就能實現一屏同時顯示多個子組件的效果:

動態設置縮放透明度變化
設置透明度和縮放比例就不細說了,主要就是在PageSlider子組件加載完成后和頁面切換中的回調方法中改變alpha值和scale值,直接上代碼:
- public final class AlphaScalePageTransformer {
- /**
- * 縮放
- */
- public static final float INACTIVE_SCALE = 0.8f;
- /**
- * 透明度
- */
- public static final float INACTIVE_ALPHA = 0.5f;
- /**
- * 設置初始狀態的縮放和透明度
- *
- * @param child
- * @param position
- * @param current
- */
- public static void defaultPage(ListContainer child, int position, float current) {
- if (position != current) {
- child.setAlpha(INACTIVE_ALPHA);
- child.setScaleX(INACTIVE_SCALE);
- child.setScaleY(INACTIVE_SCALE);
- }
- }
- /**
- * 設置滑動中的縮放和透明度
- *
- * @param childList
- * @param position
- * @param offset
- * @param direction
- */
- public static void transformPage(List<ListContainer> childList, int position, float offset, float direction) {
- Component child = childList.get(position);
- float scale = INACTIVE_SCALE + (1 - INACTIVE_SCALE) * (1 - Math.abs(offset));
- float alpha = INACTIVE_ALPHA + (1 - INACTIVE_ALPHA) * (1 - Math.abs(offset));
- child.setScaleX(scale);
- child.setScaleY(scale);
- child.setAlpha(alpha);
- if (direction > 0) {
- if (position < childList.size() - 1) {
- child = childList.get(position + 1);
- }
- } else {
- if (position >= 1) {
- child = childList.get(position - 1);
- }
- }
- scale = INACTIVE_SCALE + (1 - INACTIVE_SCALE) * Math.abs(offset);
- alpha = INACTIVE_ALPHA + (1 - INACTIVE_ALPHA) * Math.abs(offset);
- child.setScaleX(scale);
- child.setScaleY(scale);
- child.setAlpha(alpha);
- }
- }
設置兩邊的component透明度和縮放效果:
- //設置初始狀態縮放和透明度
- AlphaScalePageTransformer.defaultPage(image, i, pageSlider.getCurrentPage());
- //設置頁面切換中縮放和透明度
- pageSlider.addPageChangedListener(new PageChangedListener() {
- @Override
- public void onPageSliding(int position, float positionOffset, int positionOffsetPixels) {
- AlphaScalePageTransformer.transformPage(listContainers, position,
- positionOffset, positionOffsetPixels);
- }
- });
2.PageFlipper(翻頁器)
PageFlipper是一個翻頁器,當它有兩個或多個子組件時,切換過程中可以輕松設置入場動畫和出場動畫,以達到意想不到的效果。雖然PageFlipper的使用率遠不及PageSlider,但這并不意味著PageFlipper就不強大,他能通過簡單的代碼實現許多動畫效果,比如淘寶頭條的效果,日歷翻頁效果,背景圖淡入淡出效果等等。
常用方法:
- getCurrentComponent()//獲取當前組件
- showNext():顯示下一個組件(如果當前子組件是最后一個,則顯示第一個子組件)
- showPrevious():顯示上一個組件(如果當前子組件是第一個,則顯示最后一個子組件)
- getFlipInterval() :獲取自動翻轉時間
- setFlipPeriod(int period) :設置翻轉周期
- startFlipping() :開啟自動翻轉
- stopFlipping() :停止自動翻轉
- addComponent() :添加組件
- setIncomingAnimationA() :設置轉入動畫
- setOutgoingAnimation() :設置轉出動畫
下面通過設置文字翻頁效果來了解下它的使用方法:

- public class IndicatorComponent extends DirectionalLayout {
- /**
- * 文字大小
- */
- private static final int TEXT_SIZE = 130;
- /**
- * 動畫時長
- */
- private static final int DURATION = 600;
- private PageFlipper textSwitcher;
- private Text textcomponent;
- /**
- * ItemsCountcomponent
- *
- * @param context
- * @param attrSet
- */
- public IndicatorComponent(Context context, AttrSet attrSet) {
- super(context, attrSet);
- init(context);
- }
- private void init(Context context) {
- setOrientation(ComponentContainer.HORIZONTAL);
- textSwitcher = new PageFlipper(context);
- //理論上PageFlipper只需要添加兩個子component就能實現動畫效果,但是實際測試發現如果切換速度太快就導致子組件銜接不上出現組件消失的額情況,
- //因此這里通過實踐多添加了幾個子component,防止滑動過快出現bug
- textSwitcher.addComponent(createcomponentForTextSwitcher(context));
- textSwitcher.addComponent(createcomponentForTextSwitcher(context));
- textSwitcher.addComponent(createcomponentForTextSwitcher(context));
- textSwitcher.addComponent(createcomponentForTextSwitcher(context));
- addComponent(textSwitcher, new LayoutConfig(ComponentContainer.LayoutConfig.MATCH_CONTENT,
- ComponentContainer.LayoutConfig.MATCH_CONTENT));
- textcomponent = new Text(context);
- textcomponent.setTextSize(TEXT_SIZE);
- textcomponent.setFont(Font.DEFAULT_BOLD);
- textcomponent.setTextColor(new Color(Color.getIntColor("#8cffffff")));
- addComponent(textcomponent, new LayoutConfig(ComponentContainer.LayoutConfig.MATCH_CONTENT,
- ComponentContainer.LayoutConfig.MATCH_CONTENT));
- }
- /**
- * 創建組件
- *
- * @param context 上下文
- * @return text
- */
- private Text createcomponentForTextSwitcher(Context context) {
- Text text = new Text(context);
- text.setTextSize(TEXT_SIZE);
- text.setFont(Font.DEFAULT_BOLD);
- text.setTextColor(Color.WHITE);
- text.setLayoutConfig(new PageFlipper.LayoutConfig(ComponentContainer.LayoutConfig.MATCH_CONTENT,
- PageFlipper.LayoutConfig.MATCH_CONTENT));
- return text;
- }
- /**
- * update
- *
- * @param newPosition 新位置
- * @param oldPosition 舊位置
- * @param totalElements 總數
- */
- public void update(int newPosition, int oldPosition, int totalElements) {
- textcomponent.setText(" / " + totalElements);
- int offset = textSwitcher.getHeight();
- if (newPosition > oldPosition) {
- //設置組件進入和退出的動畫
- textSwitcher.setIncomingAnimation(createPositionAnimation(-offset, 0, 0f, 1f, DURATION));
- textSwitcher.setOutgoingAnimation(createPositionAnimation(0, offset, 1f, 0f, DURATION));
- } else if (oldPosition > newPosition) {
- textSwitcher.setIncomingAnimation(createPositionAnimation(offset, 0, 0f, 1f, DURATION));
- textSwitcher.setOutgoingAnimation(createPositionAnimation(0, -offset, 1f, 0f, DURATION));
- }
- //顯示下一個組件并執行動畫
- textSwitcher.showNext();
- Text text = (Text) textSwitcher.getCurrentComponent();
- text.setText(String.valueOf(newPosition + 1));
- }
- /**
- * 創建屬性動畫
- *
- * @param fromY
- * @param toY
- * @param fromAlpha
- * @param toAlpha
- * @param duration
- * @return
- */
- private AnimatorProperty createPositionAnimation(int fromY, int toY, float fromAlpha, float toAlpha, int duration) {
- AnimatorProperty animatorProperty = new AnimatorProperty();
- animatorProperty.setCurveType(Animator.CurveType.DECELERATE);
- animatorProperty.alphaFrom(fromAlpha);
- animatorProperty.alpha(toAlpha);
- animatorProperty.moveFromY(fromY);
- animatorProperty.moveToY(toY);
- animatorProperty.setDuration(duration);
- return animatorProperty;
- }
- }
結束
以上主要介紹了PageSlider和PageFlipper的一些簡單使用,最后補充一個小功能,設置漸變效果,這個簡單的效果可能很多人還不知道如何設置:
首先生成一個foreground_gradient.xml
- <shape
- xmlns:ohos="http://schemas.huawei.com/res/ohos"
- ohos:shape="rectangle">
- //設置填充的顏色,可以根據實際需要設置多個
- <solid
- ohos:colors="#000000,#00ffffff,#d8000000"/>
- //設置漸變方向,有三個值可供選擇:linear_gradient,radial_gradient,sweep_gradient
- <gradient
- ohos:shader_type="linear_gradient"
- />
- </shape>
然后給目標組件設置前景色,即:
- ohos:foreground_element="$graphic:foreground_gradient"