介紹一個請求庫 - Undici幾個 API 的使用方式
前言
在瀏覽器中,如果想發起一個請求,我們以前會使用到 xhr,不過這種底層 api,往往調用方式比較簡陋。為了提高開發效率, jQuery 的 $.ajax 可能是最好的選擇,好在后來出現了更加現代化的 fetch api 。
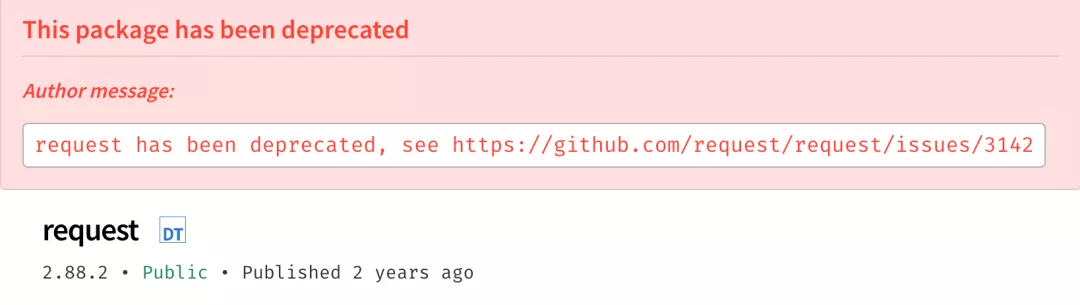
但是考慮到 fetch 的兼容性,而且它也不支持一些全局性的配置,以及請求中斷,在實際的使用過程中,我們可能會用到 axios 請求庫,來進行一些請求。到了 Node.js 中,幾乎都會通過 request 這個庫,來進行請求。遺憾的是,request 在兩年前就停止維護了,在 Node.js 中需要找到一個能夠替代的庫還挺不容易的。
在 request 的 issues[1] 中,有一個表格推薦了一些在 Node.js 中常用的請求庫:
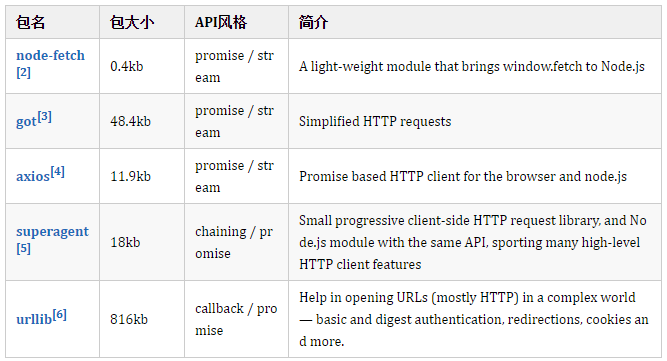
瀏覽器中使用比較多的 axios,在 Node.js 中并不好用,特別是要進行文件上傳的時候,會有很多意想不到的問題。
最近我在網上🏄🏿的時候,發現 Node.js 官方是有一個請求庫的:undici,名字取得還挺復雜的。所以,今天的文章就來介紹一下 undici。順便提一句,undici 是意大利語 11 的意思,好像雙十一也快到了,利好茅臺。
- Undici means eleven in Italian. 1.1 -> 11 -> Eleven -> Undici. It is also a Stranger Things reference.
上手
我們可以直接通過 npm 來安裝 undici:
- npm install undici -S
undici 對外暴露一個對象,該對象下面提供了幾個 API:
- undici.fetch:發起一個請求,和瀏覽器中的 fetch 方法一致;
- undici.request:發起一個請求,和 request 庫有點類似,該方法支持 Promise;
- undici.stream:處理文件流,可以用來進行文件的下載;
undici.fetch
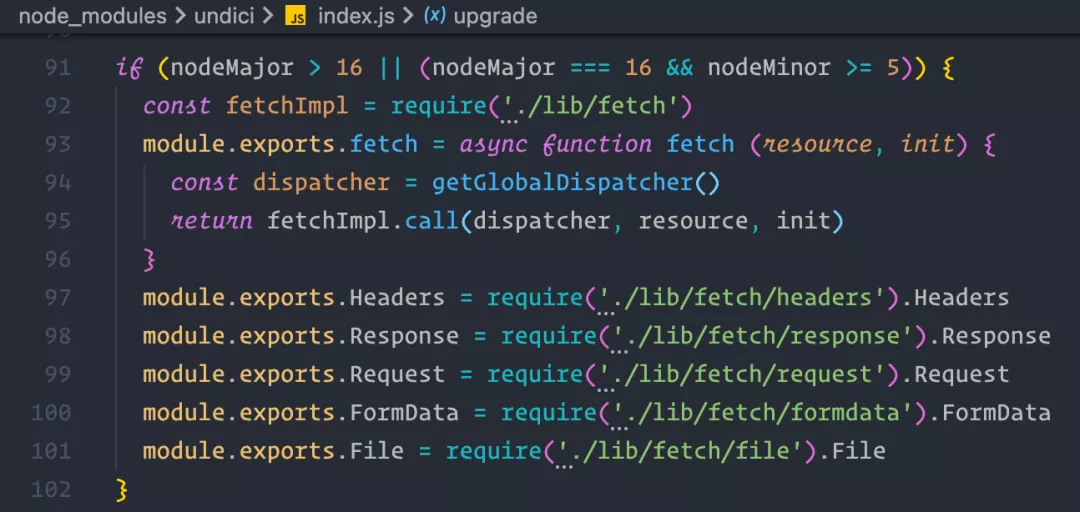
注意:該方法需要 node 版本 >= v16.5.0
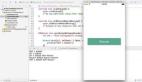
在通過 undici.fetch 請求服務之前,需要先通過 koa 啟動一個簡單登錄服務。
- const Koa = require('koa')
- const bodyParser = require('koa-bodyparser')
- const app = new Koa()
- app.use(bodyParser())
- app.use(ctx => {
- const { url, method, body } = ctx.request
- if (url === '/login') {
- if (method === 'POST') {
- if (body.account === 'shenfq' && body.password === '123456') {
- ctx.body = JSON.stringify({
- name: 'shenfq',
- mobile: '130xxxxxx'
- })
- return
- }
- }
- }
- ctx.status = 404
- ctx.body = JSON.stringify({})
- })
- app.listen(3100)
上面代碼很簡單,只支持接受一個 POST 方法到 /login 路由。下面使用 undici.fetch 發起一個 POST 請求。
- const { fetch } = require('undici')
- const bootstrap = async () => {
- const api = 'http://localhost:3100/login'
- const rsp = await fetch(api, {
- method: 'POST',
- headers: {
- 'content-type': 'application/json'
- },
- body: JSON.stringify({
- account: 'shenfq',
- password: '123456'
- })
- })
- if (rsp.status !== 200) {
- console.log(rsp.status, '請求失敗')
- return
- }
- const json = await rsp.json()
- console.log(rsp.status, json)
- }
- bootstrap()

如果將請求的方式改為 GET,就會返回 404。
- const rsp = await fetch(api, {
- method: 'GET'
- })

undici.request
undici.request 的調用方式與 undici.fetch 類似,傳參形式也差不多。
- const { request } = require('undici')
- const bootstrap = async () => {
- const api = 'http://localhost:3100/login'
- const { body, statusCode } = await request(api, {
- method: 'POST',
- headers: {
- 'content-type': 'application/json'
- },
- body: JSON.stringify({
- account: 'shenfq',
- password: '123456'
- })
- })
- const json = await body.json()
- console.log(statusCode, json)
- }
- bootstrap()

只是返回結果有點不一樣,request 方法返回的 http 響應結果在 body 屬性中,而且該屬性也支持同 fetch 類似的 .json()/.text() 等方法。
中斷請求
安裝 abort-controller 庫,然后實例化 abort-controller,將中斷信號傳入 request 配置中。
- npm i abort-controller
- const undici = require('undici')
- const AbortController = require('abort-controller')
- // 實例化 abort-controller
- const abortController = new AbortController()
- undici.request('http://127.0.0.1:3100', {
- method: 'GET',
- // 傳入中斷信號量
- signal: abortController.signal,
- }).then(({ statusCode, body }) => {
- body.on('data', (data) => {
- console.log(statusCode, data.toString())
- })
- })

我們運行代碼,發現是可以請求成功的,是因為我們沒有主動調用中斷方法。
- undici.request('http://127.0.0.1:3100', {
- method: 'GET',
- signal: abortController.signal,
- }).then(({ statusCode, body }) => {
- console.log('請求成功')
- body.on('data', (data) => {
- console.log(statusCode, data.toString())
- })
- }).catch(error => {
- // 捕獲由于中斷觸發的錯誤
- console.log('error', error.name)
- })
- // 調用中斷
- abortController.abort()
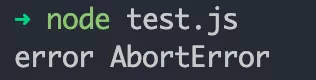
現在運行代碼會發現,并沒有輸出 請求成功 的日志,進入了 catch 邏輯,成功的進行了請求的中斷。
undici.steam
undici.steam 方法可以用來進行文件下載,或者接口代理。
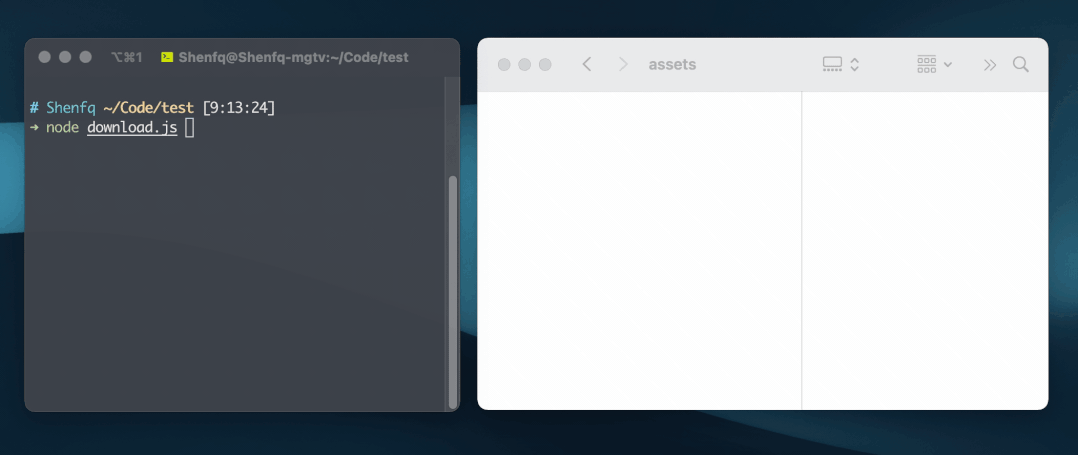
文件下載
- const fs = require('fs')
- const { stream } = require('undici')
- const out = fs.createWriteStream('./宋代-哥窯-金絲鐵線.jpg')
- const url = 'https://img.dpm.org.cn/Uploads/Picture/dc/cegift/cegift6389.jpg'
- stream(url, { opaque: out }, ({ opaque }) => opaque)
接口代理
- const http = require('http')
- const undici = require('undici')
- // 將 3100 端口的請求,代理到 80 端口
- const client = new undici.Client('http://localhost')
- http.createServer((req, res) => {
- const { url, method } = req
- client.stream(
- { method, path: url,opaque: res },
- ({ opaque }) => opaque
- )
- }).listen(3100)

總結
本文只是介紹了 undici 幾個 api 的使用方式,看起來 undici 上手難道還是比較低的。但是兼容性還不太行,比如,fetch 只支持 node@v16.5.0 以上的版本。
對于這種比較新的庫,個人還是建議多觀望一段時間,雖然 request 已經廢棄了,我們還是使用一些經過較長時間考驗過的庫,比如,egg 框架中使用的 urllib[7],還有一個 node-fetch[8],上手難道也比較低,與瀏覽器中的 fetch api 使用方式一致。
參考資料
[1]issues: https://github.com/request/request/issues/3143
[2]node-fetch: https://www.npmjs.com/package/node-fetch
[3]got: https://www.npmjs.com/package/got
[4]axios: https://www.npmjs.com/package/axios
[5]superagent: https://www.npmjs.com/package/superagent
[6]urllib: https://www.npmjs.com/package/urllib
[7]urllib: https://www.npmjs.com/package/urllib
[8]node-fetch: https://www.npmjs.com/package/node-fetch