Linux驅動小技巧 | 利用DRIVER_ATTR實現調用內核函數
作者:土豆居士
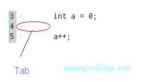
很多朋友在調試驅動的時候,都會遇到這樣一個場景:修改一個參數,然后調用某個內核中的函數。
1. 前言
很多朋友在調試驅動的時候,都會遇到這樣一個場景:修改一個參數,然后調用某個內核中的函數。
比如將某個gpio的值拉高/拉低,修改某個寄存器的值等等。
如果每一個參數都通過字符設備的ioctl接口,增加對應的cmd,會比較麻煩,
研究內核的計算機大牛門怎么會容忍這種事發生,
于是設計出了DRIVER_ATTR這個宏,完美解決這個需求。
下面一口君通過一個簡單的實例,給大家講解如何使用DRIVER_ATTR。
2. DRIVER_ATTR定義
該宏定義的文件如下:include/linux/device.h
struct driver_attribute {
 struct attribute attr;
 ssize_t (*show)(struct device_driver *driver, char *buf);
 ssize_t (*store)(struct device_driver *driver, const char *buf,
    size_t count);
};

#define DRIVER_ATTR(_name, _mode, _show, _store) \
 struct driver_attribute driver_attr_##_name = __ATTR(_name, _mode, _show, _store)
__ATTR定義于文件 include/linux/sysfs.h
#define __ATTR(_name, _mode, _show, _store) {    \
 .attr = {.name = __stringify(_name), .mode = _mode },  \
 .show = _show,      \
 .store = _store,      \
}
說明
 _name:名稱,也就是將在sys fs中生成的文件名稱。
 _mode:上述文件的訪問權限,與普通文件相同,UGO的格式,最高權限0644,否則會報錯。
 _show:顯示函數,cat該文件時,此函數被調用。
 _store:寫函數,echo內容到該文件時,此函數被調用。
3. 使用步驟定義一個寫操作的回調函數:
static ssize_t peng_test_store(struct device_driver *driver,
     const char *buf, size_t count)
{
//對參數進行檢查
 if(NULL == buf || count >255 || count == 0 || strnchr(buf, count, 0x20))
  return -1;

 printk("buf:%s count:%d\n",buf,count);

 return count;
}
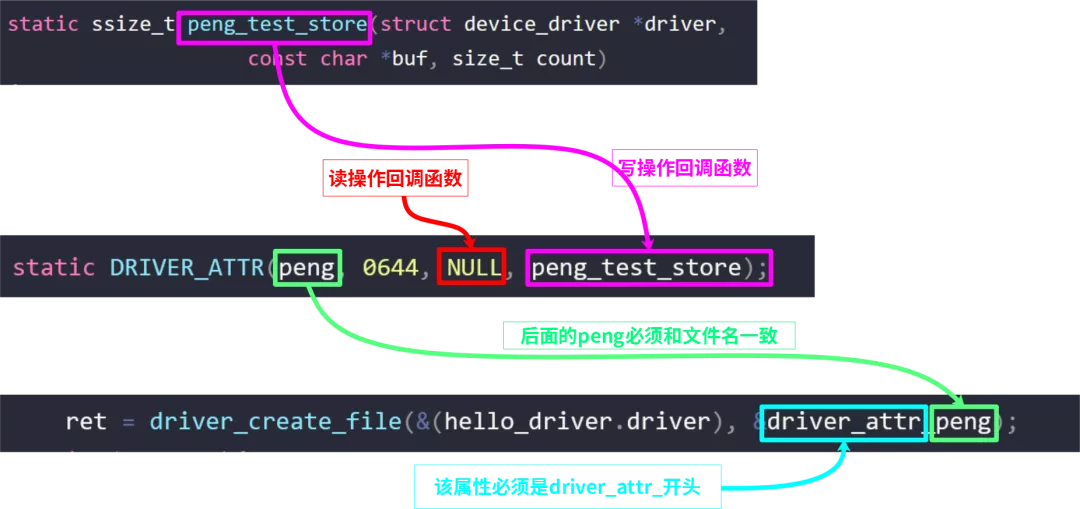
聲明該函數與文件節點關系
static DRIVER_ATTR(peng, 0644, NULL, peng_test_store);
創建文件節點:
 ret = driver_create_file(&(hello_driver.driver), &driver_attr_peng);
 if (ret < 0){
  dev_err(&pdev->dev, "could not create sysfs files\n");
  ret = -ENOENT;
 }
這幾個名字之間關系如下:
4. 源碼
本實驗代碼分為兩個模塊 device、driver, 分別定義結構體platform_device、platform_driver并注冊到platform總線。
完整源碼如下:
device.c
#include <linux/init.h>
#include <linux/module.h>
#include <linux/platform_device.h>
#include <linux/ioport.h>
static void hello_release(struct device *dev)
{
     return;
}
static struct platform_device hello_device =
{
 .name = "duang",
 .id = -1,
 .dev.release = hello_release,
};
static int hello_init(void)
{
 printk("hello_init \n");
 return platform_device_register(&hello_device);

}
static void hello_exit(void)
{
 printk("hello_exit \n");
 platform_device_unregister(&hello_device);
 return;
}
MODULE_LICENSE("GPL");
module_init(hello_init);
module_exit(hello_exit);
driver.c
#include <linux/init.h>
#include <linux/module.h>
#include <linux/kdev_t.h>
#include <linux/fs.h>
#include <linux/cdev.h>
#include <linux/device.h>
#include <asm/io.h>
#include <linux/platform_device.h>
#include <linux/ioport.h>


static int hello_probe(struct platform_device *pdev);
static  int hello_remove(struct platform_device *pdev);


static ssize_t peng_test_store(struct device_driver *driver,
     const char *buf, size_t count)
{
 if(NULL == buf || count >255 || count == 0 || strnchr(buf, count, 0x20))
  return -1;

 printk("buf:%s count:%d\n",buf,count);

 return count;
}
static DRIVER_ATTR(peng, 0644, NULL, peng_test_store);

static struct platform_driver hello_driver =
{
 .probe = hello_probe,
 .driver.name = "duang",
 .remove = hello_remove,
};

struct resource *res;
static int hello_probe(struct platform_device *pdev)
{
 int ret;
 printk("match ok \n");

 ret = driver_create_file(&(hello_driver.driver), &driver_attr_peng);
 if (ret < 0){
  dev_err(&pdev->dev, "could not create sysfs files\n");
  ret = -ENOENT;
 }


 return 0;
}
static  int hello_remove(struct platform_device *pdev)
{
 printk("hello_remove \n");
 return 0;
}

static int hello_init(void)
{
 printk("hello_init \n");
 return platform_driver_register(&hello_driver);
}
static void hello_exit(void)
{
 printk("hello_exit \n");
 platform_driver_unregister(&hello_driver);
 return;
}
MODULE_LICENSE("GPL");
module_init(hello_init);
module_exit(hello_exit);
Makefile
ifneq ($(KERNELRELEASE),)
obj-m:=device.o driver.o
else
KDIR :=/lib/modules/$(shell uname -r)/build
#KDIR :=/home/peng/linux-3.14
PWD  :=$(shell pwd)
all:
 make -C $(KDIR) M=$(PWD) modules
clean:
 rm -f *.ko *.o *.mod.o *.symvers *.cmd  *.mod.c *.order
endif
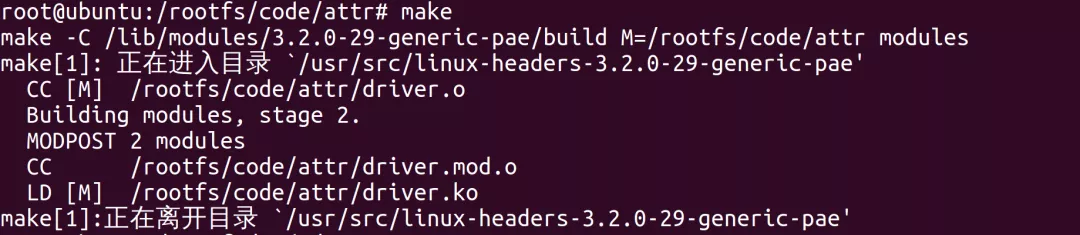
5. 編譯運行
第一步:編譯
第二步:加載模塊驅動
 第三步:查看生成的文件節點:

第四步:通過下面命令向節點輸入一個數字(要管理員權限):
echo 1 > peng
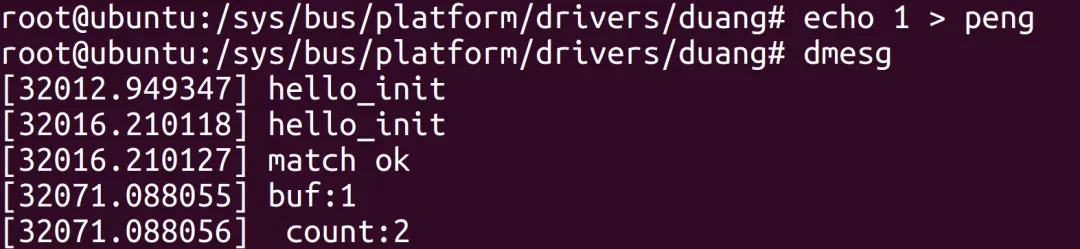
由結果可知,我們通過向文件peng寫入一個字符,實現了調用函數peng_test_store(),并且字符1傳遞給了參數buf,字符個數傳遞給了count。
其中目錄duang是由結構體變量hello_driver 給出:
static struct platform_driver hello_driver =
{
 .driver.name = "duang",
};
6. 一次注冊多個節點
需要借助結構體
drivers\input\touchscreen\ads7846.c
static ssize_t ads7846_pen_down_show(struct device *dev,
         struct device_attribute *attr, char *buf)
{
 struct ads7846 *ts = dev_get_drvdata(dev);

 return sprintf(buf, "%u\n", ts->pendown);
}

static DEVICE_ATTR(pen_down, S_IRUGO, ads7846_pen_down_show, NULL);

static ssize_t ads7846_disable_show(struct device *dev,
         struct device_attribute *attr, char *buf)
{
 struct ads7846 *ts = dev_get_drvdata(dev);

 return sprintf(buf, "%u\n", ts->disabled);
}

static ssize_t ads7846_disable_store(struct device *dev,
         struct device_attribute *attr,
         const char *buf, size_t count)
{
 struct ads7846 *ts = dev_get_drvdata(dev);
 unsigned int i;
 int err;

 err = kstrtouint(buf, 10, &i);
 if (err)
  return err;

 if (i)
  ads7846_disable(ts);
 else
  ads7846_enable(ts);

 return count;
}
static DEVICE_ATTR(disable, 0664, ads7846_disable_show, ads7846_disable_store);

static struct attribute *ads784x_attributes[] = {
 &dev_attr_pen_down.attr,
 &dev_attr_disable.attr,
 NULL,
};

static struct attribute_group ads784x_attr_group = {
 .attrs = ads784x_attributes,
};
err = sysfs_create_group(&mydevice->dev.kobj, &ads784x_attr_group);
7. 補充
當然_ATTR不是獨生子女,他還有一系列的姊妹__ATTR_RO宏只有讀方法,__ATTR_NULL等等
如對設備的使用        DEVICE_ATTR
對驅動使用               DRIVER_ATTR
對總線使用               BUS_ATTR
對類別 (class) 使用  CLASS_ATTR
好了,大家后面在調試驅動的時候別忘了有這些宏可以使用。
責任編輯:武曉燕
來源:
一口Linux