Hi3861使用NNOM實現人工智能神經網絡之MNIST
作者:再見南丫島
每當我們學習一門新的語言時,所有的入門教程官方都會提供一個典型的例子——“Hello World”。而在機器學習中,入門的例子稱之為MNIST。

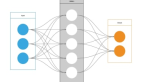
1、什么是NNOM
請查看之前的帖子:https://ost.51cto.com/posts/12287
2、什么是MNIST
每當我們學習一門新的語言時,所有的入門教程官方都會提供一個典型的例子——“Hello World”。而在機器學習中,入門的例子稱之為MNIST。
MNIST是一個簡單的視覺計算數據集,它是像下面這樣手寫的數字圖片:
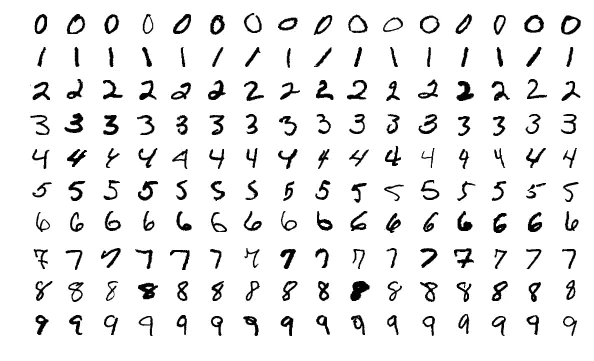
MNIST 經常被用來做為分類任務的入門數據庫使用。在這個簡單的例子里面,我們也用它來試試數據歸類。
3、移植和編譯
移植NNOM庫的方法,在之前已經有說明。
$(wildcard $(LIBPATH)/nnom/src/backends/*.c) \
$(wildcard $(LIBPATH)/nnom/src/core/*.c) \
$(wildcard $(LIBPATH)/nnom/src/layers/*.c) \
同時移植了mnist-simple下面的兩個.h文件。
#include "lib/nnom/examples/mnist-simple/image.h"
#include "lib/nnom/examples/mnist-simple/weights.h"
核心的幾個函數。
const char codeLib[] = "@B%8&WM#*oahkbdpqwmZO0QLCJUYXzcvunxrjft/\\|()1{}[]?-_+~<>i!lI;:,\"^`'.   ";
void print_img(int8_t * buf)
{
    for(int y = 0; y < 28; y++)
    {
        for (int x = 0; x < 28; x++)
        {
            int index =  69 / 127.0 * (127 - buf[y*28+x]);
            if(index > 69) index =69;
            if(index < 0) index = 0;
            DEBUG_printf("%c",codeLib[index]);
            DEBUG_printf("%c",codeLib[index]);
        }
        DEBUG_printf("\n");
    }
}
// Do simple test using image in "image.h" with model created previously.
void mnist(int index)
{
    uint32_t tick, time;
    uint32_t predic_label;
    float prob;
    DEBUG_printf("\nprediction start.. \n");
    tick = hi_get_milli_seconds();
    // copy data and do prediction
    memcpy(nnom_input_data, (int8_t*)&img[index][0], 784);
    nnom_predict(model, &predic_label, &prob);
    time = hi_get_milli_seconds() - tick;
    //print original image to console
    print_img((int8_t*)&img[index][0]);
    DEBUG_printf("Time: %d tick\n", time);
    DEBUG_printf("Truth label: %d\n", label[index]);
    DEBUG_printf("Predicted label: %d\n", predic_label);
    DEBUG_printf("Probability: %d%%\n", (int)(prob*100));
}
void nn_stat()
{
    model_stat(model);
    printf("Total Memory cost (Network and NNoM): %d\n", nnom_mem_stat());
}
4、MNIST使用
我是在Micropython下使用的,其實主要的幾個函數,如下,可以自行移植測試。
STATIC mp_obj_t machine_ai_nnom_test(mp_obj_t self_in,mp_obj_t data_in) {
    int num = mp_obj_get_int(data_in);
    // create and compile the model
    model = nnom_model_create();
    // dummy run
    model_run(model);
    mnist(num);
    nn_stat();
    return mp_const_none;
}
不同的num值,代表候選的要識別的數字的字節圖。比如8,存儲的字節符合是這樣的。

因為不方便輸入手寫數字,只能通過這種字符的形式進行測試。
5、總結
這是比較簡單的例子,對系統的要求的比較低,識別的時間也很短。同時,也可以自己訓練模型,進行分析。但該部分不是本文的重點,敢興趣的同學,可以自行去github上,進行深入的學習。下一篇,會針對KWS的功能測試,實現實時音頻輸入關鍵詞識別的demo的移植和演示。
責任編輯:jianghua
來源:
鴻蒙社區