DevEco Device Tool:HDF框架一鍵生成!

概述
HDF驅動框架,為驅動開發者提供驅動框架能力,包括驅動加載、驅動服務管理和驅動消息機制。旨在構建統一的驅動架構系統,為驅動開發者提供更精準、更高效的開發環境,力求做到一次開發,多系統部署。

開發者可以通過DevEco Device Tool的HDF功能管理和添加設備的驅動,添加驅動時,工具會自動生成相應的驅動目錄結構、初始化驅動模板、代碼及頭文件等信息。
前提條件
- 開發板:Hi3516DV300開發板(目前只支持該開發板,并且支持LiteOS內核和Linux內核的HDF驅動模板生成)
- 源碼:OpenHarmonyV3.1 Release及后續版本源碼。
- 工具:DevEco Device Tool。

使用體驗
通過HDF框架自動生成確實對于小型系統和標準系統的開發帶來很大便利,編寫驅動代碼時可以減少對編譯構建的關注,而更加關注到驅動代碼編寫本身,提高代碼編寫效率,并且會生成代碼框架,命名格式什么都比較規范,可以省去很多時間用于框架的編寫或復制修改。缺點就是目前支持的開發板只有一個,希望后續可以完善,支持更多的開發板,這個功能是真的很好用。
新建HDF驅動模塊
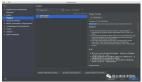
點開Deveco Device Tool插件圖標,在工具控制區中點擊HDF進入驅動添加頁面,選擇產品,目前只有ipcamera_hispark_taurus與ipcamera_hispark_taurus_linux與hispark_taurus_standard三款產品支持使用,未支持的產品無法點擊+號添加HDF模塊。

在添加驅動模塊對話框中,填寫模塊名稱,然后點擊添加。
說明:
只有標準系統的產品,在添加驅動的時候,需要選擇“RunMode”:user和kernel;小型系統的產品只需要填寫Module名稱即可。
添加后,可點擊Action下的刪除按鈕刪除已添加的模塊。

添加后,可以在Driver Module下看到已添加的模塊,使用LiteOS內核與Linux內核生成的會有所不同。


生成后會自動幫我們配置好編譯鏈,自動生成MakeFile,BUILD.gn,Kconfig,C++驅動代碼模板等。
驅動代碼實現
點擊模塊文件下的文件圖標,可以打開文件,進行驅動開發。點擊c/c++即可進行驅動代碼的開發。生成的模板如下。(找了官方的含有中文注釋的圖)。

為了驗證HDF驅動是否成功編譯進內核,對驅動代碼進行些許修改,在Init函數中加入了紅外LED燈的點亮,通過查閱原理圖得到,紅外led的引腳號為41,代碼如下,需包含#include "gpio_if.h"頭文件用于控制gpio,只是驗證的話就不寫用戶態的函數了。
#include "hdf_device_desc.h"  // Header file that describes the APIs provided by the HDF to the driver.
#include "hdf_log.h"          // Header file that describes the log APIs provided by the HDF.
#include "gpio_if.h"    //添加GPIO驅動頭文件
#define HDF_LOG_TAG hello_linux_driver   // Tag contained in logs. If no tag is not specified, the default HDF_TAG is used.
// The driver service struct definition
struct ITestDriverService {
    struct IDeviceIoService ioService;       // The first member of the service structure must be a member of type IDeviceIoService
};
// The driver service interface must be bound to the HDF for you to use the service capability.
static int32_t HdfHelloLinuxDriverBind(struct HdfDeviceObject *deviceObject) {
    HDF_LOGI("hello_linux driver bind success");
    return 0;
}
// Initialize the driver service.
static int32_t HdfHelloLinuxDriverInit(struct HdfDeviceObject *deviceObject) {
    HDF_LOGI("Hello Linux");
    GpioSetDir(41,GPIO_DIR_OUT);//引腳設置為輸出
    GpioWrite(41,GPIO_VAL_HIGH);//輸出高電平,紅外燈亮
    return 0;
}
// Release the driver resources.
static void HdfHelloLinuxDriverRelease(struct HdfDeviceObject *deviceObject) {
    HDF_LOGI("hello_linux driver Release success");
    return;
}
// Define the object of the driver entry. The object must be a global variable of the HdfDriverEntry type (defined in hdf_device_desc.h).
struct HdfDriverEntry g_hello_linuxDriverEntry = {
    .moduleVersion = 1,
    .moduleName = "hello_linux_driver",
    .Bind = HdfHelloLinuxDriverBind,
    .Init = HdfHelloLinuxDriverInit,
    .Release = HdfHelloLinuxDriverRelease,
};
// Call HDF_INIT to register the driver entry with the HDF framework. When loading the driver, call the Bind function and then the Init function. If the Init function fails to be called, the HDF will call Release to release the driver resource and exit.
HDF_INIT(g_hello_linuxDriverEntry);
燒錄驗證
接著進行編譯燒錄啟動,不清楚的可以看下面這篇文章:
Hi3516DV300 OpenHarmony3.1環境配置及燒錄。
點擊monitor開啟串口監視,可以看到打印出了Hello Linux的LOG,說明驅動成功初始化,同時可以看到紅外燈成功點亮。


后記
雖然通過工具自動生成代碼很方便,但還是建議初學者要搞清楚HDF框架的具體實現流程,手動實現一遍,了解編譯的整個流程,這對理解OpenHarmony代碼及框架還是非常有幫助的,工具最好當成你能熟練掌握后提高效率的助手。而且工具也不一定支持所有情況,理解整個HDF后即使遇到一些特殊情況也能有辦法解決,后面的一篇文章我將會深入HDF的驅動開發流程,并且比較LiteOS內核與Linux內核HDF驅動開發的區別。