VuePress-theme-hope2 搭建個人網站,保姆級教程,包含自動部署、評論、搜索等功能
VuePress 是一個以 Markdown 為中心的靜態網站生成器。好處是可以使用 Markdown 來書寫內容文檔或者博客。
VuePress 誕生的初衷是為了支持 Vue.js 及其子項目的文檔需求。
在明確你的目標之后,先不著急立馬搭建項目。
?? 你喜歡哪個主題
因為VuePress除了默認的主題外,提供了擴展主題、擴展插件的能力,不同的主題又組織了不同的插件集合來完成開箱即用的功能。
所以,你首先應該使用哪款主題作為你的個人完整風格。
比較熱門你的主題有:
- vuepress默認主題 21.7k?
- vuepress-theme-hope 1.4k?
- vuepress-theme-reco,(2.0還在測試階段) 1.6k?
- vuepress-theme-vdoing 3.5k?
不同主題的之間的最明顯的差異就是默認的樣式不同,其次就是默認提供的功能不同。
首先,我們看看各個主題默認的樣式。
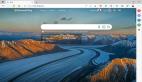
默認主題案例
vue系列早先版本的官網大多數都是默認主題。
 圖片
圖片
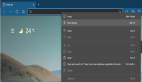
vuepress-theme-hope案例
蟬沐風的碼場: https://www.chanmufeng.com/

vuepress-theme-reco 案例:
萌萌噠草頭將軍(我的舊博客): https://mmdctjj.github.io/blogs/
 圖片
圖片
vuepress-theme-reco 2.0案例:
異想之旅のBlog:https://www.yixiangzhilv.com/
 圖片
圖片
vuepress-theme-vdoing 案例:
Dra-M: https://dra-m.com/
 圖片
圖片
相信看到這里,應該有自己心儀的主題了吧
我用的主題是:vuepress-theme-reco,主題和默認主題相似
主要功能是新增了一些圖標、新增了Tag、新增了時間軸等常用功能,
缺點是:功能還不夠豐富,圖標比較少,無法有效添加摘要、閱讀時間、字數統計等功能。
相反,vuepress-theme-hope 這些做的都不錯,成為我新的選擇。
?? 搭建項目
?? 初始化項目
如果你選擇了一個主題,請務必使用該主題提供的腳手架工具創建項目。這樣可以減少很多配置上的麻煩。
npm init vuepress-theme-hope blogsNeed to install the following packages:
create-vuepress-theme-hope@2.0.0-beta.233
Ok to proceed? (y)Need to install the following packages:
create-vuepress-theme-hope@2.0.0-beta.233
Ok to proceed? (y) y
? Select a language to display / 選擇顯示語言
english (US)
? 簡體中文
D:\work>npm init vuepress-theme-hope blogs2
Need to install the following packages:
  create-vuepress-theme-hope@2.0.0-beta.233
Ok to proceed? (y) y
? Select a language to display / 選擇顯示語言 簡體中文
? 選擇包管理器 yarn
生成 package.json...
? 設置應用名稱 blogs2
? 設置應用版本號 2.0.0
? 設置應用描述 A project of vuepress-theme-hope
? 設置協議 MIT
? 項目需要用到多語言么? No
? 是否需要一個自動部署文檔到 GitHub Pages 的工作流? Yes
? 你想要創建什么類型的項目? blog
生成模板...
? 是否初始化 Git 倉庫? Yes
? 選擇你想使用的源 當前源初始化目錄結構如下
 圖片
圖片
?? 首頁配置
其中,src 目錄下的 README.md即為博客或者文檔的首頁。
等待下載完畢,執行 npm run docs:dev
打開頁面,可以看到博客的首頁如下:
 圖片
圖片
可以通過設置heroFullScreen: false,關閉hero背景全屏。
下滑之后文章的列表如下:
 圖片
圖片
文章的列表來自于項目中所有的markdown文件,你可以在每個md文件的frontmatter中設置文章的標題、封面、分類、標簽、日期、是否在文章列表中顯示。
---
title: ????vue3自定義指令實踐
isTimeLine: true
date: 2023-07-03
category:
  - 前端
tag:
  - JavaScript
  - Vue
---
通過設置article 為 false將文章在列表中排除。
站點的基本信息、頂部的hero信息、項目鏈接、底部的footer信息都可以在README.md中配置。
我的配置如下:具體可以參考:https://theme-hope.vuejs.press/zh/config/frontmatter/blog-home.html
home: false
layout: BlogHome
icon: home
title: 首頁
heroImage: /logo.svg
heroText: 萌萌噠草頭將軍
heroFullScreen: false
tagline: 千里之行,始于足下
projects:
  - icon: react
    name: RaETable
    desc: 一款開箱即用的antd表格組件庫
    link: https://mmdctjj.github.io/raetable
  - icon: setting
    name: console-loader
    desc: 自動清除其他開發者console的loader
    link: https://github.com/mmdctjj/remove-others-console-loader


footer: 萌萌噠草頭將軍
?? 導航欄
在開始之前你需要明確,你的導航欄需求是啥樣的(大白話就是哪些欄目需要在側邊欄展示,哪些在側邊欄展示)
我的思路是,根據文章的分類,將相同的分類文章放在同一目錄下,每個目錄對應一個導航欄目。
 圖片
圖片
導航欄的相關設置在 navbar.ts文件中。
默認為字符串,對應 src 目錄下的文件路徑,你可以省略 .md 擴展名,以 / 結尾的路徑會被推斷為 /README.md。
例如:
import { navbar } from "vuepress-theme-hope";

export default navbar([
  "/", // 對應首頁,即src/README.md
  '/react/', // 對應src/react/README.md
]);
也可以是對象,基本格式如下:
import { navbar } from "vuepress-theme-hope";

export default navbar([
  {
    text: "博文",
    icon: "pen-to-square",
    prefix: "/posts/", // 對應 src/posts 目錄
    children: [
      {
        text: "蘋果",
        icon: "pen-to-square",
        prefix: "apple/", // 對應 src/posts/apple 目錄
        children: [
          { text: "蘋果1", icon: "pen-to-square", link: "1" },
          { text: "蘋果2", icon: "pen-to-square", link: "2" },
          "3",
          "4",
        ],
      },
      "tomato",
      "strawberry",
    ],
  },
  {
    text: "V2 文檔",
    icon: "book",
    link: "https://theme-hope.vuejs.press/zh/", // link代碼外鏈地址
  },
]);
我的設置為:
import { navbar } from "vuepress-theme-hope";

export default navbar([
  "/",
  {
    text: 'React系列',
    icon: 'react',
    link: '/react/'
  },
  {
    text: 'Vue系列',
    icon: 'vue',
    link: '/vue/'
  },
  {
    text: 'Vite系列',
    icon: 'tool',
    link: '/vite/'
  },
  {
    text: '新框架嘗鮮系列',
    icon: 'geometry',
    link: '/framework/'
  },
  {
    text: '雜談',
    icon: 'article',
    link: '/posts/'
  },
  {
    text: '標簽',
    icon: 'tag',
    link: '/tag/javascript/'
  },
  {
    text: '分類',
    icon: 'categoryselected',
    link: '/category/前端/'
  },
  {
    text: '時間軸',
    icon: 'time',
    link: '/timeline/'
  },
]);
我將一些默認的路由也加進了導航欄配置中,比如時間軸、標簽、分類等。
 圖片
圖片
?? 側邊欄
側邊欄的配置在 sidebar.ts中
側邊欄的配置,我們可以分兩種情況:全局導航欄、根據每個導航欄欄目分離式導航欄。
?? 全局側邊欄配置
你可以設置側邊欄導航和導航欄的路由一一對應,這樣就相當于是全局的側邊欄。
對于側邊欄的具體條目,可以通過設置children: "structure"根據當前目錄下的文件名稱自動生成。
import { sidebar } from "vuepress-theme-hope";

export default sidebar({
  "/": [
    "",
    {
      text: "React系列",
      icon: "react",
      prefix: "react/",
      children: "structure",
    },
    {
      text: "Vue系列",
      icon: "vue",
      prefix: "vue/",
      children: "structure",
    },
    {
      text: "Vite系列",
      icon: "tool",
      prefix: "vite/",
      children: "structure",
    },
    {
      text: "新框架嘗鮮系列",
      icon: "geometry",
      prefix: "framework/",
      children: "structure",
    },
    {
      text: "雜談",
      icon: "study",
      prefix: "posts/",
      children: "structure",
    },
    // "intro",
    // "slides",
  ],
});
此時頁面側邊欄如下圖:
 圖片
圖片
?? 分離式導航欄
分離式菜單配置更簡潔,如下所示:當設置structure時,默認根據目錄下的文件自動生成側邊欄。
import { sidebar } from "vuepress-theme-hope";

export default sidebar({
  "/react/":  "structure",
  "/framework/":  "structure",
  "/vite/":  "structure",
  "/vue/":  "structure",
  "/posts/":  "structure",
});
?? 自動生成目錄頁面
另外,我們還根據文件夾下的文件列表自動為每個文件夾生成目錄頁面。我們只需要在theme.ts中添加如下設置。
plugins: {

    autoCatalog: {
      index: true
    },
}
就可以自動生成目錄頁面了。例如:
 圖片
圖片
?? 搜索功能
該主題內置了幾種常見搜索插件的支持,你只需下載你喜歡的插件和配置文件即可,我使用的是vuepress-plugin-search-pro插件,配置參考的官方配置。
plugins: [
    searchProPlugin({
      // 索引全部內容
      indexContent: true,
      // 為分類和標簽添加索引
      customFields: [
        {
          getter: (page) => page.frontmatter.category as any,
          formatter: "分類:$content",
        },
        {
          getter: (page) => page.frontmatter.tag as any,
          formatter: "標簽:$content",
        },
      ],
    }),
  ]
效果如下:
 圖片
圖片
?? 自動部署
該主題已經自動添加了workflows文件,你只需添加倉庫,修改觸發分支。
不過我在部署時遇到問題:
Dependencies lock file is not found in /home/{username}/runners.../repository_name. Supported file patterns: package-lock.json,yarn.lock需要修改下workflows文件:去除npm cache設置
- name: 設置 Node.js
        uses: actions/setup-node@v3
        with:
          node-version: 18
        #  cache: npm
cicd執行成功后,會多一個部署gh-pages分支,這是文件流中配置的,你可以修改
- name: 部署文檔
        uses: JamesIves/github-pages-deploy-action@v4
        with:
          # 這是文檔部署到的分支名稱
          branch: gh-pages
          folder: src/.vuepress/dist
圖片
圖片
接著最重要的一步,到倉庫的設置頁面設置如下的內容:
 圖片
圖片
該設置的意思是,將選中的分支內容部署在github自帶的頁面服務中。
接著點擊save按鈕,就可以去對應的站點訪問了。
我的站點:https://mmdctjj.github.io/blogs2/
?? 添加評論功能
不同的插件,評論的實現原理不同,我接觸過最早的原理是通過將評論信息映射到倉庫的issue中。
然而,后來開始流行Discussions,這也是vuepress-theme-hope推薦的方式,
?
如果你的博客面向程序員,請使用Giscus,面向大眾請選擇Waline, 所以我選擇了Giscus
?
首先需要你創建一個空的倉庫。其次,由于評論需要用戶登錄到GitHub,所以,我們還需要提供登錄應用的服務。
這里我們不用擔心,因為Github為我們提供了簡單的登陸應用的功能:giscus,
首先安裝Giscus:https://github.com/apps/giscus
 圖片
圖片
點擊install按鈕,在配置詳情頁中選擇對應的生效倉庫。(這里我選擇僅僅對評論倉庫生效)
 圖片
圖片
然后回到評論倉庫,點擊seething,選中Feature下的Discussions。
 圖片
圖片
點擊set up discussions,默認的文本不需要修改,點擊提交即可出現如下頁面,說明該功能啟用成功。
 圖片
圖片
接著,我們前往https://giscus.app/zh-CN 設置你的倉庫和分類。
 圖片
圖片
 圖片
圖片
在啟用欄目復制以下幾個信息。
 圖片
圖片
接著將以下信息復到theme.ts即可:
plugins: {
    comment: {
      // You should generate and use your own comment service
      provider: "Giscus",
      repo: "mmdctjj/blogs-comments",
      repoId: "xxxx", // 替換下
      category: "Announcements",
      categoryId: "xxxx" // 替換下
    },
 }
此時當我們評論之后,在評論倉庫查看,
 圖片
圖片
?? 最后
vuepress-theme-hope 主題通過默認的配置就提供了豐富的開箱即用的功能,使得配置體驗相比較與vuepress-theme-reco有了明顯的提升。這是我替換博客主題最大的體驗。