透過源碼,捋清楚循環(huán)依賴到底是如何解決的!
以下內(nèi)容基于 Spring6.0.4。
關(guān)于 Spring 循環(huán)依賴,松哥已經(jīng)連著發(fā)了三篇文章了,本篇文章松哥從源碼的角度來和小伙伴們捋一捋 Spring 循環(huán)依賴到底是如何解決了。
小伙伴們一定要先熟悉前面文章的內(nèi)容,否則今天的源碼可能會看起來有些吃力。
接下來我通過一個簡單的循環(huán)依賴的案例,來和大家梳理一下完整的 Bean 循環(huán)依賴處理流程。
1. 案例設(shè)計
假設(shè)我有如下 Bean:
@Service
public class A {
    @Autowired
    B b;
}
@Service
public class B {
    @Autowired
    A a;
}
就這樣一個簡單的循環(huán)依賴,默認情況下,A 會被先加載,然后在 A 中做屬性填充的時候,去創(chuàng)建了 B,創(chuàng)建 B 的時候又需要 A,就會從緩存中拿到 A,大致流程如此,接下來我們結(jié)合源碼來驗證一下這個流程。
2. 源碼分析
首先我們來看獲取 Bean 的時候,如何利用這三級緩存。
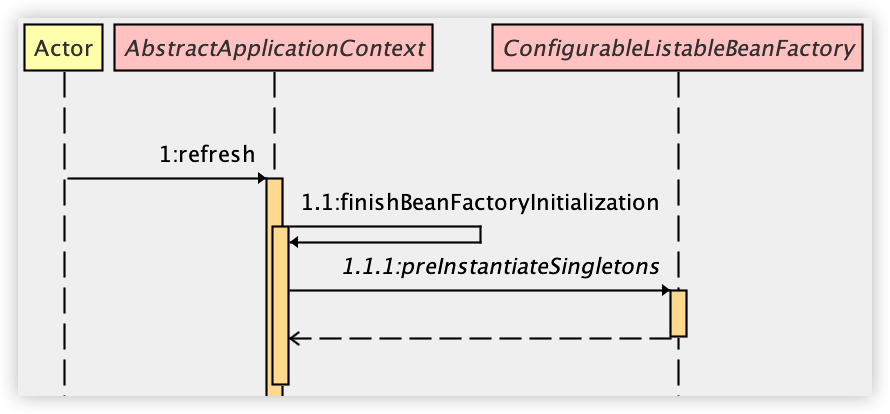
小伙伴們知道,獲取 Bean 涉及到的就是 getBean 方法,像我們上面這個案例,由于都是單例的形式,所以 Bean 的初始化其實在容器創(chuàng)建的時候就完成了。
 圖片
圖片
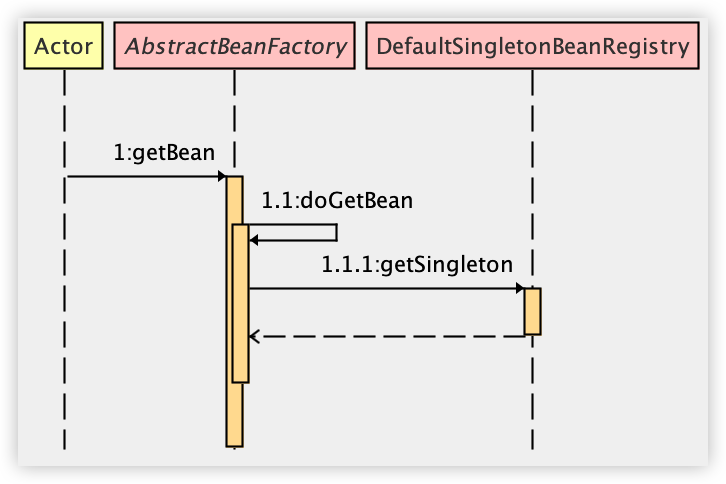
在 preInstantiateSingletons 方法中,又調(diào)用到 AbstractBeanFactory#getBean 方法,進而調(diào)用到 AbstractBeanFactory#doGetBean 方法。
 圖片
圖片
Bean 的初始化就是從這里開始的,我們就從這里來開始看起吧。
2.1 doGetBean
AbstractBeanFactory#doGetBean(方法較長,節(jié)選部分關(guān)鍵內(nèi)容):
protected <T> T doGetBean(
  String name, @Nullable Class<T> requiredType, @Nullable Object[] args, boolean typeCheckOnly)
  throws BeansException {
 String beanName = transformedBeanName(name);
 Object beanInstance;
 // Eagerly check singleton cache for manually registered singletons.
 Object sharedInstance = getSingleton(beanName);
 if (sharedInstance != null && args == null) {
  beanInstance = getObjectForBeanInstance(sharedInstance, name, beanName, null);
 }
 else {
  // Fail if we're already creating this bean instance:
  // We're assumably within a circular reference.
  if (isPrototypeCurrentlyInCreation(beanName)) {
   throw new BeanCurrentlyInCreationException(beanName);
  }
  // Check if bean definition exists in this factory.
  BeanFactory parentBeanFactory = getParentBeanFactory();
  if (parentBeanFactory != null && !containsBeanDefinition(beanName)) {
   // Not found -> check parent.
   String nameToLookup = originalBeanName(name);
   if (parentBeanFactory instanceof AbstractBeanFactory abf) {
    return abf.doGetBean(nameToLookup, requiredType, args, typeCheckOnly);
   }
   else if (args != null) {
    // Delegation to parent with explicit args.
    return (T) parentBeanFactory.getBean(nameToLookup, args);
   }
   else if (requiredType != null) {
    // No args -> delegate to standard getBean method.
    return parentBeanFactory.getBean(nameToLookup, requiredType);
   }
   else {
    return (T) parentBeanFactory.getBean(nameToLookup);
   }
  }
  if (!typeCheckOnly) {
   markBeanAsCreated(beanName);
  }
  StartupStep beanCreation = this.applicationStartup.start("spring.beans.instantiate")
    .tag("beanName", name);
  try {
   if (requiredType != null) {
    beanCreation.tag("beanType", requiredType::toString);
   }
   RootBeanDefinition mbd = getMergedLocalBeanDefinition(beanName);
   checkMergedBeanDefinition(mbd, beanName, args);
   // Guarantee initialization of beans that the current bean depends on.
   String[] dependsOn = mbd.getDependsOn();
   if (dependsOn != null) {
    for (String dep : dependsOn) {
     if (isDependent(beanName, dep)) {
      throw new BeanCreationException(mbd.getResourceDescription(), beanName,
        "Circular depends-on relationship between '" + beanName + "' and '" + dep + "'");
     }
     registerDependentBean(dep, beanName);
     try {
      getBean(dep);
     }
     catch (NoSuchBeanDefinitionException ex) {
      throw new BeanCreationException(mbd.getResourceDescription(), beanName,
        "'" + beanName + "' depends on missing bean '" + dep + "'", ex);
     }
    }
   }
   // Create bean instance.
   if (mbd.isSingleton()) {
    sharedInstance = getSingleton(beanName, () -> {
     try {
      return createBean(beanName, mbd, args);
     }
     catch (BeansException ex) {
      // Explicitly remove instance from singleton cache: It might have been put there
      // eagerly by the creation process, to allow for circular reference resolution.
      // Also remove any beans that received a temporary reference to the bean.
      destroySingleton(beanName);
      throw ex;
     }
    });
    beanInstance = getObjectForBeanInstance(sharedInstance, name, beanName, mbd);
   }
  }
 }
 return adaptBeanInstance(name, beanInstance, requiredType);
}
這個方法比較長,我來和大家說幾個關(guān)鍵的點:
- 首先這個方法一開始就調(diào)用了 getSingleton 方法,這個是嘗試從三級緩存中獲取到想要的 Bean,但是,當我們第一次初始化 A 的時候,很顯然這一步是無法獲取到 A 的實例的,所以這一步會返回 null。
- 如果第一步拿到了 Bean,那么接下來就進入到 if 分支中,直接獲取到想要的 beanInstance 實例;否則進入到第三步。
- 如果第一步?jīng)]有從三級緩存中拿到 Bean,那么接下來就要檢查是否是循環(huán)依賴了,首先調(diào)用 isPrototypeCurrentlyInCreation 方法判斷當前 Bean 是否已經(jīng)在創(chuàng)建了,如果已經(jīng)在創(chuàng)建了,那么顯然要拋異常出去了(BeanCurrentlyInCreationException)。接下來就去 parent 容器中各種查找,看能否找到需要的 Bean,Spring 中的父子容器問題松哥在之前的文章中也已經(jīng)講過了,小伙伴們可以參考:Spring 中的父子容器是咋回事?。
- 如果從父容器中也沒找到 Bean,那么接下來就會調(diào)用 markBeanAsCreated 方法來標記當前 Bean 已經(jīng)創(chuàng)建或者正準備創(chuàng)建。
- 接下來會去標記一下創(chuàng)建步驟,同時檢查一下 Bean 的 dependsOn 屬性是否存在循環(huán)關(guān)系,這些跟我們本文關(guān)系都不大,我就不去展開了。
- 關(guān)鍵點來了,接下來判斷如果我們當前 Bean 是單例的,那么就調(diào)用 getSingleton 方法去獲取一個實例,該方法的第二個參數(shù)一個 Lambda 表達式,表達式的核心內(nèi)容就是調(diào)用 createBean 方法去創(chuàng)建一個 Bean 實例,該方法將不負眾望,拿到最終想要的 Bean。
以上就是 doGetBean 方法中幾個比較重要的點。
其中有兩個方法我們需要展開講一下,第一個方法就是去三級緩存中查詢 Bean 的 getSingleton 方法(步驟一),第二個方法則是去獲取到 Bean 實例的 getSingleton 方法(步驟六),這是兩個重載方法。
接下來我們就來分析一下這兩個方法。
2.2 查詢?nèi)壘彺?/h3>
DefaultSingletonBeanRegistry#getSingleton:
protected Object getSingleton(String beanName, boolean allowEarlyReference) {
 // Quick check for existing instance without full singleton lock
 Object singletonObject = this.singletonObjects.get(beanName);
 if (singletonObject == null && isSingletonCurrentlyInCreation(beanName)) {
  singletonObject = this.earlySingletonObjects.get(beanName);
  if (singletonObject == null && allowEarlyReference) {
   synchronized (this.singletonObjects) {
    // Consistent creation of early reference within full singleton lock
    singletonObject = this.singletonObjects.get(beanName);
    if (singletonObject == null) {
     singletonObject = this.earlySingletonObjects.get(beanName);
     if (singletonObject == null) {
      ObjectFactory<?> singletonFactory = this.singletonFactories.get(beanName);
      if (singletonFactory != null) {
       singletonObject = singletonFactory.getObject();
       this.earlySingletonObjects.put(beanName, singletonObject);
       this.singletonFactories.remove(beanName);
      }
     }
    }
   }
  }
 }
 return singletonObject;
}- 首先去 singletonObjects 中查找,這就是所謂的一級緩存,如果這里能直接找到想要的對象,那么直接返回即可。
- 如果一級緩存中不存在想要的 Bean,那么接下來就該去二級緩存 earlySingletonObjects 中查找了,二級緩存要是有我們想要的 Bean,那么也是直接返回即可。
- 二級緩存中如果也不存在,那么就是加鎖然后去三級緩存中查找了,三級緩存是 singletonFactories,我們從 singletonFactories 中獲取到的是一個 ObjectFactory 對象,這是一個 Lambda 表達式,調(diào)用這里的 getObject 方法最終有可能會促成提前 AOP,至于這個 Lambda 表達式的內(nèi)容,松哥在前面的文章中已經(jīng)和小伙伴們介紹過了,這里先不啰嗦(如何通過三級緩存解決 Spring 循環(huán)依賴)。
- 如果走到三級緩存這一步了,從三級緩存中拿到了想要的數(shù)據(jù),那么就把數(shù)據(jù)存入到二級緩存 earlySingletonObjects 中,以備下次使用。同時,移除三級緩存中對應的數(shù)據(jù)。
當我們第一次創(chuàng)建 A 對象的時候,很顯然三級緩存中都不可能有數(shù)據(jù),所以這個方法最終返回 null。
2.3 獲取 Bean 實例
接下來看 2.1 小節(jié)步驟六的獲取 Bean 的方法。
DefaultSingletonBeanRegistry#getSingleton(方法較長,節(jié)選部分關(guān)鍵內(nèi)容):
public Object getSingleton(String beanName, ObjectFactory<?> singletonFactory) {
 synchronized (this.singletonObjects) {
  Object singletonObject = this.singletonObjects.get(beanName);
  if (singletonObject == null) {
   if (this.singletonsCurrentlyInDestruction) {
    throw new BeanCreationNotAllowedException(beanName,
      "Singleton bean creation not allowed while singletons of this factory are in destruction " +
      "(Do not request a bean from a BeanFactory in a destroy method implementation!)");
   }
   beforeSingletonCreation(beanName);
   boolean newSingleton = false;
   boolean recordSuppressedExceptions = (this.suppressedExceptions == null);
   if (recordSuppressedExceptions) {
    this.suppressedExceptions = new LinkedHashSet<>();
   }
   try {
    singletonObject = singletonFactory.getObject();
    newSingleton = true;
   }
   if (newSingleton) {
    addSingleton(beanName, singletonObject);
   }
  }
  return singletonObject;
 }
}- 這個方法首先也是嘗試從一級緩存中獲取到想要的 Bean,如果 Bean 為 null,就開始施法了。
- 首先會去判斷一下,如果這個工廠的單例正在銷毀,那么這個 Bean 的創(chuàng)建就不被允許。
- 接下來會有一堆準備工作,關(guān)鍵點在 singletonFactory.getObject(); 地方,這個就是方法第二個參數(shù)傳進來的回調(diào)函數(shù),將來在回調(diào)函數(shù)中,會調(diào)用到 createBean 方法,真正開始 A 這個 Bean 的創(chuàng)建。將 A 對象創(chuàng)建成功之后,會把 newSingleton 設(shè)置為 true,第 4 步會用到。
- 現(xiàn)在調(diào)用 addSingleton 方法,把創(chuàng)建成功的 Bean 添加到緩存中。
我們來看下 addSingleton 方法:
protected void addSingleton(String beanName, Object singletonObject) {
 synchronized (this.singletonObjects) {
  this.singletonObjects.put(beanName, singletonObject);
  this.singletonFactories.remove(beanName);
  this.earlySingletonObjects.remove(beanName);
  this.registeredSingletons.add(beanName);
 }
}
小伙伴們看一下,一級緩存中存入 Bean,二級緩存和三級緩存移除該 Bean,同時在 registeredSingletons 集合中記錄一下當前 Bean 已經(jīng)創(chuàng)建。
所以現(xiàn)在的重點其實又回到了 createBean 方法了。
2.4 createBean
createBean 方法其實就到了 Bean 的創(chuàng)建流程了。bean 的創(chuàng)建流程在前面幾篇 Spring 源碼相關(guān)的文章中也都有所涉獵,所以今天我就光說一些跟本文主題相關(guān)的幾個點。
createBean 方法最終會調(diào)用到 AbstractAutowireCapableBeanFactory#doCreateBean 方法,這個方法也是比較長的,而我是關(guān)心如下幾個地方:
protected Object doCreateBean(String beanName, RootBeanDefinition mbd, @Nullable Object[] args)
  throws BeanCreationException {
 // Eagerly cache singletons to be able to resolve circular references
 // even when triggered by lifecycle interfaces like BeanFactoryAware.
 boolean earlySingletonExposure = (mbd.isSingleton() && this.allowCircularReferences &&
   isSingletonCurrentlyInCreation(beanName));
 if (earlySingletonExposure) {
  addSingletonFactory(beanName, () -> getEarlyBeanReference(beanName, mbd, bean));
 }
 // Initialize the bean instance.
 Object exposedObject = bean;
 try {
  populateBean(beanName, mbd, instanceWrapper);
  exposedObject = initializeBean(beanName, exposedObject, mbd);
 }
 return exposedObject;
}
這里我比較在意的有兩個地方,一個是調(diào)用 addSingletonFactory 方法向三級緩存中添加回調(diào)函數(shù),回調(diào)函數(shù)是 getEarlyBeanReference,如果有需要,將來會通過這個回調(diào)提前進行 AOP,即使沒有 AOP,就是普通的循環(huán)依賴,三級緩存也是會被調(diào)用的,這個大家繼續(xù)往后看就知道了,另外還有一個比較重要的地方,在本方法一開始的時候,就已經(jīng)創(chuàng)建出來 A 對象了,這個時候的 A 對象是一個原始 Bean,即單純的只是通過反射把對象創(chuàng)建出來了,Bean 還沒有經(jīng)歷過完整的生命周期,這里 getEarlyBeanReference 方法的第三個參數(shù)就是該 Bean,這個也非常重要,牢記,后面會用到。
第二個地方就是 populateBean 方法,當執(zhí)行到這個方法的時候,A 對象已經(jīng)創(chuàng)建出來了,這個方法是給 A 對象填充屬性用的,因為接下來要注入 B 對象,就在這個方法中完成的。
由于我們第 1 小節(jié)是通過 @Autowired 來注入 Bean 的,所以現(xiàn)在在 populateBean 方法也主要是處理 @Autowired 注入的情況,那么這個松哥之前寫過文章,小伙伴們參考@Autowired 到底是怎么把變量注入進來的?,具體的注入細節(jié)我這里就不重復了,單說在注入的過程中,會經(jīng)過一個 DefaultListableBeanFactory#doResolveDependency 方法,這個方法就是用來解析 B 對象的(至于如何到達 doResolveDependency 方法的,小伙伴們參考 @Autowired 到底是怎么把變量注入進來的?一文)。
doResolveDependency 方法也是比較長,我這里貼出來和本文相關(guān)的幾個關(guān)鍵地方:
@Nullable
public Object doResolveDependency(DependencyDescriptor descriptor, @Nullable String beanName,
  @Nullable Set<String> autowiredBeanNames, @Nullable TypeConverter typeConverter) throws BeansException {
     //...
  Map<String, Object> matchingBeans = findAutowireCandidates(beanName, type, descriptor);
  if (matchingBeans.isEmpty()) {
   if (isRequired(descriptor)) {
    raiseNoMatchingBeanFound(type, descriptor.getResolvableType(), descriptor);
   }
   return null;
  }
  String autowiredBeanName;
  Object instanceCandidate;
  if (matchingBeans.size() > 1) {
   autowiredBeanName = determineAutowireCandidate(matchingBeans, descriptor);
   if (autowiredBeanName == null) {
    if (isRequired(descriptor) || !indicatesMultipleBeans(type)) {
     return descriptor.resolveNotUnique(descriptor.getResolvableType(), matchingBeans);
    }
    else {
     // In case of an optional Collection/Map, silently ignore a non-unique case:
     // possibly it was meant to be an empty collection of multiple regular beans
     // (before 4.3 in particular when we didn't even look for collection beans).
     return null;
    }
   }
   instanceCandidate = matchingBeans.get(autowiredBeanName);
  }
  else {
   // We have exactly one match.
   Map.Entry<String, Object> entry = matchingBeans.entrySet().iterator().next();
   autowiredBeanName = entry.getKey();
   instanceCandidate = entry.getValue();
  }
  if (autowiredBeanNames != null) {
   autowiredBeanNames.add(autowiredBeanName);
  }
  if (instanceCandidate instanceof Class) {
   instanceCandidate = descriptor.resolveCandidate(autowiredBeanName, type, this);
  }
        //...
}- 在這個方法中,首先調(diào)用 findAutowireCandidates 方法,以類型為依據(jù),找到所有滿足條件的 Class 并組成一個 Map 返回。例如第一小節(jié)的案例,這里就會找到所有 B 類型的 Class,通過一個 Map 返回。
- 如果第一步返回的 Map 存在多條記錄,那么就必須從中挑選一個出來,這就是 matchingBeans.size() > 1 的情況。
- 如果第一步返回的 Map 只有一條記錄,那么就從 Map 中提取出來 key 和 value,此時的 value 是一個 Class,所以接下來還要調(diào)用 descriptor.resolveCandidate 去完成 Class 到對象的轉(zhuǎn)變。
而 descriptor.resolveCandidate 方法又開啟了新一輪的 Bean 初始化,只不過這次初始化的 B 對象,如下:
public Object resolveCandidate(String beanName, Class<?> requiredType, BeanFactory beanFactory)
  throws BeansException {
 return beanFactory.getBean(beanName);
}
2.5 后續(xù)流程
后續(xù)流程其實就是上面的步驟,我就直接來跟大家說一說,就不貼代碼了。
現(xiàn)在系統(tǒng)調(diào)用 beanFactory.getBean 方法去查找 B 對象,結(jié)果又是走一遍本文第二小節(jié)的所有流程,當 B 創(chuàng)建出來之后,也要去做屬性填充,此時需要在 B 中注入 A,那么又來到本文的 2.4 小節(jié),最終又是調(diào)用到 resolveCandidate 方法去獲取 A 對象。
此時,在獲取 A 對象的過程中,又會調(diào)用到 doGetBean 這個方法,在這個方法中調(diào)用 getSingleton 的時候(2.1 小節(jié)的第一步),這個時候的執(zhí)行邏輯就跟前面不一樣了,我們再來看下這個方法的源碼:
protected Object getSingleton(String beanName, boolean allowEarlyReference) {
 // Quick check for existing instance without full singleton lock
 Object singletonObject = this.singletonObjects.get(beanName);
 if (singletonObject == null && isSingletonCurrentlyInCreation(beanName)) {
  singletonObject = this.earlySingletonObjects.get(beanName);
  if (singletonObject == null && allowEarlyReference) {
   synchronized (this.singletonObjects) {
    // Consistent creation of early reference within full singleton lock
    singletonObject = this.singletonObjects.get(beanName);
    if (singletonObject == null) {
     singletonObject = this.earlySingletonObjects.get(beanName);
     if (singletonObject == null) {
      ObjectFactory<?> singletonFactory = this.singletonFactories.get(beanName);
      if (singletonFactory != null) {
       singletonObject = singletonFactory.getObject();
       this.earlySingletonObjects.put(beanName, singletonObject);
       this.singletonFactories.remove(beanName);
      }
     }
    }
   }
  }
 }
 return singletonObject;
}
現(xiàn)在還是嘗試從三級緩存中獲取 A,此時一二級緩存中還是沒有 A,但是三級緩存中有一個回調(diào)函數(shù),當執(zhí)行 singletonFactory.getObject() 方法的時候,就會觸發(fā)該回調(diào)函數(shù),這個回調(diào)函數(shù)就是我們前面 2.4 小節(jié)提到的 getEarlyBeanReference 方法,我們現(xiàn)在來看下這個方法:
protected Object getEarlyBeanReference(String beanName, RootBeanDefinition mbd, Object bean) {
 Object exposedObject = bean;
 if (!mbd.isSynthetic() && hasInstantiationAwareBeanPostProcessors()) {
  for (SmartInstantiationAwareBeanPostProcessor bp : getBeanPostProcessorCache().smartInstantiationAware) {
   exposedObject = bp.getEarlyBeanReference(exposedObject, beanName);
  }
 }
 return exposedObject;
}
這個方法有一個參數(shù) Bean,這個參數(shù) Bean 會經(jīng)過一些后置處理器處理之后返回,后置處理器主要是看一下這個 Bean 是否需要 AOP,如果需要就進行 AOP 處理,如果不需要,直接就把這個參數(shù) Bean 返回就行了。至于這個參數(shù)是哪來的,我在 2.4 小節(jié)中已經(jīng)加黑標記出來了,這個參數(shù) Bean 其實就是原始的 A 對象!
好了,現(xiàn)在 B 對象就從緩存池中拿到了原始的 A 對象,B 對象屬性注入完畢,對象創(chuàng)建成功,進而導致 A 對象也創(chuàng)建成功。
大功告成。
3. 小結(jié)
老實說,如果小伙伴們認認真真看過松哥最近發(fā)的 Spring 源碼文章,今天的內(nèi)容很好懂~至此,Spring 循環(huán)依賴,從思路到源碼,都和大家分析完畢了~感興趣的小伙伴可以 DEBUG 走一遍哦~


