SpringBoot多租戶三種架構實現方案詳解
環境:SpringBoot3.3.0
1. 簡介
多租戶表示應用程序的單個運行實例同時為多個客戶機(租戶)服務的體系結構。這在SaaS解決方案中非常常見。在這些系統中,隔離與各種租戶相關的信息(數據、定制等)是一個特殊的挑戰。這包括存儲在數據庫中的每個租戶擁有的數據。以下是三種常用的多租戶架構實現方案:
1.1 獨立數據庫(Separate database)
 圖片
圖片
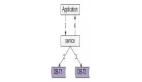
每個租戶的數據都保存在一個物理上獨立的數據庫實例中。JDBC連接將專門指向每個數據庫,因此任何池都將按租戶進行。這里,一種通用的應用程序方法是為每個租戶定義JDBC連接池,并根據與當前登錄用戶相關聯的租戶標識符來選擇要使用的池。
優點:
- 數據隔離級別高,安全性好
- 可以根據租戶的需求進行數據庫優化和擴展
- 備份和恢復操作相對簡單
缺點:
- 成本較高,需要為每個租戶購買和維護獨立的數據庫實例
- 可能存在硬件資源浪費,因為每個租戶可能只使用了數據庫的一部分功能
1.2 獨立Schema(Separate schema)

每個租戶的數據都保存在單個數據庫實例上的不同數據庫Schema中。這里有兩種不同的定義JDBC連接的方法:
- 連接可以特定地指向每個Schema,就像單獨的數據庫方法中那樣。這是一個選項,前提是驅動程序支持在連接URL中命名默認Schema,或者池機制支持命名用于其連接的Schema。使用這種方法,我們將為每個租戶創建一個不同的JDBC連接池,使用的連接池將基于與當前登錄用戶相關聯的“租戶標識符”進行選擇。
- 連接可以指向數據庫本身(使用某些默認Schema),但使用SQL SET schema(或類似的)命令可以更改連接。使用這種方法,我們將有一個JDBC連接池用于為所有租戶提供服務,但在使用連接之前,它將被更改為引用由與當前登錄用戶關聯的“租戶標識符”命名的模式。
優點:
- 降低了數據庫成本,因為多個租戶共享一個數據庫實例
- 數據隔離級別仍然較高,因為每個租戶使用獨立的模式
缺點:
- 模式之間可能存在資源競爭和性能瓶頸
- 備份和恢復操作可能更加復雜,因為需要針對每個模式進行單獨操作
1.3 分區數據(Partitioned (discriminator) data)

所有數據都保存在一個數據庫Schema中。通過使用分區列對每個租戶的數據進行分區。這種方法將使用單個連接池為所有租戶提供服務。但是,在這種方法中,應用程序需要對每個SQL語句添加分區列(查詢時where條件加入分區列作為查詢條件)。
優點:
- 成本最低,因為所有租戶都共享同一個數據庫實例和模式
- 數據訪問和查詢效率可能較高,因為數據都在同一個表中
缺點:
- 數據隔離級別最低,可能存在安全風險
- 需要通過應用程序邏輯來確保數據的正確隔離和訪問控制
- 數據備份和恢復操作可能非常復雜,因為需要考慮到所有租戶的數據
接下來我會對分區數據和獨立數據庫2種架構進行詳細的介紹。獨立Schema方案其實與獨立數據庫模式挺像的,如果基于MySQL其實對應的就是不同數據庫(可以是同一個MySQL實例,通過use xxx切換數據庫),基于Oracle就是對應不同的用戶上(并非schema與用戶等同)。
2. 實戰案例
2.1 分區數據
注:請先確保你當前使用的SpringBoot版本(Spring Data JPA)整合的Hibernate版本至少是6.0版本以上。
實體定義
@Entity
@Table(name = "t_person")
public class Person {
  @Id
  @GeneratedValue(strategy = GenerationType.IDENTITY)
  private Long id ;
  private String name ;
  private Integer age ;
  @TenantId
  private String tenantId ;
}這里通過@TenantId注解標注,該字段專門用來分區租戶的,Hibernate在查詢數據時會自動添加該查詢條件,如果你使用的本地SQL(自己編寫SQL),那么需要你自行添加該條件(租戶ID條件)。
編寫DAO&Service
// DAO
public interface PersonRepository extends JpaRepository<Person, Long>, JpaSpecificationExecutor<Person> {
}
// Service
@Service
public class PersonService {


  private final PersonRepository personRepository ;
  public PersonService(PersonRepository personRepository) {
    this.personRepository = personRepository ;
  }
  // 查詢所有Person數據
  public List<Person> persons() {
    return this.personRepository.findAll() ;
  }
}
Controller接口
@GetMapping("")
public List<Person> persons() {
  return this.personService.persons() ;
}
以上是開發一個業務功能的基本操作,接下來才是重點
租戶標識解析處理
該的作用獲取當前租戶ID,這里基于ThreadLocal實現
public class TenantIdResolver implements CurrentTenantIdentifierResolver<String> {


  private static final ThreadLocal<String> CURRENT_TENANT = new ThreadLocal<>();


  public void setCurrentTenant(String currentTenant) {
    CURRENT_TENANT.set(currentTenant);
  }
  @Override
  public String resolveCurrentTenantIdentifier() {
    // 注意這里不能返回null
    return Optional.ofNullable(CURRENT_TENANT.get()).orElse("default") ;
  }


  @Override
  public boolean validateExistingCurrentSessions() {
    return true;
  }
}
上面的組件用來從當前的ThreadLocal中獲取租戶ID,接下來就是像ThreadLocal存入租戶ID。
Web攔截器
該攔截器的作用用來從請求Header中獲取租戶ID,存入ThreadLocal中。
@Component
public class TenantIdInterceptor implements HandlerInterceptor {


  private final TenantIdResolver tenantIdResolver;
  public TenantIdInterceptor(TenantIdResolver tenantIdResolver) {
    this.tenantIdResolver = tenantIdResolver;
  }


  @Override
  public boolean preHandle(HttpServletRequest request, HttpServletResponse response, Object handler) throws Exception {
    String tenantId = request.getHeader("x-tenant-id");
    tenantIdResolver.setCurrentTenant(tenantId);
    return true ;
  }
}
最后一步就是配置hibernate,設置租戶ID的解析器。
配置租戶標識解析器
spring:
  jpa:
    properties:
      hibernate:
        '[tenant_identifier_resolver]': 'com.pack.tenant.config.TenantIdResolver'
完成以上類及配置的編寫后就實現了基于列區分(分區)的多租戶架構方案。
測試
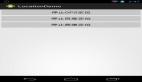
準備數據:
 圖片
圖片
 圖片
圖片
 圖片
圖片
SQL執行情況:
 圖片
圖片
自動添加了tenant_id查詢條件。
2.2 獨立數據庫
每租戶對應一個數據庫,這需要在項目中配置多個數據源,同時提供一個數據源路由的核心類。
定義多數據源配置
你也可以將數據源的信息專門存放在數據表中。
pack:
  datasource:
    defaultDs: ds1
    config:
      ds1:
        driverClassName: com.mysql.cj.jdbc.Driver
        url: jdbc:mysql://localhost:3306/tenant-01
        username: tenant01
        password: xxxooo
        type: com.zaxxer.hikari.HikariDataSource
      ds2:
        driverClassName: com.mysql.cj.jdbc.Driver
        url: jdbc:mysql://localhost:3306/tenant-02
        username: tenant02
        password: oooxxx
type: com.zaxxer.hikari.HikariDataSource在Spring實現多數據源切換,可以通過繼承AbstractRoutingDataSource。
public class PackRoutingDataSource extends AbstractRoutingDataSource {
  @Override
  protected Object determineCurrentLookupKey() {
    return DataSourceContextHolder.get() ;
  }
}
public class DataSourceContextHolder {


  private static final ThreadLocal<String> HOLDER = new InheritableThreadLocal<>() ;


  public static void set(String key) {
    HOLDER.set(key) ;
  }
  public static String get() {
    return HOLDER.get() ;
  }
  public static void clear() {
    HOLDER.remove() ;
  }
}
配置數據源Bean
@Configuration
public class DataSourceConfig {


  @Bean
  public DataSource dataSource(MultiDataSourceProperties properties) {
    PackRoutingDataSource dataSource = new PackRoutingDataSource(properties.getDefaultDs()) ;
    Map<Object, Object> targetDataSources = new HashMap<>() ;
    // PackDataSourceProperties類僅僅就是繼承DataSourceProperties
    Map<String, PackDataSourceProperties> configs = properties.getConfig() ;
    configs.forEach((key, props) -> {
      targetDataSources.put(key, createDataSource(props, HikariDataSource.class)) ;
    });
    dataSource.setTargetDataSources(targetDataSources) ;
    return dataSource ;
  }
  private static <T> T createDataSource(PackDataSourceProperties properties, Class<? extends DataSource> type) {
    // 這里沒有考慮池的配置
    return (T) properties.initializeDataSourceBuilder().type(type).build();
  }
}
接下來定義攔截器,設置當前要操作的數據源。
Web攔截器
@Component
public class TenantIdInterceptor implements HandlerInterceptor {
  @Override
  public boolean preHandle(HttpServletRequest request, HttpServletResponse response, Object handler) throws Exception {
    String tenantId = request.getHeader("x-tenant-id");
    DataSourceContextHolder.set(tenantId) ;
    return true ;
  }
}
以上就完成了多數據源的所有類及配置的編寫。