交互式圖形用戶界面(GUI)應用程序 | 基于顏色的對象檢測和追蹤
作者:二旺
在本文中,我將展示如何創建一個GUI,用于使用它們的顏色來檢測和追蹤對象。
大多數時候,用于對象檢測和追蹤的都是深度學習模型。的確,深度學習非常強大,但也存在其他的對象檢測和追蹤方法。在本文中,我將展示如何創建一個GUI,用于使用它們的顏色來檢測和追蹤對象。

檢測魚類
顏色可以用不同的格式表示。有多種方式來表示顏色:
- RGB(紅,綠,藍)
- BGR(藍,綠,紅)
- HSV(色調,飽和度,值)
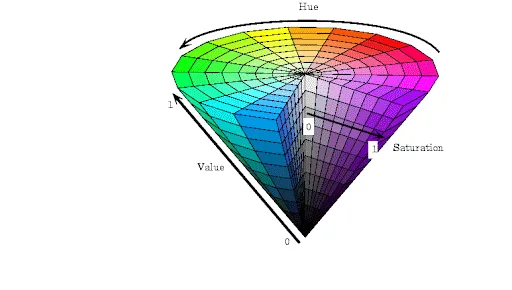
HSV 顏色空間
HSV代表色調、飽和度和值。這是一種常用于圖像處理和計算機視覺任務的顏色空間表示。使用HSV顏色空間進行顏色選擇的優勢在于它允許輕松地操作色調、飽和度和值。然而,一個缺點是它可能無法準確表示所有顏色。如果你仔細觀察這張圖片,你會注意到你無法獲得所有顏色:
如何使用顏色進行對象檢測?
使用顏色進行對象檢測涉及基于圖像中對象的顏色屬性來識別對象。有5個主要步驟:
- 選擇顏色空間:通常,HSV是一個很好的選擇。
- 閾值處理:在選定的顏色空間中設置閾值,以隔離與要檢測的對象顏色匹配的圖像區域。例如,如果你選擇HSV顏色空間,定義色調、飽和度和值通道的范圍。如果你想檢測藍色對象,你需要為藍色定義特定的下限和上限。
- 生成掩碼:創建一個二進制掩碼,其中指定顏色范圍內的像素設置為1(白色),范圍外的像素設置為0(黑色)。這個掩碼將分離圖像中的感興趣區域,在這種情況下,它將隔離所需的顏色。
- 輪廓檢測:找到掩碼后,找到輪廓就很簡單了。OpenCV提供了cv2.findContours()函數用于查找輪廓。
- 繪制矩形:cv2.findContours()函數將返回一系列輪廓。遍歷該列表,并使用cv2.boundingRect(contour)函數找到每個輪廓的邊界矩形的坐標。之后,使用這些坐標繪制矩形。

檢測藍色球體
交互式GUI應用程序 / 代碼
我在上面的5個步驟中解釋了主要算法。在代碼部分,我用注釋解釋了所有行。程序相當簡單。用戶使用顏色條選擇一種顏色,然后程序獲取那種顏色,處理它,并提取那種顏色的對象:
import cv2
import numpy as np
import tkinter as tk
from tkinter import ttk
from PIL import Image, ImageTk

class ColorPickerApp:
    def __init__(self, master):
        self.master = master
        self.master.title("Color Picker")
        self.master.geometry("800x600")  # Adjust the size of the window

        # Create a frame to hold the color bar and color image
        self.color_bar_frame = tk.Frame(master)
        self.color_bar_frame.pack(side="top", fill="x", padx=5, pady=5)

        self.hue_label = ttk.Label(self.color_bar_frame, text="Select Hue Value (10-179):")
        self.hue_label.pack(side="left", padx=5, pady=5)

        self.hue_scale = ttk.Scale(self.color_bar_frame, from_=10, to=179, orient="horizontal", command=self.update_color)
        self.hue_scale.pack(side="left", padx=5, pady=5)

        # Create a canvas for the color image
        self.canvas_color = tk.Canvas(master, width=100, height=320)
        self.canvas_color.pack(side="left", padx=5, pady=75)

        # Create a canvas for the image
        self.canvas_image = tk.Canvas(master, width=800, height=400)
        self.canvas_image.pack(side="top", padx=5, pady=50)

        self.detect_button = ttk.Button(master, text="Detect Objects", command=self.detect_objects)
        self.detect_button.pack(side="top", padx=5, pady=5)

        self.image = None
        self.image_rgb = None
        self.image_hsv = None

        # Video capture
        self.cap = cv2.VideoCapture("fish.mp4")  # Change to 0 for webcam, or provide path for video file

        # Load the initial frame
        self.load_frame()

    def load_frame(self):
        ret, frame = self.cap.read()
        if ret:
            self.image = frame
            self.image_rgb = cv2.cvtColor(frame, cv2.COLOR_BGR2RGB)
            self.image_hsv = cv2.cvtColor(frame, cv2.COLOR_BGR2HSV)

            # Display the frame with detected regions
            self.display_frame(self.image_rgb)
            self.master.after(100, self.load_frame)  # Continue to load frames

    def update_color(self, value):
        hue_value = int(float(value))
        color_image = np.zeros((400, 100, 3), dtype=np.uint8)
        color_image[:, :] = (hue_value, 255, 255)
        color_image_rgb = cv2.cvtColor(color_image, cv2.COLOR_HSV2RGB)
        color_image_rgb = Image.fromarray(color_image_rgb)

        # Display the color image
        color_image_tk = ImageTk.PhotoImage(image=color_image_rgb)
        self.canvas_color.create_image(0, 0, anchor="nw", image=color_image_tk)
        self.canvas_color.image = color_image_tk


    def display_frame(self, frame):
        img = Image.fromarray(frame)

        # Get the original frame dimensions
        frame_width, frame_height = img.size


         # Define maximum width and height
        max_width = 600
        max_height = 300

        # Calculate target width and height
        target_width = min(frame_width, max_width)
        target_height = min(frame_height, max_height)

        # Calculate aspect ratio
        aspect_ratio = frame_width / frame_height

        # Adjust dimensions if necessary to fit within limits
        if aspect_ratio > max_width / max_height:
            target_width = max_width
            target_height = int(target_width / aspect_ratio)
        else:
            target_height = max_height
            target_width = int(target_height * aspect_ratio)


        # Resize the frame while maintaining the aspect ratio
        img = img.resize((target_width, target_height), Image.LANCZOS)

        # Convert the resized frame to PhotoImage
        img = ImageTk.PhotoImage(image=img)


        # Clear previous frame and display the resized frame
        self.canvas_image.delete("all")
        self.canvas_image.create_image(0, 0, anchor="nw", image=img)
        self.canvas_image.image = img

    def detect_objects(self):
        if self.image is None:
            return

        print("detecting objects")
        # Define the hue range based on the current value of the hue scale
        hue_value = int(self.hue_scale.get())
        lower_limit = np.array([hue_value - 8, 100, 100])
        upper_limit = np.array([hue_value + 8, 255, 255])

        # Create a mask to detect objects within the specified hue range
        mask = cv2.inRange(self.image_hsv, lower_limit, upper_limit)
        contours, _ = cv2.findContours(mask, cv2.RETR_EXTERNAL, cv2.CHAIN_APPROX_SIMPLE)

        # Draw rectangles around the detected objects
        for contour in contours:
            print("contour found")
            #if cv2.contourArea(contour) > 50:
            x, y, w, h = cv2.boundingRect(contour)
            cv2.rectangle(self.image_rgb, (x, y), (x + w, y + h), (255, 255, 0), 5)

        # Display the updated frame with detected objects
        self.display_frame(self.image_rgb)

        # Call detect_objects again after a delay
        self.master.after(50, self.detect_objects)


def main():
    root = tk.Tk()
    app = ColorPickerApp(root)
    root.mainloop()


if __name__ == "__main__":
    main()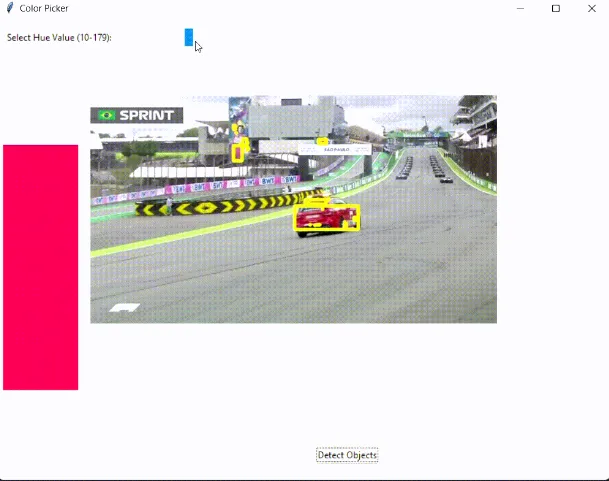

責任編輯:趙寧寧
來源:
小白玩轉Python