這才是批量Update的正確姿勢!

前言
最近我有位小伙伴問我,在實際工作中,批量更新的代碼要怎么寫。
這個問題挺有代表性的,今天拿出來給大家一起分享一下,希望對你會有所幫助。
1.案發現場
有一天上午,在我的知識星球群里,有位小伙伴問了我一個問題:批量更新你們一般是使用when case嗎?還是有其他的批量更新方法?
我的回答是:咱們星球的商城項目中,有批量更新的代碼可以參考一下,這個項目中很多代碼,大家平時可以多看看。
然后我將關鍵代碼發到群里了,這是批量重置用戶密碼的業務場景:
<update id="updateForBatch" parameterType="cn.net.susan.entity.sys.UserEntity">
    <foreach collection="list" item="entity" separator=";">
        UPDATE sys_user
        SET password = #{entity.password},update_user_id=#{entity.updateUserId},update_user_name=#{entity.updateUserName}
        <where>
            id = #{entity.id}
        </where>
    </foreach>
</update>
有小伙伴說,第一次見到這種寫法,漲知識了。
還有小伙伴問,上面這種寫法,跟直接for循環中update有什么區別?
for(UserEntity userEntity: list) {
   userMapper.update(userEntity);
}
直接for循環需要多次請求數據庫,網絡有一定的開銷,很顯然沒有批量一次請求數據庫的好。
2.其他的批量更新寫法
有小伙說,他之前一直都是用的case when的寫法。
類似下面這樣的:
<update id="updateForBatch" parameterType="cn.net.susan.entity.sys.UserEntity">
  update sys_user
  <trim prefix="set" suffixOverrides=",">
      <trim prefix="password = case id" suffix="end,">
          <foreach collection="list" item="item">
              when #{item.id} then #{item.password}
          </foreach>
      </trim>
      <trim prefix="update_user_id = case id" suffix="end,">
          <foreach collection="list" item="item">
              when #{item.id} then #{item.updateUserId}
          </foreach>
      </trim>
      <trim prefix="update_user_name = case id" suffix="end">
          <foreach collection="list" item="item">
              when #{item.id} then #{item.updateUserName}
          </foreach>
      </trim>
  </trim>
  <where>
      id in (
      <foreach collection="list" separator="," item="item">
          #{item.id}
      </foreach>
      )
  </where>
</update>
但這種寫法顯然需要拼接很多條件,有點復雜,而且性能也不太好。
還有些文章中介紹,可以使用在insert的時候,可以在語句最后加上ON DUPLICATE KEY UPDATE關鍵字。
<update id="updateForBatch" parameterType="cn.net.susan.entity.sys.UserEntity">
    insert into sys_user
    (id,username,password) values
    <foreach collection="list" index="index" item="item" separator=",">
        (#{item.id},
        #{item.username},
        #{item.password})
    </foreach>
    ON DUPLICATE KEY UPDATE
     password=values(password)
</update>
在插入數據時,數據庫會先判斷數據是否存在,如果不存在,則執行插入操作。如果存在,則執行更新操作。
這種方式我之前也用過,一般需要創建唯一索引。
因為很多時候主鍵id,是自動增長的或者根據雪花算法生成的,每次都不一樣,沒法區分多次相同業務參數請求的唯一性。
因此,建議創建一個唯一索引,來保證業務數據的唯一性。
比如:給username創建唯一索引,在insert的時候,發現username已存在,則執行update操作,更新password。
這種方式批量更新數據,性能比較好,但一般的大公司很少會用,因為非常容易出現死鎖的問題。
因此,目前批量更新數據最好的選擇,還是我在文章開頭介紹的第一種方法。
3.發現了一個問題
群里另外一位小伙伴,按照我的建議,在自己的項目中嘗試了一下foreach的這種批量更新操作,但代碼報了一個異常:
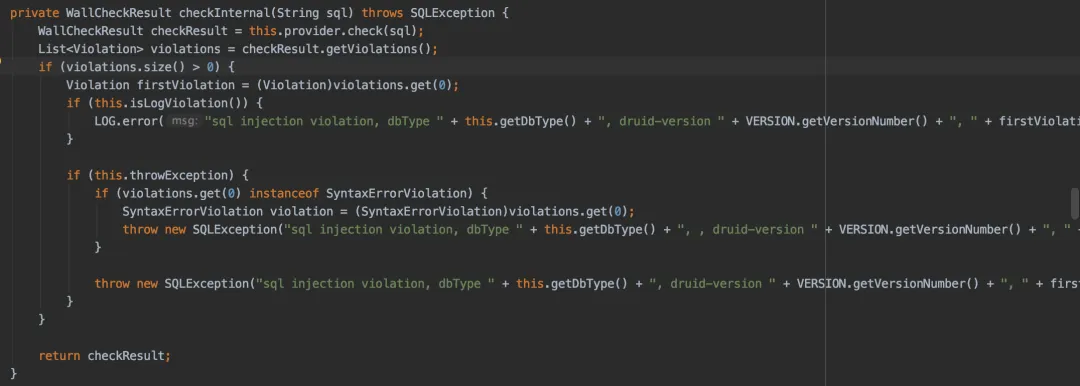
sql injection violation, multi-statement not allow這個異常是阿里巴巴druid包的WallFilter中報出來了。
它里面有個checkInternal方法,會對sql語句做一些校驗,如果不滿足條件,就會拋異常:

而druid默認不支持一條sql語句中包含多個statement語句,例如:我們的批量update數據的場景。
此外,MySQL默認也是關閉批量更新數據的,不過我們可以在jdbc的url要上,添加字符串參數:&allowMultiQueries=true,開啟批量更新操作。
比如:
datasource:
    type: com.alibaba.druid.pool.DruidDataSource
    druid:
      driver-class-name: com.mysql.cj.jdbc.Driver
      url: jdbc:mysql://localhost:3306/console?useUnicode=true&characterEncoding=utf-8&useSSL=false&allowMultiQueries=true
      username: root
      password: root
這個改動非常簡單。
但WallFilter中的校驗問題如何解決呢?
于是,我上網查了一下,可以通過參數調整druid中的filter的判斷邏輯,比如:
spring:
  datasource:
    url: jdbc:xxx&serverTimeznotallow=Asia/Shanghai&rewriteBatchedStatements=true&allowMultiQueries=true
    username: xxx
    password: xxx
    driver-class-name: com.mysql.cj.jdbc.Driver
    type: com.alibaba.druid.pool.DruidDataSource
    druid:
      filter:
        wall:
          config:
            multi-statement-allow: true
            none-base-statement-allow: true
通過設置filter中的multi-statement-allow和none-base-statement-allow為true,這樣就能開啟批量更新的功能。
4.一直不生效
普通使用druid的datasource配置,通過上面這樣調整是OK的。
但有些小伙伴發現,咱們的商城項目中,通過上面的兩個地方的修改,還是一直報下面的異常:
sql injection violation, multi-statement not allow這是怎么回事呢?
答:咱們商城項目中的訂單表,使用shardingsphere做了分庫分表,并且使用baomidou實現多個數據源動態切換的功能:
<dependency>
    <groupId>com.baomidou</groupId>
    <artifactId>dynamic-datasource-spring-boot-starter</artifactId>
    <version>3.1.1</version>
</dependency>
我們是使用了baomidou包下的數據源配置,這個配置在DynamicDataSourceProperties類中:
/**
 * Copyright ? 2018 organization baomidou
 * <pre>
 * Licensed under the Apache License, Version 2.0 (the "License");
 * you may not use this file except in compliance with the License.
 * You may obtain a copy of the License at
 *
 *     http://www.apache.org/licenses/LICENSE-2.0
 *
 * Unless required by applicable law or agreed to in writing, software
 * distributed under the License is distributed on an "AS IS" BASIS,
 * WITHOUT WARRANTIES OR CONDITIONS OF ANY KIND, either express or implied.
 * See the License for the specific language governing permissions and
 * limitations under the License.
 * <pre/>
 */
package com.baomidou.dynamic.datasource.spring.boot.autoconfigure;

import com.baomidou.dynamic.datasource.spring.boot.autoconfigure.druid.DruidConfig;
import com.baomidou.dynamic.datasource.spring.boot.autoconfigure.hikari.HikariCpConfig;
import com.baomidou.dynamic.datasource.strategy.DynamicDataSourceStrategy;
import com.baomidou.dynamic.datasource.strategy.LoadBalanceDynamicDataSourceStrategy;
import com.baomidou.dynamic.datasource.toolkit.CryptoUtils;
import lombok.Getter;
import lombok.Setter;
import lombok.extern.slf4j.Slf4j;
import org.springframework.boot.autoconfigure.jdbc.DataSourceProperties;
import org.springframework.boot.context.properties.ConfigurationProperties;
import org.springframework.boot.context.properties.NestedConfigurationProperty;
import org.springframework.core.Ordered;

import java.util.LinkedHashMap;
import java.util.Map;

/**
 * DynamicDataSourceProperties
 *
 * @author TaoYu Kanyuxia
 * @see DataSourceProperties
 * @since 1.0.0
 */
@Slf4j
@Getter
@Setter
@ConfigurationProperties(prefix = DynamicDataSourceProperties.PREFIX)
public class DynamicDataSourceProperties {

    public static final String PREFIX = "spring.datasource.dynamic";
    public static final String HEALTH = PREFIX + ".health";

    /**
     * 必須設置默認的庫,默認master
     */
    private String primary = "master";
    /**
     * 是否啟用嚴格模式,默認不啟動. 嚴格模式下未匹配到數據源直接報錯, 非嚴格模式下則使用默認數據源primary所設置的數據源
     */
    private Boolean strict = false;
    /**
     * 是否使用p6spy輸出,默認不輸出
     */
    private Boolean p6spy = false;
    /**
     * 是否使用seata,默認不使用
     */
    private Boolean seata = false;
    /**
     * 是否使用 spring actuator 監控檢查,默認不檢查
     */
    private boolean health = false;
    /**
     * 每一個數據源
     */
    private Map<String, DataSourceProperty> datasource = new LinkedHashMap<>();
    /**
     * 多數據源選擇算法clazz,默認負載均衡算法
     */
    private Class<? extends DynamicDataSourceStrategy> strategy = LoadBalanceDynamicDataSourceStrategy.class;
    /**
     * aop切面順序,默認優先級最高
     */
    private Integer order = Ordered.HIGHEST_PRECEDENCE;
    /**
     * Druid全局參數配置
     */
    @NestedConfigurationProperty
    private DruidConfig druid = new DruidConfig();
    /**
     * HikariCp全局參數配置
     */
    @NestedConfigurationProperty
    private HikariCpConfig hikari = new HikariCpConfig();

    /**
     * 全局默認publicKey
     */
    private String publicKey = CryptoUtils.DEFAULT_PUBLIC_KEY_STRING;
}
這個類是數據庫的配置類,我們可以看到master和druid的配置是在同一層級的,于是,將application.yml文件中的配置改成下面這樣的:
spring:
  application:
    name: mall-job
  datasource:
    dynamic:
      primary: master
      datasource:
        master:
          username: root
          password: 123456
          url: jdbc:mysql://localhost:3306/susan_mall?serverTimeznotallow=Asia/Shanghai&characterEncoding=utf8&useSSL=false&zeroDateTimeBehavior=convertToNull
          driver-class-name: com.mysql.cj.jdbc.Driver
       druid:
        wall:
          multiStatementAllow: true
          noneBaseStatementAllow: true
這樣改動之后,商城項目中使用foreach這種批量更新數據的功能OK了。
5.最后
本文由一位球友的問題開始,討論了批量更新的四種常見方式:
- for循環中一條條更新。
- foreach拼接update語句后批量更新。
- 使用case when的方式做判斷。
- 使用insert into on duplicate key update語法,批量插入或者批量更新。
雖說有很多種方式,但我個人認為批量update的最佳方式是第2種方式。
但需要需要的地方是,使用foreach做批量更新的時候,一次性更新的數據不宜太多,盡量控制在1000以內,這樣更新的性能還是不錯的。
如果需要更新的數據超過了1000,則需要分成多批更新。
此外,如果大家遇到執行批量update操作,不支持批量更新問題時:
sql injection violation, multi-statement not allow首先要在數據庫連接的url后面增加&allowMultiQueries=true參數,開啟數據的批量更新操作。
如果使用了druid數據庫驅動的,可以在配置文件中調整filter的參數。
spring:
  datasource:
    druid:
      filter:
        wall:
          config:
            multi-statement-allow: true
            none-base-statement-allow: true
主要是multi-statement-allow設置成true。
如果你還使用了其他第三方的數據庫中間件,比如我使用了baomidou實現多個數據源動態切換的功能。
這時候,需要查看它的源碼,確認它multi-statement-allow的配置參數是怎么配置的,有可能跟druid不一樣。


