
??想了解更多關于開源的內容,請訪問:??
??51CTO 開源基礎軟件社區??
??https://ost.51cto.com??。
前言
虛擬搖桿在移動端游戲中是最常見看的,用來實現游戲中的精靈移動。本案例中使用jspai中的div和image組件來實現的虛擬搖桿組件,然后監聽touch事件獲取滑動的方向和位置x,y。
開發環境說明
- 工具版本:OpenHarmony DevEco Studio 3.0 Release
- SDK版本:3.0.0.993(API Version 8 Beta3)
- 組要組件:組件名稱yg-rocker
展示效果
實現虛擬搖桿組件-開源基礎軟件社區")
屬性
rockerData
屬性名
| 類型
| 默認值
| 作用
|
ou_width
| Number
| 140
| 搖桿外圓寬度
|
ou_height
| Number
| 140
| 搖桿外圓高度
|
in_width
| Number
| 60
| 搖桿內圓寬度
|
in_height
| Number
| 60
| 搖桿內圓高度
|
ou_img
| Image
| -
| 搖桿外圓圖片
|
in_img
| Image
| -
| 搖桿內圓圖片
|
組件事件
屬性名
| 類型
| 返回值
| 備注
|
play
| Function
| {x:Number, y:Number, angle:Number}
| x: 搖桿滑動的x, y: 搖桿滑動的y, angle: 對應x方向的角度
|
調用實現
hml部分:
<element name="yg-rocker" src="../../common/component/ygRocker.hml"></element>
<div class="container" ref="box">
    <yg-rocker
        rocker-data="{{rockerData}}"
        @play="play"
    ></yg-rocker>
</div>
js部分:
import Log from '../../common/utils/log.js'
const log = new Log('index.js頁面')
export default {
    data: {
        rockerData: {
            ou_width: 140,
            ou_height: 140,
            in_width: 60,
            in_height: 60,
            ou_img: '/common/images/rocker_bg.png',
            in_img: '/common/images/rocker.png',
        },
        d_x: 0,
        d_y: 0,
        window: {
            w: 720,
            h: 332
        },
        angle: 0
    },
    onInit() {
    },
    onShow(){
        let d = this.$refs.box.getBoundingClientRect();
        this.window.w = d.width || 720;
        this.window.h = d.height || 332;
    },
    play(e){
        let opt = e.detail
        let {x, y, angle} = opt;
        this.angle = angle;
        this.d_x = x;
        this.d_y = y;
    }
}
實現過程
1、首先渲染虛擬搖桿的外圓和內圓
實現虛擬搖桿組件-開源基礎軟件社區")
通過css調整:
.yg-rocker{
  position: fixed;
  bottom: 40px;
  left: 40px;
}
.yg-rocker{
  opacity: .4;
}
.yg-rocker-bg .active-bg{
  box-shadow: 0fp 0 10px 5px rgba(0,170,255,.2);
  opacity: .6;
}
.yg-rocker .yg-rocker-item{
  position: absolute;
}
最后得到:
實現虛擬搖桿組件-開源基礎軟件社區")
2、給虛擬搖桿添加touch事件
<div
    class="yg-rocker-bg"
    ref="ygRockerBg"
    @touchstart="touchStart"
    @touchmove="touchMove"
    @touchend="touchEnd"
>
touchStart觸摸開始事件:
- 在開始觸摸時,記錄當前手勢按壓的位置x,y。
- 獲取搖桿內圓的位置,d = this.$refs.ygRockerItem.getBoundingClientRect()。
- 記錄當前內圓的圓心在屏幕的位置 this.x, this.y。
- isTouch記錄當前在觸摸,后面需要做定時器邏輯判斷。
- setSide(t)方法傳入一個x,y坐標,計算當前內圓的位置,下面詳細講解。
- ani(time)傳入一個毫秒級的時間,作為定時器刷新時間,下面詳細講解。
touchStart(e){
    let t = e.touches[0];
    let d = this.$refs.ygRockerItem.getBoundingClientRect();
    this.x = d.left + d.width / 2;
    this.y = d.top + d.height / 2;
    this.isTouch = true;
    this.setSide(t);
    this.ani(10);
  },
觸摸滑動事件和觸摸結束事件。
// 觸摸滑動事件也交給setSide方法處理
touchMove(e){
    let t = e.touches[0];
    this.setSide(t);
},
// 觸摸結束,搖桿內圓回歸到最開始位置
touchEnd(){
    this.isTouch = false;
    // 回到中心位置
    this.top = 0;
    this.left = 0;
},
3、對滑動的位置處理
- setSide(t)方法傳入一個對象{x,y},表示當前手勢觸摸在屏幕的位置。
- 計算當前觸摸手指的位置到搖桿內圓初始圓心的半徑為temp,如下圖。
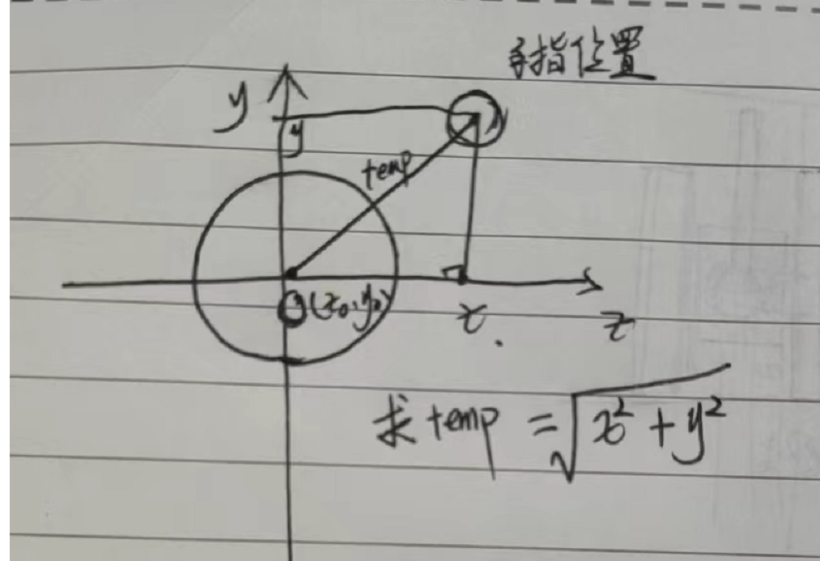
- 通過勾股定理,我們得到temp=Math.sqrt(Math.pow(x,2) + Math.pow(y,2))。
- 讓手指所在的位置和當前搖桿外圓的半徑對比,如果超出外圓,就讓內圓在外圓的邊上滑動,不讓內圓跟著手指超出外圓范圍。
- 最后通過三角函數求得內圓在屏幕上的位置left,top。
- speed記錄滑動處理后的坐標速度。
- getAngle獲取當前手指和內圓圓心所在x軸方向的角度。后續用來判斷物體的方向。
- setFlag記錄坐標所在的以內圓圓心位坐標原點的象限。
setSide(t){
    let x = this.x - t.globalX;
    let y = this.y - t.globalY;
    // 獲取到當前位置到圓心半徑
    let temp = Math.sqrt(Math.pow(x,2) + Math.pow(y,2));
    let r = this.rockerData.ou_width / 2;
    let r2 = temp <= r ? r : temp;
    let top = Math.sin(y/r2) * (this.rockerData.ou_width / 2);
    let left = Math.sin(x/r2) * (this.rockerData.ou_width / 2);
    this.top = this.setFlag(top);
    this.left = this.setFlag(left);
    this.xx = -1 * x * this.speed;
    this.yy = -1 * y * this.speed;
    this.angle = this.getAngle({x: (-1 * x), y});
},
setFlag(num){
  return num > 0 ? 0 - num : Math.abs(num);
},
4、獲取角度
獲取當前手指和內圓圓心所在x軸方向的角度。用來判斷物體的方向。
因為通過css的rotate來判斷實現物體方向,所以以x軸方向為起點,順時針為遞增從0到360°
圓的周長為2Πr,也就是說2Π為圓的360°,一個Π就是180°,使用三角函數的反正切可求得當前位置對應圓心的角度。
但是因為是正切,所以取值只有0到90°或者是-0到-90°。
所以需要根據在象限的位置來計算內圓圓心為坐標原點,x軸為起邊的順時針角度。
getAngle(obj){
  let {x, y} = obj;
  //返回角度,不是弧度
  let res = 180 * Math.atan(y / x) / Math.PI;
  if(x > 0 && y > 0){
    res = 90 - Math.abs(res)
  }
  if(x > 0 && y < 0){
    res = 90 + Math.abs(res)
  }
  if(x < 0 && y < 0){
    res = 180 + (90-Math.abs(res))
  }
  if(x < 0 && y > 0){
    res = 270 + Math.abs(res)
  }
  return res === res ? res.toFixed(2) : 0;
}
5、動畫幀處理
ani傳入一個定時器的時間,表示這個時間段刷新一次動畫。
因為我們觸摸的時候,如果在一個方向觸摸停止了,但是操作的物體不應該是停止的。而是根據這個方向繼續根據當前速度前進。所以需要使用定時器操作刷新這個動畫幀。
ani(t){
  clearInterval(this.timer);
  this.timer = setInterval(()=>{
    if(!this.isTouch){
      clearInterval(this.timer)
    } else {
      this.d_x = this.d_x + this.xx;
      this.d_y = this.d_y + this.yy;
      this.$emit('play', {x: this.d_x, y: this.d_y, angle: this.angle})
      // 下面的操作都是為了防止物體(坦克)離開屏幕畫面。
      if(this.d_x <= 0){
        this.d_x = 0;
      }
      if(this.d_x >= 680){
        this.d_x = 680;
      }
      if(this.d_y <= 0){
        this.d_y = 0;
      }
      if(this.d_y >= 292){
        this.d_y = 292;
      }
    }
  },t)
},
最后的效果就出來了。
實現虛擬搖桿組件-開源基礎軟件社區")
6、最后,畫一個坦克來驗證虛擬搖桿的數據。
<div class="tank" style="transform: rotate({{angle}}deg); top: {{d_y}}px; left: {{d_x}}px;">
    <div class="l1"></div>
    <div class="l2"></div>
    <div class="c"></div>
    <div class="g"></div>
    <div class="r"></div>
</div>
最后我們再次看一下效果
實現虛擬搖桿組件-開源基礎軟件社區")
代碼地址
https://gitee.com/yango520/yg-rocker。
總結
整體的實現就是這樣,邏輯也比較簡單,當然也有些bug,比如滑動的速度沒有限制超出搖桿外圓的時候而限制。坦克用div畫的,如果需要做更復雜的操作,需要使用canvas來作為畫布場景。
??想了解更多關于開源的內容,請訪問:??
??51CTO 開源基礎軟件社區??
??https://ost.51cto.com??。