The Annotated GPT2注釋加量版,讀懂代碼才算讀懂了GPT 原創
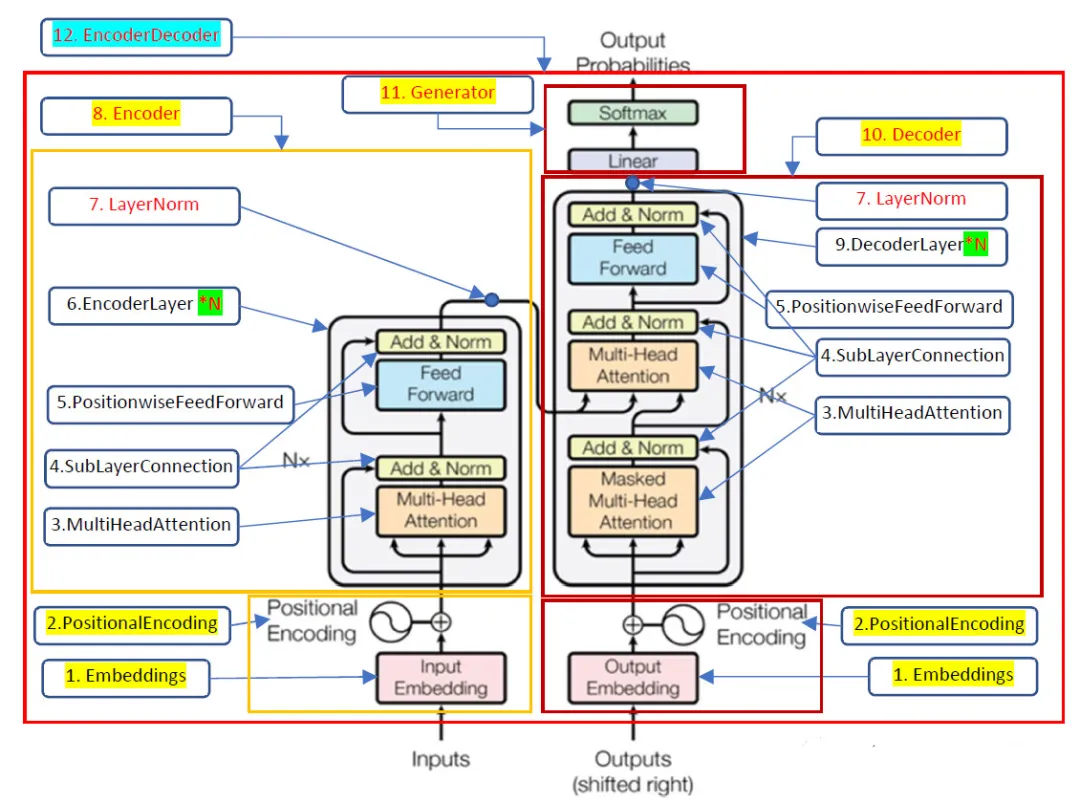
The Annotated Transformer這篇文章從零復現了2017年那篇Transformer論文,The Annotated Transformer注釋加量版在此基礎上追加注釋和輸出數據維度信息進一步揭開Transformer的一些細節,原始Transformer是一個Encoder-Decoder架構的模型,今天我將用同樣的方法繼續學習GPT系列模型中最簡單的GPT2,GPT是Decoder only架構模型,所以,我們只需要關注Transformer的右側部分。
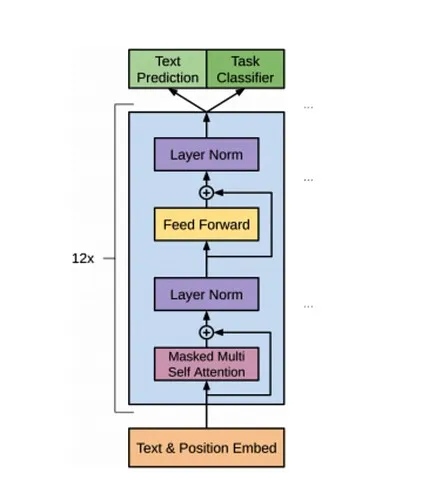
由于代碼過長,所以沒有把全部代碼拷貝過來,建議打開下面代碼作為參照閱讀本文。
代碼運行環境:google colab
??https://github.com/AIDajiangtang/annotated-transformer/blob/master/gpt_model_from_scratch.ipynb??
-1.超參數
GPT_CONFIG_124M = {
"vocab_size": 50257, #詞表大小
"context_length": 256, #上下文長度
"emb_dim": 768,#詞嵌入維度
"n_heads": 12,#頭的個數
"n_layers": 12,#N=12
"drop_rate": 0.1,
"qkv_bias": False
}
0.下載訓練數據
訓練數據來自伊迪絲·華頓(Edith Wharton)的一篇短篇小說《Roman Fever》。
import requests
url = "https://raw.githubusercontent.com/rasbt/LLMs-from-scratch/main/ch02/01_main-chapter-code/the-verdict.txt"
#下載數據
# Send a GET request to the URL
response = requests.get(url)
text_data = response.tex
total_characters = len(text_data)
total_tokens = len(tokenizer.encode(text_data))
print(f"Total characters: {total_characters}")
print(f"Total tokens: {total_tokens}")
Total characters: 20479
Total tokens: 5145
訓練數據包含20479個字符,5145個tokens,下面是打印的部分內容。
I HAD always thought Jack Gisburn rather a cheap genius--though a good fellow enough--so it was no great surprise to me to hear that, in the height of his glory, he had dropped his painting, married a rich widow, and established himself in a villa on the Riviera. (Though I rather thought it would have been Rome or Florence.)
"The height of his glory"--that was what the women called it. I can hear Mrs. Gideon Thwing--his last Chicago sitter--deploring his unaccountable abdication. "Of course it's going to send the value of my picture 'way up; but I don't think of that, Mr. Rickham--the loss to Arrt is all I think of." The word, on Mrs. Thwing's lips, multiplied its rs
Well!--even through the prism of Hermia's tears I felt able to face the fact with equanimity. Poor Jack Gisburn! The women had made him--it was fitting that they should mourn him. Among his own sex fewer regrets were heard, and in his own trade hardly a murmur. Professional jealousy? Perhaps. If it were, the honour of the craft was vindicated by little Claude Nutley, who, in all good faith, brought out in the Burlington a very handsome "obituary" on Jack--one of those showy articles stocked with random technicalities that I have heard (I won't say by whom) compared to Gisburn's painting. And so--his resolve being apparently irrevocable--the discussion gradually died out, and, as Mrs. Thwing had predicted, the price of "Gisburns" went up.
It was not till three years later that, in the course of a few weeks' idling on the Riviera, it suddenly occurred to me to wonder why Gisburn had given up his painting. On reflection, it really was a tempting problem. To accuse his wife would have been too easy--his fair sitters had been denied the solace of saying that Mrs. Gisburn had "dragged him down." For Mrs. Gisburn--as such--had not existed till nearly a year after Jack's resolve had been taken. It might be that he had married her--since he liked his ease--because he didn't want to go on painting; but it would have been hard to prove that he had given up his painting because he had married her.
Of course, if she had not dragged him down, she had equally, as Miss Croft contended, failed to "lift him up"--she had not led him back to the easel. To put the brush into his hand again--what a vocation for a wife! But Mrs. Gisburn appeared to have disdained it--and I felt it might be interesting to find out why.
1.分詞
我們本次要實現的GPT2使用的是一種基于子詞(BPE)的分詞方法。
分詞是將上面的文本轉換成數字索引,根據超參數"vocab_size": 50257,整個詞表有50257單詞(子詞),所以數字索引范圍是0-50256。
import tiktoken
# 加載gpt2 tokenizer
tokenizer = tiktoken.get_encoding("gpt2")

# 文本轉換成token ids
def text_to_token_ids(text, tokenizer):
    encoded = tokenizer.encode(text, allowed_special={'<|endoftext|>'})
    encoded_tensor = torch.tensor(encoded).unsqueeze(0)
    # .unsqueeze(0) adds the batch dimension
    return encoded_tensor

# token ids轉換成文本
def token_ids_to_text(token_ids, tokenizer):
    flat = token_ids.squeeze(0) # Remove batch dimension
    return tokenizer.decode(flat.tolist())
如果想詳細了解分詞方法的請參考下面這篇文章。
1.圖解tokenization
為了查看后面輸出日志中的token ids對應的文本,可以通過text_to_token_ids和token_ids_to_text進行文本和ids相互轉換。
也可以使用在線工具:The Tokenizer Playground,但是在Playground中沒有找到GPT2選項,可以選擇GPT3。
??https://huggingface.co/spaces/Xenova/the-tokenizer-playground??
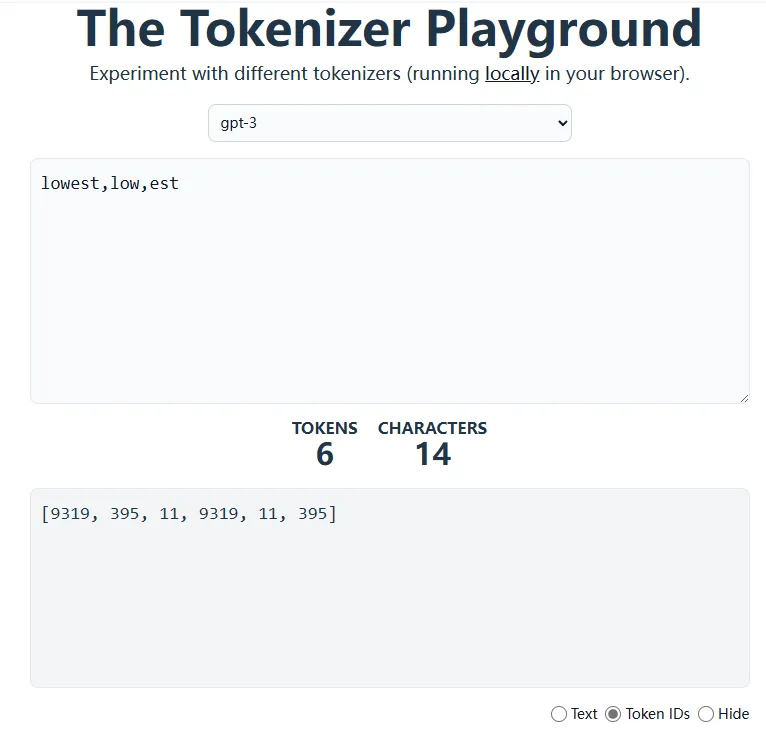
如上圖,BPE分詞方法將lowest分成兩個子詞low和est。
2.構造輸入X和標簽Y
訓練數據一共有5145個token,90%*5145作為訓練集,10%*5145作為驗證集。
train_ratio = 0.90 # 90% of data will be training, 10% will be validation
split_index = int(train_ratio * len(text_data))
train_data = text_data[:split_index]
val_data = text_data[split_index:]
根據超參數的設置上下文長度"context_length": 256,也就是訓練時輸入到模型的每個樣本長度256個token,stride=256,所以會從訓練數據的頭開始,每隔256個token取256個tokens作為輸入X,標簽則是將窗口向右移動一位。
import torch
from torch.utils.data import Dataset, DataLoader

 # Create a data loader
class GPTDatasetV1(Dataset):
    def __init__(self, txt, tokenizer, max_length, stride):
        self.input_ids = []
        self.target_ids = []

        token_ids = tokenizer.encode(txt)

        for i in range(0, len(token_ids) - max_length, stride):
            # The input chunk
            input_chunk = token_ids[i:i + max_length]
            # The target chunk is the input chunk, offset by 1 character
            target_chunk = token_ids[i + 1: i + max_length + 1]

            # Append chunk to list of chunks
            self.input_ids.append(torch.tensor(input_chunk))
            self.target_ids.append(torch.tensor(target_chunk))

    def __len__(self):
        return len(self.input_ids)

    def __getitem__(self, idx):
        return self.input_ids[idx], self.target_ids[idx]
因為batch_size=2,所以每個batch的輸入和標簽維度都是torch.Size([2, 256]) 。
torch.manual_seed(123)
train_loader = create_dataloader_v1(
train_data,
batch_size=2,
max_length=GPT_CONFIG_124M["context_length"],# 256
stride=GPT_CONFIG_124M["context_length"],# 256
drop_last=True,
shuffle=True,
num_workers=0
)
val_loader = create_dataloader_v1(
val_data,
batch_size=2,
max_length=GPT_CONFIG_124M["context_length"],
stride=GPT_CONFIG_124M["context_length"],
drop_last=False,
shuffle=False,
num_workers=0,
)
# Load the data
def create_dataloader_v1(txt, batch_size=4, max_length=256, stride=128, shuffle=True, drop_last=True, num_workers=0):
    tokenizer = tiktoken.get_encoding("gpt2")
    dataset = GPTDatasetV1(txt, tokenizer, max_length, stride)
    dataloader = DataLoader(
        dataset,
        batch_size=batch_size,
        shuffle=shuffle,
        drop_last=drop_last,
        num_workers=0
    )

    return dataloader
為了便于理解,舉個簡單的例子,假設訓練數據的token_ids = [1, 2, 3, 4, 5, 6, 7, 8, 9, 10],context_length=4,stride=4,batch_size=2。
Input IDs: [tensor([1, 2, 3, 4]), tensor([5, 6, 7, 8])]
Target IDs: [tensor([2, 3, 4, 5]),tensor([6, 7, 8, 9])]
X=[tensor([1, 2, 3, 4]), tensor([5, 6, 7, 8])]
Y=[tensor([2, 3, 4, 5]),tensor([6, 7, 8, 9])]
3.詞嵌入
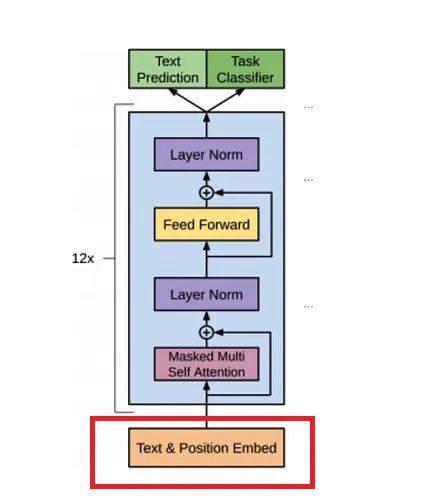
接下來將[2, 256]個token ids轉換成詞嵌入,根據超參數設置:"emb_dim": 768,也就是每個token id映射成一個768維的向量。
簡單地講,這768個數字中每個數字都可以表示一個屬性,維度越高能表述的屬性越豐富,想詳細了解詞嵌入的請閱讀下面文章。
另外,在計算注意力時,沒有考慮token之間的相對位置,所以要在詞嵌入上加一個位置編碼,位置編碼向量維度與詞嵌入維度相同,都是768。
class GPTModel(nn.Module):
  def __init__(self, config):
    super().__init__()

    self.token_embedding = nn.Embedding(config["vocab_size"], config["emb_dim"])#[50257,768]
    self.positional_embedding = nn.Embedding(config["context_length"], config["emb_dim"])#[256,768]
    #隨機將一些元素的值設置為零,不改變維度
    self.drop_embedding = nn.Dropout(config["drop_rate"])

    self.transformer_blocks = nn.Sequential(
        *[TransformerBlock(config) for _ in range(config["n_layers"])]
    )
    #對數據進行平滑,不改變維度
    self.final_norm = LayerNorm(config["emb_dim"])
    self.out_head = nn.Linear(config["emb_dim"], config["vocab_size"], bias=False)

  def forward(self, in_idx):
    batch_size, sequence_length = in_idx.shape #in_idx.shape:訓練時[2, 256],推理時[1, N]
    token_embeddings = self.token_embedding(in_idx)#訓練時[2, 256,768],推理時[1, N,768]
    positional_embeddings = self.positional_embedding(
        torch.arange(sequence_length, device=in_idx.device)
    )#[256,768]
    x = token_embeddings + positional_embeddings #訓練時[2, 256,768],推理時[1, N,768]
    x = self.drop_embedding(x)#[2, 256,768]

    x = self.transformer_blocks(x)#訓練時[2, 256,768],推理時[1, N,768]
    x = self.final_norm(x)#訓練時[2, 256,768],推理時[1, N,768]
    logits = self.out_head(x)#訓練時[2, 256,50257],推理時[1, N,50257]
    return logits
詞嵌入和位置編碼通過下面這兩個可學習的嵌入層完成,嵌入層可以簡單地理解成是一個映射表(map)。將token id或者位置索引映射成一個向量。
self.token_embedding = nn.Embedding(config["vocab_size"], config["emb_dim"])
self.positional_embedding = nn.Embedding(config["context_length"], config["emb_dim"])
在訓練過程中,token_embedding嵌入層將一個batch的輸入數據[2, 256]個token id映射成[2, 256, 768]維詞嵌入。
在推理過程中,token_embedding嵌入層將輸入數據[1, N]映射成[1, N, 768]維詞嵌入,N是隨著不斷地預測下一個token而增長的,直到遇到結束符。
positional_embeddings = self.positional_embedding(
torch.arange(sequence_length, device=in_idx.device)
)
positional_embeddings 嵌入層將256個位置映射成[256,768]位置編碼向量,位置通過torch.arange生成,元素內容是0,1....255。
位置編碼之所以是[256,768]而非[2, 256, 768],說明每個batch下所有樣本共用同一個位置編碼。
與前一篇采用固定計算方式不同,gpt2采用的是可學習的方法,也就是在訓練過程中positional_embedding中的內容會通過反向傳播進行更改。
最終輸出[2, 256, 768]維詞嵌入。
4.TransformerBlock
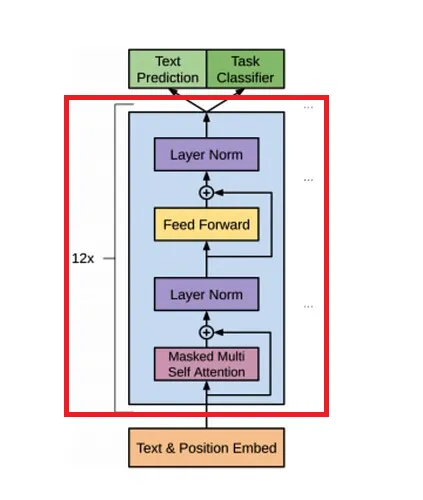
根據超參數設置"n_layers": 12,模型會經過12個結構相同,但參數獨立的TransformerBlock模塊。def forward(self, x): shortcut = x
class TransformerBlock(nn.Module):
  def __init__(self, config):
    super().__init__()

    self.attention = MultiHeadAttention(
        d_in=config["emb_dim"],
        d_out=config["emb_dim"],
        context_length=config["context_length"],
        dropout=config["drop_rate"],
        num_heads=config["n_heads"],
        qkv_bias=config["qkv_bias"]
    )

    self.ff = FeedForward(config)
    self.norm1 = LayerNorm(config["emb_dim"])
    self.norm2 = LayerNorm(config["emb_dim"])
    self.drop_shortcut = nn.Dropout(config["drop_rate"])

  def forward(self, x):
    shortcut = x

    # Attention layer
    x = self.norm1(x)
    x = self.attention(x)
    x = self.drop_shortcut(x)
    x = x + shortcut         # Add the original input back

    # Feedforward layer
    shortcut = x
    x = self.norm2(x)
    x = self.ff(x)
    x = self.drop_shortcut(x)
    x = x + shortcut         # Add the original input back
    return x
TransformerBlock是由MultiHeadAttention、FeedForward和LayerNorm構成。
接下來我們看看數據是如何流經這些層的。
5.MultiHeadAttention
class MultiHeadAttention(nn.Module):
  def __init__(self, d_in, d_out, context_length, dropout, num_heads, qkv_bias=False):
    super().__init__()

    assert d_out % num_heads == 0, "d_out must be divisible by num_heads"

    self.d_out = d_out                  # 768
    self.num_heads = num_heads          # 12
    self.head_dim = d_out // num_heads  # 64
    self.W_query = nn.Linear(d_in, d_out, bias=qkv_bias)
    self.W_key = nn.Linear(d_in, d_out, bias=qkv_bias)
    self.W_value = nn.Linear(d_in, d_out, bias=qkv_bias)
    self._out_proj = nn.Linear(d_out, d_out)
    self.dropout = nn.Dropout(dropout)
    self.register_buffer(
        'mask',
        torch.triu(torch.ones(
            context_length,             # 256
            context_length,             # 256
          ), diagonal=1)
    )

  def forward(self, x):
    batch_size, num_tokens, embedding_length = x.shape
    keys = self.W_key(x)
    queries = self.W_query(x)
    values = self.W_value(x)

    # Add the num_heads and head_dim dimensions
    keys = keys.view(batch_size, num_tokens, self.num_heads, self.head_dim)       # Transform to a tensor of dimensions: 2 x 256 x 12 x 64
    queries = queries.view(batch_size, num_tokens, self.num_heads, self.head_dim) # Transform to a tensor of dimensions: 2 x 256 x 12 x 64
    values = values.view(batch_size, num_tokens, self.num_heads, self.head_dim)   # Transform to a tensor of dimensions: 2 x 256 x 12 x 64

    # Transpose from (batch_size, num_tokens, num_heads, head_dim) to (batch_size, num_heads, num_tokens, head_dim)
    queries = queries.transpose(1, 2)
    keys = keys.transpose(1, 2)
    values = values.transpose(1, 2)

    # Calculate attention scores
    attention_scores = queries @ keys.transpose(2, 3)
    mask_bool = self.mask.bool()[:num_tokens, :num_tokens]

    # Mask the attention scores
    attention_scores.masked_fill_(mask_bool, -torch.inf)

    # Calculate attention weights
    attention_weights = torch.softmax(attention_scores / keys.shape[-1]**0.5, dim=-1)

    # Apply dropout to attention weights
    attention_weights = self.dropout(attention_weights)

    # Calculate context vectors
    context_vectors = (attention_weights @ values).transpose(1, 2)

    # Concatenate the context vectors
    context_vectors = context_vectors.contiguous().view(batch_size, num_tokens, self.d_out)
    return self._out_proj(context_vectors)
輸入的詞嵌入[2, 256, 768]先經過三個矩陣[768, 768]變換,分別得到q、k、v,維度都是[2, 256, 768]。
根據超參數設置"n_heads": 12,將q、k、v reshape成[2, 256, 12,64],再轉置成[2, 12,256, 64]。將原始768維詞嵌入劃分到12個頭中,每個頭64維,這就實現了多頭注意力機制。
 圖片
圖片
然后計算每個頭的注意力,注意力分數矩陣維度[2, 12, 256, 256]。
為了防止看到未來時刻的內容,構造一個上三角掩碼矩陣[256, 256],其對角線以上的部分設置True, 再將注意力分數矩陣中對應掩碼矩陣為True的位置設置為負無窮,這樣softmax 之后接近于零,以屏蔽未來位置的注意力得分。
self.register_buffer(
    'mask',
    torch.triu(torch.ones(
        context_length,             # 256
        context_length,             # 256
      ), diagonal=1)
)
mask_bool = self.mask.bool()[:num_tokens, :num_tokens]

# Mask the attention scores
attention_scores.masked_fill_(mask_bool, -torch.inf)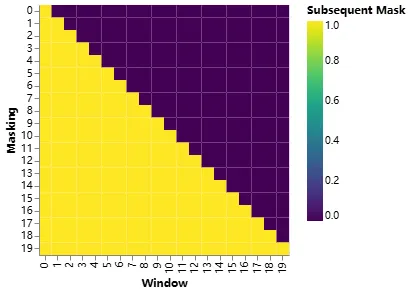
然后將注意力分數矩陣[2, 12, 256, 256]與v[2, 12,256, 64]相乘,輸出[2, 12,256, 64]。
最后將多個頭的輸出通過reshape拼接在一起輸出[2, 256, 768],再經過一個線性層[768, 768]輸出[2, 256, 768],最終與輸入進行殘差鏈接輸出[2, 256, 768]。
與原始Transformer的Encoder-Decoder架構不同,GPT2是Decoder only架構,所以q、k、v全部來自輸入或者前一層輸出,而不是來自Encoder。
6.LaynerNorm
class LayerNorm(nn.Module):
def init(self, emb_dim):
super().init()
self.eps = 1e-5
self.scale = nn.Parameter(torch.ones(emb_dim))
self.shift = nn.Parameter(torch.zeros(emb_dim))
def forward(self, x):
mean = x.mean(dim=-1, keepdim=True)
var = x.var(dim=-1, keepdim=True, unbiased=False)
normalized_x = (x - mean) / torch.sqrt(var + self.eps)
return self.scale * normalized_x + self.shift
LaynerNorm的目的是為了計算穩定,不改變維度,LaynerNorm層的輸入輸出維度均是[2, 256, 768]。
7.FeedForward
FeedForward是一個MLP層,前面LaynerNorm層的輸出[2, 256, 768],2256個詞嵌入并行通過MLP層,先升維到4768,再恢復到768,中間使用GELU非線性激活函數。
# Implement feed-forward neural network
class FeedForward(nn.Module):
  def __init__(self, config):
    super().__init__()
    self.layers = nn.Sequential(
        nn.Linear(config["emb_dim"], 4 * config["emb_dim"]),
        GELU(),
        nn.Linear(4 * config["emb_dim"], config["emb_dim"]),
    )

  def forward(self, x):
    return self.layers(x)
MLP層不會改變輸入維度[2, 256, 768],但會通過非線性變換會進一步修改詞嵌入的值,以次提升模型的表示能力,生成更高層次的抽象特征。
8.輸出
class GPTModel(nn.Module):
  def __init__(self, config):
    super().__init__()

    self.token_embedding = nn.Embedding(config["vocab_size"], config["emb_dim"])
    self.positional_embedding = nn.Embedding(config["context_length"], config["emb_dim"])
    self.drop_embedding = nn.Dropout(config["drop_rate"])

    self.transformer_blocks = nn.Sequential(
        *[TransformerBlock(config) for _ in range(config["n_layers"])]
    )

    self.final_norm = LayerNorm(config["emb_dim"])
    self.out_head = nn.Linear(config["emb_dim"], config["vocab_size"], bias=False)

  def forward(self, in_idx):
    batch_size, sequence_length = in_idx.shape
    token_embeddings = self.token_embedding(in_idx)
    positional_embeddings = self.positional_embedding(
        torch.arange(sequence_length, device=in_idx.device)
    )
    x = token_embeddings + positional_embeddings
    x = self.drop_embedding(x)

    x = self.transformer_blocks(x)
    x = self.final_norm(x)
    logits = self.out_head(x)
    return logits
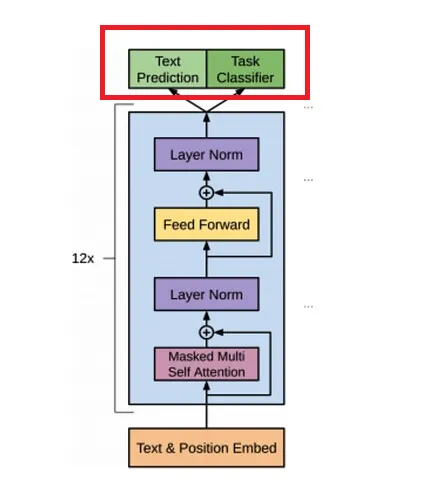
MLP層的輸出[2, 256, 768]先經過一個LaynerNorm進行平滑操作。
最后2*256個token并行經過一個輸出線性層[768, 50257],將[2, 256, 768]映射成[2, 256, 50257]。
也就是每個token都會輸出一個概率分布,這50257個概率值表示下一個token屬于詞表中50257個詞的概率。
9.計算損失
訓練過程中需要通過計算損失來更新參數,如何根據輸出[2, 256, 50257]計算損失呢?
在準備訓練數據時已經構造了標簽,維度與輸入X一致,也是[2, 256]。
def calc_loss_batch(input_batch, target_batch, model, device):
  """
  Calculates the loss for a single batch.
  """
  input_batch = input_batch.to(device)
  target_batch = target_batch.to(device)


  # Run the model
  logits = model(input_batch)
  print("target_batch loss")
  print(target_batch.flatten().shape)
  print("logits.flatten(0, 1)")
  print(logits.flatten(0, 1).shape)
  # Calculate the loss
  loss = torch.nn.functional.cross_entropy(
      logits.flatten(0, 1),
      target_batch.flatten(),
  )
  return loss
input_batch是輸入X,維度[2, 256],target_batch是標簽,維度[2, 256],輸入經過模型后輸出[2, 256, 50257],展平后[512, 50257],標簽展平后[512],每個元素表示詞表中位置。
cross_entropy估計是根據這[512]位置構造one-hot編碼,然后與輸出logits計算損失值。
推理階段
def generate_text_simple(model, idx, max_new_tokens, context_size):
    for _ in range(max_new_tokens):
        idx_cond = idx[:, -context_size:]
        with torch.no_grad():
            logits = model(idx_cond)

        logits = logits[:, -1, :]#取最后一個詞的概率分布
        probas = torch.softmax(logits, dim=-1)
        idx_next = torch.argmax(probas, dim=-1, keepdim=True)#取概率最大的
        idx = torch.cat((idx, idx_next), dim=1)#將其加到輸入后面

    return idx
GPT通過自回歸方式預測下一個token,但在訓練過程中,通過矩陣,掩碼實現了并行計算。
但在預測階段每次前向計算只能預測一個token,然后將這個新token添加到輸入末尾在此作為輸入,直到輸出結束符。
設置生成50個詞。
第一輪:
初始上下文:"Oh Juliet, where is"
轉換成token后:
torch.Size([1, 5])
tensor([[ 5812, 38201,    11,   810,   318]])
只取is對應輸出的概率分布,模型預測is的下一個詞是“,”,將“,”加到輸入后面作為下一輪輸入。
第二輪:
輸入:"Oh Juliet, where is,"
轉換成token后:
torch.Size([1, 6])
tensor([[ 5812, 38201,    11,   810,   318,    13]])
只取“,”對應輸出的概率分布,模型預測“,”的下一個詞是 "and",將“and”加到輸入后面作為下一輪輸入。
以此類推,直到生成50個詞。
Oh Juliet, where is, and, and,, and,,,, and, and,,,,,,,,, and,,,, and,,,, and,, and,,,,, and,,,,,, and本文轉載自公眾號人工智能大講堂
原文鏈接:????https://mp.weixin.qq.com/s/YZU9rPPyYZTbSPhCZtbGZg??


