使用YOLO進行目標檢測 原創
前言
本章的學習內容,將以目標檢測為切入口,了解目標檢測流程,包括:數據標準、模型訓練以及模型預測。
圖片分類vs目標檢測
通過查看YOLO網站的task目錄,我們可以看到:在計算機視覺領域中,常見的任務包括目標檢測(detect)、語義分割(segment)、圖像分類(classify)、人體姿態估計(pose)、以及有向邊界框(Oriented Bounding Box,OBB)等。
- 圖像分類(classify)
a. 輸出是圖像所屬的類別或標簽,通常以概率分布的形式(例如:[0.2, 0.5, 0.1, 0.2])表示每個類別的概率。
b. 模型會輸出每個類別的概率值,最終選擇概率最高的類別作為預測結果。
c. 輸入是一張圖像,通常是固定大小的RGB圖像。
d. 定義:圖片分類是指根據圖像的內容將其分為不同的類別或標簽。
e. 輸入:
f. 輸出:
- 目標檢測(detect)
a. 輸出是圖像中檢測到的所有物體的邊界框和類別信息。
b. 通常是一個包含物體位置、類別和置信度的列表。
c. 輸入是一張圖像,同樣是RGB圖像。
d. 定義:目標檢測是指在圖像中檢測和定位物體的任務,同時識別物體的類別。
e. 輸入:
f. 輸出:
目標檢測的問題
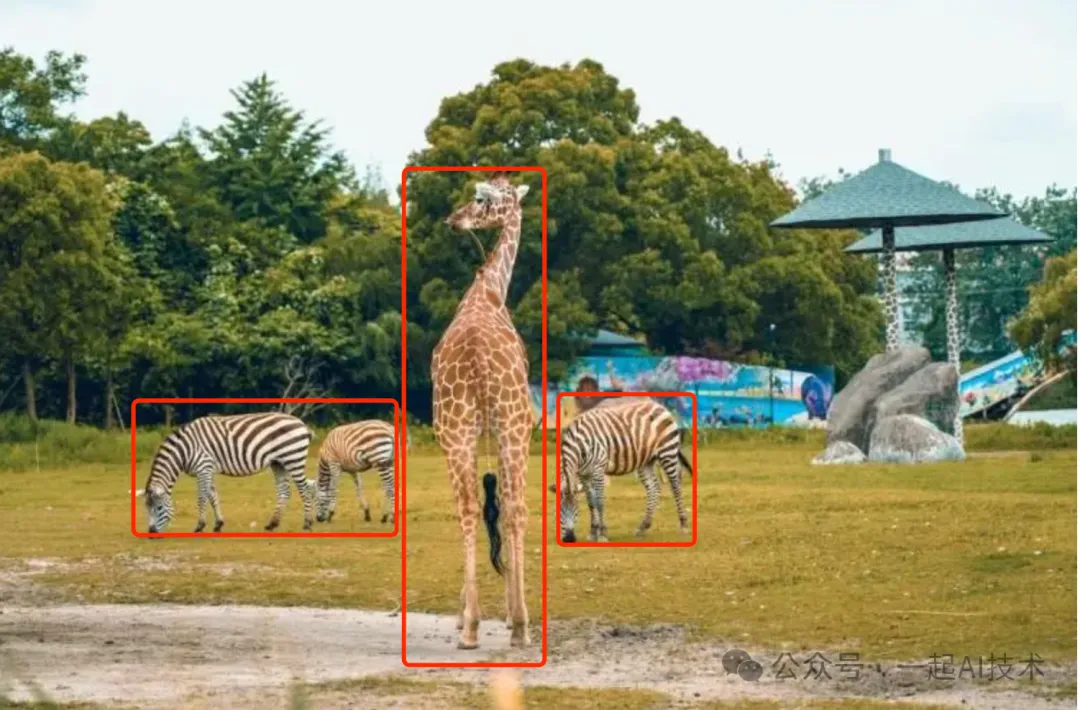
通過上圖可以看到,目標檢測會遇到以下問題:
- 圖片中包含多個動物,并不能簡單的分類這張圖是長頸鹿還是斑馬;
- 圖片中的動物所在的位置也是大小不同,位置不同;
- ...
傳統算法的解決思路
在利用深度學習做物體檢測之前,傳統算法對于目標檢測通常分為3個階段:區域選取、特征提取和體征分類。
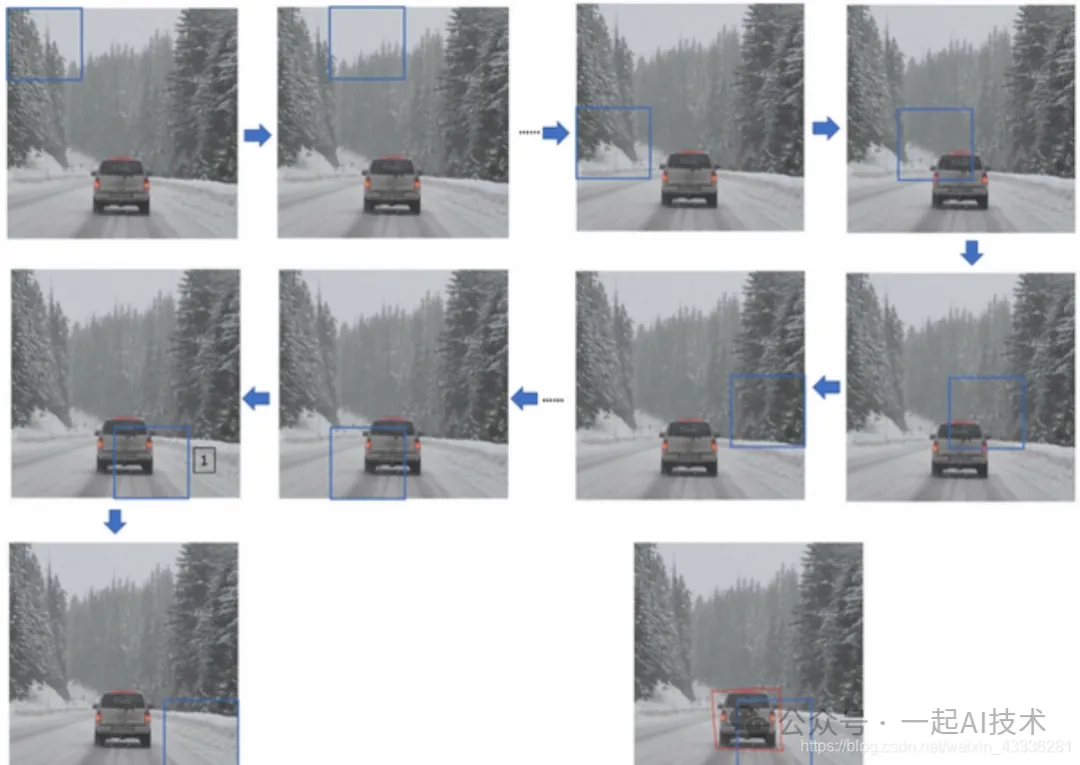
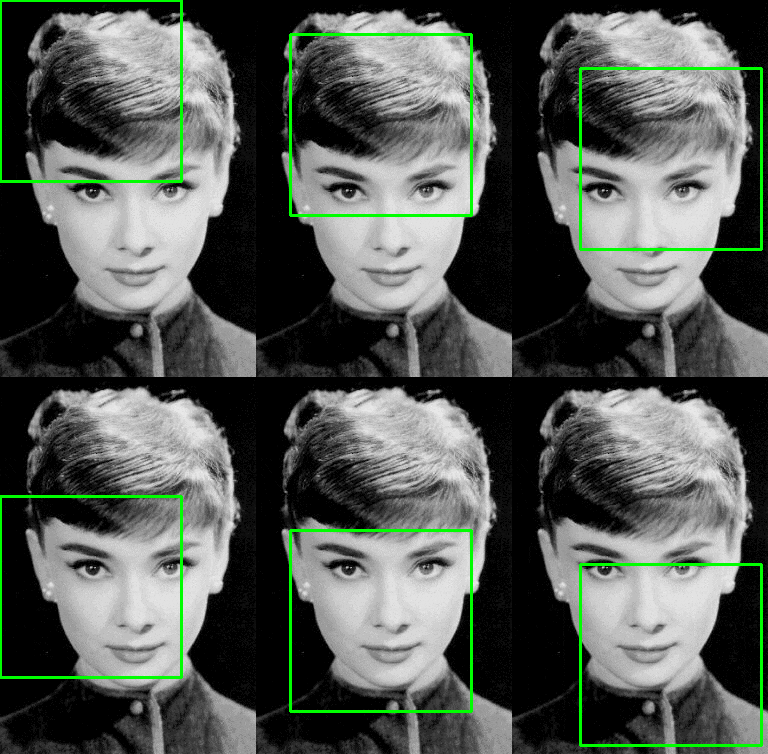
- 區域選取:首先選取圖像中可能出現物體的位置,由于物體位置、大小都不固定,因此傳統算法通常使用滑動窗口(Sliding Windows)算法,但這種算法會存在大量的冗余框,并且計算復雜度高。
- 特征提取:在得到物體位置后,通常使用人工精心設計的提取器進行特征提取,如SIFT和HOG等。由于提取器包含的參數較少,并且人工設計的魯棒性較低,因此特征提取的質量并不高。
- 特征分類:最后,對上一步得到的特征進行分類,通常使用如SVM、AdaBoost的分類器。
深度學習的解決思路
Anchor-based(基于錨框)
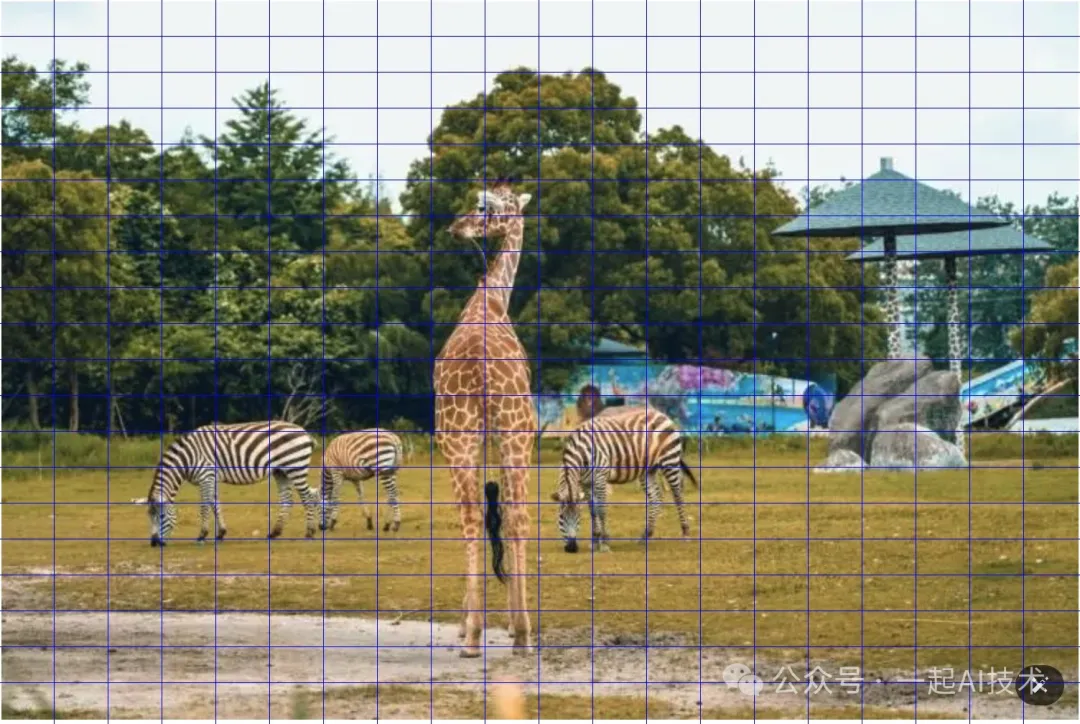
定義:Anchor-based 方法通過在圖像上生成一組預定義的錨框(Anchor Boxes),然后利用這些錨框進行目標檢測。 流程:
- 生成錨框:在圖像上生成一組不同尺寸和長寬比的錨框。
- 特征提取:通過卷積神經網絡提取圖像特征(套種圖片中的物體)。
- 預測:對每個錨框預測偏移量和目標類別信息。
- 篩選:通過非極大值抑制(NMS)等方法篩選出最終的檢測結果。
核心思想:
- 死框+修正量
20×20的錨框
40×40的錨框
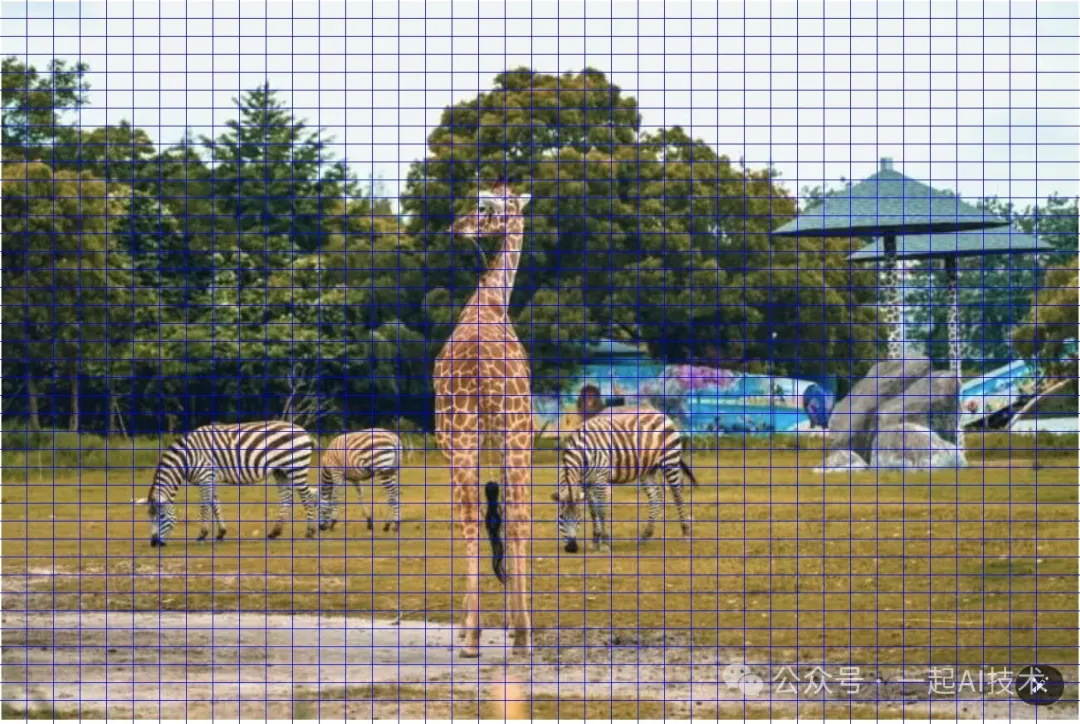
80×80的錨框
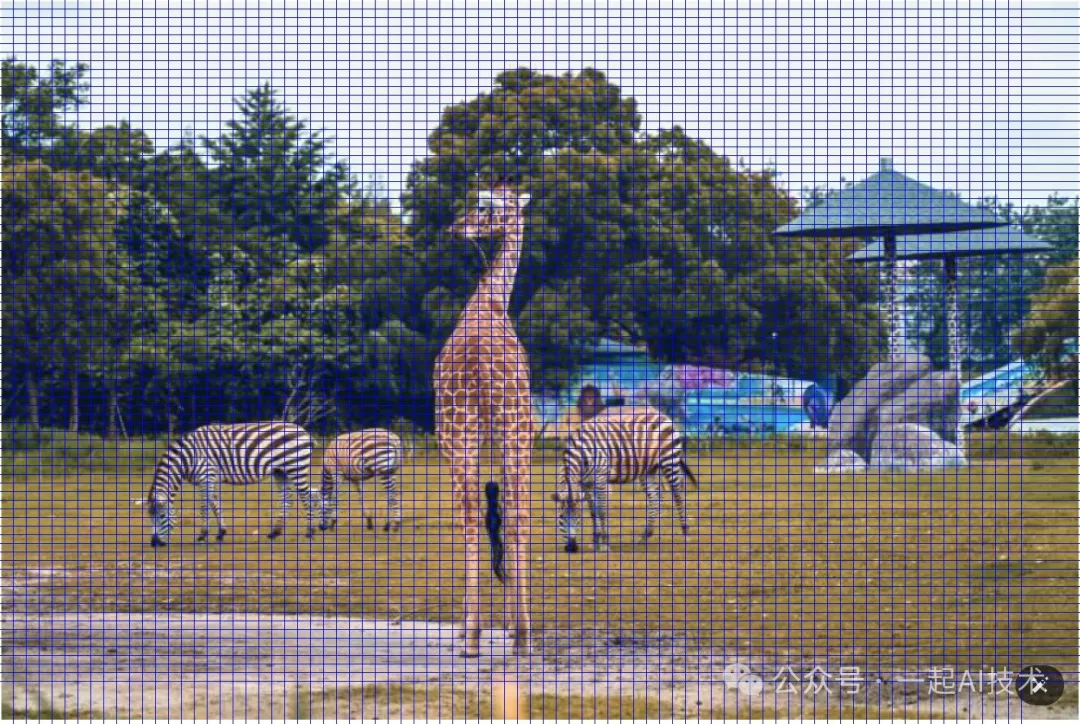
優點:
- 相對容易實現和訓練。
- 可以處理多尺度目標和不同長寬比的目標。
缺點:
- 需要預定義大量的錨框,增加了計算復雜度和訓練難度。
- 對于不規則形狀的目標可能不夠靈活。
Anchor-free(無錨框)
定義:Anchor-free 方法不依賴于預定義的錨框,而是直接預測目標的位置和類別信息。 流程:
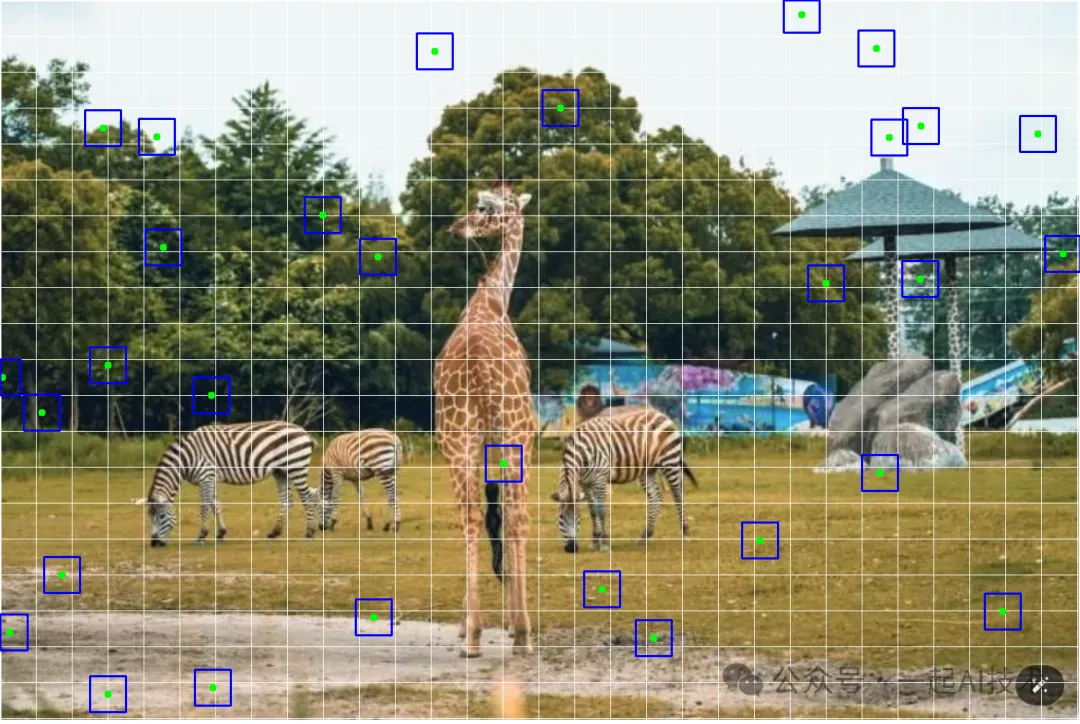
- 中心點檢測:首先,在圖像上“撒豆子”(也稱為“CenterNet”),即在圖像的每個位置(像素)處預測目標中心點的存在概率。這些中心點通常表示可能存在目標的位置。
- 邊界框預測:對于每個被預測為目標中心點的位置,模型會進一步預測目標的邊界框(向上下左右生長,套住要預測的問題)。
- 后處理:通過后處理算法(如非極大值抑制)來篩選和優化檢測結果,以獲得最終的目標檢測結果。
核心思想:
- 中心點 + 四個方向的生長
優點:
- 更加靈活,可以適應各種目標形狀和尺度。
- 減少了預定義錨框帶來的計算復雜度。
缺點:
- 相對 Anchor-based 方法,Anchor-free 方法可能需要更多的訓練數據和更復雜的網絡結構。
- 在處理小目標或密集目標時可能性能略遜于 Anchor-based 方法。
目前,目標檢測基本使用anchor-free的方法。
目標檢測的兩種策略
目標檢測具體的開展策略有兩種:
方式 | 過程 | 代表 |
方式1 | 1. 先對輸入圖像進行切片。 2. 對每一片進行特征提取。 3. 對提取的特征進行分類和回歸。 | MTCNN |
方式2 | 1. 先對輸入圖像進行特征提取。 2. 對提取的特征進行切片。 3. 對每一片進行分類和回歸。 | YOLO |
兩個例子
獲取視頻頭內容進行目標檢測
from ultralytics import YOLO
import cv2

# 加載YOLO模型
model = YOLO("yolov8n.pt")

cap = cv2.VideoCapture(0)

while cap.isOpened():
# 讀取視頻幀
    ret, frame = cap.read()
ifnot ret:
break

# 使用YOLO模型檢測物體
    results = model(frame)

# 繪制預測結果
    img = results[0].plot()

# 顯示檢測結果
    cv2.imshow("frame", img)

if cv2.waitKey(1)==ord("q"):
break

# 釋放資源
cap.release()
cv2.destroyAllWindows()
運行以上代碼,YOLO可以將攝像頭中的視頻按幀逐幀檢測物體。
讀取圖片進行目標檢測
import cv2
from ultralytics import YOLO
import os

# 設置環境變量,解決OMP: Error #15: Initializing libiomp5.dylib, but found libiomp5.dylib already initialized的問題
os.environ["KMP_DUPLICATE_LIB_OK"]="TRUE"

# 加載模型
model = YOLO("yolov8n.pt")# 使用預訓練模型權重

# 讀取圖片
image = cv2.imread("animal.png")

# 預測
results = model(image)

result = results[0]
img = result.plot()

from matplotlib import pyplot as plt

# 對對象進行可視化,從RGB轉換為BGR
plt.imshow(X=img[:,:,::-1])
運行結果:

通過查看??result??的內容,可以得到:
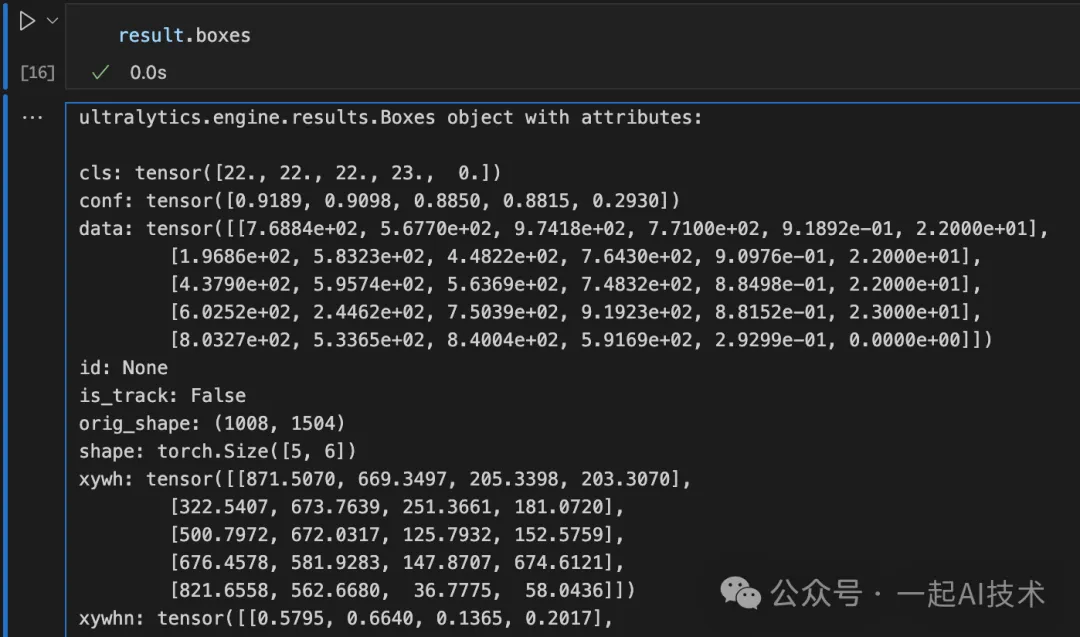
??cls??: 表示檢測到的物體類別,是一個包含類別標識號的張量。
例如:上例分別為類別22、22、22、23和0。這意味著模型在圖像中檢測到了不同類別的物體。
??conf??: 表示置信度,即模型對檢測結果的信心程度,是一個包含置信度值的張量。
例如:上例分別為[0.9189, 0.9098, 0.8850, 0.8815, 0.2930]表示模型對每個檢測結果的置信度,置信度值越高,表示模型對該檢測結果的信心程度越高。
??data??: 包含了檢測結果的詳細數據,如邊界框坐標、置信度、類別等信息。
例如:第一行數據[7.6884e+02, 5.6770e+02, 9.7418e+02, 7.7100e+02, 9.1892e-01, 22]表示一個邊界框的左上角和右下角坐標、置信度和類別。
??shape??: 結果張量的形狀。
例如:[5, 6]表示這個張量是一個二維張量,上圖中一共預測了5個目標檢測結果。
??xywh??: 表示邊界框的中心坐標、寬度和高度。
例如:[[871.5070, 669.3497, 205.3398, 203.3070], [322.5407, 673.7639, 251.3661, 181.0720], ...]表示了每個檢測結果的邊界框信息。
??xyxy??: 表示邊界框的左上角和右下角坐標。
例如:[[768.8371, 567.6962, 974.1769, 771.0032], [196.8576, 583.2280, 448.2238, 764.2999], ...]表示了每個檢測結果的邊界框的左上角和右下角坐標。
自定義模型訓練
以上的目標檢測都是基于預先訓練好的模型,如果想自主實現一個模型的訓練以及目標檢測,具體流程如下:
數據準備
為了更加接近實戰,我計劃在天池及飛槳社區找一份數據集進行目標檢測的模型訓練。
數據集地址:https://aistudio.baidu.com/datasetdetail/91732
數據集簡述: 一個理想的智能零售結算系統應當能夠精準地識別每一個商品,并且能夠返回完整地購物清單及顧客應付的實際商品總價格。這是一份智能零售柜識別的圖片數據集,非常適用于進行目標檢測。

數據分析
由于該數據集采用VOC格式,其內容形式與YOLOv8的格式不同,所以我們需要做相關的處理。
VOC數據集目錄格式:
我有一個VOC的目標檢測數據集,其目錄結構為:

VOC
|-Annotations
|-ori_000_XYGOC20200313162026456_1.xml
|-ori_000_XYGOC20200313162953549_1.xml
|-ori_001_11_0.xml
|-ori_001_4_0.xml
|-ori_001_6_0.xml
|-ori_t1_TEST20191101164758498_1.xml
|-ori_t1_TEST20191101164829232_1.xml
|-...
|-JPEGImages
|-ori_000_XYGOC20200313162026456_1.jpg
|-ori_000_XYGOC20200313162953549_1.jpg
|-ori_001_11_0.jpg
|-ori_001_4_0.jpg
|-ori_001_6_0.jpg
|-ori_t1_TEST20191101164758498_1.jpg
|-ori_t1_TEST20191101164829232_1.jpg
|-...
|-labels.txt
|-test_list.txt
|-train_list.txt
|-val_list.txt
# labels.txt的內容格式為如下:
3+2-2
3jia2
aerbeisi
anmuxi
aoliao
asamu
baicha
baishikele
...

# train_list.txt內容格式如下:
JPEGImages/ori_XYGOC2021042115092870201IK-4_0.jpg Annotations/ori_XYGOC2021042115092870201IK-4_0.xml
JPEGImages/ori_XYGOC2021010413165585501IK-3_0.jpg Annotations/ori_XYGOC2021010413165585501IK-3_0.xml
YOLOv8數據集的目錄結構
|-images
|-train
|-ori_000_XYGOC20200313162026456_1.jpg
...
|-val
|-ori_t1_TEST20191101164758498_1.jpg
...
|-lables
|-train
|-ori_000_XYGOC20200313162026456_1.txt
|-val
|-ori_t1_TEST20191101164829232_1.txt
數據轉換
1. 創建Dataset根目錄
import os

# 創建Dataset根目錄,同時按照YOLO的格式分別創建train和val目錄
defcreate_directories(base_dir):
    dirs =[
        os.path.join(base_dir,"images/train"),
        os.path.join(base_dir,"images/val"),
        os.path.join(base_dir,"labels/train"),
        os.path.join(base_dir,"labels/val")
]
fordirin dirs:
        os.makedirs(dir, exist_ok=True)
2. 讀取classes類別
def read_classes(classes_file):
"""
    從類別文件中讀取類別名稱,并返回類別名稱與索引的映射字典。

    參數:
    - classes_file (str): 類別文件路徑

    返回:
    - classes (dict): 類別名稱與索引的映射字典
    """
    classes ={}
withopen(classes_file,"r")as f:
        lines = f.readlines()
for index, line inenumerate(lines):
            class_name = line.strip()
            classes[index]= class_name
return classes
3. 讀取xml文件并轉換為yolo格式
def parse_xml(xml_path, classes_dict):
"""
    解析XML文件,獲取圖像的寬度、高度以及對象的類別和邊界框坐標。

    參數:
    - xml_path (str): XML文件路徑

    返回:
    - width (int): 圖像寬度
    - height (int): 圖像高度
    - objects (list): 包含對象信息的列表,每個對象信息包括類別和邊界框坐標
    """
    tree = ET.parse(xml_path)
    root = tree.getroot()
    size = root.find("size")
    width =int(size.find("width").text)
    height =int(size.find("height").text)
    objects =[]
for obj in root.findall("object"):
        name = obj.find("name").text
        label_index = get_label_index(name, classes_dict)
        bndbox = obj.find("bndbox")
        xmin =int(bndbox.find("xmin").text)
        ymin =int(bndbox.find("ymin").text)
        xmax =int(bndbox.find("xmax").text)
        ymax =int(bndbox.find("ymax").text)
        objects.append({"label_index": label_index,"xmin": xmin,"ymin": ymin,"xmax": xmax,"ymax": ymax})
return width, height, objects

defconvert_to_yolo_format(width, height, obj):
"""
    將對象信息轉換為適合YOLO格式的坐標。

    參數:
    - width (int): 圖像寬度
    - height (int): 圖像高度
    - obj (dict): 包含對象信息的字典,包括類別和邊界框坐標
    """
    x_center =(obj["xmin"]+ obj["xmax"])/2/ width
    y_center =(obj["ymin"]+ obj["ymax"])/2/ height
    w =(obj["xmax"]- obj["xmin"])/ width
    h =(obj["ymax"]- obj["ymin"])/ height
return x_center, y_center, w, h
4. 將xml文件轉換為txt文件
def write_txt_file(file_path, content):
"""
    創建或寫入內容到.txt文件

    參數:
    - file_path (str): 目標.txt文件路徑
    - content (str): 寫入文件的內容
    """
try:
ifnot os.path.exists(file_path):
open(file_path,'w').close()# 創建空的目標文件

withopen(file_path,"a")as f:
            f.write(content)
print(f"成功寫入文件 {file_path}")
exceptExceptionas e:
print(f"寫入文件時發生異常: {e}")


defprocess_VOC_data(root_dir, train_list_file, images_dst, labels_dst, classes_dict):
"""
    從VOC數據集中讀取訓練列表文件,解析xml文件并將圖像復制到目標目錄中,并將類別和bbox信息寫入標簽文件中。

    參數:
    - root_dir (str): VOC數據集的根目錄
    - train_list_file (str): 訓練列表文件路徑
    - image_folder (str): 圖像文件夾的相對路徑
    - images_dst (str): 圖像目標目錄
    - labels_dst (str): 標簽目標目錄
    """
withopen(train_list_file,"r")as f:
        lines = f.readlines()
# 逐行讀取列表文件
for line in lines:
            line = line.strip()
            image_path, xml_path = line.split(" ")
# 獲取xml文件絕對路徑
            xml_path = os.path.join(root_dir, xml_path)
# 獲取image文件絕對路徑
            image_path = os.path.join(root_dir, image_path)

            width, height, objects = parse_xml(xml_path, classes_dict)

            copy_image(image_path, images_dst)

for obj in objects:
                label_name = os.path.splitext(os.path.basename(image_path))[0]+".txt"
                label_dst = os.path.join(labels_dst, label_name)
                yolo_format = convert_to_yolo_format(width, height, obj)
                content =f"{obj['label_index']} {yolo_format[0]} {yolo_format[1]} {yolo_format[2]} {yolo_format[3]}\n"
                write_txt_file(label_dst, content)
5. 保存.txt文件到新目錄下,同時拷貝圖像
def copy_image(image_path, images_dst):
"""
    將圖像從原路徑復制到目標路徑。

    參數:
    - image_path (str): 原圖像路徑
    - images_dst (str): 目標圖像路徑
    """
    image_name = os.path.basename(image_path)
    image_dst = os.path.join(images_dst, image_name)

ifnot os.path.exists(image_path):
print(f"原圖像路徑 '{image_path}' 未找到文件")
return

if os.path.exists(image_dst):
print(f"目標路徑 '{image_dst}' 中已存在同名圖像文件")
return

try:
        shutil.copy(image_path, image_dst)
print(f"成功復制圖像 {image_name} 到目標目錄")
exceptExceptionas e:
print(f"拷貝圖像時發生異常: {e}")
完整代碼如下:
import xml.etree.ElementTreeas ET
import shutil
import os

# 創建Dataset根目錄,同時按照YOLO的格式分別創建train和val目錄
defcreate_directories(base_dir):
    dirs =[
        os.path.join(base_dir,"images/train"),
        os.path.join(base_dir,"images/val"),
        os.path.join(base_dir,"labels/train"),
        os.path.join(base_dir,"labels/val")
]
fordirin dirs:
        os.makedirs(dir, exist_ok=True)

defget_label_index(name, classes_dict):
"""
    根據類別名稱從類別字典中獲取對應的序號。

    參數:
    - name (str): 類別名稱
    - classes_dict (dict): 包含類別名稱和對應序號的字典

    返回:
    - label_index (int): 類別名稱對應的序號,如果不存在則返回-1
    """
    label_index =-1
for key, value in classes_dict.items():
if value == name:
            label_index = key
break
return label_index

defparse_xml(xml_path, classes_dict):
"""
    解析XML文件,獲取圖像的寬度、高度以及對象的類別和邊界框坐標。

    參數:
    - xml_path (str): XML文件路徑

    返回:
    - width (int): 圖像寬度
    - height (int): 圖像高度
    - objects (list): 包含對象信息的列表,每個對象信息包括類別和邊界框坐標
    """
    tree = ET.parse(xml_path)
    root = tree.getroot()
    size = root.find("size")
    width =int(size.find("width").text)
    height =int(size.find("height").text)
    objects =[]
for obj in root.findall("object"):
        name = obj.find("name").text
        label_index = get_label_index(name, classes_dict)
        bndbox = obj.find("bndbox")
        xmin =int(bndbox.find("xmin").text)
        ymin =int(bndbox.find("ymin").text)
        xmax =int(bndbox.find("xmax").text)
        ymax =int(bndbox.find("ymax").text)
        objects.append({"label_index": label_index,"xmin": xmin,"ymin": ymin,"xmax": xmax,"ymax": ymax})
return width, height, objects

defconvert_to_yolo_format(width, height, obj):
"""
    將對象信息轉換為適合YOLO格式的坐標。

    參數:
    - width (int): 圖像寬度
    - height (int): 圖像高度
    - obj (dict): 包含對象信息的字典,包括類別和邊界框坐標
    """
    x_center =(obj["xmin"]+ obj["xmax"])/2/ width
    y_center =(obj["ymin"]+ obj["ymax"])/2/ height
    w =(obj["xmax"]- obj["xmin"])/ width
    h =(obj["ymax"]- obj["ymin"])/ height
return x_center, y_center, w, h

defcopy_image(image_path, images_dst):
"""
    將圖像從原路徑復制到目標路徑。

    參數:
    - image_path (str): 原圖像路徑
    - images_dst (str): 目標圖像路徑
    """
    image_name = os.path.basename(image_path)
    image_dst = os.path.join(images_dst, image_name)

ifnot os.path.exists(image_path):
print(f"原圖像路徑 '{image_path}' 未找到文件")
return

if os.path.exists(image_dst):
print(f"目標路徑 '{image_dst}' 中已存在同名圖像文件")
return

try:
        shutil.copy(image_path, image_dst)
print(f"成功復制圖像 {image_name} 到目標目錄")
exceptExceptionas e:
print(f"拷貝圖像時發生異常: {e}")

defwrite_txt_file(file_path, content):
"""
    創建或寫入內容到.txt文件

    參數:
    - file_path (str): 目標.txt文件路徑
    - content (str): 寫入文件的內容
    """
try:
ifnot os.path.exists(file_path):
open(file_path,'w').close()# 創建空的目標文件

withopen(file_path,"a")as f:
            f.write(content)
print(f"成功寫入文件 {file_path}")
exceptExceptionas e:
print(f"寫入文件時發生異常: {e}")


defprocess_VOC_data(root_dir, train_list_file, images_dst, labels_dst, classes_dict):
"""
    從VOC數據集中讀取訓練列表文件,解析xml文件并將圖像復制到目標目錄中,并將類別和bbox信息寫入標簽文件中。

    參數:
    - root_dir (str): VOC數據集的根目錄
    - train_list_file (str): 訓練列表文件路徑
    - image_folder (str): 圖像文件夾的相對路徑
    - images_dst (str): 圖像目標目錄
    - labels_dst (str): 標簽目標目錄
    """
withopen(train_list_file,"r")as f:
        lines = f.readlines()
# 逐行讀取列表文件
for line in lines:
            line = line.strip()
            image_path, xml_path = line.split(" ")
# 獲取xml文件絕對路徑
            xml_path = os.path.join(root_dir, xml_path)
# 獲取image文件絕對路徑
            image_path = os.path.join(root_dir, image_path)

            width, height, objects = parse_xml(xml_path, classes_dict)

            copy_image(image_path, images_dst)

for obj in objects:
                label_name = os.path.splitext(os.path.basename(image_path))[0]+".txt"
                label_dst = os.path.join(labels_dst, label_name)
                yolo_format = convert_to_yolo_format(width, height, obj)
                content =f"{obj['label_index']} {yolo_format[0]} {yolo_format[1]} {yolo_format[2]} {yolo_format[3]}\n"
                write_txt_file(label_dst, content)

defread_classes(classes_file):
"""
    從類別文件中讀取類別名稱,并返回類別名稱與索引的映射字典。

    參數:
    - classes_file (str): 類別文件路徑

    返回:
    - classes (dict): 類別名稱與索引的映射字典
    """
    classes ={}
withopen(classes_file,"r")as f:
        lines = f.readlines()
for index, line inenumerate(lines):
            class_name = line.strip()
            classes[index]= class_name
return classes

defgenerate_coco8_yaml_content(dataset_root, train_images, val_images, classes):
"""
    生成類似COCO8數據集配置文件的內容

    參數:
    - dataset_root (str): 數據集根目錄路徑
    - train_images (str): 訓練圖像相對于根目錄的路徑
    - val_images (str): 驗證圖像相對于根目錄的路徑
    - classes (dict): 類別名稱與索引的映射字典

    返回:
    - content (str): COCO8數據集配置文件內容
    """
    content =f"path: ../datasets/{dataset_root} # dataset root dir\n"
    content +=f"train: {train_images} # train images (relative to 'path') 4 images\n"
    content +=f"val: {val_images} # val images (relative to 'path') 4 images\n"
    content +="test: # test images (optional)\n\n"
    content +="# Classes\n"
    content +="names:\n"

for index, class_name in classes.items():
        content +=f"  {index}: {class_name}\n"

return content

defwrite_yaml_file(file_path, content):
"""
    創建或寫入內容到.yaml文件

    參數:
    - file_path (str): 目標.yaml文件路徑
    - content (str): 寫入文件的內容
    """
try:
ifnot os.path.exists(file_path):
open(file_path,'w').close()# 創建空的目標文件

withopen(file_path,"w")as f:
            f.write(content)
print(f"成功寫入文件 {file_path}")
exceptExceptionas e:
print(f"寫入文件時發生異常: {e}")


if __name__ =="__main__":
# VOC數據集根目錄
    root_dir ="VOC"
    train_list_file = os.path.join(root_dir,"train_list.txt")
    test_list_file = os.path.join(root_dir,"val_list.txt")
    classes_file ="VOC/labels.txt"

# 設置轉換后YOLO的圖像和標簽目錄
    dataset_root ="cabinet"
    train_images ="images/train"
    train_labels ="labels/train"
    val_images ="images/val"
    val_labels ="labels/val"
    yaml_file_name ="cabinet.yaml"

    images_dst_train = os.path.join(dataset_root, train_images)
    labels_dst_train = os.path.join(dataset_root, train_labels)

    images_dst_test = os.path.join(dataset_root, val_images)
    labels_dst_test = os.path.join(dataset_root, val_labels)

    yaml_file = os.path.join(dataset_root, yaml_file_name)

# 創建YOLO數據集目錄
    create_directories(dataset_root)
# 讀取類別文件
    classes = read_classes(classes_file)

# 轉換訓練數據集
    process_VOC_data(root_dir, train_list_file, images_dst_train, labels_dst_train, classes)
# 轉換測試數據集
    process_VOC_data(root_dir, test_list_file, images_dst_test, labels_dst_test, classes)

# 生成COCO8.yaml文件

    content = generate_coco8_yaml_content(dataset_root, train_images, val_images, classes)
    write_yaml_file(yaml_file, content)
以上轉換后的數據,我也打包上傳到網盤,可直接使用。 網盤地址:https://pan.baidu.com/s/1DyoK7r_74OzrRdoogrtTKw?pwd=q4ww
模型訓練
第一步:拷貝數據到YOLO的datasets目錄下

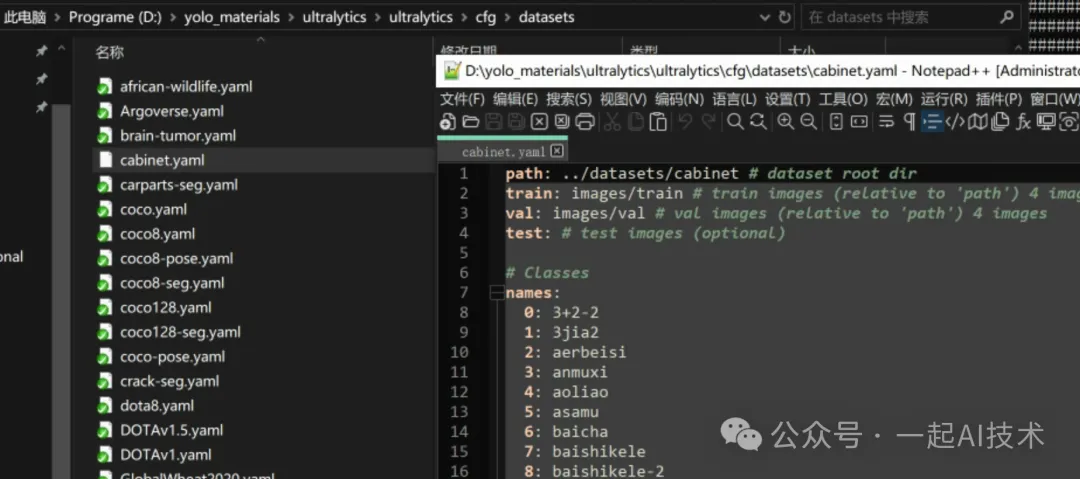
第二步:拷貝cabinet.yaml文件到YOLO的cfg\datasets目錄下
第三步:使用命令行訓練模型
from ultralytics import YOLO
import cv2

model = YOLO("yolov8n.yaml")

if __name__ =='__main__':
    result = model.train(data="cabinet.yaml",
                        epochs=10,
                        imgsz=640,
                        device='cuda',# 設備類型,這里是使用CUDA加速
# batch=2,           # 批量大小
                        workers=8# 數據加載的工作進程數
    )
訓練時顯存占用情況
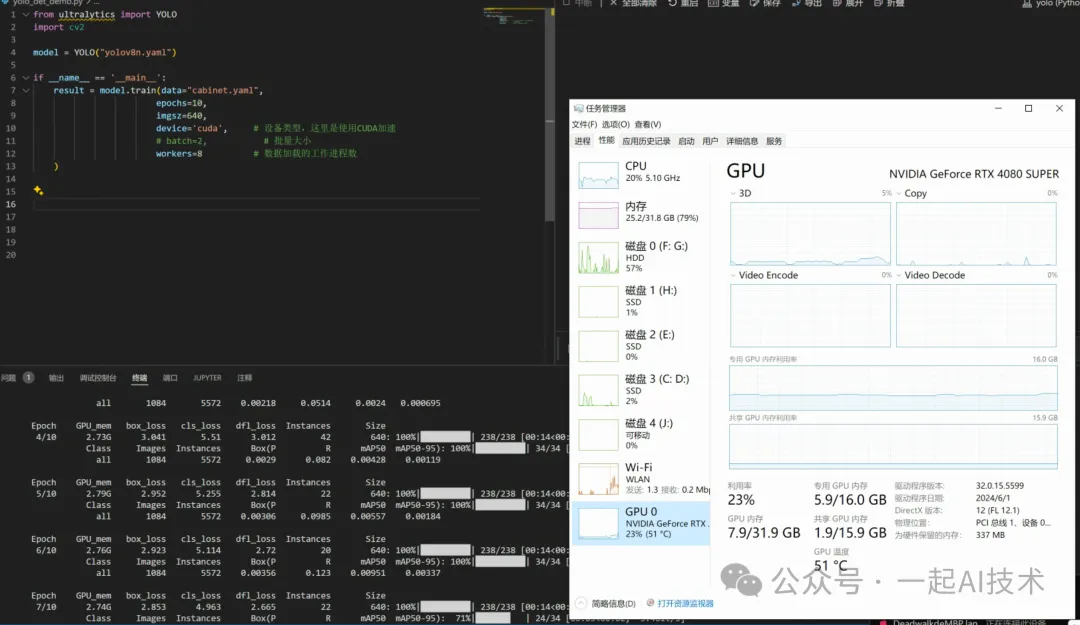
訓練結果: 訓練完畢后,在run\train*目錄下生成對應的訓練結果

查看其中的驗證集顯示內容,看起來結果是正常的

由于時間原因,本次就沒有開發相關的前端頁面來進行模型加載和圖片識別,但是可以想象:如果模型加載后同時開啟智能柜的攝像頭,那么就可以實時對售賣柜內的商品進行目標檢測。
內容小結
- 目標檢測理論
a. 在計算機視覺領域中,常見的任務包括目標檢測(detect)、圖像分類(classify)
b. 目標檢測輸入是一張圖像,輸出是圖像中檢測到的所有物體的邊界框和類別信息
c. 目標檢測在深度學習下有了新的發展,有??Anchor-based(基于錨框)???和??Anchor-free(無錨框)??兩種解決思路
d. Anchor-based的核心思想是:??死框+修正量???,Anchor-free的核心思想是:??中心點 + 四個方向的生長??
e. 相對 Anchor-based 方法,Anchor-free 方法可能需要更多的訓練數據和更復雜的網絡結構。
- 目標檢測使用
a. 使用YOLO進行目標檢測后,結果保存在results中,results中有??cls???(物體類別)、??conf???(表示置信度)、??data??(詳細數據,如邊界框坐標等)
b. 如果要自定義數據集訓練,可以按照coco8的目錄結構和yaml文件準備數據
c. 訓練數據集可以通過labelimg來進行標注,使用前需要建立獨立的虛擬環境
d. 如果從網上下載的訓練集是VOC格式,需要對其進行轉換后訓練?
本文轉載自公眾號一起AI技術 作者:熱情的Dongming


