Android應用--QR的生成(二維碼)
二維碼的定義:
二維碼(2-dimensional bar code),是用某種特定的幾何圖形按一定規律在平面(二維方向上)分布的黑白相間的圖形記錄數據符號信息的。
在許多種類的二維條碼中,常用的碼制有:Data Matrix, Maxi Code, Aztec, QR Code, Vericode, PDF417, Ultracode, Code 49, Code 16K等。
1.堆疊式/行排式二維條碼,如,Code 16K、Code 49、PDF417(如下圖)等。


2.矩陣式二維碼,***莫過于QR CODE
二維碼的名稱是相對與一維碼來說的,比如以前的條形碼就是一個“一維碼”,它的優點有:二維碼存儲的數據量更大;可以包含數字、字符,及中文文本等混合內容;有一定的容錯性(在部分損壞以后可以正常讀取);空間利用率高等。
二維碼原理介紹:
QR(Quick-Response) code是被廣泛使用的一種二維碼,解碼速度快。
它可以存儲多用類型

如上圖時一個qrcode的基本結構,其中:
位置探測圖形、位置探測圖形分隔符、定位圖形:用于對二維碼的定位,對每個QR碼來說,位置都是固定存在的,只是大小規格會有所差異;
校正圖形:規格確定,校正圖形的數量和位置也就確定了;
格式信息:表示改二維碼的糾錯級別,分為L、M、Q、H;
版本信息:即二維碼的規格,QR碼符號共有40種規格的矩陣(一般為黑白色),從21x21(版本1),到177x177(版本40),每一版本符號比前一版本 每邊增加4個模塊;
數據和糾錯碼字:實際保存的二維碼信息,和糾錯碼字(用于修正二維碼損壞帶來的錯誤)。
簡要的編碼過程:
1. 數據分析:確定編碼的字符類型,按相應的字符集轉換成符號字符; 選擇糾錯等級,在規格一定的條件下,糾錯等級越高其真實數據的容量越小。
2. 數據編碼:將數據字符轉換為位流,每8位一個碼字,整體構成一個數據的碼字序列。其實知道這個數據碼字序列就知道了二維碼的數據內容。


數據可以按照一種模式進行編碼,以便進行更高效的解碼,例如:對數據:01234567編碼(版本1-H),
1)分組:012 345 67
2)轉成二進制:
012→0000001100
345→0101011001
67 →1000011
3)轉成序列:0000001100 0101011001 1000011
4)字符數 轉成二進制:8→0000001000
5)加入模式指示符(上圖數字)0001:0001 0000001000 0000001100 0101011001 1000011
對于字母、中文、日文等只是分組的方式、模式等內容有所區別。基本方法是一致的
3. 糾錯編碼:按需要將上面的碼字序列分塊,并根據糾錯等級和分塊的碼字,產生糾錯碼字,并把糾錯碼字加入到數據碼字序列后面,成為一個新的序列。

在二維碼規格和糾錯等級確定的情況下,其實它所能容納的碼字總數和糾錯碼字數也就確定了,比如:版本10,糾錯等級時H時,總共能容納346個碼字,其中224個糾錯碼字。
就是說二維碼區域中大約1/3的碼字時冗余的。對于這224個糾錯碼字,它能夠糾正112個替代錯誤(如黑白顛倒)或者224個據讀錯誤(無法讀到或者無法譯碼),
這樣糾錯容量為:112/346=32.4%
4. 構造最終數據信息:在規格確定的條件下,將上面產生的序列按次序放如分塊中
按規定把數據分塊,然后對每一塊進行計算,得出相應的糾錯碼字區塊,把糾錯碼字區塊 按順序構成一個序列,添加到原先的數據碼字序列后面。
如:D1, D12, D23, D35, D2, D13, D24, D36, ... D11, D22, D33, D45, D34, D46, E1, E23,E45, E67, E2, E24, E46, E68,...
構造矩陣:將探測圖形、分隔符、定位圖形、校正圖形和碼字模塊放入矩陣中。

把上面的完整序列填充到相應規格的二維碼矩陣的區域中
6. 掩摸:將掩摸圖形用于符號的編碼區域,使得二維碼圖形中的深色和淺色(黑色和白色)區域能夠比率***的分布。
7. 格式和版本信息:生成格式和版本信息放入相應區域內。
版本7-40都包含了版本信息,沒有版本信息的全為0。二維碼上兩個位置包含了版本信息,它們是冗余的。
版本信息共18位,6X3的矩陣,其中6位時數據為,如版本號8,數據位的信息時 001000,后面的12位是糾錯位。
二維碼現在隨處可見,使用Android代碼根據輸入的字符串生成二維碼其實也很簡單,其中需要引用一個Google開源的包--ZXing。
下面這個例子里包含條形碼和QR碼的生成和解析,下面講解二維碼的生成。
首先,給出實現的截圖:
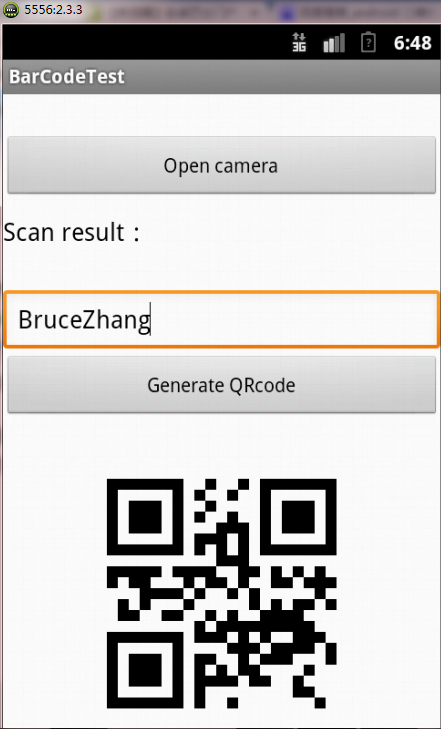
生成二維碼的步驟如下:
1.首先用戶在編輯框中輸入需要生成的字符串內容
2.點擊下方的按鈕
3.按鈕下方的ImageView控件顯示生成的二維碼
下頁將為你展示具體代碼和發放源代碼
#p#
下面給出實現的具體代碼:
1.界面的布局
- <?xml version="1.0" encoding="utf-8"?>
- <LinearLayout xmlns:android="http://schemas.android.com/apk/res/android"
- android:layout_width="fill_parent"
- android:layout_height="fill_parent"
- android:background="@android:color/white"
- android:orientation="vertical" >
- <Button
- android:id="@+id/btn_scan_barcode"
- android:layout_width="fill_parent"
- android:layout_height="wrap_content"
- android:layout_marginTop="30dp"
- android:text="Open camera" />
- <LinearLayout
- android:orientation="horizontal"
- android:layout_marginTop="10dp"
- android:layout_width="fill_parent"
- android:layout_height="wrap_content">
- <TextView
- android:layout_width="wrap_content"
- android:layout_height="wrap_content"
- android:textColor="@android:color/black"
- android:textSize="18sp"
- android:text="Scan result:" />
- <TextView
- android:id="@+id/tv_scan_result"
- android:layout_width="fill_parent"
- android:textSize="18sp"
- android:textColor="@android:color/black"
- android:layout_height="wrap_content" />
- </LinearLayout>
- <EditText
- android:id="@+id/et_qr_string"
- android:layout_width="fill_parent"
- android:layout_height="wrap_content"
- android:layout_marginTop="30dp"
- android:hint="Input the text"/>
- <Button
- android:id="@+id/btn_add_qrcode"
- android:layout_width="fill_parent"
- android:layout_height="wrap_content"
- android:text="Generate QRcode" />
- <ImageView
- android:id="@+id/iv_qr_image"
- android:layout_width="wrap_content"
- android:layout_height="wrap_content"
- android:layout_marginTop="10dp"
- android:layout_gravity="center"/>
- nearLayout>
2.生成二維碼的代碼
- package com.zxing.encoding;
- import java.util.Hashtable;
- import android.graphics.Bitmap;
- import com.google.zxing.BarcodeFormat;
- import com.google.zxing.EncodeHintType;
- import com.google.zxing.MultiFormatWriter;
- import com.google.zxing.WriterException;
- import com.google.zxing.common.BitMatrix;
- /**
- * @author Ryan Tang
- *
- */
- public final class EncodingHandler {
- private static final int BLACK = 0xff000000;
- public static Bitmap createQRCode(String str,int widthAndHeight) throws WriterException {
- Hashtable<EncodeHintType, String> hints = new Hashtable<EncodeHintType, String>();
- hints.put(EncodeHintType.CHARACTER_SET, "utf-8");
- BitMatrix matrix = new MultiFormatWriter().encode(str,
- BarcodeFormat.QR_CODE, widthAndHeight, widthAndHeight);
- int width = matrix.getWidth();
- int height = matrix.getHeight();
- int[] pixels = new int[width * height];
- for (int y = 0; y < height; y++) {
- for (int x = 0; x < width; x++) {
- if (matrix.get(x, y)) {
- pixels[y * width + x] = BLACK;
- }
- }
- }
- Bitmap bitmap = Bitmap.createBitmap(width, height,
- Bitmap.Config.ARGB_8888);
- bitmap.setPixels(pixels, 0, width, 0, 0, width, height);
- return bitmap;
- }
- }
3.Activity上的操作實現
- package com.ericssonlabs;
- import com.google.zxing.WriterException;
- import com.zxing.activity.CaptureActivity;
- import com.zxing.encoding.EncodingHandler;
- import android.app.Activity;
- import android.content.Intent;
- import android.graphics.Bitmap;
- import android.os.Bundle;
- import android.view.View;
- import android.view.View.OnClickListener;
- import android.widget.Button;
- import android.widget.EditText;
- import android.widget.ImageView;
- import android.widget.TextView;
- import android.widget.Toast;
- public class BarCodeTestActivity extends Activity {
- /** Called when the activity is first created. */
- private TextView resultTextView;
- private EditText qrStrEditText;
- private ImageView qrImgImageView;
- @Override
- public void onCreate(Bundle savedInstanceState) {
- super.onCreate(savedInstanceState);
- setContentView(R.layout.main);
- resultTextView = (TextView) this.findViewById(R.id.tv_scan_result);
- qrStrEditText = (EditText) this.findViewById(R.id.et_qr_string);
- qrImgImageView = (ImageView) this.findViewById(R.id.iv_qr_image);
- Button scanBarCodeButton = (Button) this.findViewById(R.id.btn_scan_barcode);
- scanBarCodeButton.setOnClickListener(new OnClickListener() {
- @Override
- public void onClick(View v) {
- Intent openCameraIntent = new Intent(BarCodeTestActivity.this,CaptureActivity.class);
- startActivityForResult(openCameraIntent, 0);
- }
- });
- Button generateQRCodeButton = (Button) this.findViewById(R.id.btn_add_qrcode);
- generateQRCodeButton.setOnClickListener(new OnClickListener() {
- @Override
- public void onClick(View v) {
- try {
- String contentString = qrStrEditText.getText().toString();
- if (!contentString.equals("")) {
- Bitmap qrCodeBitmap = EncodingHandler.createQRCode(contentString, 350);
- qrImgImageView.setImageBitmap(qrCodeBitmap);
- }else {
- Toast.makeText(BarCodeTestActivity.this, "Text can not be empty", Toast.LENGTH_SHORT).show();
- }
- } catch (WriterException e) {
- // TODO Auto-generated catch block
- e.printStackTrace();
- }
- }
- });
- }
- @Override
- protected void onActivityResult(int requestCode, int resultCode, Intent data) {
- super.onActivityResult(requestCode, resultCode, data);
- if (resultCode == RESULT_OK) {
- Bundle bundle = data.getExtras();
- String scanResult = bundle.getString("result");
- resultTextView.setText(scanResult);
- }
- }
- }
下面給出Demo的下載地址(注:下載前需注冊第三方網站會員):
http://download.csdn.net/detail/dlutbrucezhang/5066053
或
下載源代碼:點擊這里http://code.google.com/p/zxing/downloads/detail?name=ZXing-1.6.zip&can=2&q=