Android程序手機平板兩不誤:Fragment輕松實現(xiàn)
記得我之前參與開發(fā)過一個華為的項目,要求程序可以支持好幾種終端設備,其中就包括 Android手機和Android Pad。然后為了節(jié)省人力,公司無節(jié)操地讓Android手機和Android Pad都由我們團隊開發(fā)。當時項目 組定的方案是,制作兩個版本的App,一個手機版,一個Pad版。由于當時手機版的主體功能已經(jīng)做的差不多了,所以Pad版基本上就是把手機版的代碼完全 拷過來,然后再根據(jù)平板的特性部分稍作修改就好了。
但是,從此以后我們就非常苦 逼了。每次要添加什么新功能,同樣的代碼要寫兩遍。每次要修復任何bug,都要在手機版代碼和Pad版代碼里各修改一遍。這還不算什么,每到出版本的時候 就更離譜了。華為要求每次需要出兩個版本,一個華為內(nèi)網(wǎng)環(huán)境的版本,一個客戶現(xiàn)場的版本,而現(xiàn)在又分了手機和Pad,也就是每次需要出四個版本。如果在出 完版本后自測還出現(xiàn)了問題,就可以直接通宵了。這尤其是苦了我們的X總(由于他dota打的比較好,我都喜歡叫他X神)。他在我們項目組中單獨維護一個模 塊,并且每次打版本都是由他負責,加班的時候我們都能跑,就是他跑不了。這里也是贊揚一下我們X神的敬業(yè)精神,如果他看得到的話。
經(jīng)歷過那么苦逼時期的我也就開始思考,可不可以制作同時兼容手機和平板的App呢?答案當然是肯定的,不過我這個人比較懶,一直也提不起精神去鉆研這個問題。直到我一個在美國留學的朋友Gong讓我?guī)退鉀Q她的研究生導師布置的作業(yè)(我知道你研究生導師看不懂中文 ^-^),正好涉及到了這一塊,也就借此機會研究了一下,現(xiàn)在拿出來跟大家分享。
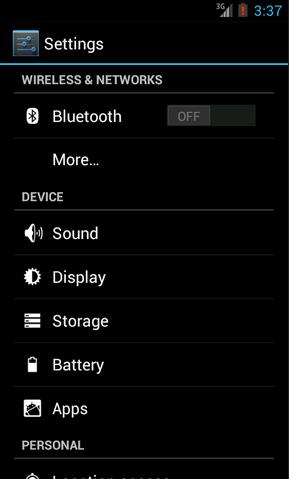
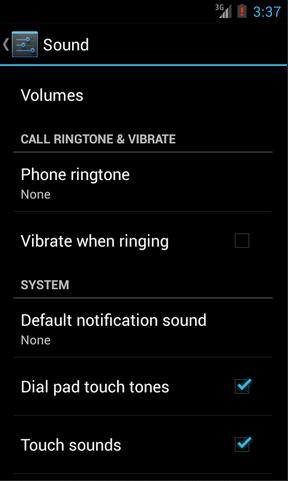
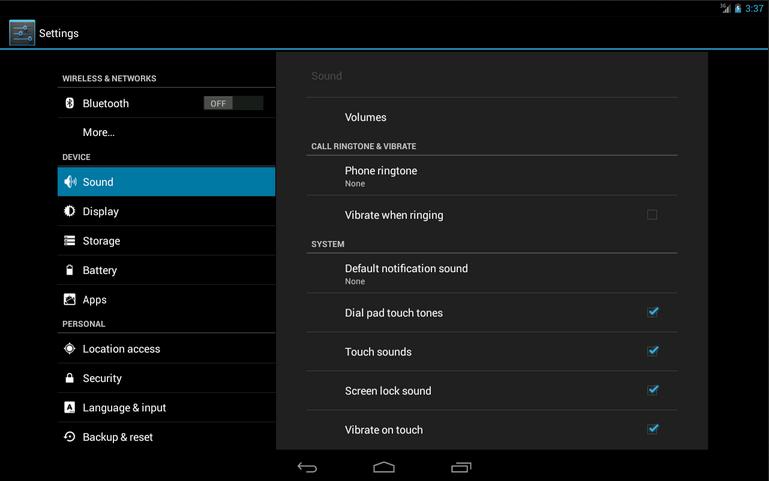
我們先來看一下Android手機的設置界面,點擊一下Sound,可以跳轉到聲音設置界面,如下面兩張圖所示:
然后再來看一下Android Pad的設置界面,主設置頁面和聲音設置頁面都是在一個界面顯示的,如下圖所示:
如果這分別是兩個不同的App做出的效果,那沒有絲毫驚奇之處。但如果是同一個App,在手機上和平板上運行分別有以上兩種效果的話,你是不是就已經(jīng)心動了?我們現(xiàn)在就來模擬實現(xiàn)一下。
首先你需要對Fragment有一定的了解,如果你還沒接觸過Fragment,建議可以先閱讀 Android Fragment完全解析,關于碎片你所需知道的一切 這篇文章。并且本次的代碼是運行在Android 4.0版本上的,如果你的SDK版本還比較低的話,建議可以先升升級了。
新建一個Android項目,取名叫FragmentDemo。打開或新建MainActivity作為程序的主Activity,里面有如下自動生成的內(nèi)容:
- publicclass MainActivity extends Activity {
- @Override
- publicvoid onCreate(Bundle savedInstanceState) {
- super.onCreate(savedInstanceState);
- setContentView(R.layout.activity_main);
- }
- }
- public class MainActivity extends Activity {
- @Override
- public void onCreate(Bundle savedInstanceState) {
- super.onCreate(savedInstanceState);
- setContentView(R.layout.activity_main);
- }
- }
作為一個Android老手,上面的代碼實在太小兒科了,每個Activity中都會有這樣的代碼。不過今天我們的程序可不會這么簡單,加載布局這一塊還是大有文章的。
打開或新建res/layout/activity_main.xml作為程序的主布局文件,里面代碼如下:
- <LinearLayoutxmlns:android="http://schemas.android.com/apk/res/android"
- xmlns:tools="http://schemas.android.com/tools"
- android:layout_width="fill_parent"
- android:layout_height="fill_parent"
- android:orientation="horizontal"
- tools:context=".MainActivity">
- <fragment
- android:id="@+id/menu_fragment"
- android:name="com.example.fragmentdemo.MenuFragment"
- android:layout_width="fill_parent"
- android:layout_height="fill_parent"
- />
- </LinearLayout>
- <LinearLayout xmlns:android="http://schemas.android.com/apk/res/android"
- xmlns:tools="http://schemas.android.com/tools"
- android:layout_width="fill_parent"
- android:layout_height="fill_parent"
- android:orientation="horizontal"
- tools:context=".MainActivity" >
- <fragment
- android:id="@+id/menu_fragment"
- android:name="com.example.fragmentdemo.MenuFragment"
- android:layout_width="fill_parent"
- android:layout_height="fill_parent"
- />
- </LinearLayout>
這個布局引用了一個MenuFragment,我們稍后來進行實現(xiàn),先來看一下今天的一個重點,我們需要再新建一個activity_main.xml,這個布局文件名和前面的主布局文件名是一樣的,但是要放在不同的目錄下面。
別走開,下頁為您繼續(xù)介紹Fragment實現(xiàn)Android程序手機平板兼容
#p#
在res目錄下新建layout-large目錄,然后這個目錄下創(chuàng)建新的activity_main.xml,加入如下代碼:
- <LinearLayoutxmlns:android="http://schemas.android.com/apk/res/android"
- xmlns:tools="http://schemas.android.com/tools"
- android:layout_width="fill_parent"
- android:layout_height="fill_parent"
- android:orientation="horizontal"
- android:baselineAligned="false"
- tools:context=".MainActivity"
- >
- <fragment
- android:id="@+id/left_fragment"
- android:name="com.example.fragmentdemo.MenuFragment"
- android:layout_width="0dip"
- android:layout_height="fill_parent"
- android:layout_weight="1"
- />
- <FrameLayout
- android:id="@+id/details_layout"
- android:layout_width="0dip"
- android:layout_height="fill_parent"
- android:layout_weight="3"
- ></FrameLayout>
- </LinearLayout>
- <LinearLayout xmlns:android="http://schemas.android.com/apk/res/android"
- xmlns:tools="http://schemas.android.com/tools"
- android:layout_width="fill_parent"
- android:layout_height="fill_parent"
- android:orientation="horizontal"
- android:baselineAligned="false"
- tools:context=".MainActivity"
- >
- <fragment
- android:id="@+id/left_fragment"
- android:name="com.example.fragmentdemo.MenuFragment"
- android:layout_width="0dip"
- android:layout_height="fill_parent"
- android:layout_weight="1"
- />
- <FrameLayout
- android:id="@+id/details_layout"
- android:layout_width="0dip"
- android:layout_height="fill_parent"
- android:layout_weight="3"
- ></FrameLayout>
- </LinearLayout>
這個布局同樣也引用了MenuFragment,另外還加入了一個FrameLayout用于顯示詳細內(nèi)容。其實也就是分別對應了平板界面上的左側布局和右側布局。
這里用到了動態(tài)加載布局的技巧,首先Activity中調(diào)用 setContentView(R.layout.activity_main) ,表明當前 的Activity想加載activity_main這個布局文件。而Android系統(tǒng)又會根據(jù)當前的運行環(huán)境判斷程序是否運行在大屏幕設備上,如果運 行在大屏幕設備上,就加載layout-large目錄下的activity_main.xml,否則就默認加載layout目錄下的 activity_main.xml。
關于動態(tài)加載布局的更多內(nèi)容,可以閱讀 Android官方提供的支持不同屏幕大小的全部方法 這篇文章。
下面我們來實現(xiàn)久違的MenuFragment,新建一個MenuFragment類繼承自Fragment,具體代碼如下:
- publicclass MenuFragment extends Fragment implements OnItemClickListener {
- /**
- * 菜單界面中只包含了一個ListView。
- */
- private ListView menuList;
- /**
- * ListView的適配器。
- */
- private ArrayAdapter<String> adapter;
- /**
- * 用于填充ListView的數(shù)據(jù),這里就簡單只用了兩條數(shù)據(jù)。
- */
- private String[] menuItems = { "Sound", "Display" };
- /**
- * 是否是雙頁模式。如果一個Activity中包含了兩個Fragment,就是雙頁模式。
- */
- privateboolean isTwoPane;
- /**
- * 當Activity和Fragment建立關聯(lián)時,初始化適配器中的數(shù)據(jù)。
- */
- @Override
- publicvoid onAttach(Activity activity) {
- super.onAttach(activity);
- adapter = new ArrayAdapter<String>(activity, android.R.layout.simple_list_item_1, menuItems);
- }
- /**
- * 加載menu_fragment布局文件,為ListView綁定了適配器,并設置了監(jiān)聽事件。
- */
- @Override
- public View onCreateView(LayoutInflater inflater, ViewGroup container, Bundle savedInstanceState) {
- View view = inflater.inflate(R.layout.menu_fragment, container, false);
- menuList = (ListView) view.findViewById(R.id.menu_list);
- menuList.setAdapter(adapter);
- menuList.setOnItemClickListener(this);
- return view;
- }
- /**
- * 當Activity創(chuàng)建完畢后,嘗試獲取一下布局文件中是否有details_layout這個元素,如果有說明當前
- * 是雙頁模式,如果沒有說明當前是單頁模式。
- */
- @Override
- publicvoid onActivityCreated(Bundle savedInstanceState) {
- super.onActivityCreated(savedInstanceState);
- if (getActivity().findViewById(R.id.details_layout) != null) {
- isTwoPane = true;
- } else {
- isTwoPane = false;
- }
- }
- /**
- * 處理ListView的點擊事件,會根據(jù)當前是否是雙頁模式進行判斷。如果是雙頁模式,則會動態(tài)添加Fragment。
- * 如果不是雙頁模式,則會打開新的Activity。
- */
- @Override
- publicvoid onItemClick(AdapterView<?> arg0, View view, int index, long arg3) {
- if (isTwoPane) {
- Fragment fragment = null;
- if (index == 0) {
- fragment = new SoundFragment();
- } elseif (index == 1) {
- fragment = new DisplayFragment();
- }
- getFragmentManager().beginTransaction().replace(R.id.details_layout, fragment).commit();
- } else {
- Intent intent = null;
- if (index == 0) {
- intent = new Intent(getActivity(), SoundActivity.class);
- } elseif (index == 1) {
- intent = new Intent(getActivity(), DisplayActivity.class);
- }
- startActivity(intent);
- }
- }
- }
- public class MenuFragment extends Fragment implements OnItemClickListener {
- /**
- * 菜單界面中只包含了一個ListView。
- */
- private ListView menuList;
- /**
- * ListView的適配器。
- */
- private ArrayAdapter<String> adapter;
- /**
- * 用于填充ListView的數(shù)據(jù),這里就簡單只用了兩條數(shù)據(jù)。
- */
- private String[] menuItems = { "Sound", "Display" };
- /**
- * 是否是雙頁模式。如果一個Activity中包含了兩個Fragment,就是雙頁模式。
- */
- private boolean isTwoPane;
- /**
- * 當Activity和Fragment建立關聯(lián)時,初始化適配器中的數(shù)據(jù)。
- */
- @Override
- public void onAttach(Activity activity) {
- super.onAttach(activity);
- adapter = new ArrayAdapter<String>(activity, android.R.layout.simple_list_item_1, menuItems);
- }
- /**
- * 加載menu_fragment布局文件,為ListView綁定了適配器,并設置了監(jiān)聽事件。
- */
- @Override
- public View onCreateView(LayoutInflater inflater, ViewGroup container, Bundle savedInstanceState) {
- View view = inflater.inflate(R.layout.menu_fragment, container, false);
- menuList = (ListView) view.findViewById(R.id.menu_list);
- menuList.setAdapter(adapter);
- menuList.setOnItemClickListener(this);
- return view;
- }
- /**
- * 當Activity創(chuàng)建完畢后,嘗試獲取一下布局文件中是否有details_layout這個元素,如果有說明當前
- * 是雙頁模式,如果沒有說明當前是單頁模式。
- */
- @Override
- public void onActivityCreated(Bundle savedInstanceState) {
- super.onActivityCreated(savedInstanceState);
- if (getActivity().findViewById(R.id.details_layout) != null) {
- isTwoPane = true;
- } else {
- isTwoPane = false;
- }
- }
- /**
- * 處理ListView的點擊事件,會根據(jù)當前是否是雙頁模式進行判斷。如果是雙頁模式,則會動態(tài)添加Fragment。
- * 如果不是雙頁模式,則會打開新的Activity。
- */
- @Override
- public void onItemClick(AdapterView<?> arg0, View view, int index, long arg3) {
- if (isTwoPane) {
- Fragment fragment = null;
- if (index == 0) {
- fragment = new SoundFragment();
- } else if (index == 1) {
- fragment = new DisplayFragment();
- }
- getFragmentManager().beginTransaction().replace(R.id.details_layout, fragment).commit();
- } else {
- Intent intent = null;
- if (index == 0) {
- intent = new Intent(getActivity(), SoundActivity.class);
- } else if (index == 1) {
- intent = new Intent(getActivity(), DisplayActivity.class);
- }
- startActivity(intent);
- }
- }
- }
這個類的代碼并不長,我簡單的說明一下。在onCreateView方法中加載了menu_fragment這個布局,這個布局里面包含 了一個ListView,然后我們對這個ListView填充了兩個簡單的數(shù)據(jù) "Sound" 和 "Display" 。又在 onActivityCreated方法中做了一個判斷,如果Activity的布局中包含了details_layout這個元素,那么當前就是雙頁模 式,否則就是單頁模式。onItemClick方法則處理了ListView的點擊事件,發(fā)現(xiàn)如果當前是雙頁模式,就動態(tài)往details_layout 中添加Fragment,如果當前是單頁模式,就直接打開新的Activity。
別走開,下頁為您繼續(xù)介紹Fragment實現(xiàn)Android程序手機平板兼容
#p#
我們把MenuFragment中引用到的其它內(nèi)容一個個添加進來。新建menu_fragment.xml文件,加入如下代碼:
- <?xmlversion="1.0"encoding="UTF-8"?>
- <LinearLayoutxmlns:android="http://schemas.android.com/apk/res/android"
- android:layout_width="fill_parent"
- android:layout_height="fill_parent">
- <ListView
- android:id="@+id/menu_list"
- android:layout_width="fill_parent"
- android:layout_height="fill_parent"
- ></ListView>
- </LinearLayout>
- <?xml version="1.0" encoding="UTF-8"?>
- <LinearLayout xmlns:android="http://schemas.android.com/apk/res/android"
- android:layout_width="fill_parent"
- android:layout_height="fill_parent" >
- <ListView
- android:id="@+id/menu_list"
- android:layout_width="fill_parent"
- android:layout_height="fill_parent"
- ></ListView>
- </LinearLayout>
然后新建SoundFragment,里面內(nèi)容非常簡單:
- publicclass SoundFragment extends Fragment {
- @Override
- public View onCreateView(LayoutInflater inflater, ViewGroup container, Bundle savedInstanceState) {
- View view = inflater.inflate(R.layout.sound_fragment, container, false);
- return view;
- }
- }
- public class SoundFragment extends Fragment {
- @Override
- public View onCreateView(LayoutInflater inflater, ViewGroup container, Bundle savedInstanceState) {
- View view = inflater.inflate(R.layout.sound_fragment, container, false);
- return view;
- }
- }
這里SoundFragment需要用到sound_fragment.xml布局文件,因此這里我們新建這個布局文件,并加入如下代碼:
- <?xmlversionxmlversion="1.0"encoding="utf-8"?>
- ativeLayoutxmlns:androidRelativeLayoutxmlns:android="http://schemas.android.com/apk/res/android"
- android:layout_width="match_parent"
- android:layout_height="match_parent"
- android:background="#00ff00"
- android:orientation="vertical">
- <TextView
- android:layout_width="wrap_content"
- android:layout_height="wrap_content"
- android:layout_centerInParent="true"
- android:textSize="28sp"
- android:textColor="#000000"
- android:text="This is sound view"
- />
- </RelativeLayout>
- <?xml version="1.0" encoding="utf-8"?>
- <RelativeLayout xmlns:android="http://schemas.android.com/apk/res/android"
- android:layout_width="match_parent"
- android:layout_height="match_parent"
- android:background="#00ff00"
- android:orientation="vertical" >
- <TextView
- android:layout_width="wrap_content"
- android:layout_height="wrap_content"
- android:layout_centerInParent="true"
- android:textSize="28sp"
- android:textColor="#000000"
- android:text="This is sound view"
- />
- </RelativeLayout>
同樣的道理,我們再新建DisplayFragment和display_fragment.xml布局文件:
- publicclass DisplayFragment extends Fragment {
- public View onCreateView(LayoutInflater inflater, ViewGroup container, Bundle savedInstanceState) {
- View view = inflater.inflate(R.layout.display_fragment, container, false);
- return view;
- }
- }
- <?xmlversion="1.0"encoding="utf-8"?>
- <RelativeLayoutxmlns:android="http://schemas.android.com/apk/res/android"
- android:layout_width="match_parent"
- android:layout_height="match_parent"
- android:background="#0000ff"
- android:orientation="vertical">
- <TextView
- android:layout_width="wrap_content"
- android:layout_height="wrap_content"
- android:layout_centerInParent="true"
- android:textSize="28sp"
- android:textColor="#000000"
- android:text="This is display view"
- />
- </RelativeLayout>
- <?xml version="1.0" encoding="utf-8"?>
- <RelativeLayout xmlns:android="http://schemas.android.com/apk/res/android"
- android:layout_width="match_parent"
- android:layout_height="match_parent"
- android:background="#0000ff"
- android:orientation="vertical" >
- <TextView
- android:layout_width="wrap_content"
- android:layout_height="wrap_content"
- android:layout_centerInParent="true"
- android:textSize="28sp"
- android:textColor="#000000"
- android:text="This is display view"
- />
- </RelativeLayout>
然后新建SoundActivity,代碼如下:
- publicclass SoundActivity extends Activity {
- @Override
- protectedvoid onCreate(Bundle savedInstanceState) {
- super.onCreate(savedInstanceState);
- setContentView(R.layout.sound_activity);
- }
- }
- public class SoundActivity extends Activity {
- @Override
- protected void onCreate(Bundle savedInstanceState) {
- super.onCreate(savedInstanceState);
- setContentView(R.layout.sound_activity);
- }
- }
這個Activity只是加載了一個布局文件,現(xiàn)在我們來實現(xiàn)sound_activity.xml這個布局文件:
- <?xmlversion="1.0"encoding="utf-8"?>
- <fragmentxmlns:android="http://schemas.android.com/apk/res/android"
- android:id="@+id/sound_fragment"
- android:name="com.example.fragmentdemo.SoundFragment"
- android:layout_width="match_parent"
- android:layout_height="match_parent">
- </fragment>
- <?xml version="1.0" encoding="utf-8"?>
- <fragment xmlns:android="http://schemas.android.com/apk/res/android"
- android:id="@+id/sound_fragment"
- android:name="com.example.fragmentdemo.SoundFragment"
- android:layout_width="match_parent"
- android:layout_height="match_parent" >
- </fragment>
這個布局文件引用了SoundFragment,這樣寫的好處就是,以后我們只需要在SoundFragment中修改代碼,SoundActivity就會跟著自動改變了,因為它所有的代碼都是從SoundFragment中引用過來的。
好,同樣的方法,我們再完成DisplayActivity:
- publicclass DisplayActivity extends Activity {
- @Override
- protectedvoid onCreate(Bundle savedInstanceState) {
- super.onCreate(savedInstanceState);
- setContentView(R.layout.display_activity);
- }
- }
- public class DisplayActivity extends Activity {
- @Override
- protected void onCreate(Bundle savedInstanceState) {
- super.onCreate(savedInstanceState);
- setContentView(R.layout.display_activity);
- }
- }
別走開,下頁為您繼續(xù)介紹Fragment實現(xiàn)Android程序手機平板兼容
#p#
然后加入display_activity.xml:
- <?xmlversion="1.0"encoding="utf-8"?>
- <fragmentxmlns:android="http://schemas.android.com/apk/res/android"
- android:id="@+id/display_fragment"
- android:name="com.example.fragmentdemo.DisplayFragment"
- android:layout_width="match_parent"
- android:layout_height="match_parent">
- </fragment>
- <?xml version="1.0" encoding="utf-8"?>
- <fragment xmlns:android="http://schemas.android.com/apk/res/android"
- android:id="@+id/display_fragment"
- android:name="com.example.fragmentdemo.DisplayFragment"
- android:layout_width="match_parent"
- android:layout_height="match_parent" >
- </fragment>
現(xiàn)在所有的代碼就都已經(jīng)完成了,我們來看一下效果吧。
首先將程序運行在手機上,效果圖如下:
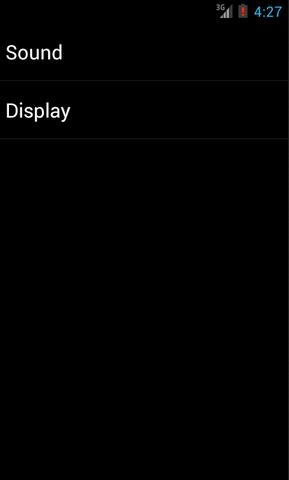
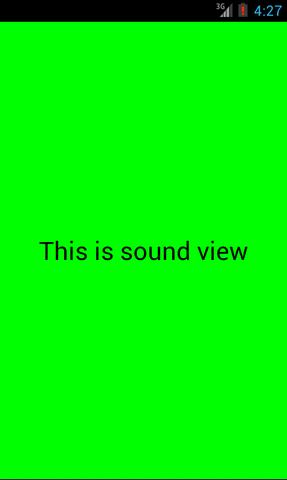
分別點擊Sound和Display,界面會跳轉到聲音和顯示界面:

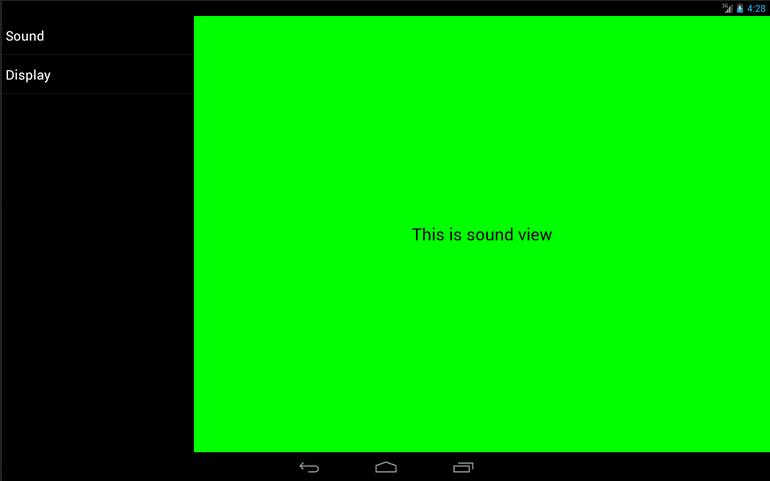
然后將程序在平板上運行,點擊Sound,效果圖如下:
然后點擊Display切換到顯示界面,效果圖如下:
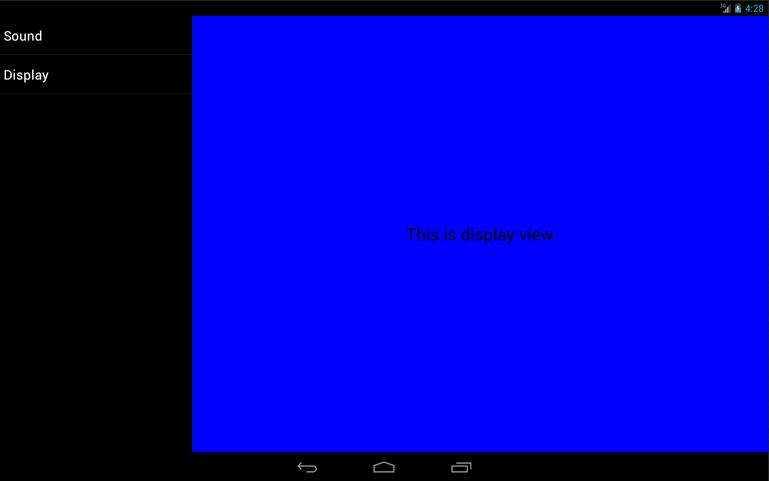
這樣我們就成功地讓程序同時兼容手機和平板了。當然,這只是一個簡單的demo,更多復雜的內(nèi)容需要大家自己去實現(xiàn)了。
好了,今天的講解到此結束。