在Ubuntu 14.04 LTS系統中設置Apache虛擬主機
虛擬主機常用于在一個單獨的IP地址上提供多個域名的網站服務。如果有人想在單個VPS的單個IP地址運行多個網站,這是非常有用的。在這個教程中,讓我告訴你如何設置在Ubuntu 14.04 LTS的Apache網頁服務器設置虛擬主機。請注意,這個教程只針對Ubuntu14.04的32位版本。
我不保證它也可以工作在其它更低的Ubuntu版本或者Ubuntu衍生版本(雖然可能過程是類似的)。
方案
在這個教程中,我會使用Ubuntu 14.04 32位 LTS,并搭建2個測試網站分別命名為“unixmen1.local” 和 “unixmen2.local”.我的測試機分別為192.168.1.250/24和server.unixmen.local。你可以根據你的需要更改虛擬域名。
安裝Apache網站服務器
安裝apache服務器之前,我們來更新一下我們的Ubuntu服務器:
- sudo apt-get update
然后,用下面命令來安裝apache網絡服務器:
- sudo apt-get install apache2
安裝apache服務器之后,讓我們通過這個URL http://你的服務器的IP地址/ 來測試網站服務器是否正常工作
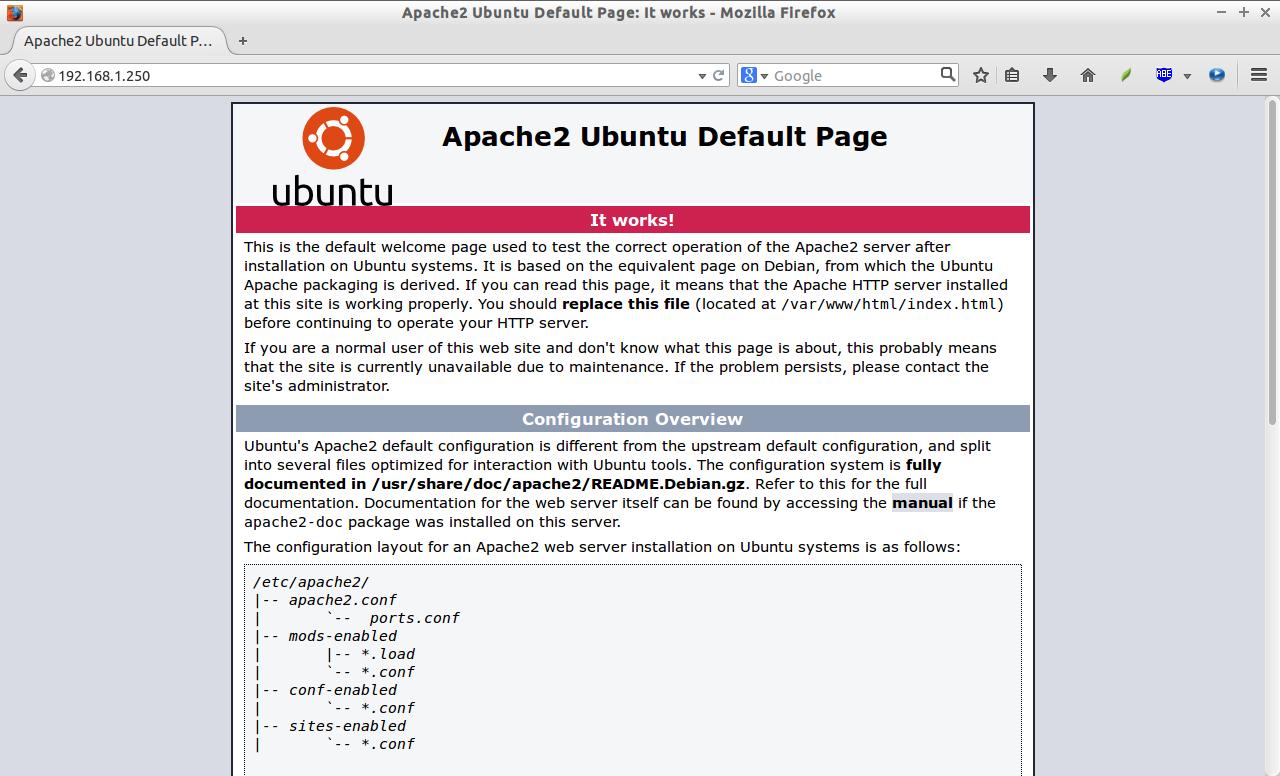
如你所見,apache服務器已經工作了。
設置虛擬主機
1.創建虛擬目錄
現在,讓我們繼續安裝虛擬主機。正如我先前所述,我要新建2臺虛擬主機分別命名為“unixmen1.local”和“unixmen2.local”.
創建一個公用的文件夾來存放這兩臺虛擬主機的數據。
首先,讓我們為unixmen1.local這個站點創建一個目錄:
- sudo mkdir -p /var/www/unixmen1.local/public_html
接著,為for unixmen2.local站點創建一個目錄:
- sudo mkdir -p /var/www/unixmen2.local/public_html
2. 設置所有者和權限
上面目錄現在只有root擁有權限。我們需要修改這2個目錄的擁有權給普通用戶,而不僅僅是root用戶。
- sudo chown -R $USER:$USER /var/www/unixmen1.local/public_html/
- sudo chown -R $USER:$USER /var/www/unixmen2.local/public_html/
“$USER”變量指向了當前的登錄用戶。
設置讀寫權限給apache網頁根目錄(/var/www)及其子目錄,這樣每個人都可以從目錄中讀取文件。
- sudo chmod -R 755 /var/www/
這樣,我們就創建好了一些文件夾來保存網絡相關數據并分配必要的權限和所屬用戶。
3. 為虛擬主機創建示例頁
現在,我們給網站增加示例頁。第一步,讓我們給虛擬主機unixmen1.local創建一個示例頁。
給unixmen1.local虛擬主機創建一個示例頁,
- sudo vi /var/www/unixmen1.local/public_html/index.html
添加以下內容:
- <html>
- <head>
- <title>www.unixmen1.local</title>
- </head>
- <body>
- <h1>Welcome To Unixmen1.local website</h1>
- </body>
- </html>
保存并關閉文件。
同樣的,添加示例頁到第二臺虛擬主機。
- sudo vi /var/www/unixmen2.local/public_html/index.html
添加以下內容:
- <html>
- <head>
- <title>www.unixmen2.local</title>
- </head>
- <body>
- <h1>Welcome To Unixmen2.local website</h1>
- </body>
- </html>
保存并關閉文件。
4. 創建虛擬主機配置文件
默認情況下,apache有一個默認的虛擬主機文件叫000-default.conf。我們將會復制000-default.conf文件內容到我們新的虛擬主機配置文件中。
- sudo cp /etc/apache2/sites-available/000-default.conf /etc/apache2/sites-available/unixmen1.local.conf
- sudo cp /etc/apache2/sites-available/000-default.conf /etc/apache2/sites-available/unixmen2.local.conf
確保虛擬主機配置文件末尾包含.conf擴展名。
現在,修改unximen1.local.conf文件以符合需求。
- sudo vi /etc/apache2/sites-available/unixmen1.local.conf
使相關的變化直接呈現在unixmen1站點中(譯注:以“#”開頭的注釋行可以忽略。)。
- <VirtualHost *:80>
- # The ServerName directive sets the request scheme, hostname and port that
- # the server uses to identify itself. This is used when creating
- # redirection URLs. In the context of virtual hosts, the ServerName
- # specifies what hostname must appear in the request's Host: header to
- # match this virtual host. For the default virtual host (this file) this
- # value is not decisive as it is used as a last resort host regardless.
- # However, you must set it for any further virtual host explicitly.
- #ServerName www.example.com
- ServerAdmin webmaster@unixmen1.local
- ServerName unixmen1.local
- ServerAlias www.unixmen1.local
- DocumentRoot /var/www/unixmen1.local/public_html
- # Available loglevels: trace8, ..., trace1, debug, info, notice, warn,
- # error, crit, alert, emerg.
- # It is also possible to configure the loglevel for particular
- # modules, e.g.
- #LogLevel info ssl:warn
- ErrorLog ${APACHE_LOG_DIR}/error.log
- CustomLog ${APACHE_LOG_DIR}/access.log combined
- # For most configuration files from conf-available/, which are
- # enabled or disabled at a global level, it is possible to
- # include a line for only one particular virtual host. For example the
- # following line enables the CGI configuration for this host only
- # after it has been globally disabled with "a2disconf".
- #Include conf-available/serve-cgi-bin.conf
- </VirtualHost>
同理,修改第二臺主機文件。
- sudo vi /etc/apache2/sites-available/unixmen2.local.conf
使相關的修改在unixmen2 站點呈現出來。
- <VirtualHost *:80>
- # The ServerName directive sets the request scheme, hostname and port that
- # the server uses to identify itself. This is used when creating
- # redirection URLs. In the context of virtual hosts, the ServerName
- # specifies what hostname must appear in the request's Host: header to
- # match this virtual host. For the default virtual host (this file) this
- # value is not decisive as it is used as a last resort host regardless.
- # However, you must set it for any further virtual host explicitly.
- #ServerName www.example.com
- ServerAdmin webmaster@unixmen2.local
- ServerName unixmen2.local
- ServerAlias www.unixmen2.local
- DocumentRoot /var/www/unixmen2.local/public_html
- # Available loglevels: trace8, ..., trace1, debug, info, notice, warn,
- # error, crit, alert, emerg.
- # It is also possible to configure the loglevel for particular
- # modules, e.g.
- #LogLevel info ssl:warn
- ErrorLog ${APACHE_LOG_DIR}/error.log
- CustomLog ${APACHE_LOG_DIR}/access.log combined
- # For most configuration files from conf-available/, which are
- # enabled or disabled at a global level, it is possible to
- # include a line for only one particular virtual host. For example the
- # following line enables the CGI configuration for this host only
- # after it has been globally disabled with "a2disconf".
- #Include conf-available/serve-cgi-bin.conf
- </VirtualHost>
修改虛擬主機文件后,禁用默認的虛擬主機配置(000.default.conf),然后啟用新的虛擬主機配置,如下所示。
- sudo a2dissite 000-default.conf
- sudo a2ensite unixmen1.local.conf
- sudo a2ensite unixmen2.local.conf
最后,重啟apache服務器。
- sudo service apache2 restart
就是這樣。現在,我們成功地配置了apach虛擬主機在我們的Ubuntu服務器上
測試虛擬主機
編輯/etc/hosts文件,
- sudo vi /etc/hosts
在文件末尾添加如下所示的虛擬域名。
- 192.168.1.250 unixmen1.local
- 192.168.1.250 unixmen2.local
保存并關閉文件。
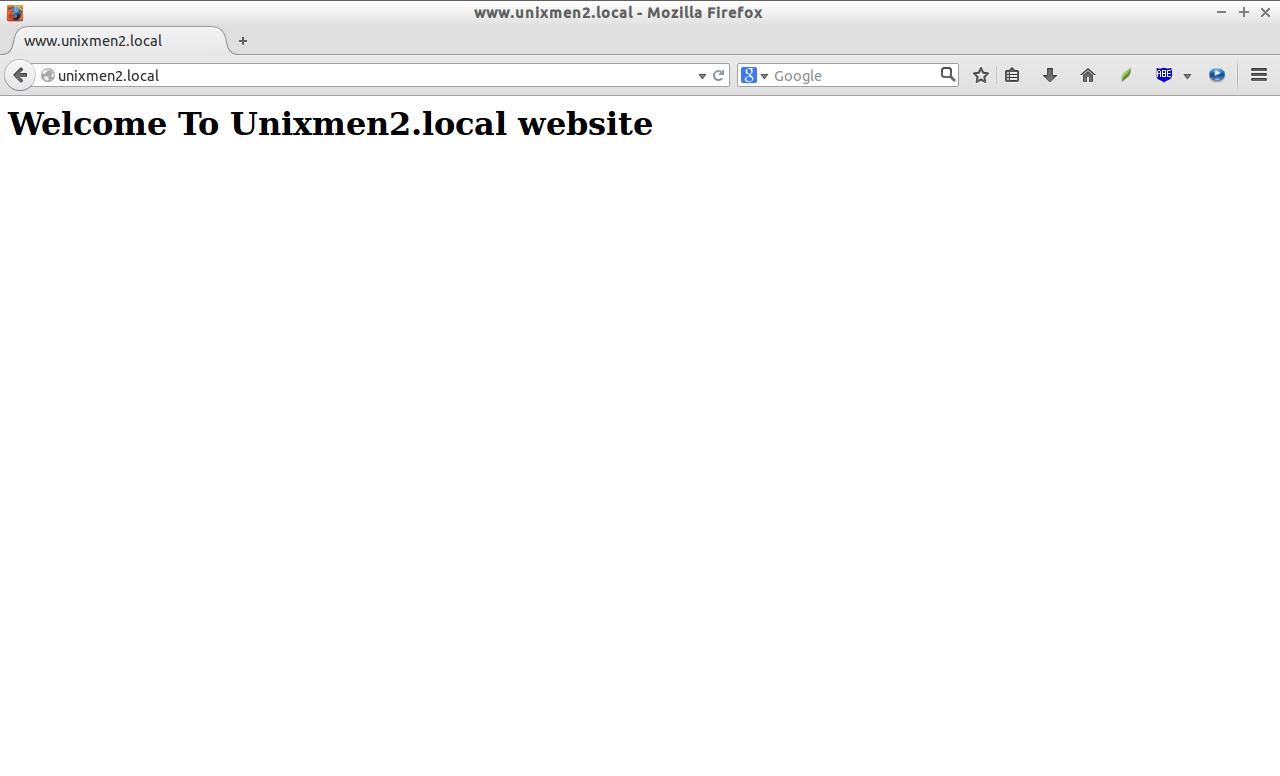
打開你的瀏覽器并訪問http://unixmen1.local 或 http://unixmen2.local。你將會看到我們之前創建的示例頁。
Unixmen1.local 測試頁:

Unixmen2.local 測試頁
如果你想從你的遠程系統訪問這些站點,你需要在你的DNS服務器添加實際域名記錄。不過,我沒有真實的域名和DNS服務器,我只想通過我的本地系統測試,那么它剛好如我所愿地工作。
Cheers!
via: http://www.unixmen.com/setup-virtual-hosts-apache-ubuntu-14-04-lts/