


Hadoop RPC通信Client客戶端的流程分析
Hadoop的RPC的通信與其他系統的RPC通信不太一樣,作者針對Hadoop的使用特點,專門的設計了一套RPC框架,這套框架個人感覺還是 有點小復雜的。所以我打算分成Client客戶端和Server服務端2個模塊做分析。如果你對RPC的整套流程已經非常了解的前提下,對于Hadoop 的RPC,你也一定可以非常迅速的了解的。OK,下面切入正題。
Hadoop的RPC的相關代碼都在org.apache.hadoop.ipc的包下,首先RPC的通信必須遵守許多的協議,其中最最基本的協議即使如下:
- /**
- * Superclass of all protocols that use Hadoop RPC.
- * Subclasses of this interface are also supposed to have
- * a static final long versionID field.
- * Hadoop RPC所有協議的基類,返回協議版本號
- */
- public interface VersionedProtocol {
- /**
- * Return protocol version corresponding to protocol interface.
- * @param protocol The classname of the protocol interface
- * @param clientVersion The version of the protocol that the client speaks
- * @return the version that the server will speak
- */
- public long getProtocolVersion(String protocol,
- long clientVersion) throws IOException;
- }
他是所有協議的基類,他的下面還有一堆的子類,分別對應于不同情況之間的通信,下面是一張父子類圖:

顧名思義,只有客戶端和服務端遵循相同的版本號,才能進行通信。
RPC客戶端的所有相關操作都被封裝在了一個叫Client.java的文件中:
- /** A client for an IPC service. IPC calls take a single {@link Writable} as a
- * parameter, and return a {@link Writable} as their value. A service runs on
- * a port and is defined by a parameter class and a value class.
- * RPC客戶端類
- * @see Server
- */
- public class Client {
- public static final Log LOG =
- LogFactory.getLog(Client.class);
- //客戶端到服務端的連接
- private Hashtable<ConnectionId, Connection> connections =
- new Hashtable<ConnectionId, Connection>();
- //回調值類
- private Class<? extends Writable> valueClass; // class of call values
- //call回調id的計數器
- private int counter; // counter for call ids
- //原子變量判斷客戶端是否還在運行
- private AtomicBoolean running = new AtomicBoolean(true); // if client runs
- final private Configuration conf;
- //socket工廠,用來創建socket
- private SocketFactory socketFactory; // how to create sockets
- private int refCount = 1;
- ......
從代碼中明顯的看到,這里存在著一個類似于connections連接池的東西,其實這暗示著連接是可以被復用的,在hashtable中,與每個Connecttion連接的對應的是一個ConnectionId,顯然這里不是一個Long類似的數值:
- /**
- * This class holds the address and the user ticket. The client connections
- * to servers are uniquely identified by <remoteAddress, protocol, ticket>
- * 連接的唯一標識,主要通過<遠程地址,協議類型,用戶組信息>
- */
- static class ConnectionId {
- //遠程的socket地址
- InetSocketAddress address;
- //用戶組信息
- UserGroupInformation ticket;
- //協議類型
- Class<?> protocol;
- private static final int PRIME = 16777619;
- private int rpcTimeout;
- private String serverPrincipal;
- private int maxIdleTime; //connections will be culled if it was idle for
- //maxIdleTime msecs
- private int maxRetries; //the max. no. of retries for socket connections
- private boolean tcpNoDelay; // if T then disable Nagle's Algorithm
- private int pingInterval; // how often sends ping to the server in msecs
- ....
這里用了3個屬性組成唯一的標識屬性,為了保證可以進行ID的復用,所以作者對ConnectionId的equal比較方法和hashCode 進行了重寫:
- /**
- * 作者重寫了equal比較方法,只要成員變量都想等也就想到了
- */
- @Override
- public boolean equals(Object obj) {
- if (obj == this) {
- return true;
- }
- if (obj instanceof ConnectionId) {
- ConnectionId that = (ConnectionId) obj;
- return isEqual(this.address, that.address)
- && this.maxIdleTime == that.maxIdleTime
- && this.maxRetries == that.maxRetries
- && this.pingInterval == that.pingInterval
- && isEqual(this.protocol, that.protocol)
- && this.rpcTimeout == that.rpcTimeout
- && isEqual(this.serverPrincipal, that.serverPrincipal)
- && this.tcpNoDelay == that.tcpNoDelay
- && isEqual(this.ticket, that.ticket);
- }
- return false;
- }
- /**
- * 重寫了hashCode的生成規則,保證不同的對象產生不同的hashCode值
- */
- @Override
- public int hashCode() {
- int result = 1;
- result = PRIME * result + ((address == null) ? 0 : address.hashCode());
- result = PRIME * result + maxIdleTime;
- result = PRIME * result + maxRetries;
- result = PRIME * result + pingInterval;
- result = PRIME * result + ((protocol == null) ? 0 : protocol.hashCode());
- result = PRIME * rpcTimeout;
- result = PRIME * result
- + ((serverPrincipal == null) ? 0 : serverPrincipal.hashCode());
- result = PRIME * result + (tcpNoDelay ? 1231 : 1237);
- result = PRIME * result + ((ticket == null) ? 0 : ticket.hashCode());
- return result;
- }
這樣就能保證對應同類型的連接就能夠完全復用了,而不是僅僅憑借引用的關系判斷對象是否相等,這里就是一個不錯的設計了。
與連接Id對應的就是Connection了,它里面維護是一下的一些變量;
- /** Thread that reads responses and notifies callers. Each connection owns a
- * socket connected to a remote address. Calls are multiplexed through this
- * socket: responses may be delivered out of order. */
- private class Connection extends Thread {
- //所連接的服務器地址
- private InetSocketAddress server; // server ip:port
- //服務端的krb5的名字,與安全方面相關
- private String serverPrincipal; // server's krb5 principal name
- //連接頭部,內部包含了,所用的協議,客戶端用戶組信息以及驗證的而方法
- private ConnectionHeader header; // connection header
- //遠程連接ID
- private final ConnectionId remoteId; // connection id
- //連接驗證方法
- private AuthMethod authMethod; // authentication method
- //下面3個變量都是安全方面的
- private boolean useSasl;
- private Token<? extends TokenIdentifier> token;
- private SaslRpcClient saslRpcClient;
- //下面是一組socket通信方面的變量
- private Socket socket = null; // connected socket
- private DataInputStream in;
- private DataOutputStream out;
- private int rpcTimeout;
- private int maxIdleTime; //connections will be culled if it was idle for
- //maxIdleTime msecs
- private int maxRetries; //the max. no. of retries for socket connections
- //tcpNoDelay可設置是否阻塞模式
- private boolean tcpNoDelay; // if T then disable Nagle's Algorithm
- private int pingInterval; // how often sends ping to the server in msecs
- // currently active calls 當前活躍的回調,一個連接 可能會有很多個call回調
- private Hashtable<Integer, Call> calls = new Hashtable<Integer, Call>();
- //最后一次IO活動通信的時間
- private AtomicLong lastActivity = new AtomicLong();// last I/O activity time
- //連接關閉標記
- private AtomicBoolean shouldCloseConnection = new AtomicBoolean(); // indicate if the connection is closed
- private IOException closeException; // close reason
- .....
里面維護了大量的和連接通信相關的變量,在這里有一個很有意思的東西connectionHeader,連接頭部,里面的數據時為了在通信最開始的時候被使用:
- class ConnectionHeader implements Writable {
- public static final Log LOG = LogFactory.getLog(ConnectionHeader.class);
- //客戶端和服務端通信的協議名稱
- private String protocol;
- //客戶端的用戶組信息
- private UserGroupInformation ugi = null;
- //驗證的方式,關系到寫入數據的時的格式
- private AuthMethod authMethod;
- .....
起到標識驗證的作用。一個Client類的基本結構我們基本可以描繪出來了,下面是完整的類關系圖:
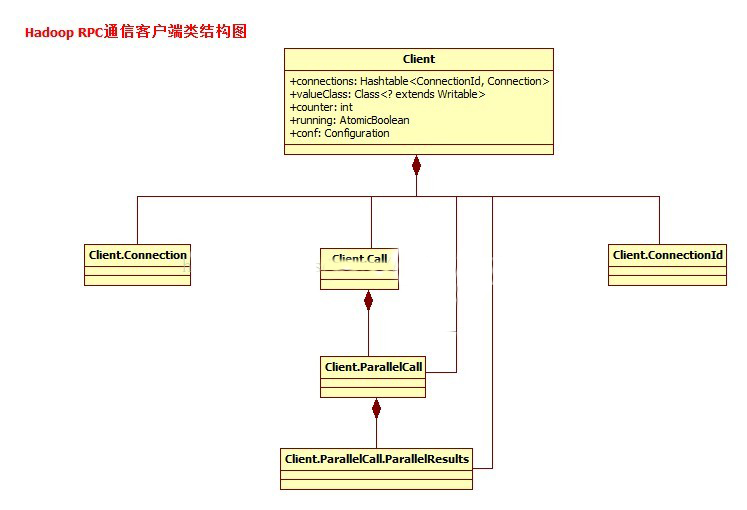
在上面這幅圖中,你肯定會發現我少了一個很關鍵的類了,就是Call回調類。Call回調在很多異步通信中是經常出現的。因為在通信過程中,當一個對象通 過網絡發送請求給另外一個對象的時候,如果采用同步的方式,會一直阻塞在那里,會帶來非常不好的效率和體驗的,所以很多時候,我們采用的是一種叫回調接口 的方式。在這期間,用戶可以繼續做自己的事情。所以同樣的Call這個概念當然也是適用在Hadoop RPC中。在Hadoop的RPC的核心調 用原理, 簡單的說,就是我把parame參數序列化到一個對象中,通過參數的形式把對象傳入,進行RPC通信,最后服務端把處理好的結果值放入call對象,在返 回給客戶端,也就是說客戶端和服務端都是通過Call對象進行操作,Call里面存著,請求的參數,和處理后的結構值2個變量。通過Call對象的封裝, 客戶單實現了完美的無須知道細節的調用。下面是Call類的類按時:
- /** A call waiting for a value. */
- //客戶端的一個回調
- private class Call {
- /回調ID
- int id; // call id
- //被序列化的參數
- Writable param; // parameter
- //返回值
- Writable value; // value, null if error
- //出錯時返回的異常
- IOException error; // exception, null if value
- //回調是否已經被完成
- boolean done; // true when call is done
- ....
看到這個Call回調類,也許你慢慢的會明白Hadoop RPC的一個基本原型了,這些Call當然是存在于某個連接中的,一個連接可能會發生多個回調,所以在Connection中維護了calls列表:
- private class Connection extends Thread {
- ....
- // currently active calls 當前活躍的回調,一個連接 可能會有很多個call回調
- private Hashtable<Integer, Call> calls = new Hashtable<Integer, Call>();
作者在設計Call類的時候,比較聰明的考慮一種并發情況下的Call調用,所以為此設計了下面這個Call的子類,就是專門用于短時間內的瞬間Call調用:
- /** Call implementation used for parallel calls. */
- /** 繼承自Call回調類,可以并行的使用,通過加了index下標做Call的區分 */
- private class ParallelCall extends Call {
- /每個ParallelCall并行的回調就會有對應的結果類
- private ParallelResults results;
- //index作為Call的區分
- private int index;
- ....
如果要查找值,就通過里面的ParallelCall查找,原理是根據index索引:
- /** Result collector for parallel calls. */
- private static class ParallelResults {
- //并行結果類中擁有一組返回值,需要ParallelCall的index索引匹配
- private Writable[] values;
- //結果值的數量
- private int size;
- //values中已知的值的個數
- private int count;
- .....
- /** Collect a result. */
- public synchronized void callComplete(ParallelCall call) {
- //將call中的值賦給result中
- values[call.index] = call.value; // store the value
- count++; // count it
- //如果計數的值等到最終大小,通知caller
- if (count == size) // if all values are in
- notify(); // then notify waiting caller
- }
- }
因為Call結構集是這些并發Call共有的,所以用的是static變量,都存在在了values數組中了,只有所有的并發Call都把值取出來了,才 算回調成功,這個是個非常細小的輔助設計,這個在有些書籍上并沒有多少提及。下面我們看看一般Call回調的流程,正如剛剛說的,最終客戶端看到的形式就 是,傳入參數,獲得結果,忽略內部一切邏輯,這是怎么做到的呢,答案在下面:
在執行之前,你會先得到ConnectionId:
- public Writable call(Writable param, InetSocketAddress addr,
- Class<?> protocol, UserGroupInformation ticket,
- int rpcTimeout)
- throws InterruptedException, IOException {
- ConnectionId remoteId = ConnectionId.getConnectionId(addr, protocol,
- ticket, rpcTimeout, conf);
- return call(param, remoteId);
- }
接著才是主流程:
- public Writable call(Writable param, ConnectionId remoteId)
- throws InterruptedException, IOException {
- //根據參數構造一個Call回調
- Call call = new Call(param);
- //根據遠程ID獲取連接
- Connection connection = getConnection(remoteId, call);
- //發送參數
- connection.sendParam(call); // send the parameter
- boolean interrupted = false;
- synchronized (call) {
- //如果call.done為false,就是Call還沒完成
- while (!call.done) {
- try {
- //等待遠端程序的執行完畢
- call.wait(); // wait for the result
- } catch (InterruptedException ie) {
- // save the fact that we were interrupted
- interrupted = true;
- }
- }
- //如果是異常中斷,則終止當前線程
- if (interrupted) {
- // set the interrupt flag now that we are done waiting
- Thread.currentThread().interrupt();
- }
- //如果call回到出錯,則返回call出錯信息
- if (call.error != null) {
- if (call.error instanceof RemoteException) {
- call.error.fillInStackTrace();
- throw call.error;
- } else { // local exception
- // use the connection because it will reflect an ip change, unlike
- // the remoteId
- throw wrapException(connection.getRemoteAddress(), call.error);
- }
- } else {
- //如果是正常情況下,返回回調處理后的值
- return call.value;
- }
- }
- }
在這上面的操作步驟中,重點關注2個函數,獲取連接操作,看看人家是如何保證連接的復用性的:
- private Connection getConnection(ConnectionId remoteId,
- Call call)
- throws IOException, InterruptedException {
- .....
- /* we could avoid this allocation for each RPC by having a
- * connectionsId object and with set() method. We need to manage the
- * refs for keys in HashMap properly. For now its ok.
- */
- do {
- synchronized (connections) {
- //從connection連接池中獲取連接,可以保證相同的連接ID可以復用
- connection = connections.get(remoteId);
- if (connection == null) {
- connection = new Connection(remoteId);
- connections.put(remoteId, connection);
- }
- }
- } while (!connection.addCall(call));
有點單例模式的味道哦,還有一個方法叫sendParam發送參數方法:
- public void sendParam(Call call) {
- if (shouldCloseConnection.get()) {
- return;
- }
- DataOutputBuffer d=null;
- try {
- synchronized (this.out) {
- if (LOG.isDebugEnabled())
- LOG.debug(getName() + " sending #" + call.id);
- //for serializing the
- //data to be written
- //將call回調中的參數寫入到輸出流中,傳向服務端
- d = new DataOutputBuffer();
- d.writeInt(call.id);
- call.param.write(d);
- byte[] data = d.getData();
- int dataLength = d.getLength();
- out.writeInt(dataLength); //first put the data length
- out.write(data, 0, dataLength);//write the data
- out.flush();
- }
- ....
代碼只發送了Call的id,和請求參數,并沒有把所有的Call的內容都扔出去了,一定是為了減少數據量的傳輸,這里還把數據的長度寫入了,這是為了方 便服務端準確的讀取到不定長的數據。這服務端中間的處理操作不是今天討論的重點。Call的執行過程就是這樣。那么Call是如何被調用的呢,這又要重新 回到了Client客戶端上去了,Client有一個run()函數,所有的操作都是始于此的;
- public void run() {
- if (LOG.isDebugEnabled())
- LOG.debug(getName() + ": starting, having connections "
- + connections.size());
- //等待工作,等待請求調用
- while (waitForWork()) {//wait here for work - read or close connection
- //調用完請求,則立即獲取回復
- receiveResponse();
- }
- close();
- if (LOG.isDebugEnabled())
- LOG.debug(getName() + ": stopped, remaining connections "
- + connections.size());
- }
操作很簡單,程序一直跑著,有請求,處理請求,獲取請求,沒有請求,就死等。
- private synchronized boolean waitForWork() {
- if (calls.isEmpty() && !shouldCloseConnection.get() && running.get()) {
- long timeout = maxIdleTime-
- (System.currentTimeMillis()-lastActivity.get());
- if (timeout>0) {
- try {
- wait(timeout);
- } catch (InterruptedException e) {}
- }
- }
- ....
獲取回復的操作如下:
- /* Receive a response.
- * Because only one receiver, so no synchronization on in.
- * 獲取回復值
- */
- private void receiveResponse() {
- if (shouldCloseConnection.get()) {
- return;
- }
- //更新最近一次的call活動時間
- touch();
- try {
- int id = in.readInt(); // try to read an id
- if (LOG.isDebugEnabled())
- LOG.debug(getName() + " got value #" + id);
- //從獲取call中取得相應的call
- Call call = calls.get(id);
- //判斷該結果狀態
- int state = in.readInt(); // read call status
- if (state == Status.SUCCESS.state) {
- Writable value = ReflectionUtils.newInstance(valueClass, conf);
- value.readFields(in); // read value
- call.setValue(value);
- calls.remove(id);
- } else if (state == Status.ERROR.state) {
- call.setException(new RemoteException(WritableUtils.readString(in),
- WritableUtils.readString(in)));
- calls.remove(id);
- } else if (state == Status.FATAL.state) {
- // Close the connection
- markClosed(new RemoteException(WritableUtils.readString(in),
- WritableUtils.readString(in)));
- }
- .....
- } catch (IOException e) {
- markClosed(e);
- }
- }
從之前維護的Call列表中取出,做判斷。Client本身的執行流程比較的簡單:

Hadoop RPC客戶端的通信模塊的部分大致就是我上面的這個流程,中間其實還忽略了很多的細節,大家學習的時候,針對源碼會有助于更好的理解,Hadoop RPC的服務端的實現更加復雜,所以建議采用分模塊的學習或許會更好一點。
本文出自:http://blog.csdn.net/Androidlushangderen/article/details/41751133


