如何在前端編碼時實現人肉雙向編譯
如何在前端編碼時實現人肉雙向編譯
React+flux是目前最火的前端解決方案之一,但flux槽點頗多,例如store比較混亂,使用比較繁瑣等,于是出現了很多第三方的基于flux優化的架構。
有人統計了目前主流的flux實現方案,感興趣的可以看這里:Which Flux implementation should I use?
其中redux是目前github上star最多的一個方案,該方案完全獨立于react,意味著這套理念可以作為架構層應用于其他的組件化方案。同時官方也提供了react-redux庫,幫助開發者直接使用react+redux快速開發。
個人理解它的主要特性體現在以下幾點:
-
強制使用一個全局的
store,store只提供了幾個簡單的api(實際上應該是4個),如subscribe/dispatch(訂閱、發布),getState,replaceReducer。 -
store負責維護一個唯一的叫做state樹的對象,其中state存儲了應用需要用到的所有數據。 -
store和頂層組件使用connect方法綁定,并賦給props一個dispatch方法,可以直接在組件內部this.props.dispatch(action)。 簡單一點說,就是去掉了flux中組件和store的unbind/bind環節。當state變化時,自動更新components,不需要手動操作。 -
提供了
applyMiddleware方法用于異步的action,并且提供了加入中間件的能力,例如打印日志追蹤應用的所有狀態變化。 -
對全局的數據
state的操作,由多個reducer完成。每個reducer都是一個純函數,接收兩個參數state和action,返回處理后的state。這點類似管道的操作。
接下來我們可以回答標題的問題了,即:如何在前端編碼時實現人肉雙向編(zi)譯(can)。
其實就是使用coffee來編寫react+redux應用。
我們來寫個簡單的hello world玩玩。
view部分
這部分和redux/flux無關,純粹react的實現,使用jsx的話,render部分的代碼大概長這樣:
- render:function(){
- return (
- <div>
- <div class="timer">定時器:{interval}</div>
- <div>{title}</div>
- <input ref="input"><button>click it.</button>
- </div>
- )
- }
那如何使用coffee寫這段代碼呢? 我們需要先將jsx編譯這類似這樣的js代碼,請注意是用大腦編譯:
- render:function(){
- return React.createElement('div',null,
- React.createElement('div',{className:'timer'},'定時器'+this.props.interval),
- React.createElement('div',null,this.props.title),
- React.createElement('input',{ref:'input'}),
- React.createElement('button',null,'click it.')
- );
- }
然后將js代碼逆向編譯為coffee。
這里我們可以用$代替React.createElement簡化代碼(終于可以用jQuery的坑位了),得益于coffee的語法,借助React.DOM可以用一種更簡單的方式實現:
{div,input,button,span,h1,h2,h3} = React.DOM
這里就不單獨放render部分,直接看完整代碼:
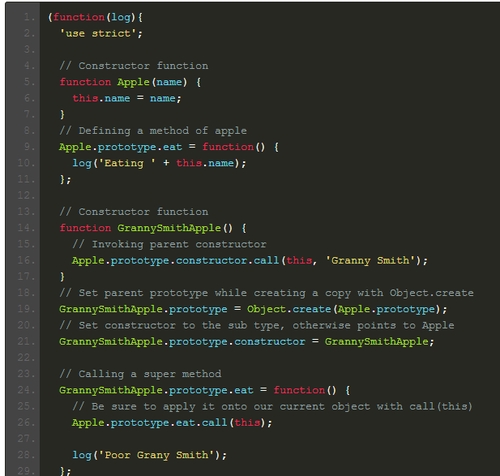
- {Component,PropTypes} = React = require 'react'
- $ = React.createElement
- {div,input,button} = React.DOM
- class App extends Component
- clickHandle:->
- dom = this.refs.input.getDOMNode()
- this.props.actions.change(dom.value)
- dom.value = ''
- render:->
- {title,interval} = this.props
- div className:'timer',
- div null,'定時器:' + interval
- div null,title
- input ref:'input'
- button onClick:@clickHandle.bind(this),'click it.'
- App.propTypes =
- title: PropTypes.string
- actions: PropTypes.object
- interval: PropTypes.number
- module.exports = App
如果你能看到并看懂這段coffee,并在大腦里自動編譯成js代碼再到jsx代碼,恭喜你。
連接store
這個環節的作用,主要是實現view層和store層的綁定,當store數據變化時,可自動更新view。
這里需要使用redux提供的createStore方法創建一個store,該方法接受2個參數,reducer和初始的state(應用初始數據)。
store.coffee的代碼如下:
- {createStore} = require 'redux'
- reducers = require './reducers' # reducer
- state = require './state' # 應用初始數據
- module.exports = createStore reducers,state
然后我們在應用的入口將store和App綁定,這里使用了redux官方提供的react-redux庫。
- {Provider,connect} = require 'react-redux'
- store = require './store'
- $ = React.createElement
- mapState = (state)->
- state
- rootComponent = $ Provider,store:store,->
- $ connect(mapState)(App)
- React.render rootComponent,document.body
可能有人會問,mapState和Provider是什么鬼?
mapState提供了一個類似選擇器的效果,當一個應用很龐大時,可以選擇將state的某一部分數據連接到該組件。我們這里用不著,直接返回state自身。
Provider是一個特殊處理過的react component,官方文檔是這樣描述的:
- This makes our store instance available to the components below.
- (Internally, this is done via React undocumented “context” feature,
- but it’s not exposed directly in the API so don’t worry about it.)
所以,放心的用就好了。
connect方法用于連接state和App,之后即可在App組件內部使用this.props.dispatch()方法了。
添加action和reducer
***我們添加一個按鈕點擊的事件和定時器,用于觸發action,并編寫對應的reducer處理數據。
在前面的App內部已經添加了this.props.actions.change(dom.value),這里看下action.coffee的代碼:
- module.exports =
- change:(title)->
- type:'change'
- title: title
- timer:(interval)->
- type:'timer'
- interval:interval
再看reducer.coffee
- module.exports = (state,action)->
- switch action.type
- when 'change'
- Object.assign {},state,title:'hello ' + action.title
- when 'timer'
- Object.assign {},state,interval:action.interval
- else
- state
至此,代碼寫完了。
一些其他的東西
這里只介紹一個中間件的思想,其他的特性例如異步action,或者dispatch一個promise等原理基本類似:
- dispatch = store.dispatch
- store.dispatch = (action)->
- console.log action # 打印每一次action
- dispatch.apply store,arguments
由于時間關系,redux的一些特性和設計原理沒有展現出來,以后有時間再單獨講,完整的項目代碼,感興趣的同學可以看這里:請點我,或者直接找我聊。
項目用到了fis3作為構建工具,使用fis3 release即可在本地查看效果。