Vue.js源碼(2):初探List Rendering
下面例子來自官網,雖然看上去就比Hello World多了一個v-for,但是內部多了好多的處理過程。但是這就是框架,只給你留下最美妙的東西,讓生活變得簡單。
- <div id="mountNode">
- <ul>
- <li v-for="todo in todos">
- {{ todo.text }}
- </li>
- </ul>
- </div>
- var vm = new Vue({
- el: '#mountNode',
- data: {
- todos: [
- { text: 'Learn JavaScript' },
- { text: 'Learn Vue.js' },
- { text: 'Build Something Awesome' }
- ]
- }
- })
這篇文章將要一起分析:
- observe array
- terminal directive
- v-for指令過程
recap
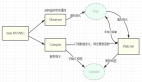
這里先用幾張圖片回顧和整理下上一篇Vue.js源碼(1):Hello World的背后的內容,這將對本篇的compile,link和bind過程的理解有幫助:
copmile階段:主要是得到指令的descriptor

link階段:實例化指令,替換DOM

bind階段:調用指令的bind函數,創建watcher
用一張圖表示即為:

observe array
初始化中的merge options,proxy過程和Hello World的過程基本一樣,所以這里直接從observe開始分析。
- // file path: src/observer/index.js
- var ob = new Observer(value) // value = data = {todos: [{message: 'Learn JavaScript'}, ...]}
- // file path: src/observer/index.js
- export function Observer (value) {
- this.value = value
- this.dep = new Dep()
- def(value, '__ob__', this)
- if (isArray(value)) { // 數組分支
- var augment = hasProto
- ? protoAugment
- : copyAugment // 選擇增強方法
- augment(value, arrayMethods, arrayKeys) // 增強數組
- this.observeArray(value)
- } else { // plain object分支
- this.walk(value)
- }
- }
增強數組
增強(augment)數組,即對數組進行擴展,使其能detect change。這里面有兩個內容,一個是攔截數組的mutation methods(導致數組本身發生變化的方法),一個是提供兩個便利的方法$set和$remove。
攔截有兩個方法,如果瀏覽器實現__proto__那么就使用protoAugment,否則就使用copyAugment。
- // file path: src/util/evn.js
- export const hasProto = '__proto__' in {}
- // file path: src/observer/index.js
- // 截取原型鏈
- function protoAugment (target, src) {
- target.__proto__ = src
- }
- // file path: src/observer/index.js
- // 定義屬性
- function copyAugment (target, src, keys) {
- for (var i = 0, l = keys.length; i < l; i++) {
- var key = keys[i]
- def(target, key, src[key])
- }
- }
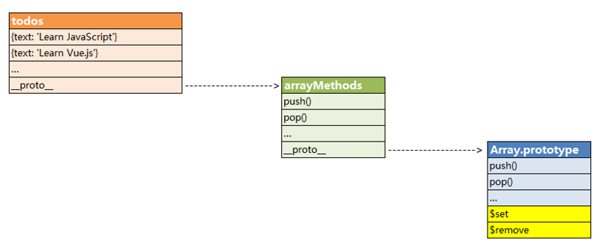
為了更直觀,請看下面的示意圖:
增強之前:

通過原型鏈攔截:
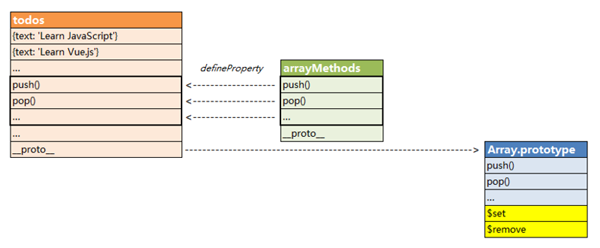
通過定義屬性攔截:
在攔截器arrayMethods里面,就是對這些mutation methods進行包裝:
- 調用原生的Array.prototype中的方法
- 檢查是否有新的值被插入(主要是push, unshift和splice方法)
- 如果有新值插入,observe它們
- ***就是notify change:調用observer的dep.notify()
代碼如下:
- // file path: src/observer/array.js
- ;[
- 'push',
- 'pop',
- 'shift',
- 'unshift',
- 'splice',
- 'sort',
- 'reverse'
- ]
- .forEach(function (method) {
- // cache original method
- var original = arrayProto[method]
- def(arrayMethods, method, function mutator () {
- // avoid leaking arguments:
- // http://jsperf.com/closure-with-arguments
- var i = arguments.length
- var args = new Array(i)
- while (i--) {
- args[i] = arguments[i]
- }
- var result = original.apply(this, args)
- var ob = this.__ob__
- var inserted
- switch (method) {
- case 'push':
- inserted = args
- break
- case 'unshift':
- inserted = args
- break
- case 'splice':
- inserted = args.slice(2)
- break
- }
- if (inserted) ob.observeArray(inserted)
- // notify change
- ob.dep.notify()
- return result
- })
- })
observeArray()
知道上一篇的observe(),這里的observeArray()就很簡單了,即對數組對象都observe一遍,為各自對象生成Observer實例。
- // file path: src/observer/index.js
- Observer.prototype.observeArray = function (items) {
- for (var i = 0, l = items.length; i < l; i++) {
- observe(items[i])
- }
- }
compile
在介紹v-for的compile之前,有必要回顧一下compile過程:compile是一個遞歸遍歷DOM tree的過程,這個過程對每個node進行指令類型,指令參數,表達式,過濾器等的解析。
遞歸過程大致如下:
- compile當前node
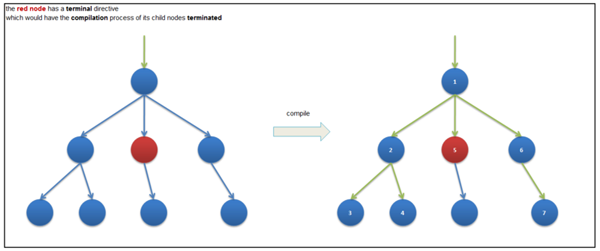
- 如果當前node沒有terminal directive,則遍歷child node,分別對其compile node
- 如果當前node有terminal directive,則跳過其child node
這里有個terminal directive的概念,這個概念在Element Directive中提到過:
A big difference from normal directives is that element directives are terminal, which means once Vue encounters an element directive, it will completely skip that element
實際上自帶的directive中也有兩個terminal的directive,v-for和v-if(v-else)。
terminal directive
在源碼中找到:
terminal directive will have a terminal link function, which build a node link function for a terminal directive. A terminal link function terminates the current compilation recursion and handles compilation of the subtree in the directive.
也就是上面遞歸過程中描述的,有terminal directive的node在compile時,會跳過其child node的compile過程。而這些child node將由這個directive單獨compile(partial compile)。
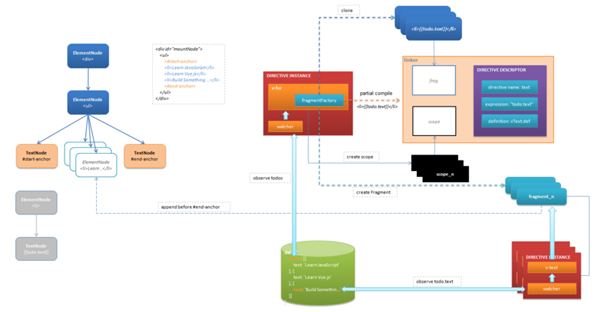
以圖為例,紅色節點有terminal directive,compile時(綠線)將其子節點跳過:
為什么是v-for和v-if?因為它們會帶來節點的增加或者刪除。
Compile的中間產物是directive的descriptor,也可能會創建directive來管理的document fragment。這些產物是在link階段時需要用來實例化directive的。從racap中的圖可以清楚的看到,compile過程產出了和link過程怎么使用的它們。那么現在看看v-for的情況:
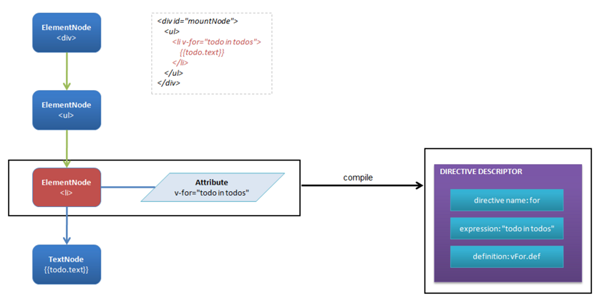
compile之后,只得到了v-for的descriptor,link時將用它實例化v-for指令。
- descriptor = {
- name: 'for',
- attrName: 'v-for',
- expression: 'todo in todos',
- raw: 'todo in todos',
- def: vForDefinition
- }
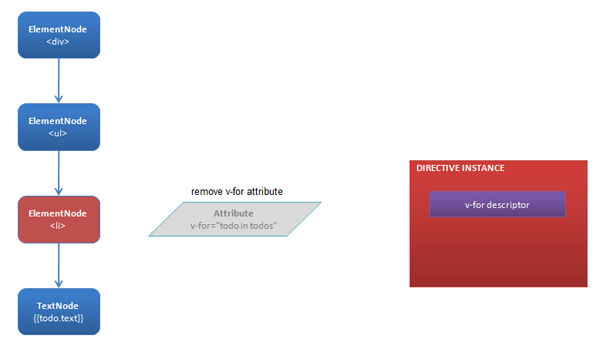
link
Hello World中,link會實例化指令,并將其與compile階段創建好的fragment(TextNode)進行綁定。但是本文例子中,可以看到compile過程沒有創建fragment。這里的link過程只實例化指令,其他過程將發生在v-for指令內部。
bind
主要的list rendering的魔法都在v-for里面,這里有FragmentFactory,partial compile還有diff算法(diff算法會在單獨的文章介紹)。
在v-for的bind()里面,做了三件事:
- 重新賦值expression,找出alias:"todo in todos"里面,todo是alias,todos才是真正的需要監聽的表達式
- 移除<li v-for="todo in todos">{{todo.text}}</li>元素,替換上start和end錨點(anchor)。錨點用來幫助插入最終的li節點
- 創建FragmentFactory:factory會compile被移除的li節點,得到并緩存linker,后面會用linker創建Fragment
- // file path: /src/directives/public/for.js
- bind () {
- // 找出alias,賦值expression = "todos"
- var inMatch = this.expression.match(/(.*) (?:in|of) (.*)/)
- if (inMatch) {
- var itMatch = inMatch[1].match(/\((.*),(.*)\)/)
- if (itMatch) {
- this.iterator = itMatch[1].trim()
- this.alias = itMatch[2].trim()
- } else {
- this.alias = inMatch[1].trim()
- }
- this.expression = inMatch[2]
- }
- ...
- // 創建錨點,移除LI元素
- this.start = createAnchor('v-for-start')
- this.end = createAnchor('v-for-end')
- replace(this.el, this.end)
- before(this.start, this.end)
- ...
- // 創建FragmentFactory
- this.factory = new FragmentFactory(this.vm, this.el)
- }
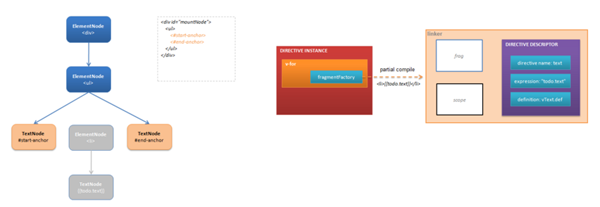
Fragment & FragmentFactory
這里的Fragment,指的不是DocumentFragment,而是Vue內部實現的一個類,源碼注釋解釋為:
Abstraction for a partially-compiled fragment. Can optionally compile content with a child scope.
FragmentFactory會compile<li>{{todo.text}}</li>,并保存返回的linker。在v-for中,數組發生變化時,將創建scope,克隆template,即<li>{{todo.text}}</li>,使用linker,實例化Fragment,然后掛在end錨點上。
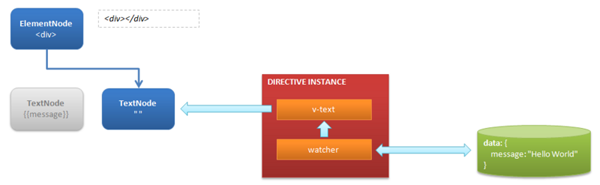
在Fragment中調用linker時,就是link和bind<li>{{todo.text}}</li>,和Hello World中一樣,創建v-text實例,創建watcher。
scope
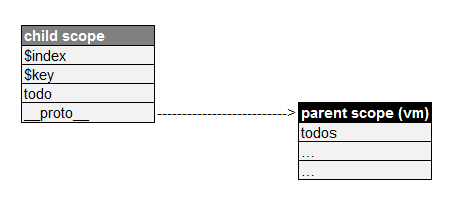
為什么在v-for指令里面可以通過別名(alias)todo訪問循環變量?為什么有$index和$key這樣的特殊變量?因為使用了child scope。
還記得Hello World中watcher是怎么識別simplePath的嗎?
- var getter = new Function('scope', 'return scope.message;')
在這里,說白了就是訪問scope對象的todo,$index或者$key屬性。在v-for指令里,會擴展其父作用域,本例中父作用域對象就是vm本身。在調用factory創建每一個fragment時,都會以下面方式創建合適的child scope給其使用:
- // file path: /src/directives/public/for.js
- create (value, alias, index, key) {
- // index是遍歷數組時的下標
- // value是對應下標的數組元素
- // alias = 'todo'
- // key是遍歷對象時的屬性名稱
- ...
- var parentScope = this._scope || this.vm
- var scope = Object.create(parentScope) // 以parent scope為原型鏈創建child scope
- ...
- withoutConversion(() => {
- defineReactive(scope, alias, value) // 添加alias到child scope
- })
- defineReactive(scope, '$index', index) // 添加$index到child scope
- ...
- var frag = this.factory.create(host, scope, this._frag)
- ...
- }
detect change
到這里,基本上“初探”了一下List Rendering的過程,里面有很多概念沒有深入,打算放在后面結合其他使用這些概念的地方一起在分析,應該能體會到其巧妙的設計。
***舉兩個例子,回顧上面的內容
例一:
- vm.todos[0].text = 'Learn JAVASCRIPT';
改變的是數組元素中text屬性,由于factory創建的fragment的v-text指令observe todo.text,因此這里直接由v-text指令更新對應li元素的TextNode內容。
例二:
- vm.todos.push({text: 'Learn Vue Source Code'});
增加了數組元素,v-for指令的watcher通知其做update,diff算法判斷新增了一個元素,于是創建scope,factory克隆template,創建新的fragment,append在#end-anchor的前面,fragment中的v-text指令observe新增元素的text屬性,將值更新到TextNode上。
更多數組操作放在diff算法中再看。
到這里,應該對官網上的這句話有更深的理解了:
Instead of a Virtual DOM, Vue.js uses the actual DOM as the template and keeps references to actual nodes for data bindings.