深入探討Android異步精髓Handler
前言
眾所周知,Android的UI是在其主線程中進行刷新的,所以Google建議開發人員切勿在主線程中進行耗時的操作否則很容易導致應用程序無響應(ANR)。鑒于此幾乎接近硬性的要求,我們常把耗時的操作(比如網絡請求)置于子線程中進行;但是子線程不能直接訪問UI。
至此,這個矛盾就凸顯出來了:
- 主線程可以刷新UI,但不能執行耗時操作
- 子線程可以執行耗時操作 ,但是不能直接刷新UI
嗯哼,那有沒有一個東西可以調和并化解這個矛盾呢?當然是有的,Google采用Handler把主線程和子線程精巧地聯系起來——子線程中進行耗時的業務邏輯,然后利用Handler通知主線程刷新UI。除此以外,還有別的方式可以實現類似的操作么?答案是肯定的,我們也可以利用AsyncTask或者IntentService進行異步的操作。這兩者又是怎么做到的呢?其實,在AsyncTask和IntentService的內部亦使用了Handler實現其主要功能。拋開這兩者不談,當我們打開Android源碼的時候也隨處可見Handler的身影。所以,Handler是Android異步操作的核心和精髓,它在眾多領域發揮著極其重要甚至是不可替代的作用。
在此,對Handler的工作原理和實現機制進行系統的梳理。
ThreadLocal簡介及其使用
對于線程Thread大家都挺熟悉的了,但是對于ThreadLocal可能就要陌生許多了。雖然我們對于它不太了解,但是它早在JDK1.2版本中就已問世并且被廣泛的使用,比如hibernate,EventBus,Handler都運用了ThreadLocal進行線程相關的操作。如果單純地從ThreadLocal這個名字來看,它帶著濃濃的“本地線程”的味道; 然而,喝一口之后才發現根本就不是這個味兒。其實,ThreadLocal并不是用來操作什么本地線程而是用于實現不同線程的數據副本。當使用ThreadLocal維護變量時,它會為每個使用該變量的線程提供獨立的變量副本;每一個線程都可以獨立地改變自己的副本并且不會影響其它線程所持有的對應的副本。所以,ThreadLocal的實際作用并不與它的名字所暗含的意義相吻合,或許改稱為ThreadLocalVariable(線程本地變量)會更合適一些。
接下來,我們通過一個實例來瞅瞅ThreadLocal的使用方式
- /**
- * 原創作者:
- * 谷哥的小弟
- *
- * 博客地址:
- * http://blog.csdn.net/lfdfhl
- */
- private void testThreadLocal(){
- mThreadLocal.set("東京熱");
- new HotThread1().start();
- new HotThread2().start();
- hot3=mThreadLocal.get();
- try{
- Thread.sleep(1000*4);
- Log.i(TAG,"HotThread1獲取到的變量值: "+hot1);
- Log.i(TAG,"HotThread2獲取到的變量值: "+hot2);
- Log.i(TAG,"MainThread獲取到的變量值: "+hot3);
- }catch (Exception e){
- }
- }
- private class HotThread1 extends Thread{
- @Override
- public void run() {
- super.run();
- mThreadLocal.set("北京熱");
- hot1=mThreadLocal.get();
- }
- }
- private class HotThread2 extends Thread{
- @Override
- public void run() {
- super.run();
- mThreadLocal.set("南京熱");
- hot2=mThreadLocal.get();
- }
- }
查看輸出結果:
- HotThread1獲取到的變量值: 北京熱
- HotThread2獲取到的變量值: 南京熱
- MainThread獲取到的變量值: 東京熱
在這段代碼中使用ThreadLocal保存String類型的數據,并且在主線程和兩個子線程中為ThreadLocal設置了不同的值,然后再將這些值分別取出。結合輸出日志可以發現:在不同的線程中訪問了同一個ThreadLocal對象,但是通過mThreadLocal.get()得到的值卻是不一樣的;也就是說:它們之間沒有發生相互的影響而是保持了彼此的獨立。明白了ThreadLocal的這個特性之后,我們再去理解Looper的工作機制就會容易得多了。
Looper、線程、消息隊列的關系
Google官方建議開發人員使用Handler實現異步刷新UI,我們在平常的工作中也很好地采納了這個提議:首先在主線程中建立Handler,然后在子線程中利用handler.sendMessage(message)發送消息至主線程,最終消息在handleMessage(Message msg) {}得到相應的處理。這個套路,大家都再熟悉不過了;現在換個角度,我們試試在子線程中建立Handler
- private class LooperThread extends Thread{
- @Override
- public void run() {
- super.run();
- Handler handler=new Handler();
- //doing something
- }
- }
此處的代碼很簡單:LooperThread繼承自Thread,并且在其run( )方法中新建一個Handler。
嗯哼,再運行一下,喔哦,報錯了:
- Can’t create handler inside thread that has not called Looper.prepare().
咦,有點出師不利呢,剛開始試就出錯了…….沒事,生活不就是無盡的挫折和希望嘛,這點小事嘛也不算。既然是在調用Handler的構造方法時報的錯那就從該構造方法的源碼入手,一探究竟:
- public Handler() {
- this(null, false);
- }
- public Handler(Callback callback) {
- this(callback, false);
- }
- public Handler(Callback callback, boolean async) {
- if (FIND_POTENTIAL_LEAKS) {
- final Class<? extends Handler> klass = getClass();
- if ((klass.isAnonymousClass() || klass.isMemberClass() || klass.isLocalClass()) &&
- (klass.getModifiers() & Modifier.STATIC) == 0) {
- Log.w(TAG, "The following Handler class should be static or leaks might occur");
- }
- }
- mLooper = Looper.myLooper();
- if (mLooper == null) {
- throw new RuntimeException
- ("Can't create handler inside thread that has not called Looper.prepare()");
- }
- mQueue = mLooper.mQueue;
- mCallback = callback;
- mAsynchronous = async;
- }
請注意第20行代碼:
如果mLooper == null那么系統就會拋出剛才的錯誤:Can’t create handler inside thread that has not called Looper.prepare()。這句話的意思是:如果在線程內創建handler必須調用Looper.prepare()。既然這個提示已經提示了我們該怎么做,那就加上這一行代碼:
- private class LooperThread extends Thread{
- @Override
- public void run() {
- super.run();
- Looper.prepare();
- Handler handler=new Handler();
- System.out.println("add code : Looper.prepare()");
- //doing something
- }
- }
嘿嘿,果然不再報錯了,運行一下:

既然Looper.prepare()解決了這個問題,那我們就去瞅瞅在該方法中做了哪些操作:
- /**Initialize the current thread as a looper.
- * This gives you a chance to create handlers that then reference
- * this looper, before actually starting the loop. Be sure to call
- * loop() after calling this method, and end it by calling quit().
- */
- public static void prepare() {
- prepare(true);
- }
- private static void prepare(boolean quitAllowed) {
- if (sThreadLocal.get() != null) {
- throw new RuntimeException("Only one Looper may be created per thread");
- }
- sThreadLocal.set(new Looper(quitAllowed));
- }
從這段源碼及其注釋文檔我們可以看出:
在prepare()中利用一個Looper來初始化當前線程或者說初始化一個帶有Looper的線程。
請注意第14行代碼,它是這段源碼的核心,現對其詳細分析:
- sThreadLocal.set(new Looper(quitAllowed));
在該行代碼中一共執行了兩個操作
(1) 構造Looper
- private Looper(boolean quitAllowed) {
- mQueue = new MessageQueue(quitAllowed);
- mThread = Thread.currentThread();
- }
在Looper的構造方法中初始化了一個消息隊列MessageQueue和一個線程Thread。從這可看出:一個Looper對應著一個消息隊列以及當前線程。
當收到消息Message后系統會將其存入消息隊列中等候處理。至于Looper,它在Android的消息機制中擔負著消息輪詢的職責,它會不間斷地查看MessageQueue中是否有新的未處理的消息;若有則立刻處理,若無則進入阻塞。
(2) 將此Looper保存到sThreadLocal中。
此處的sThreadLocal是定義在Looper類中的一個ThreadLocal類型變量
- static final ThreadLocal<Looper> sThreadLocal = new ThreadLocal<Looper>();
Looper是framework中的一個類,sThreadLocal是它的一個static final變量。當在某一個Thread中執行Looper.prepare()時系統就會將與該Thread所對應的Looper保存到sThreadLocal中。不同的線程對著不同的Looper,但它們均由系統保存在sThreadLocal中并且互不影響,相互獨立;并且可以通過sThreadLocal.get()獲取不同線程所對應的Looper.
在調用prepare()方法后需要調用loop()方法開始消息的輪詢,并且在需要的時候調用quit()方法停止消息的輪詢
假若再次執行Looper.prepare()系統發現sThreadLocal.get()的值不再為null于是拋出異常:
Only one Looper may be created per thread,一個線程只能創建一個Looper!
小結:
- 一個線程對應一個Looper
- 一個Looper對應一個消息隊列
- 一個線程對應一個消息隊列
- 線程,Looper,消息隊列三者一一對應
所以,在一個子線程中使用Handler的方式應該是這樣的:
- class LooperThread extends Thread {
- public Handler mHandler;
- public void run() {
- Looper.prepare();
- mHandler = new Handler() {
- public void handleMessage(Message msg) {
- }
- };
- Looper.loop();
- }
- }
看到這個范例,有的人可能心里就犯嘀咕了:為什么我們平常在MainActivity中使用Handler時并沒有調用Looper.prepare()也沒有報錯呢?
這是因為UI線程是主線程,系統會自動調用Looper.prepareMainLooper()方法創建主線程的Looper和消息隊列MessageQueue
Message的發送和處理過程
在討論完Looper、線程、消息隊列這三者的關系之后我們再來瞅瞅Android消息機制中對于Message的發送和處理。
平常最常用的方式:
handler.sendMessage(message)——>發送消息
handleMessage(Message msg){}——>處理消息
先來分析消息的入隊。
Handler可以通過post()、postAtTime()、postDelayed()、postAtFrontOfQueue()等方法發送消息,除了postAtFrontOfQueue()之外這幾個方法均會執行到sendMessageAtTime(Message msg, long uptimeMillis)方法,源碼如下:
- public boolean sendMessageAtTime(Message msg, long uptimeMillis) {
- MessageQueue queue = mQueue;
- if (queue == null) {
- RuntimeException e = new RuntimeException(
- this + " sendMessageAtTime() called with no mQueue");
- Log.w("Looper", e.getMessage(), e);
- return false;
- }
- return enqueueMessage(queue, msg, uptimeMillis);
- }
- public final boolean sendMessageAtFrontOfQueue(Message msg) {
- MessageQueue queue = mQueue;
- if (queue == null) {
- RuntimeException e = new RuntimeException(
- this + " sendMessageAtTime() called with no mQueue");
- Log.w("Looper", e.getMessage(), e);
- return false;
- }
- return enqueueMessage(queue, msg, 0);
- }
- private boolean enqueueMessage(MessageQueue queue, Message msg, long uptimeMillis) {
- msg.target = this;
- if (mAsynchronous) {
- msg.setAsynchronous(true);
- }
- return queue.enqueueMessage(msg, uptimeMillis);
- }
在這里可以看到sendMessageAtTime()內部又調用了enqueueMessage(),在該方法內的重要操作:
- ***步:
給msg設置了target,請參見代碼第25行此處的this就是當前Handler對象本身。在這就指明了該msg的來源——它是由哪個Handler發出的,與此同時也指明了該msg的歸宿——它該由哪個Handler處理。不難發現,哪個Handler發出了消息就由哪個Handler負責處理。
- 第二步:
將消息放入消息隊列中,請參見代碼第29行在enqueueMessage(msg,uptimeMillis)中將消息Message存放進消息隊列中,距離觸發時間最短的message排在隊列最前面,同理距離觸發時間最長的message排在隊列的最尾端。若調用sendMessageAtFrontOfQueue()方法發送消息它會直接調用該enqueueMessage(msg,uptimeMillis)讓消息入隊只不過時間為延遲時間為0,也就是說該消息會被插入到消息隊列頭部優先得到執行。直覺告訴我們此處的消息隊列mQueue就是該線程所對應的消息隊列。可是光有直覺是不夠的甚至是不可靠的。我們再回過頭瞅瞅Handler的構造方法,從源碼中找到確切的依據
- public Handler(Callback callback, boolean async) {
- if (FIND_POTENTIAL_LEAKS) {
- final Class<? extends Handler> klass = getClass();
- if ((klass.isAnonymousClass() || klass.isMemberClass() || klass.isLocalClass()) &&
- (klass.getModifiers() & Modifier.STATIC) == 0) {
- Log.w(TAG, "The following Handler class should be static or leaks might occur");
- }
- }
- mLooper = Looper.myLooper();
- if (mLooper == null) {
- throw new RuntimeException
- ("Can't create handler inside thread that has not called Looper.prepare()");
- }
- mQueue = mLooper.mQueue;
- mCallback = callback;
- mAsynchronous = async;
- }
(1) 獲取Looper,請參見代碼第10行
(2) 利用Looper的消息隊列為mQueue賦值,請參見代碼第15行
(3) 為mCallback賦值,,請參見代碼第16行
(4) 為mAsynchronous賦值,,請參見代碼第17行
嗯哼,看到了吧,這個mQueue就是從Looper中取出來的。在之前我們也詳細地分析了Looper、線程、消息隊列這三者的一一對應關系,所以此處的mQueue正是線程所對應的消息隊列。
看完了消息的入隊,再來分析消息的出隊。
請看Looper中的loop()方法源碼:
- public static void loop() {
- final Looper me = myLooper();
- if (me == null) {
- throw new RuntimeException("No Looper; Looper.prepare() wasn't called on this thread.");
- }
- final MessageQueue queue = me.mQueue;
- // Make sure the identity of this thread is that of the local process,
- // and keep track of what that identity token actually is.
- Binder.clearCallingIdentity();
- final long ident = Binder.clearCallingIdentity();
- for (;;) {
- Message msg = queue.next(); // might block
- if (msg == null) {
- // No message indicates that the message queue is quitting.
- return;
- }
- // This must be in a local variable, in case a UI event sets the logger
- final Printer logging = me.mLogging;
- if (logging != null) {
- logging.println(">>>>> Dispatching to " + msg.target + " " +
- msg.callback + ": " + msg.what);
- }
- final long traceTag = me.mTraceTag;
- if (traceTag != 0) {
- Trace.traceBegin(traceTag, msg.target.getTraceName(msg));
- }
- try {
- msg.target.dispatchMessage(msg);
- } finally {
- if (traceTag != 0) {
- Trace.traceEnd(traceTag);
- }
- }
- if (logging != null) {
- logging.println("<<<<< Finished to " + msg.target + " " + msg.callback);
- }
- // Make sure that during the course of dispatching the
- // identity of the thread wasn't corrupted.
- final long newIdent = Binder.clearCallingIdentity();
- if (ident != newIdent) {
- Log.wtf(TAG, "Thread identity changed from 0x"
- + Long.toHexString(ident) + " to 0x"
- + Long.toHexString(newIdent) + " while dispatching to "
- + msg.target.getClass().getName() + " "
- + msg.callback + " what=" + msg.what);
- }
- msg.recycleUnchecked();
- }
- }
我們發現關于消息的處理是在一個死循環中就行的,請參見代碼第13-55行。也就是說在該段代碼中Looper一直在輪詢消息隊列MessageQueue。假若消息隊列中沒有未處理的消息(即queue.next()==null)則其進入阻塞block狀態,假若消息隊列中有待處理消息(即queue.next()!=null)則利用msg.target.dispatchMessage(msg)將該消息派發至對應的Handler。
到了這,可能有的人會有一個疑問:系統怎么知道把消息發送給哪個Handler呢?
嘿嘿,還記不記得enqueueMessage()中系統給msg設置了target從而確定了其目標Handler么?嗯哼,所以只要通過msg.target.dispatchMessage(msg)就可以將消息派發至對應的Handler了。那在dispatchMessage()中又會對消息做哪些操作呢?我們繼續跟進源碼
- public void dispatchMessage(Message msg) {
- if (msg.callback != null) {
- handleCallback(msg);
- } else {
- if (mCallback != null) {
- if (mCallback.handleMessage(msg)) {
- return;
- }
- }
- handleMessage(msg);
- }
- }
哇哈,看到這,心情就舒暢多了,基本上回到了我們熟悉的地方;在此處對Message消息進行了處理,我們來瞅瞅主要的步驟
- ***步:
處理Message的回調callback,請參見代碼第3行
比如調用handler.post(Runnable runnable)時,該runnable就會被系統封裝為Message的callback。
關于這點在源碼中也有非常直觀的體現:
- private static Message getPostMessage(Runnable r) {
- Message m = Message.obtain();
- m.callback = r;
- return m;
- }
- 第二步:
處理Handler的回調callback,請參見代碼第6行
比如執行Handler handler=Handler(Callback callback)時就會將callback賦值給mCallback,關于這點已經在介紹Handler構造方法時分析過了,不再贅述。
第三步:
調用handleMessage()處理消息Message,請參見代碼第10行
handleMessage()的源碼如下:
- public void handleMessage(Message msg) {
- }
嗯哼,它是一個空的方法。所以Handler的子類需要覆寫該方法,并在其中處理接收到的消息。
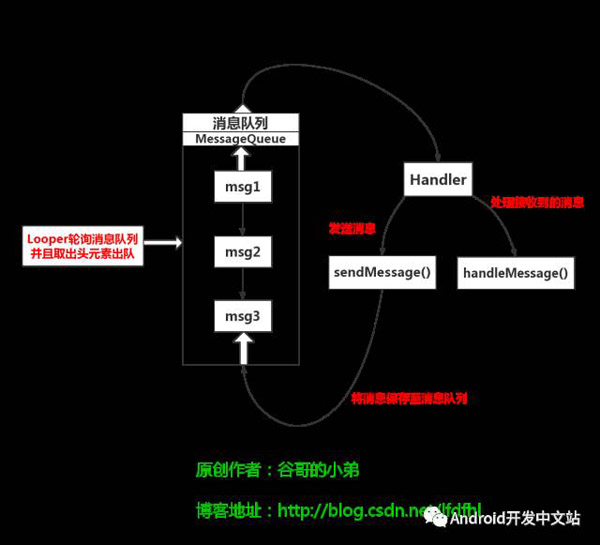
梳理Handler工作機制
至此,關于Handler的異步機制及其實現原理已經分析完了。在此,對其作一個全面的梳理和總結。
Android異步消息機制中主要涉及到:Thread、Handler、MessageQueue、Looper,在整個機制中它們扮演著不同的角色也承擔著各自的不同責任。
- Thread負責業務邏輯的實施。
線程中的操作是由各自的業務邏輯所決定的,視具體情況進行。
- Handler負責發送消息和處理消息。
通常的做法是在主線程中建立Handler并利用它在子線程中向主線程發送消息,在主線程接收到消息后會對其進行處理
- MessageQueue負責保存消息。
Handler發出的消息均會被保存到消息隊列MessageQueue中,系統會根據Message距離觸發時間的長短決定該消息在隊列中位置。在隊列中的消息會依次出隊得到相應的處理。
- Looper負責輪詢消息隊列。
Looper使用其loop()方法一直輪詢消息隊列,并在消息出隊時將其派發至對應的Handler.
為了更好地理解這幾者的相互關系及其作用,請參見如下示圖
使用Handler的錯誤姿勢及其潛在風險
關于Handler的具體用法,尤其是那些常規的使用方式在此就不再一一列舉了。