基于ZStack構建深度學習云平臺
前言
深度學習是機器學習和人工智能研究的熱門分支,也是當今最流行的科學研究趨勢之一。深度學習方法為計算機視覺、機器學習帶來了革命性的進步,而新的深度學習技術也正在不斷誕生。由于深度學習正快速發展,新的研究者很難對這一技術實時跟進。國內各大公有云廠商都提供了相應的深度學習相關產品,但對于初學者并不那么實用。本文將介紹基于產品化云平臺——ZStack,來構建對初學者友好、易運維、易使用的深度學習云平臺。
由于ZStack的輕量性,我們僅通過一臺普通PC機就能部署云平臺,進而實現深度學習平臺構建。讀者可結合本文輕松擴展出規模更大、功能更為完備的深度學習云平臺。
1 、ZStack簡介
ZStack是下一代開源的云計算IaaS(基礎架構即服務)軟件。它主要面向未來的智能數據中心,通過提靈活完善的APIs來管理包括計算、存儲和網絡在內的數據中心資源。用戶可以利用ZStack快速構建自己的智能云數據中心,也可以在穩定的ZStack之上搭建靈活的云應用場景。
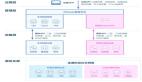
ZStack功能架構

ZStack產品優勢:
ZStack是基于專有云平臺4S(Simple簡單,Strong健壯,Scalable彈性,Smart智能)標準設計的下一代云平臺IaaS軟件。
1. 簡單(Simple)
• 簡單安裝部署:提供安裝文件網絡下載,30分鐘完成從裸機到云平臺的安裝部署。
• 簡單搭建云平臺:支持云主機的批量(生成,刪除等)操作,提供列表展示和滑窗詳情。
• 簡單實用操作:詳細的用戶手冊,足量的幫助信息,良好的社區,標準的API提供。
• 友好UI交互:設計精良的專業操作界面,精簡操作實現強大的功能。
2. 健壯(Strong)
• 穩定且高效的系統架構設計:擁有全異步的后臺架構,進程內微服務架構,無鎖架構,無狀態服務架構,一致性哈希環,保證系統架構的高效穩定。目前已實現:單管理節點管理上萬臺物理主機、數十萬臺云主機;而多個管理節點構建的集群使用一個數據庫、一套消息總線可管理十萬臺物理主機、數百萬臺云主機、并發處理數萬個API。
• 支撐高并發的API請求:單ZStack管理節點可以輕松處理每秒上萬個并發API調用請求。
• 支持HA的嚴格要求:在網絡或節點失效情況下,業務云主機可自動切換到其它健康節點運行;利用管理節點虛擬化實現了單管理節點的高可用,故障時支持管理節點動態遷移。
3. 彈性(Scalable)
• 支撐規模無限制:單管理節點可管理從一臺到上萬臺物理主機,數十萬臺云主機。
• 全API交付:ZStack提供了全套IaaS API,用戶可使用這些APIs完成全新跨地域的可用區域搭建、
網絡配置變更、以及物理服務器的升級。
• 資源可按需調配:云主機和云存儲等重要資源可根據用戶需求進行擴縮容。ZStack不僅支持對云主
機的CPU、內存等資源進行在線更改,還可對云主機的網絡帶寬、磁盤帶寬等資源進行動態調整。
4. 智能(Smart)
• 自動化運維管理:在ZStack環境里,一切由APIs來管理。ZStack利用Ansible庫實現全自動部署和
升級,自動探測和重連,在網絡抖動或物理主機重啟后能自動回連各節點。其中定時任務支持定時
開關云主機以及定時對云主機快照等輪詢操作。
• 在線無縫升級:5分鐘一鍵無縫升級,用戶只需升級管控節點。計算節點、存儲節點、網絡節點在
管控軟件啟動后自動升級。
• 智能化的UI交互界面:實時的資源計算,避免用戶誤操作。
• 實時的全局監控:實時掌握整個云平臺當前系統資源的消耗情況,通過實時監控,智能化調配,從
而節省IT的軟硬件資源。
0x2 構建深度學習平臺
2.1 組件部署介紹
- TensorFlow
是一個開放源代碼軟件庫,用于進行高性能數值計算。借助其靈活的架構,用戶可以輕松地將計算工作部署到多種平臺(CPU、GPU、TPU)和設備(桌面設備、服務器集群、移動設備、邊緣設備等)。TensorFlow最初是由 Google Brain 團隊中的研究人員和工程師開發的,可為機器學習和深度學習提供強力支持,并且其靈活的數值計算核心廣泛應用于許多其他科學領域。
- cuDNN
NVIDIA CUDA深層神經網絡庫(cuDNN)是一種用于深層神經網絡的GPU加速庫原始圖形。cuDNN為標準例程提供了高度調優的實現,如前向和后向卷積、池化、歸一化和激活層。cuDNN是NVIDIA深度學習SDK的一部分。
- TensorBoard
是一個可視化工具,能夠有效地展示Tensorflow在運行過程中的計算圖、各種指標隨著時間的變化趨勢以及訓練中使用到的數據信息。
- Jupyter
Jupyter是一個交互式的筆記本,可以很方便地創建和共享文學化程序文檔,支持實時代碼,數學方程,可視化和 markdown。一般用與做數據清理和轉換,數值模擬,統計建模,機器學習等等。
2.2 云平臺環境準備
環境介紹
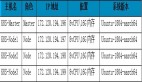
本次使用如下配置構建深度學習平臺:
| 物理服務器配置 | GPU型號 | 云主機配置 | 云主機系統 | IP地址 | 主機名 | |
| Intel(R) i5-3470 DDR3 24G |
|
8vCPU16G | CentOS7.4 | 192.168.66.6 | GPU-TF |
本次使用一臺普通PC機部署ZStack云平臺,使用云平臺中GPU透傳功能將一塊NVIDIA QuadroP2000顯卡透傳給一個CentOS7.4虛擬機,進行平臺的構建。
ZStack云平臺部署步驟詳情參考官方文檔:https://www.zstack.io/help/product_manuals/user_guide/3.html#c3
2.2.1 創建云主機

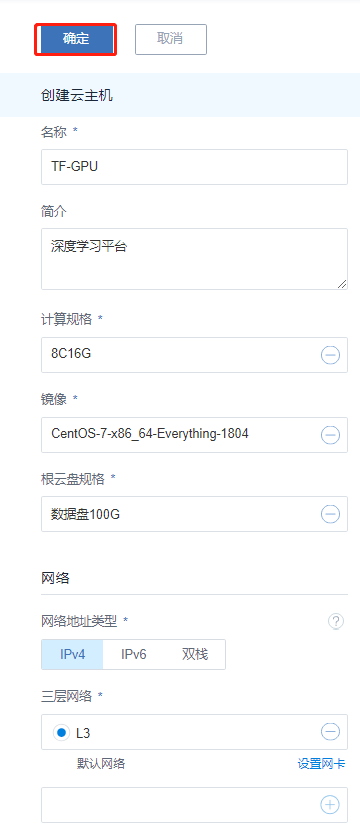
選擇“云資源池”點擊“云主機”點擊“創建云主機按鈕”打開云主機創建頁面;
創建云主機的步驟:
1、選擇添加方式; 平臺支持創建單個云主機和創建多個云主機,根據需求進行選擇。
2、設置云主機名稱;在設置名稱時建議以業務系統名稱進行命名,方便管理運維。
3、選擇計算規格;根據定義的計算規格結合業務需求選擇適合的計算規格。
4、選擇鏡像模板;根據業務需求選擇相應的鏡像模板。
5、選擇三層網絡;在新版本中平臺三層網絡同時支持IPv4和IPv6,請根據自身業務需求進行選擇;同時也可以在創建云主機過程中設置網卡屬性。
6、確認配置無誤后點擊“確定”開始創建。
2.2.2 透傳GPU操作
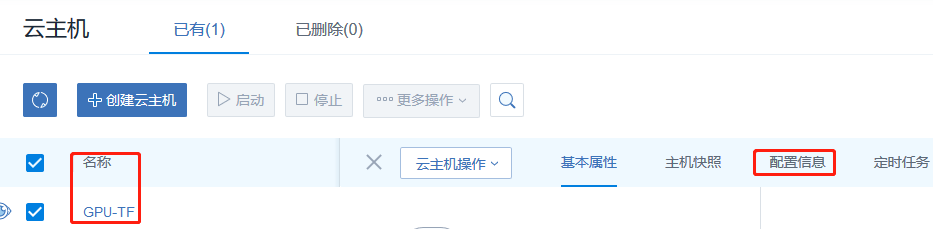
點擊云主機名稱點擊配置信息;
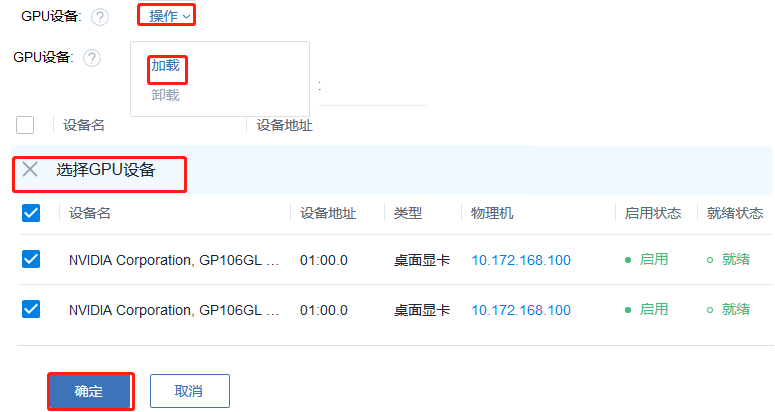
找到GPU設備標簽,點擊操作選擇加載,然后選擇相應的GPU設備給云主機直接使用。
0x3 開始部署
3.1 運行環境準備
- 安裝pip
- # curl https://bootstrap.pypa.io/get-pip.py -o get-pip.py
- # python get-pip.py
- # pip --version
- pip 18.1 from /usr/lib/python2.7/site-packages/pip (python 2.7)
- # python --version
- Python 2.7.5
- 安裝GCC G++
- # yum install gcc gcc-c++
- # gcc --version
- gcc (GCC) 4.8.5 20150623 (Red Hat 4.8.5-36)
- 安裝一些需要的包
- #yum -y install zlib*
- #yum install openssl-devel -y
- #yum install sqlite* -y
- 升級CentOS默認Python2.7.5版本到3.6.5
- 下載Python源碼包
- # wget -c https://www.python.org/ftp/python/3.6.5/Python-3.6.5.tgz
- 解壓源碼包
- # tar -zvxf Python-3.6.5.tgz
- 進入源碼目錄
- # cd Python-3.6.5/
- # ./configure --with-ssl
- 編譯并安裝
- # make && make install
- 查看一下新安裝的python3的文件位置
- # ll /usr/local/bin/python*

|
|

3.2 安裝CUDA
- 升級內核:
- # rpm -import https://www.elrepo.org/RPM-GPG-KEY-elrepo.org
- # rpm -Uvh http://www.elrepo.org/elrepo-release-7.0-2.el7.elrepo.noarch.rpm
- # yum -y --enablerepo=elrepo-kernel install kernel-ml.x86_64 kernel-ml-devel.x86_64
- 查看內核版本默認啟動順序:
- awk -F\' '$1=="menuentry " {print $2}' /etc/grub2.cfg
- CentOS Linux (4.20.0-1.el7.elrepo.x86_64) 7 (Core)
- CentOS Linux (3.10.0-862.el7.x86_64) 7 (Core)
- CentOS Linux (0-rescue-c4581dac5b734c11a1881c8eb10d6b09) 7 (Core)
- #vim /etc/default/grub
- GRUB_DEFAULT=saved 改為GRUB_0=saved
- 運行grub2-mkconfig命令來重新創建內核配置
- # grub2-mkconfig -o /boot/grub2/grub.cfg
- #reboot
- # uname -r 重啟后驗證一下內核版本
- 4.20.0-1.el7.elrepo.x86_64
- CUDA Toolkit安裝有兩種方式:
- Package安裝 (RPM and Deb packages)
- Runfile安裝
- 這里選擇使用Runfile模式進行安裝
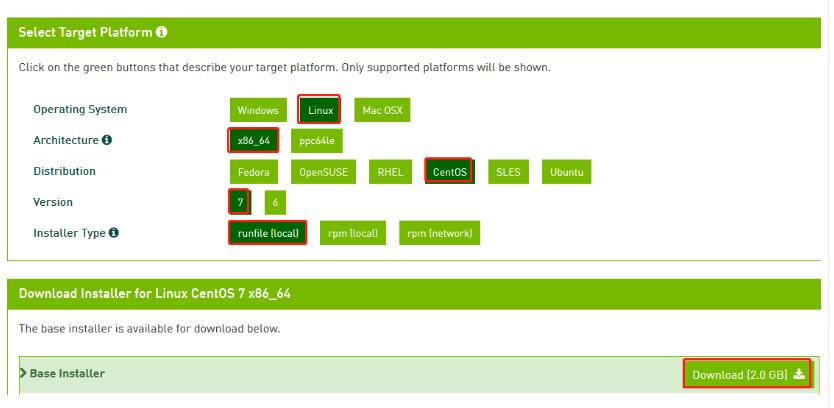
- 安裝包下載:https://developer.nvidia.com/compute/cuda/10.0/Prod/local_installers/cuda_10.0.130_410.48_linux
- 根據自身操作系統進行安裝包篩選,并下載。復制下載鏈接直接用wget -c命令進行下載
- # wget -c https://developer.nvidia.com/compute/cuda/10.0/Prod/local_installers/cuda_10.0.130_410.48_linux
- #chmod +x cuda_10.0.130_410.48_linux
- #./cuda_10.0.130_410.48_linux
- Do you accept the previously read EULA?
- accept/decline/quit: accept
- Install NVIDIA Accelerated Graphics Driver for Linux-x86_64 410.48?
- (y)es/(n)o/(q)uit: y
- Install the CUDA 10.0 Toolkit?
- (y)es/(n)o/(q)uit: y
- Enter Toolkit Location
- [ default is /usr/local/cuda-10.0 ]:
- Do you want to install a symbolic link at /usr/local/cuda?
- (y)es/(n)o/(q)uit: y
- Install the CUDA 10.0 Samples?
- (y)es/(n)o/(q)uit: y
- Enter CUDA Samples Location
- [ default is /root ]:
- 配置CUDA運行環境變量:
- # vim /etc/profile
- # CUDA
- export PATH=/usr/local/cuda-10.0/bin${PATH:+:${PATH}}
- export LD_LIBRARY_PATH=/usr/local/cuda-10.0/lib64${LD_LIBRARY_PATH:+:${LD_LIBRARY_PATH}}
- # source /etc/profile
- 檢查版本
- # nvcc --version
- nvcc: NVIDIA (R) Cuda compiler driver
- Copyright (c) 2005-2018 NVIDIA Corporation
- Built on Sat_Aug_25_21:08:01_CDT_2018
- Cuda compilation tools, release 10.0, V10.0.130
- 使用實例驗證測試CUDA是否正常:
- #cd /root/NVIDIA_CUDA-10.0_Samples/1_Utilities/deviceQuery
- # make
- "/usr/local/cuda-10.0"/bin/nvcc -ccbin g++ -I../../common/inc -m64 -gencode arch=compute_30,code=sm_30 -gencode arch=compute_35,code=sm_35 -gencode arch=compute_37,code=sm_37 -gencode arch=compute_50,code=sm_50 -gencode arch=compute_52,code=sm_52 -gencode arch=compute_60,code=sm_60 -gencode arch=compute_61,code=sm_61 -gencode arch=compute_70,code=sm_70 -gencode arch=compute_75,code=sm_75 -gencode arch=compute_75,code=compute_75 -o deviceQuery.o -c deviceQuery.cpp
- "/usr/local/cuda-10.0"/bin/nvcc -ccbin g++ -m64 -gencode arch=compute_30,code=sm_30 -gencode arch=compute_35,code=sm_35 -gencode arch=compute_37,code=sm_37 -gencode arch=compute_50,code=sm_50 -gencode arch=compute_52,code=sm_52 -gencode arch=compute_60,code=sm_60 -gencode arch=compute_61,code=sm_61 -gencode arch=compute_70,code=sm_70 -gencode arch=compute_75,code=sm_75 -gencode arch=compute_75,code=compute_75 -o deviceQuery deviceQuery.o
- mkdir -p ../../bin/x86_64/linux/release
- cp deviceQuery ../../bin/x86_64/linux/release
- # cd ../../bin/x86_64/linux/release/
- # ./deviceQuery
- #./deviceQuery Starting...
- CUDA Device Query (Runtime API) version (CUDART static linking)
- Detected 1 CUDA Capable device(s)
- Device 0: "Quadro P2000"
- CUDA Driver Version / Runtime Version 10.0 / 10.0
- CUDA Capability Major/Minor version number: 6.1
- Total amount of global memory: 5059 MBytes (5304745984 bytes)
- ( 8) Multiprocessors, (128) CUDA Cores/MP: 1024 CUDA Cores
- GPU Max Clock rate: 1481 MHz (1.48 GHz)
- Memory Clock rate: 3504 Mhz
- Memory Bus Width: 160-bit
- L2 Cache Size: 1310720 bytes
- Maximum Texture Dimension Size (x,y,z) 1D=(131072), 2D=(131072, 65536), 3D=(16384, 16384, 16384)
- Maximum Layered 1D Texture Size, (num) layers 1D=(32768), 2048 layers
- Maximum Layered 2D Texture Size, (num) layers 2D=(32768, 32768), 2048 layers
- Total amount of constant memory: 65536 bytes
- Total amount of shared memory per block: 49152 bytes
- Total number of registers available per block: 65536
- Warp size: 32
- Maximum number of threads per multiprocessor: 2048
- Maximum number of threads per block: 1024
- Max dimension size of a thread block (x,y,z): (1024, 1024, 64)
- Max dimension size of a grid size (x,y,z): (2147483647, 65535, 65535)
- Maximum memory pitch: 2147483647 bytes
- Texture alignment: 512 bytes
- Concurrent copy and kernel execution: Yes with 2 copy engine(s)
- Run time limit on kernels: No
- Integrated GPU sharing Host Memory: No
- Support host page-locked memory mapping: Yes
- Alignment requirement for Surfaces: Yes
- Device has ECC support: Disabled
- Device supports Unified Addressing (UVA): Yes
- Device supports Compute Preemption: Yes
- Supports Cooperative Kernel Launch: Yes
- Supports MultiDevice Co-op Kernel Launch: Yes
- Device PCI Domain ID / Bus ID / location ID: 0 / 0 / 11
- Compute Mode:
- < Default (multiple host threads can use ::cudaSetDevice() with device simultaneously) >
- deviceQuery, CUDA Driver = CUDART, CUDA Driver Version = 10.0, CUDA Runtime Version = 10.0, NumDevs = 1
- Result = PASS
- Result = PASS且測試過程中無報錯,表示測試通過!
3.3安裝 cuDNN
cuDNN的全稱為NVIDIA CUDA® Deep Neural Network library,是NVIDIA專門針對深度神經網絡(Deep Neural Networks)中的基礎操作而設計基于GPU的加速庫。cuDNN為深度神經網絡中的標準流程提供了高度優化的實現方式。
- 下載安裝包:https://developer.nvidia.com/rdp/cudnn-download
- 注:下載前需先注冊 NVIDIA Developer Program,然后才能下載。
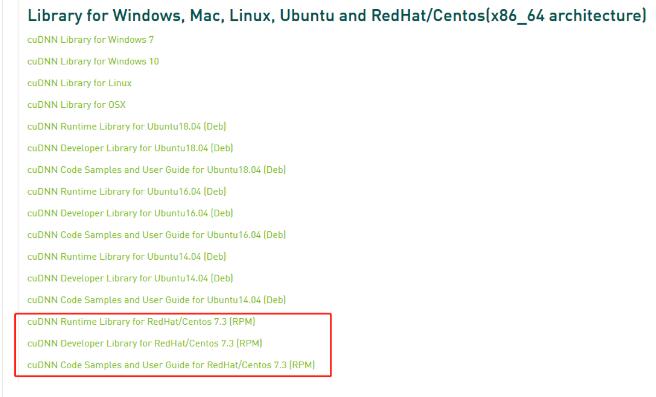
- 可以根據自身的環境選擇相應版本進行下載,這個有身份驗證只能瀏覽器下載然后再上傳到云主機中。
- 安裝:
- #rpm -ivh libcudnn7-7.4.2.24-1.cuda10.0.x86_64.rpm libcudnn7-devel-7.4.2.24-1.cuda10.0.x86_64.rpm libcudnn7-doc-7.4.2.24-1.cuda10.0.x86_64.rpm
- 準備中... ################################# [100%]
- 正在升級/安裝...
- 1:libcudnn7-7.4.2.24-1.cuda10.0 ################################# [ 33%]
- 2:libcudnn7-devel-7.4.2.24-1.cuda10################################# [ 67%]
- 3:libcudnn7-doc-7.4.2.24-1.cuda10.0################################# [100%]
- 驗證cuDNN:
- # cp -r /usr/src/cudnn_samples_v7/ $HOME
- # cd $HOME/cudnn_samples_v7/mnistCUDNN
- # make clean && make
- rm -rf *o
- rm -rf mnistCUDNN
- /usr/local/cuda/bin/nvcc -ccbin g++ -I/usr/local/cuda/include -IFreeImage/include -m64 -gencode arch=compute_30,code=sm_30 -gencode arch=compute_35,code=sm_35 -gencode arch=compute_50,code=sm_50 -gencode arch=compute_53,code=sm_53 -gencode arch=compute_53,code=compute_53 -o fp16_dev.o -c fp16_dev.cu
- g++ -I/usr/local/cuda/include -IFreeImage/include -o fp16_emu.o -c fp16_emu.cpp
- g++ -I/usr/local/cuda/include -IFreeImage/include -o mnistCUDNN.o -c mnistCUDNN.cpp
- /usr/local/cuda/bin/nvcc -ccbin g++ -m64 -gencode arch=compute_30,code=sm_30 -gencode arch=compute_35,code=sm_35 -gencode arch=compute_50,code=sm_50 -gencode arch=compute_53,code=sm_53 -gencode arch=compute_53,code=compute_53 -o mnistCUDNN fp16_dev.o fp16_emu.o mnistCUDNN.o -I/usr/local/cuda/include -IFreeImage/include -LFreeImage/lib/linux/x86_64 -LFreeImage/lib/linux -lcudart -lcublas -lcudnn -lfreeimage -lstdc++ -lm
- # ./mnistCUDNN
- cudnnGetVersion() : 7402 , CUDNN_VERSION from cudnn.h : 7402 (7.4.2)
- Host compiler version : GCC 4.8.5
- There are 1 CUDA capable devices on your machine :
- device 0 : sms 8 Capabilities 6.1, SmClock 1480.5 Mhz, MemSize (Mb) 5059, MemClock 3504.0 Mhz, Ecc=0, boardGroupID=0
- Using device 0
- Testing single precision
- Loading image data/one_28x28.pgm
- Performing forward propagation ...
- Testing cudnnGetConvolutionForwardAlgorithm ...
- Fastest algorithm is Algo 1
- Testing cudnnFindConvolutionForwardAlgorithm ...
- ^^^^ CUDNN_STATUS_SUCCESS for Algo 0: 0.036864 time requiring 0 memory
- ^^^^ CUDNN_STATUS_SUCCESS for Algo 1: 0.044032 time requiring 3464 memory
- ^^^^ CUDNN_STATUS_SUCCESS for Algo 2: 0.053248 time requiring 57600 memory
- ^^^^ CUDNN_STATUS_SUCCESS for Algo 4: 0.116544 time requiring 207360 memory
- ^^^^ CUDNN_STATUS_SUCCESS for Algo 7: 0.181248 time requiring 2057744 memory
- Resulting weights from Softmax:
- 0.0000000 0.9999399 0.0000000 0.0000000 0.0000561 0.0000000 0.0000012 0.0000017 0.0000010 0.0000000
- Loading image data/three_28x28.pgm
- Performing forward propagation ...
- Resulting weights from Softmax:
- 0.0000000 0.0000000 0.0000000 0.9999288 0.0000000 0.0000711 0.0000000 0.0000000 0.0000000 0.0000000
- Loading image data/five_28x28.pgm
- Performing forward propagation ...
- Resulting weights from Softmax:
- 0.0000000 0.0000008 0.0000000 0.0000002 0.0000000 0.9999820 0.0000154 0.0000000 0.0000012 0.0000006
- Result of classification: 1 3 5
- Test passed!
- Testing half precision (math in single precision)
- Loading image data/one_28x28.pgm
- Performing forward propagation ...
- Testing cudnnGetConvolutionForwardAlgorithm ...
- Fastest algorithm is Algo 1
- Testing cudnnFindConvolutionForwardAlgorithm ...
- ^^^^ CUDNN_STATUS_SUCCESS for Algo 0: 0.032896 time requiring 0 memory
- ^^^^ CUDNN_STATUS_SUCCESS for Algo 1: 0.036448 time requiring 3464 memory
- ^^^^ CUDNN_STATUS_SUCCESS for Algo 2: 0.044000 time requiring 28800 memory
- ^^^^ CUDNN_STATUS_SUCCESS for Algo 4: 0.115488 time requiring 207360 memory
- ^^^^ CUDNN_STATUS_SUCCESS for Algo 7: 0.180224 time requiring 2057744 memory
- Resulting weights from Softmax:
- 0.0000001 1.0000000 0.0000001 0.0000000 0.0000563 0.0000001 0.0000012 0.0000017 0.0000010 0.0000001
- Loading image data/three_28x28.pgm
- Performing forward propagation ...
- Resulting weights from Softmax:
- 0.0000000 0.0000000 0.0000000 1.0000000 0.0000000 0.0000714 0.0000000 0.0000000 0.0000000 0.0000000
- Loading image data/five_28x28.pgm
- Performing forward propagation ...
- Resulting weights from Softmax:
- 0.0000000 0.0000008 0.0000000 0.0000002 0.0000000 1.0000000 0.0000154 0.0000000 0.0000012 0.0000006
- Result of classification: 1 3 5
- Test passed!
- Test passed!且測試過程中無報錯,表示測試通過!
3.4安裝 TensorFlow
- # pip3 install --upgrade setuptools==30.1.0
- # pip3 install tf-nightly-gpu
- 驗證測試:
- 在 Python 交互式 shell 中輸入以下幾行簡短的程序代碼:
- # python
- import tensorflow as tf
- hello = tf.constant('Hello, TensorFlow!')
- sess = tf.Session()
- print(sess.run(hello))
- 如果系統輸出以下內容,就說明您可以開始編寫 TensorFlow 程序了:
- Hello, TensorFlow!
- 同時使用nvidia-smi命令可以看到當前顯卡的處理任務。

3.5 安裝TensorBoard 可視化工具
可以用 TensorBoard 來展現 TensorFlow 圖,繪制圖像生成的定量指標圖以及顯示附加數據(如其中傳遞的圖像)。通過 pip 安裝 TensorFlow 時,也會自動安裝 TensorBoard:
- 驗證版本:
- # pip3 show tensorboard
- Name: tensorboard
- Version: 1.12.2
- Summary: TensorBoard lets you watch Tensors Flow
- Home-page: https://github.com/tensorflow/tensorboard
- Author: Google Inc.
- Author-email: opensource@google.com
- License: Apache 2.0
- Location: /usr/lib/python2.7/site-packages
- Requires: protobuf, numpy, futures, grpcio, wheel, markdown, werkzeug, six
- Required-by:
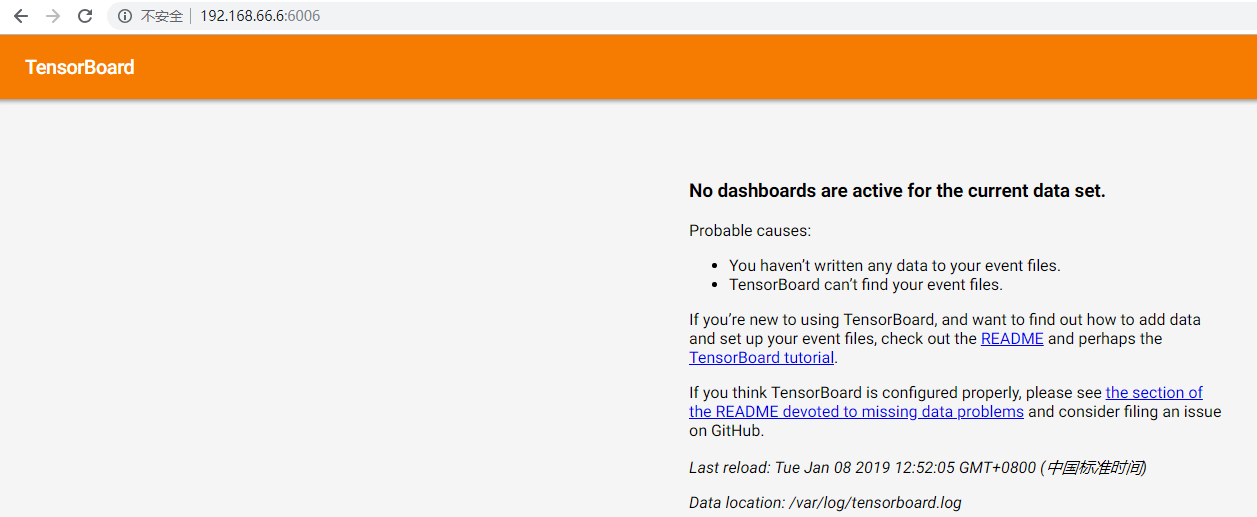
- 啟動服務:
- # tensorboard --logdir /var/log/tensorboard.log
- TensorBoard 1.13.0a20190107 at http://GPU-TF:6006 (Press CTRL+C to quit)
- 根據提示在瀏覽器上輸入http://服務器IP:6006
3.6 安裝Jupyter
Jupyter是一個交互式的筆記本,可以很方便地創建和共享文學化程序文檔,支持實時代碼,數學方程,可視化和 markdown。一般用與做數據清理和轉換,數值模擬,統計建模,機器學習等等。
- 安裝:
- # sudo pip3 install jupyter
- 生成配置文件:
- # jupyter notebook --generate-config
- Writing default config to: /root/.jupyter/jupyter_notebook_config.py
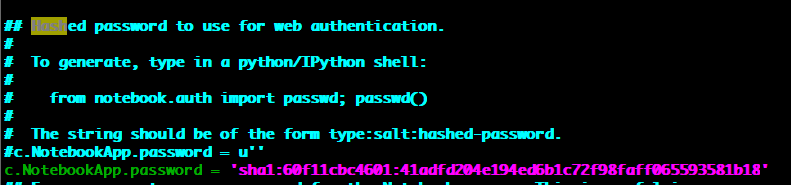
- 生成Jupyter密碼:
- # python
- Python 3.6.5 (default, Jan 15 2019, 02:51:51)
- [GCC 4.8.5 20150623 (Red Hat 4.8.5-36)] on linux
- Type "help", "copyright", "credits" or "license" for more information.
- >>> from notebook.auth import passwd;
- >>> passwd()
- Enter password:
- Verify password:
- 'sha1:6067bcf7350b:8407670bb3f94487c9404ed3c20c1ebf7ddee32e'
- >>>
- 將生成的hash串寫入Jupyter配置文件:
- # vim /root/.jupyter/jupyter_notebook_config.py
- 啟動服務
- # jupyter notebook --allow-root --ip='192.168.66.11'
- 瀏覽器登陸

- 輸入密碼后登陸:即可正常訪問
- 執行測試任務:
- 運行TensorFlow Demo示例
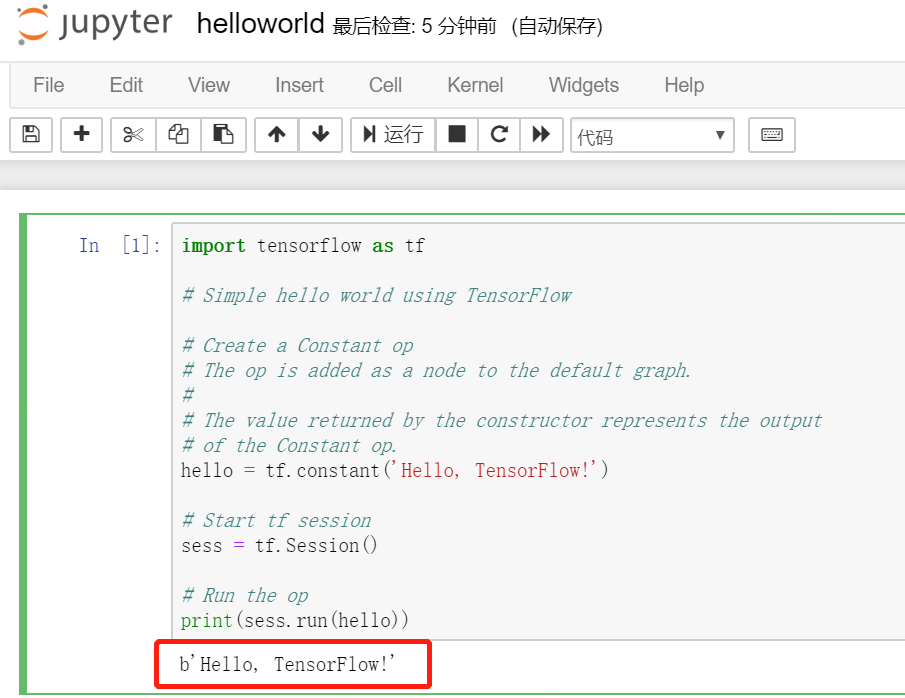
- Jupyter中新建 HelloWorld 示例,代碼如下:
- import tensorflow as tf
- # Simple hello world using TensorFlow
- # Create a Constant op
- # The op is added as a node to the default graph.
- #
- # The value returned by the constructor represents the output
- # of the Constant op.
- hello = tf.constant('Hello, TensorFlow!')
- # Start tf session
- sess = tf.Session()
- # Run the op
- print(sess.run(hello))
0x4總結
通過使用ZStack云平臺可以快速構建深度學習平臺,云平臺自身無需太多的復雜配置,在安裝各種驅動及深度學習組件時也與物理機無異。安裝好驅動后進行性能測試發現與同配置物理邏輯性能相當,GPU部分沒有任何性能損失。
當上述軟件環境都準備完成以后,可配置多塊GPU并從模板創建多個云主機一一透傳,結合ZStack本身的多租戶屬性,可使得多人在同一套環境中互不影響進行開發或者運行應用程序,從而成為一個真正的深度學習“云”平臺。