程序員深夜用Python跑神經(jīng)網(wǎng)絡(luò),只為用中二動作關(guān)掉臺燈
對于上了床就再也不想下來的人來說,關(guān)燈成為睡覺前面臨的最大挑戰(zhàn)!
然而這一屆網(wǎng)友永遠(yuǎn)不會讓人失望,他們開發(fā)出了各種關(guān)燈大法:
當(dāng)然少不了憨豆先生最簡單粗暴的關(guān)燈方式:

然而,一個來自意大利拉不勒斯的小哥哥,決定利用“舞步”(身體姿勢)來控制自己家的燈,整個過程利用一個神經(jīng)網(wǎng)絡(luò)實現(xiàn),就像這樣:
下面是小哥哥寫的教程,文摘菌在不改變原意的基礎(chǔ)上進(jìn)行了編譯。
在今天的文章里,我將手把手教大家訓(xùn)練一個神經(jīng)網(wǎng)絡(luò)模型,用來識別攝像頭拍下的“舞步”,從而控制燈的開關(guān)。
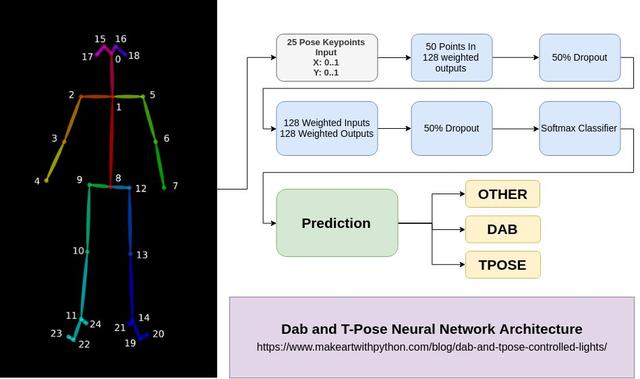
我們將在已有的OpenPose深度學(xué)習(xí)模型之上建立我們自己的模型來識別身體的位置,然后,我們會建立一些樣本來代表各種身體的各種姿態(tài)。
當(dāng)我們建立好舞步(包括嘻哈超人舞步、T-Pose舞步)和其他身體姿態(tài)的樣本后,我們會清理數(shù)據(jù)集,然后利用這些樣例訓(xùn)練我們的神經(jīng)網(wǎng)絡(luò)。
當(dāng)神經(jīng)網(wǎng)絡(luò)訓(xùn)練好之后,我們會用它來控制燈光。
今天的文章包括很多步驟,不過,所有的代碼都在Github上,上面還包括了我已經(jīng)搜集到的原始數(shù)據(jù)樣例。
GitHub鏈接:
https://github.com/burningion/dab-and-tpose-controlled-lights
編寫“編寫軟件”的軟件:怎樣訓(xùn)練你的神經(jīng)網(wǎng)絡(luò)?
首先就是數(shù)據(jù)——大量數(shù)據(jù)。
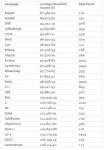
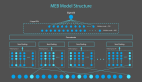
我們今天即將采用的神經(jīng)網(wǎng)絡(luò)模型卡內(nèi)基梅隆大學(xué)的團(tuán)隊也曾經(jīng)使用過,他們用自己的全景數(shù)據(jù)集來訓(xùn)練該模型。該數(shù)據(jù)集包括五個半小時的視頻,視頻中包含了150萬個手動添加的代表人體骨骼位置的標(biāo)簽。
整個全景工作室的圓屋頂上裝有500個攝像頭,所有攝像頭都對準(zhǔn)人,從不同角度記錄他們的動作。
這個全景工作室用構(gòu)造訓(xùn)練數(shù)據(jù)集幾乎是完美的,很方便進(jìn)行計算機(jī)視覺的實驗。
今天,我們將在他們的工作基礎(chǔ)之上開始我們的工作。
首先我們會用他們的工具來創(chuàng)建一個很小的數(shù)據(jù)集。我們最終的神經(jīng)網(wǎng)絡(luò)只會使用171個姿態(tài),包括記錄的嘻哈超人舞步、T-Pose舞步和其他姿態(tài)。每一個姿態(tài)樣例都是從卡耐基梅隆大學(xué)已有的工作中提取出來的。
神經(jīng)網(wǎng)絡(luò)的一個好處就是你可以使用別人已經(jīng)建成的模型,然后加入一些新的神經(jīng)網(wǎng)絡(luò)層,以此來擴(kuò)展該模型。這個過程被稱之為遷移學(xué)習(xí),因此我們可以用有限的資源來進(jìn)行遷移學(xué)習(xí)。
從技術(shù)上來說,我們不會在這個項目中使用遷移學(xué)習(xí),因為我們會對OpenPose的工作做一些細(xì)微的修改,然后創(chuàng)建一個獨立的神經(jīng)網(wǎng)絡(luò)。
那么問題來了,我們該如何獲取數(shù)據(jù)呢?
寫一個程序并利用OpenCV來收集帶標(biāo)簽的數(shù)據(jù)
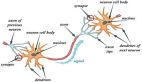
使用OpenPose的成果,我們得到了25個代表人體骨骼架構(gòu)的標(biāo)簽。我們可以寫一個程序來控制網(wǎng)絡(luò)攝像頭,在圖像上運行OpenPose,然后將動作與鍵盤上的按鍵相對應(yīng)。
也就是說,我們做出一個T-Pose的動作,然后在鍵盤上點擊m鍵,那么這個動作就被歸到T-Pose那一類里。我們按照這個方法去添加171個不同的姿勢,這樣一來,我們就有數(shù)據(jù)訓(xùn)練神經(jīng)網(wǎng)絡(luò)了。以下是用于數(shù)據(jù)收集的代碼的示例:
- # create lists for dab, tpose, other examplesdabs = []tposes = []other = []fps_time = 0# loop forever, reading webcam each timewhile True: ret_val, frame = vs.read() datum.cvInputData = frame opWrapper.emplaceAndPop([datum]) # need to be able to see what's going on image = datum.cvOutputData cv2.putText(image, "FPS: %f" % (1.0 / (time.time() - fps_time)), (10, 10), cv2.FONT_HERSHEY_SIMPLEX, 0.5, (0, 255, 0), 2) cv2.imshow("Openpose", image) fps_time = time.time() # quit with a q keypress, b or m to save data key = cv2.waitKey(1) & 0xFF if key == ord("q"): break elif key == ord("b"): print("Dab: " + str(datum.poseKeypoints)) dabs.append(datum.poseKeypoints[0]) elif key == ord("m"): print("TPose: " + str(datum.poseKeypoints)) tposes.append(datum.poseKeypoints[0]) elif key == ord("/"): print("Other: " + str(datum.poseKeypoints)) other.append(datum.poseKeypoints[0])# write our data as numpy binary files# for analysis laterdabs = np.asarray(dabs)tposes = np.asarray(tposes)other = np.asarray(other)np.save('dabs.npy', dabs)np.save('tposes.npy', tposes)np.save('other.npy', other)
然后用NumPy的數(shù)組來儲存特征,并用np.save函數(shù)把特征保存為二進(jìn)制文件以便后續(xù)使用。我個人傾向于使用Jupyter notebook來觀察和處理數(shù)據(jù)。
當(dāng)數(shù)據(jù)收集好之后,我們可以觀察并清理數(shù)據(jù)以便更好地去訓(xùn)練模型。
觀察數(shù)據(jù)、清理數(shù)據(jù)以及使用數(shù)據(jù)訓(xùn)練模型
這部分看上去很復(fù)雜,但是通過使用Jupyter notebook、NumPy和Keras,我們就可以很直觀地去觀察數(shù)據(jù)、清理數(shù)據(jù),并且使用數(shù)據(jù)來訓(xùn)練神經(jīng)網(wǎng)絡(luò)。
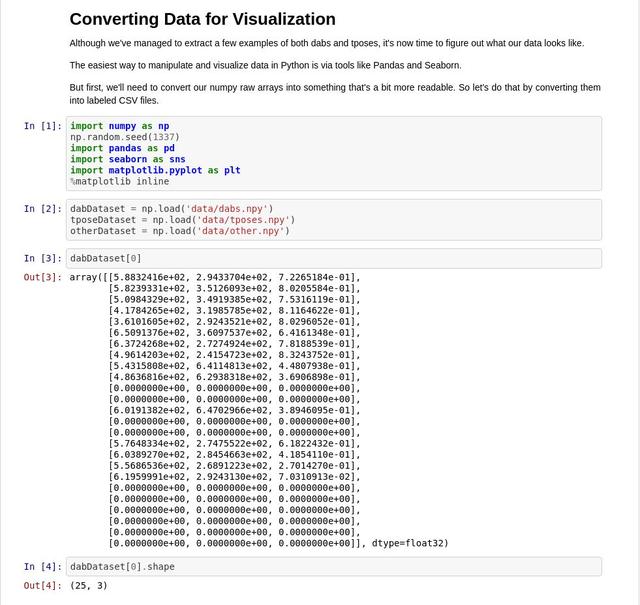
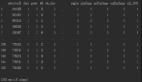
根據(jù)我們的截圖,我們可以發(fā)現(xiàn)npy文件中保存的數(shù)據(jù)和OpenPose模型本身都有三個維度,25個已知的身體位置坐標(biāo)點,X、Y、以及Confidence。
我們的模型訓(xùn)練工作不需要用到confidence。如果某個身體位置坐標(biāo)點被命名了,我們就保留它,否則,我們就直接讓它為0。
我們已經(jīng)把(絕大部分)數(shù)據(jù)梳理好了,現(xiàn)在我們需要把數(shù)據(jù)特征和標(biāo)簽結(jié)合起來。
我們用0代表其他姿勢,1代表嘻哈超人舞步、2代表T-Pose舞步。
- labels = np.zeros(len(otherDataset))labels = np.append(labels, np.full((len(dabDataset)), 1))labels = np.append(labels, np.full((len(tposeDataset)), 2))print(labels)print("%i total examples for training." % len(labels))
接下來,我們可以使用獨熱編碼處理我們的數(shù)字標(biāo)簽。也就是說,我們將標(biāo)簽0、1、2轉(zhuǎn)換成[1,0,0]、[0,1,0]、[0,0,1]。之后,我們可以使用sklearn的shuffle函數(shù)將數(shù)據(jù)標(biāo)簽和特征打亂(數(shù)據(jù)標(biāo)簽和特征仍保持原有的對應(yīng)關(guān)系)
- # now, let's shuffle labels and the array, the same wayfrom sklearn.utils import shuffleX1, y1 = shuffle(dataset, labels)# now let's label them for 'one hot'from keras.utils.np_utils import to_categoricaly1 = to_categorical(y1, 3) # we have 3 categories, dab, tpose, otherprint(y1.shape[1)]
我們的輸入數(shù)據(jù)代表著鼻子、手等等的位置,而它們的是介于0到720和0到1280之間的像素值,所以我們需要把數(shù)據(jù)歸一化。這樣一來,我們可以重復(fù)使用我們的模型而不用考慮輸入圖片數(shù)據(jù)的分辨率。
- X1[:,:,0] = X1[:,:,0] / 720 # I think the dimensions are 1280 x 720 ?X1[:,:,1] = X1[:,:,1] / 1280 # let's see?X1 = X1[:,:,1:]print(X1.shape)X1 = X1.reshape(len(X1), 50) # we got rid of confidence percentage
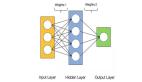
在最后一步中,我們將把我們的多維數(shù)據(jù)變成一維。我們會分批向模型輸入50個位置信息(25個部位,每個部位的X和Y值)。
構(gòu)建并訓(xùn)練我們的模型
在Jupyter notebook中使用Keras可以把訓(xùn)練和測試神經(jīng)網(wǎng)絡(luò)模型的工作變得十分簡單,這也是我最喜歡Keras的地方。
現(xiàn)在我們的數(shù)據(jù)已經(jīng)貼上標(biāo)簽準(zhǔn)備就緒了,我們可以開始訓(xùn)練一個簡單的模型了,只需要幾行代碼。
現(xiàn)在我們導(dǎo)入Keras庫然后訓(xùn)練一個簡單的神經(jīng)網(wǎng)絡(luò)模型。
- from keras.models import Sequentialfrom keras.layers import Dense, Dropout, Activation, Flattenfrom keras.optimizers import SGD
- model = Sequential()model.add(Dense(128, activation='relu', input_shape=(50,)))model.add(Dropout(0.5))model.add(Dense(128, activation='relu'))model.add(Dropout(0.5))model.add(Dense(y1.shape[1], activation='softmax'))model.compile(optimizer='Adam', loss='categorical_crossentropy', metrics=['accuracy'])model.fit(X1, y1, epochs=2000,batch_size=25)
搞定!
這里有個稍微需要注意的地方,輸入層的大小為50,提醒大家一下,這個數(shù)字是OpenPose模型中位置點的X坐標(biāo)和Y坐標(biāo)數(shù)量之和。
最后我們用到了Softmax層,它是用來分類的。我們將y.shape[1]傳入該層,這樣我們的模型就知道不同類別的數(shù)量了。
最后的最后,我們使用輸入數(shù)據(jù),用model.fit()的方法去訓(xùn)練模型。這里,我已經(jīng)做了2000次迭代(全部樣本訓(xùn)練一次為一次迭代)。2000次迭代貌似有點多了,500次左右的迭代可能更好,因為迭代次數(shù)過多可能使我們的模型出現(xiàn)一些過擬合問題。但是不論是哪一種情況,你都需要經(jīng)過多次嘗試來確定迭代次數(shù)。
當(dāng)我們運行這段代碼時,我們會看到準(zhǔn)確度在提高。如果你看不到,請再次確認(rèn)當(dāng)你打亂數(shù)據(jù)時,數(shù)據(jù)標(biāo)簽和數(shù)據(jù)特征的對應(yīng)關(guān)系是不變的。此外,也要確認(rèn)數(shù)據(jù)里的數(shù)值是不是在0到1之間。
最后,我們可以保存訓(xùn)練后的模型,也可以使用樣本數(shù)據(jù)集來測試該模型,保存模型的代碼很簡單:
- model.save('data/dab-tpose-other.h5') # save our model as h5
- # in our other code, or inline, load the model and test against sample dab datasetimport kerasmodello = keras.models.load_model('data/dab-tpose-other.h5')dabDataset = np.load('data/test-dabs.npy')dabDataset[:,:,0] = dabDataset[:,:,0] / 720 # I think the dimensions are 1280 x 720 ?dabDataset[:,:,1] = dabDataset[:,:,1] / 1280 # let's see?dabDataset = dabDataset[:,:,1:]dabDataset = dabDataset.reshape(len(dabDataset), 50)modello.predict_classes(dabDataset) # returns array([1, 1, 1, 1, 1, 1])
用模型來控制燈光
我們現(xiàn)在已經(jīng)有了可以識別姿勢的模型,接下來要做的只是把這個模型和無線燈光控制關(guān)聯(lián)起來就行了。
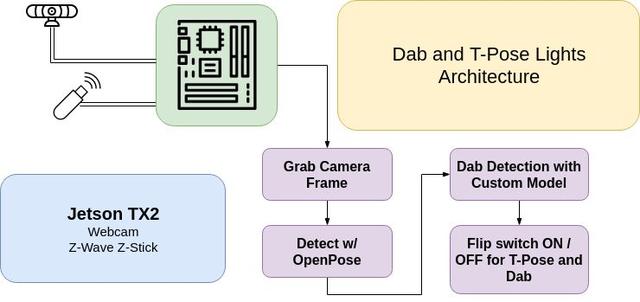
在我的這個例子中,我使用Aeotec Z-Stick來發(fā)送Z-Wave指令,并配有兩個GE Z-Wave的室外開關(guān)。USB接口接入到NVIDIA TX2人工智能模塊,其實NVIDIA的Jestson Nano也能勝任,盡管Jetson Nano所能提供的分辨率要低于我樣例中1280x720的分辨率。當(dāng)Z-Stick插入到ARM設(shè)備后,你首先需要把開關(guān)調(diào)到Z-Wave模式,可能需要多按幾下USB Stick上的按鈕和燈的開關(guān)。
代碼并不復(fù)雜,基本上就是訓(xùn)練環(huán)境再加上一個額外的步驟。現(xiàn)在,我們導(dǎo)入Keras,然后使用清理過的數(shù)據(jù)訓(xùn)練模型。
- import cv2import pyopenpose as opfrom imutils import translate, rotate, resizeimport openzwavefrom openzwave.option import ZWaveOptionfrom openzwave.network import ZWaveNetwork# make sure these commands get flushed by doing them first, then loading tensorflow...# tensorflow should take enough time to start for these commands to flushoptions = ZWaveOption('/dev/ttyACM0')options.lock()network = ZWaveNetwork(options)import timeimport numpy as npnp.random.seed(1337)import tensorflow as tf# make sure tensorflow doesn't take up all the gpu memoryconf = tf.ConfigProto()conf.gpu_options.allow_growth=Truesession = tf.Session(config=conf)import keras# Custom Params (refer to include/openpose/flags.hpp for more parameters)params = dict()params["model_folder"] = "../../models/"# built in TX2 video capture sourcevs = cv2.VideoCapture("nvarguscamerasrc ! video/x-raw(memory:NVMM), width=(int)1280, height=(int)720,format=(string)NV12, framerate=(fraction)24/1 ! nvvidconv flip-method=0 ! video/x-raw, format=(string)BGRx ! videoconvert ! video/x-raw, format=(string)BGR ! appsink")tposer = keras.models.load_model('dab-tpose-other.h5')# Starting OpenPoseopWrapper = op.WrapperPython()opWrapper.configure(params)opWrapper.start()datum = op.Datum()np.set_printoptions(precision=4)fps_time = 0DAB = 1TPOSE = 2OTHER = 0LIGHTS = 0bounced = time.time()debounce = 3 # wait 3 seconds before allowing another commandwhile True: ret_val, frame = vs.read() datum.cvInputData = frame opWrapper.emplaceAndPop([datum]) # need to be able to see what's going on image = datum.cvOutputData cv2.putText(image, "FPS: %f" % (1.0 / (time.time() - fps_time)), (10, 20), cv2.FONT_HERSHEY_SIMPLEX, 0.5, (0, 255, 0), 2) cv2.imshow("Openpose", image) if datum.poseKeypoints.any(): first_input = datum.poseKeypoints try: first_input[:,:,0] = first_input[:,:,0] / 720 first_input[:,:,1] = first_input[:,:,1] / 1280 first_input = first_input[:,:,1:] first_input = first_input.reshape(len(datum.poseKeypoints), 50) except: continue output = tposer.predict_classes(first_input) for j in output: if j == 1: print("dab detected") if LIGHTS == 0 or (time.time() - bounced) < debounce: continue for node in network.nodes: for val in network.nodes[node].get_switches(): network.nodes[node].set_switch(val, False) LIGHTS = 0 bounced = time.time() elif j == 2: print("tpose detected") if LIGHTS == 1 or (time.time() - bounced) < debounce: continue for node in network.nodes: for val in network.nodes[node].get_switches(): network.nodes[node].set_switch(val, True) LIGHTS = 1 bounced = time.time() fps_time = time.time() # quit with a q keypress, b or m to save data key = cv2.waitKey(1) & 0xFF if key == ord("q"): break# clean up after yourselfvs.release()cv2.destroyAllWindows()
到了這一步,工作基本上就算完成了!
我們成功地訓(xùn)練了一個用于識別嘻哈超人舞步、T-Pose舞步的神經(jīng)網(wǎng)絡(luò)模型,然后我們可以讓它根據(jù)我們的舞步來制造可互動的燈。
太棒了,給自己點個贊!
后記
所有代碼、模型以及訓(xùn)練數(shù)據(jù)都免費公布在Github上。
我建議你們在Jupyter notebook上試試這個項目。我的代碼中有個漏洞,我一直無法從自己的工作簿中找出來。這個漏洞導(dǎo)致我的原始的X和Y標(biāo)簽并沒有被正確地標(biāo)記。如果你找到了解決這個漏洞的方法,記得在Github上創(chuàng)建一個Pull Request(PR)。
另外,我們今天構(gòu)建的基礎(chǔ)模型可以用來訓(xùn)練很多類型的舞蹈動作。盡管我的模型每秒只能捕捉很少的畫面,但我們可以開始建立一個有關(guān)舞步的數(shù)據(jù)集,然后再構(gòu)建一個能識別這些不同舞步的神經(jīng)網(wǎng)絡(luò)模型。