簡單而強大的人臉識別項目登上GitHub趨勢榜
近日,一個名為 face_recognition 的人臉識別項目登上了 GitHub Trending 趨勢榜,賺足了眼球。自開源至截稿,此項目在 Github 上的 Star 數(shù)已達 26500,F(xiàn)ork 數(shù)也達到了 7117。本文主要介紹了該項目的使用說明和使用方法,便于國內(nèi)的開發(fā)者們進行研究學(xué)習(xí)。
face_recognition 宣稱是史上最強大,最簡單的人臉識別項目。據(jù)悉,該項目由軟件工程開發(fā)師和咨詢師 Adam Geitgey 開發(fā),其強大之處在于不僅基于業(yè)內(nèi)領(lǐng)先的 C++ 開源庫 dlib 中的深度學(xué)習(xí)模型,采用的人臉數(shù)據(jù)集也是由美國麻省大學(xué)安姆斯特分校制作的 Labeled Faces in the Wild,它含有從網(wǎng)絡(luò)收集的 13,000 多張面部圖像,準(zhǔn)確率高達 99.38%。此外,項目還配備了完整的開發(fā)文檔和應(yīng)用案例,特別是兼容樹莓派系統(tǒng)。簡單之處在于操作者可以直接使用 Python和命令行工具提取、識別、操作人臉。
目前,該項目的說明已有中文翻譯版,本文已獲得譯者授權(quán)(GitHub ID:TommyZihao),引用譯文對本項目進行簡單介紹。
照例先奉上 GitHub 項目鏈接:
https://github.com/ageitgey/face_recognitio
特性
1. 找到并定位圖片中的所有人臉:
- import face_recognition
- image = face_recognition.load_image_file("your_file.jpg")
- face_locations = face_recognition.face_locations(image)
2.識別人臉關(guān)鍵點(包括眼睛、鼻子、嘴和下巴)
- import face_recognition
- image = face_recognition.load_image_file("your_file.jpg")
- face_landmarks_list = face_recognition.face_landmarks(image)
本人臉識別項目除了在某些關(guān)鍵領(lǐng)域有重要作用外,還有一個可能會引起 “玩心” 的 digital make-up 自動化妝功能(類似美圖秀秀)。
3.識別圖片中的人是誰
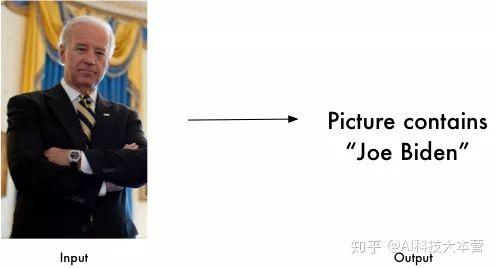
- import face_recognition
- known_image = face_recognition.load_image_file("biden.jpg")
- unknown_image = face_recognition.load_image_file("unknown.jpg")
- biden_encoding = face_recognition.face_encodings(known_image)[0]
- results = face_recognition.compare_faces([biden_encoding], unknown_encoding)
4.配合其它的Python庫(比如opencv),該項目還可實現(xiàn)實時人臉檢測:詳細案例見:
https://github.com/ageitgey/face_recognition/blob/master/examples/facerec_from_webcam_faster.py
安裝
環(huán)境配置:
- Python 3.3+ or Python 2.7macOS or LinuxWindows(官方并不支持,但一些大神們摸索出了在Windows上運行的方法)
不同操作系統(tǒng)的安裝方法:
1. 在 Mac 或者 Linux上安裝本項目:
方法一:
首先安裝dlib和相關(guān)Python依賴:
https://gist.github.com/ageitgey/629d75c1baac34dfa5ca2a1928a7aeaf
然后通過 pip3 或者是 Python 2 的 pip2 用以下代碼安裝。
- pip3 install face_recognition
若未能安裝成功,可以用Ubuntu虛擬機安裝,參見這一教程:
https://medium.com/@ageitgey/try-deep-learning-in-python-now-with-a-fully-pre-configured-vm-1d97d4c3e9b
(需要電腦中安裝VMWare Player 或者 VirtualBox)
方法二:
修改你的 pip 鏡像源為清華鏡像,然后使用 pip install face_recognition,可以自動幫你安裝各種依賴,包括dlib。只是在安裝dlib的時候可能會出問題,因為dlib需要編譯,出現(xiàn)的問題一般是gcc或者g++版本的問題,所以在pip install face_recognition之前,可以通過在命令行鍵入。
- export CC=/usr/local/bin/gcc
- export CXX=/usr/local/bin/g++
來指定你gcc和g++對應(yīng)的位置,(這兩句話會臨時修改當(dāng)前終端的環(huán)境變量/usr/local/bin/gcc對應(yīng)你自己gcc或者g++所在目錄)。
2. 在樹莓派上安裝:
樹莓派安裝指南:
https://gist.github.com/ageitgey/1ac8dbe8572f3f533df6269dab35df65
3. 在Windows上安裝:雖然本項目官方并不支持Windows,但一些大神們摸索出了在Windows上運行本項目的方法:@masoudr寫的如何在Win10系統(tǒng)上安裝 dlib庫和 face_recognition項目的教程:
https://github.com/ageitgey/face_recognition/issues/175#issue-257710508
使用Ubuntu虛擬機鏡像文件安裝配置虛擬機,本項目已經(jīng)包含在這個鏡像中。
https://medium.com/@ageitgey/try-deep-learning-in-python-now-with-a-fully-pre-configured-vm-1d97d4c3e9b
使用方法
1.使用命令行工具
本項目安裝完畢后,有兩種命令行工具可供使用:
- face_recognition - 在單張圖片或一個圖片文件夾中識別人臉身份。face_detection - 在單張圖片或一個圖片文件夾中定位人臉位置。
face_recognition 命令行工具:
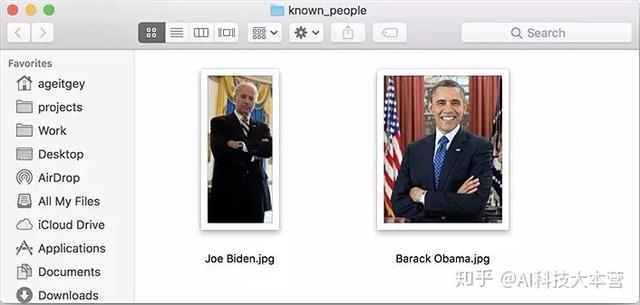
face_recognition命令行工具可以在單張圖片或一個圖片文件夾中識別人臉身份。首先,需要一個你已經(jīng)知道名字的人臉圖片文件夾,一個人一張圖,圖片的文件名即為對應(yīng)的人的名字,然后,需要第二個圖片文件夾,文件夾里面是你希望識別的圖片:
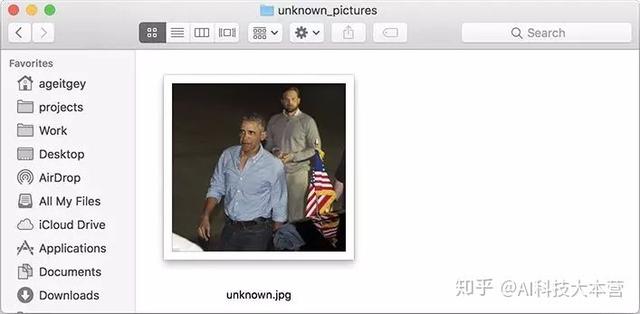
然后,在命令行中切換到這兩個文件夾所在路徑,使用 face_recognition 命令行,傳入這兩個圖片文件夾,然后就會輸出未知圖片中人的名字:
- $ face_recognition ./pictures_of_people_i_know/ ./unknown_pictures/
- /unknown_pictures/unknown.jpg,Barack Obama
- /face_recognition_test/unknown_pictures/unknown.jpg,unknown_person
輸出結(jié)果的每一行對應(yīng)著圖片中的一張臉,圖片名字和對應(yīng)人臉識別結(jié)果用逗號分開。
如果結(jié)果輸出了unknown_person,那么代表這張臉沒有對應(yīng)上已知人臉圖片文件夾中的任何一個人。
face_detection 命令行工具
face_detection命令行工具可以在單張圖片或一個圖片文件夾中定位人臉位置(輸出像素點坐標(biāo))。在命令行中使用face_detection,傳入一個圖片文件夾或單張圖片文件來進行人臉位置檢測:
- $ face_detection ./folder_with_pictures/
- examples/image1.jpg,65,215,169,112
- examples/image2.jpg,62,394,211,244
- examples/image2.jpg,95,941,244,792
輸出結(jié)果的每一行都對應(yīng)圖片中的一張臉,輸出坐標(biāo)代表著這張臉的上、右、下、左像素點坐標(biāo)。
調(diào)整人臉識別的容錯率和敏感度
如果一張臉識別出不止一個結(jié)果,那么這意味著他和其他人長的太像了(此外,本項目對于小孩和亞洲人的人臉識別準(zhǔn)確率有待提升)。你可以把容錯率調(diào)低一些,使識別結(jié)果更加嚴(yán)格。這個功能可通過傳入?yún)?shù) --tolerance 來實現(xiàn),默認的容錯率是0.6,容錯率越低,識別越嚴(yán)格準(zhǔn)確。
- $ face_recognition --tolerance 0.54 ./pictures_of_people_i_know/ ./unknown_pictures/
- /unknown_pictures/unknown.jpg,Barack Obama
- /face_recognition_test/unknown_pictures/unknown.jpg,unknown_person
人臉匹配的具體數(shù)值可以通過傳入?yún)?shù) --show-distance true 來查看:
- $ face_recognition --show-distance true ./pictures_of_people_i_know/ ./unknown_pictures/
- /unknown_pictures/unknown.jpg,Barack Obama,0.378542298956785
- /face_recognition_test/unknown_pictures/unknown.jpg,unknown_person,None
對識別速度不滿意怎么辦?
如果你的CPU是多核的,你可以通過并行運算加速人臉識別。例如,如果你的CPU有四個核心,那么你可以通過并行運算提升大概四倍的運算速度。
如果你使用Python3.4或更新的版本,可以傳入 --cpus <number_of_cpu_cores_to_use> 參數(shù):
- $ face_recognition --cpus 4 ./pictures_of_people_i_know/ ./unknown_pictures/
(你可以傳入 --cpus -1參數(shù)來調(diào)用cpu的所有核心。)此外,子豪兄Tommy 表示樹莓派3B有4個CPU核心,傳入多核參數(shù)可以顯著提升圖片識別的速度。
更多案例
如果你并不在乎圖片的文件名,只想知道文件夾中的圖片里有誰,可以用這個管道命令:
- $ face_recognition ./pictures_of_people_i_know/ ./unknown_pictures/ | cut -d ',' -f2
- Barack Obama
- unknown_person
2.使用Python
在 Python 中導(dǎo)入 face_recognition模塊,調(diào)用豐富的API接口,用幾行代碼就可以輕松玩轉(zhuǎn)各種人臉識別功能!API 接口文檔:
https://face-recognition.readthedocs.io
如何定位人臉位置或者識別人臉身份?
在 Python 中可以分別通過以下代碼來實現(xiàn)在圖片中定位人臉的位置:
- import face_recognition
- image = face_recognition.load_image_file("my_picture.jpg")
- face_locations = face_recognition.face_locations(image)
- # face_locations is now an array listing the co-ordinates of each face
參考案例:
https://github.com/ageitgey/face_recognition/blob/master/examples/find_faces_in_picture.py
在圖片中識別人臉身份:
- import face_recognition
- picture_of_me = face_recognition.load_image_file("me.jpg")
- my_face_encoding = face_recognition.face_encodings(picture_of_me)[0]
- # my_face_encoding now contains a universal 'encoding' of my facial features that can be compared to any other picture of a face!
- unknown_picture = face_recognition.load_image_file("unknown.jpg")
- unknown_face_encoding = face_recognition.face_encodings(unknown_picture)[0]
- # Now we can see the two face encodings are of the same person with `compare_faces`!
- results = face_recognition.compare_faces([my_face_encoding], unknown_face_encoding)
- if results[0] == True:
- print("It's a picture of me!")
- else:
- print("It's not a picture of
參考案例:
https://github.com/ageitgey/face_recognition/blob/master/examples/recognize_faces_in_pictures.py
對人臉識別有精準(zhǔn)要求怎么辦?
可以使用深度學(xué)習(xí)模型以達到更加精準(zhǔn)的人臉定位,但要注意:這種方法需要GPU加速(通過英偉達顯卡的CUDA庫驅(qū)動),在編譯安裝dlib的時候也需要開啟CUDA支持。
- import face_recognition
- image = face_recognition.load_image_file("my_picture.jpg")
- face_locations = face_recognition.face_locations(image, model="cnn")
- # face_locations is now an array listing the co-ordinates of each face
參考案例:
https://github.com/ageitgey/face_recognition/blob/master/examples/find_faces_in_picture_cnn.py
如果有大量圖片需要識別,同時又有GPU,那么你可以參考這個例子:
https://github.com/ageitgey/face_recognition/blob/master/examples/find_faces_in_batches.py
如何識別單張圖片中人臉的關(guān)鍵點?
- import face_recognition
- image = face_recognition.load_image_file("my_picture.jpg")
- face_landmarks_list = face_recognition.face_landmarks(image)
- # face_landmarks_list is now an array with the locations of each facial feature in each face.
- # face_landmarks_list[0]['left_eye'] would be the location and outline of the first person's left eye
參考案例:
https://github.com/ageitgey/face_recognition/blob/master/examples/find_facial_features_in_picture.py
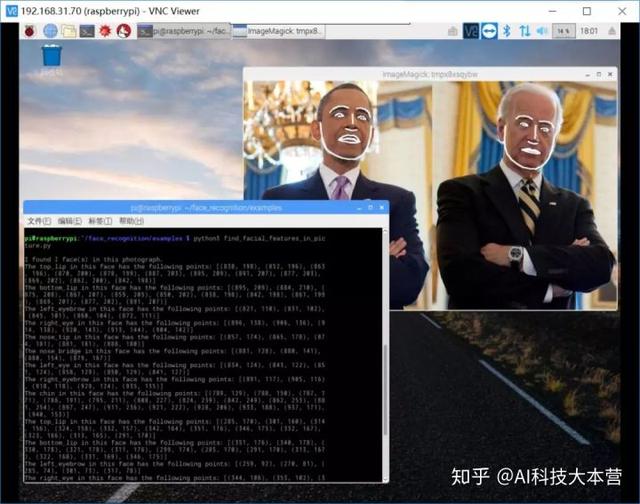
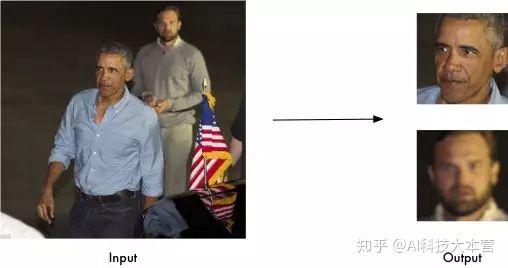
識別奧巴馬和拜登的人臉關(guān)鍵點
更多案例:
https://github.com/ageitgey/face_recognition/tree/master/examples
人臉定位
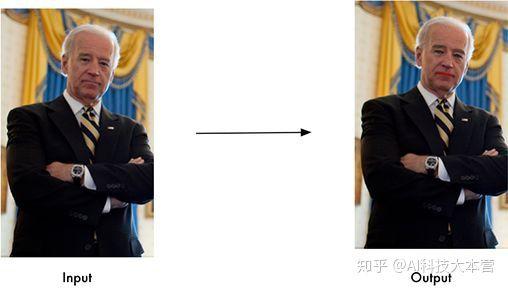
案例:定位拜登的臉
https://github.com/ageitgey/face_recognition/blob/master/examples/find_faces_in_picture_cnn.py
案例:使用卷積神經(jīng)網(wǎng)絡(luò)深度學(xué)習(xí)模型定位拜登的臉
https://github.com/ageitgey/face_recognition/blob/master/examples/find_faces_in_picture_cnn.py
案例:使用卷積神經(jīng)網(wǎng)絡(luò)深度學(xué)習(xí)模型批量識別圖片中的人臉
https://github.com/ageitgey/face_recognition/blob/master/examples/find_faces_in_batches.py
案例:把來自網(wǎng)絡(luò)攝像頭視頻里的人臉高斯模糊(需要安裝OpenCV)
https://github.com/ageitgey/face_recognition/blob/master/examples/blur_faces_on_webcam.py
人臉關(guān)鍵點識別
案例:提取奧巴馬和拜登的面部關(guān)鍵點
https://github.com/ageitgey/face_recognition/blob/master/examples/find_facial_features_in_picture.py
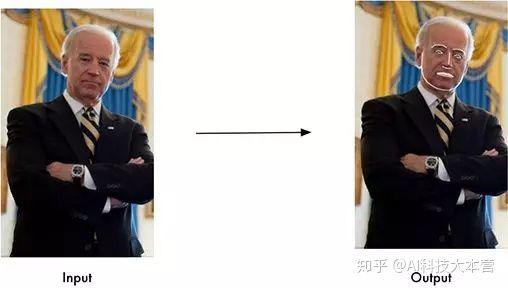
案例:給美國副總統(tǒng)拜登涂美妝
https://github.com/ageitgey/face_recognition/blob/master/examples/digital_makeup.py
人臉識別
案例:是奧巴馬還是拜登?
https://github.com/ageitgey/face_recognition/blob/master/examples/recognize_faces_in_pictures.py
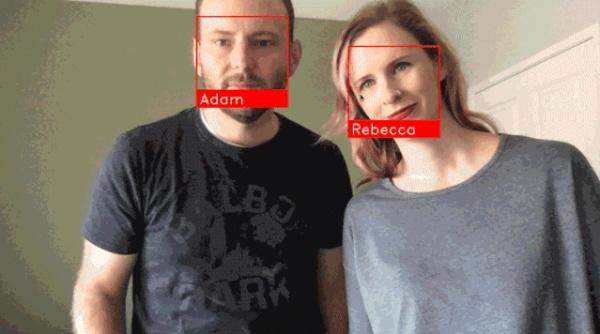
案例:人臉識別之后在原圖上畫框框并標(biāo)注姓名
https://github.com/ageitgey/face_recognition/blob/master/examples/identify_and_draw_boxes_on_faces.py
案例:在不同精度上比較兩個人臉是否屬于一個人
https://github.com/ageitgey/face_recognition/blob/master/examples/face_distance.py
案例:從攝像頭獲取視頻進行人臉識別-較慢版(需要安裝OpenCV)
https://github.com/ageitgey/face_recognition/blob/master/examples/facerec_from_webcam.py
- 案例:從攝像頭獲取視頻進行人臉識別-較快版(需要安裝OpenCV)
https://github.com/ageitgey/face_recognition/blob/master/examples/facerec_from_webcam_faster.py
- 案例:從視頻文件中識別人臉并把識別結(jié)果輸出為新的視頻文件(需要安裝OpenCV)
https://github.com/ageitgey/face_recognition/blob/master/examples/facerec_from_video_file.py
- 案例:通過樹莓派攝像頭進行人臉個數(shù)統(tǒng)計及人臉身份識別
https://github.com/ageitgey/face_recognition/blob/master/examples/facerec_on_raspberry_pi.py
- 案例:通過瀏覽器HTTP訪問網(wǎng)絡(luò)服務(wù)器進行人臉識別(需要安裝Flask后端開發(fā)框架)
https://github.com/ageitgey/face_recognition/blob/master/examples/web_service_example.py
- 案例:基于K最近鄰KNN分類算法進行人臉識別
https://github.com/ageitgey/face_recognition/blob/master/examples/face_recognition_knn.py
關(guān)于 face_recognition的文章和教程
- 本項目作者寫的一篇文章 Modern Face Recognition with Deep Learning:
https://medium.com/@ageitgey/machine-learning-is-fun-part-4-modern-face-recognition-with-deep-learning-c3cffc121d78
- 主要內(nèi)容:基本算法和原理
- Face recognition with OpenCV, Python, and deep learning by Adrian Rosebrock:
https://www.pyimagesearch.com/2018/06/18/face-recognition-with-opencv-python-and-deep-learning/
- 主要內(nèi)容:如何實際使用本項目
- Raspberry Pi Face Recognition by Adrian Rosebrock
https://www.pyimagesearch.com/2018/06/25/raspberry-pi-face-recognition/
- 主要內(nèi)容:如何在樹莓派上使用本項目
- Face clustering with Python by Adrian Rosebrock
https://www.pyimagesearch.com/2018/07/09/face-clustering-with-python/
- 主要內(nèi)容:使用非監(jiān)督學(xué)習(xí)算法實現(xiàn)把圖片中的人臉高斯模糊
人臉識別的原理
如果你想更深入了解人臉識別這個黑箱的原理請讀這篇文章:
https://medium.com/@ageitgey/machine-learning-is-fun-part-4-modern-face-recognition-with-deep-learning-c3cffc121d78
警告說明
本項目的人臉識別模型是基于成年人的,在孩子身上效果可能一般。如果圖片中有孩子的話,建議把臨界值設(shè)為0.6.不同人種的識別結(jié)果可能不同, 看wiki百科頁面查看更多細節(jié)。
把本項目部署在云服務(wù)器上 (Heroku, AWS等)
本項目是基于C++庫dlib的,所以把本項目部署在Heroku或者AWS的云端服務(wù)器上是很明智的。
為了簡化這個過程,有一個Dockerfile案例,教你怎么把face_recognition開發(fā)的app封裝成Docker 容器文件,你可以把它部署在所以支持Docker鏡像文件的云服務(wù)上。
出了幺蛾子?
如果出了問題,請在Github提交Issue之前查看 常見錯誤 。