了不起的tsconfig.json指南
在 TypeScript 開發中,tsconfig.json 是個不可或缺的配置文件,它是我們在 TS 項目中最常見的配置文件,那么你真的了解這個文件嗎?它里面都有哪些優秀配置?如何配置一個合理的 tsconfig.json 文件?本文將全面帶大家一起詳細了解 tsconfig.json 的各項配置。
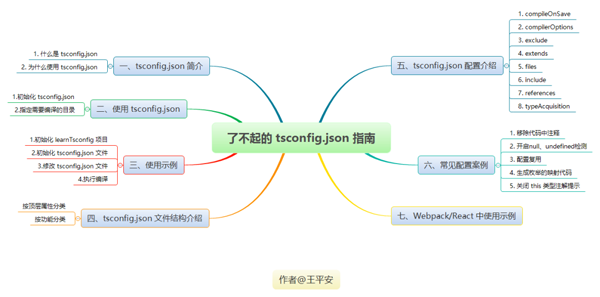
本文將從以下幾個方面全面介紹 tsconfig.json 文件:
水平有限,歡迎各位大佬指點~~
一、tsconfig.json 簡介
1. 什么是 tsconfig.json
TypeScript 使用 tsconfig.json 文件作為其配置文件,當一個目錄中存在 tsconfig.json 文件,則認為該目錄為 TypeScript 項目的根目錄。
通常 tsconfig.json 文件主要包含兩部分內容:指定待編譯文件和定義編譯選項。
從《TypeScript編譯器的配置文件的JSON模式》可知,目前 tsconfig.json 文件有以下幾個頂層屬性:
- compileOnSave
- compilerOptions
- exclude
- extends
- files
- include
- references
- typeAcquisition
文章后面會詳細介紹一些常用屬性配置。
2. 為什么使用 tsconfig.json
通常我們可以使用 tsc 命令來編譯少量 TypeScript 文件:
- /*
- 參數介紹:
- --outFile // 編譯后生成的文件名稱
- --target // 指定ECMAScript目標版本
- --module // 指定生成哪個模塊系統代碼
- index.ts // 源文件
- */
- $ tsc --outFile leo.js --target es3 --module amd index.ts
但如果實際開發的項目,很少是只有單個文件,當我們需要編譯整個項目時,就可以使用 tsconfig.json 文件,將需要使用到的配置都寫進 tsconfig.json 文件,這樣就不用每次編譯都手動輸入配置,另外也方便團隊協作開發。
二、使用 tsconfig.json
目前使用 tsconfig.json 有2種操作:
1. 初始化 tsconfig.json
在初始化操作,也有 2 種方式:
- 手動在項目根目錄(或其他)創建 tsconfig.json 文件并填寫配置;
- 通過 tsc --init 初始化 tsconfig.json 文件。
2. 指定需要編譯的目錄
在不指定輸入文件的情況下執行 tsc 命令,默認從當前目錄開始編譯,編譯所有 .ts 文件,并且從當前目錄開始查找 tsconfig.json 文件,并逐級向上級目錄搜索。
- $ tsc
另外也可以為 tsc 命令指定參數 --project 或 -p 指定需要編譯的目錄,該目錄需要包含一個 tsconfig.json 文件,如:
- /*
- 文件目錄:
- ├─src/
- │ ├─index.ts
- │ └─tsconfig.json
- ├─package.json
- */
- $ tsc --project src
注意,tsc 的命令行選項具有優先級,會覆蓋 tsconfig.json 中的同名選項。
更多 tsc 編譯選項,可查看《編譯選項》章節。
三、使用示例
這個章節,我們將通過本地一個小項目 learnTsconfig 來學著實現一個簡單配置。
當前開發環境:windows / node 10.15.1 / TypeScript3.9
1. 初始化 learnTsconfig 項目
執行下面命令:
- $ mkdir learnTsconfig
- $ cd .\learnTsconfig\
- $ mkdir src
- $ new-item index.ts
并且我們為 index.ts 文件寫一些簡單代碼:
- // 返回當前版本號
- function getVersion(version:string = "1.0.0"): string{
- return version;
- }
- console.log(getVersion("1.0.1"))
我們將獲得這么一個目錄結構:
- └─src/
- └─index.ts
2. 初始化 tsconfig.json 文件
在 learnTsconfig 根目錄執行:
- $ tsc --init
3. 修改 tsconfig.json 文件
我們設置幾個常見配置項:
- {
- "compilerOptions": {
- "target": "ES5", // 目標語言的版本
- "module": "commonjs", // 指定生成代碼的模板標準
- "noImplicitAny": true, // 不允許隱式的 any 類型
- "removeComments": true, // 刪除注釋
- "preserveConstEnums": true, // 保留 const 和 enum 聲明
- "sourceMap": true // 生成目標文件的sourceMap文件
- },
- "files": [ // 指定待編譯文件
- "./src/index.ts"
- ]
- }
其中需要注意一點:
files 配置項值是一個數組,用來指定了待編譯文件,即入口文件。
當入口文件依賴其他文件時,不需要將被依賴文件也指定到 files 中,因為編譯器會自動將所有的依賴文件歸納為編譯對象,即 index.ts 依賴 user.ts 時,不需要在 files 中指定 user.ts , user.ts 會自動納入待編譯文件。
4. 執行編譯
配置完成后,我們可以在命令行執行 tsc 命令,執行編譯完成后,我們可以得到一個 index.js 文件和一個 index.js.map 文件,證明我們編譯成功,其中 index.js 文件內容如下:
- function getVersion(version) {
- if (version === void 0) { version = "1.0.0"; }
- return version;
- }
- console.log(getVersion("1.0.1"));
- //# sourceMappingURL=index.js.map
可以看出,tsconfig.json 中的 removeComments 配置生效了,將我們添加的注釋代碼移除了。
到這一步,就完成了這個簡單的示例,接下來會基于這個示例代碼,講解《七、常見配置示例》。
四、tsconfig.json 文件結構介紹
1. 按頂層屬性分類
在 tsconfig.json 文件中按照頂層屬性,分為以下幾類:
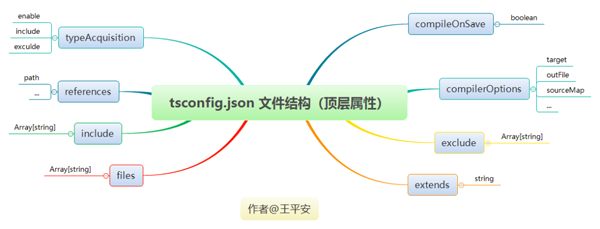
2. 按功能分類
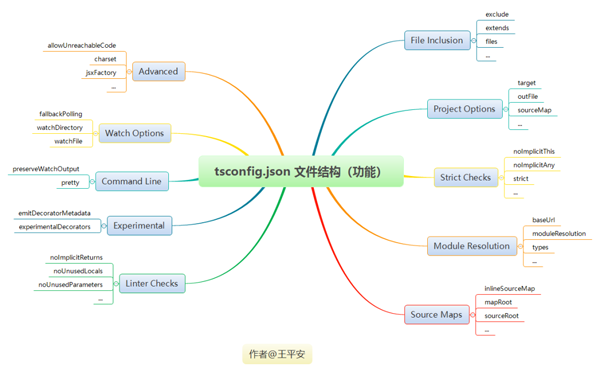
五、tsconfig.json 配置介紹
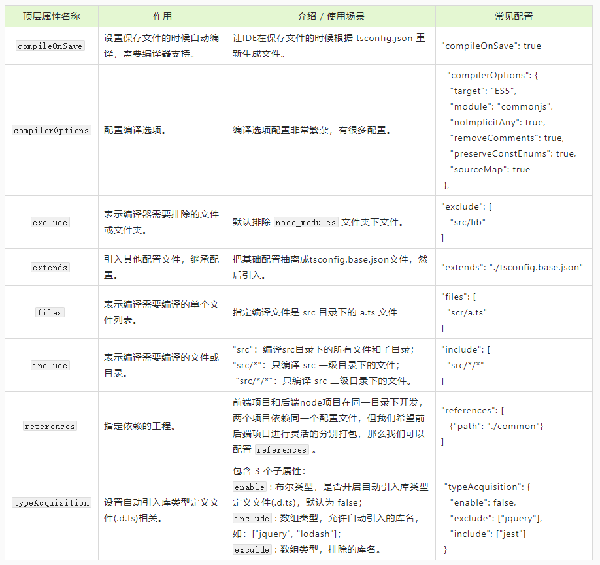
1. compileOnSave
compileOnSave 屬性作用是設置保存文件的時候自動編譯,但需要編譯器支持。
- {
- // ...
- "compileOnSave": false,
- }
2. compilerOptions
compilerOptions 屬性作用是配置編譯選項。
若 compilerOptions 屬性被忽略,則編譯器會使用默認值,可以查看《官方完整的編譯選項列表》。
編譯選項配置非常繁雜,有很多配置,這里只列出常用的配置。
- {
- // ...
- "compilerOptions": {
- "incremental": true, // TS編譯器在第一次編譯之后會生成一個存儲編譯信息的文件,第二次編譯會在第一次的基礎上進行增量編譯,可以提高編譯的速度
- "tsBuildInfoFile": "./buildFile", // 增量編譯文件的存儲位置
- "diagnostics": true, // 打印診斷信息
- "target": "ES5", // 目標語言的版本
- "module": "CommonJS", // 生成代碼的模板標準
- "outFile": "./app.js", // 將多個相互依賴的文件生成一個文件,可以用在AMD模塊中,即開啟時應設置"module": "AMD",
- "lib": ["DOM", "ES2015", "ScriptHost", "ES2019.Array"], // TS需要引用的庫,即聲明文件,es5 默認引用dom、es5、scripthost,如需要使用es的高級版本特性,通常都需要配置,如es8的數組新特性需要引入"ES2019.Array",
- "allowJS": true, // 允許編譯器編譯JS,JSX文件
- "checkJs": true, // 允許在JS文件中報錯,通常與allowJS一起使用
- "outDir": "./dist", // 指定輸出目錄
- "rootDir": "./", // 指定輸出文件目錄(用于輸出),用于控制輸出目錄結構
- "declaration": true, // 生成聲明文件,開啟后會自動生成聲明文件
- "declarationDir": "./file", // 指定生成聲明文件存放目錄
- "emitDeclarationOnly": true, // 只生成聲明文件,而不會生成js文件
- "sourceMap": true, // 生成目標文件的sourceMap文件
- "inlineSourceMap": true, // 生成目標文件的inline SourceMap,inline SourceMap會包含在生成的js文件中
- "declarationMap": true, // 為聲明文件生成sourceMap
- "typeRoots": [], // 聲明文件目錄,默認時node_modules/@types
- "types": [], // 加載的聲明文件包
- "removeComments":true, // 刪除注釋
- "noEmit": true, // 不輸出文件,即編譯后不會生成任何js文件
- "noEmitOnError": true, // 發送錯誤時不輸出任何文件
- "noEmitHelpers": true, // 不生成helper函數,減小體積,需要額外安裝,常配合importHelpers一起使用
- "importHelpers": true, // 通過tslib引入helper函數,文件必須是模塊
- "downlevelIteration": true, // 降級遍歷器實現,如果目標源是es3/5,那么遍歷器會有降級的實現
- "strict": true, // 開啟所有嚴格的類型檢查
- "alwaysStrict": true, // 在代碼中注入'use strict'
- "noImplicitAny": true, // 不允許隱式的any類型
- "strictNullChecks": true, // 不允許把null、undefined賦值給其他類型的變量
- "strictFunctionTypes": true, // 不允許函數參數雙向協變
- "strictPropertyInitialization": true, // 類的實例屬性必須初始化
- "strictBindCallApply": true, // 嚴格的bind/call/apply檢查
- "noImplicitThis": true, // 不允許this有隱式的any類型
- "noUnusedLocals": true, // 檢查只聲明、未使用的局部變量(只提示不報錯)
- "noUnusedParameters": true, // 檢查未使用的函數參數(只提示不報錯)
- "noFallthroughCasesInSwitch": true, // 防止switch語句貫穿(即如果沒有break語句后面不會執行)
- "noImplicitReturns": true, //每個分支都會有返回值
- "esModuleInterop": true, // 允許export=導出,由import from 導入
- "allowUmdGlobalAccess": true, // 允許在模塊中全局變量的方式訪問umd模塊
- "moduleResolution": "node", // 模塊解析策略,ts默認用node的解析策略,即相對的方式導入
- "baseUrl": "./", // 解析非相對模塊的基地址,默認是當前目錄
- "paths": { // 路徑映射,相對于baseUrl
- // 如使用jq時不想使用默認版本,而需要手動指定版本,可進行如下配置
- "jquery": ["node_modules/jquery/dist/jquery.min.js"]
- },
- "rootDirs": ["src","out"], // 將多個目錄放在一個虛擬目錄下,用于運行時,即編譯后引入文件的位置可能發生變化,這也設置可以虛擬src和out在同一個目錄下,不用再去改變路徑也不會報錯
- "listEmittedFiles": true, // 打印輸出文件
- "listFiles": true// 打印編譯的文件(包括引用的聲明文件)
- }
- }
3. exclude
exclude 屬性作用是指定編譯器需要排除的文件或文件夾。
默認排除 node_modules 文件夾下文件。
- {
- // ...
- "exclude": [
- "src/lib" // 排除src目錄下的lib文件夾下的文件不會編譯
- ]
- }
和 include 屬性一樣,支持 glob 通配符:
- * 匹配0或多個字符(不包括目錄分隔符)
- ? 匹配一個任意字符(不包括目錄分隔符)
- **/ 遞歸匹配任意子目錄
4. extends
extends 屬性作用是引入其他配置文件,繼承配置。
默認包含當前目錄和子目錄下所有 TypeScript 文件。
- {
- // ...
- // 把基礎配置抽離成tsconfig.base.json文件,然后引入
- "extends": "./tsconfig.base.json"
- }
5. files
files 屬性作用是指定需要編譯的單個文件列表。
默認包含當前目錄和子目錄下所有 TypeScript 文件。
- {
- // ...
- "files": [
- // 指定編譯文件是src目錄下的leo.ts文件
- "scr/leo.ts"
- ]
- }
6. include
include 屬性作用是指定編譯需要編譯的文件或目錄。
- {
- // ...
- "include": [
- // "scr" // 會編譯src目錄下的所有文件,包括子目錄
- // "scr/*" // 只會編譯scr一級目錄下的文件
- "scr/*/*" // 只會編譯scr二級目錄下的文件
- ]
- }
7. references
references 屬性作用是指定工程引用依賴。
在項目開發中,有時候我們為了方便將前端項目和后端node項目放在同一個目錄下開發,兩個項目依賴同一個配置文件和通用文件,但我們希望前后端項目進行靈活的分別打包,那么我們可以進行如下配置:
- {
- // ...
- "references": [ // 指定依賴的工程
- {"path": "./common"}
- ]
- }
8. typeAcquisition
typeAcquisition 屬性作用是設置自動引入庫類型定義文件(.d.ts)相關。
包含 3 個子屬性:
- enable : 布爾類型,是否開啟自動引入庫類型定義文件(.d.ts),默認為 false;
- include : 數組類型,允許自動引入的庫名,如:["jquery", "lodash"];
- exculde : 數組類型,排除的庫名。
- {
- // ...
- "typeAcquisition": {
- "enable": false,
- "exclude": ["jquery"],
- "include": ["jest"]
- }
- }
六、常見配置示例
本部分內容中,我們找了幾個實際開發中比較常見的配置,當然,還有很多配置需要自己摸索喲~~
1. 移除代碼中注釋
tsconfig.json:
- {
- "compilerOptions": {
- "removeComments": true,
- }
- }
編譯前:
- // 返回當前版本號
- function getVersion(version:string = "1.0.0"): string{
- return version;
- }
- console.log(getVersion("1.0.1"))
編譯結果:
- function getVersion(version) {
- if (version === void 0) { version = "1.0.0"; }
- return version;
- }
- console.log(getVersion("1.0.1"));
2. 開啟null、undefined檢測
tsconfig.json:
- {
- "compilerOptions": {
- "strictNullChecks": true
- },
- }
修改 index.ts 文件內容:
- const leo;
- leo = new Pingan('leo','hello');
這時候編輯器也會提示錯誤信息,執行 tsc 后,控制臺報錯:
- src/index.ts:9:11 - error TS2304: Cannot find name 'Pingan'.
- 9 leo = new Pingan('leo','hello');
- Found 1 error.
3. 配置復用
通過 extends 屬性實現配置復用,即一個配置文件可以繼承另一個文件的配置屬性。
比如,建立一個基礎的配置文件 configs/base.json :
- {
- "compilerOptions": {
- "noImplicitAny": true,
- "strictNullChecks": true
- }
- }
在tsconfig.json 就可以引用這個文件的配置了:
- {
- "extends": "./configs/base",
- "files": [
- "main.ts",
- "supplemental.ts"
- ]
- }
4. 生成枚舉的映射代碼
在默認情況下,使用 const 修飾符后,枚舉不會生成映射代碼。
如下,我們可以看出:使用 const 修飾符后,編譯器不會生成任何 RequestMethod 枚舉的任何映射代碼,在其他地方使用時,內聯每個成員的值,節省很大開銷。
- const enum RequestMethod {
- Get,
- Post,
- Put,
- Delete
- }
- let methods = [
- RequestMethod.Get,
- RequestMethod.Post
- ]
編譯結果:
- "use strict";
- let methods = [
- 0 /* Get */,
- 1 /* Post */
- ];
當然,我們希望生成映射代碼時,也可以設置 tsconfig.json 中的配置,設置 preserveConstEnums 編譯器選項為 true :
- {
- "compilerOptions": {
- "target": "es5",
- "preserveConstEnums": true
- }
- }
最后編譯結果變成:
- "use strict";
- var RequestMethod;
- (function (RequestMethod) {
- RequestMethod[RequestMethod["Get"] = 0] = "Get";
- RequestMethod[RequestMethod["Post"] = 1] = "Post";
- RequestMethod[RequestMethod["Put"] = 2] = "Put";
- RequestMethod[RequestMethod["Delete"] = 3] = "Delete";
- })(RequestMethod || (RequestMethod = {}));
- let methods = [
- 0 /* Get */,
- 1 /* Post */
- ];
5. 關閉 this 類型注解提示
通過下面代碼編譯后會報錯:
- const button = document.querySelector("button");
- button?.addEventListener("click", handleClick);
- function handleClick(this) {
- console.log("Clicked!");
- this.removeEventListener("click", handleClick);
- }
報錯內容:
- src/index.ts:10:22 - error TS7006: Parameter 'this' implicitly has an 'any' type.
- 10 function handleClick(this) {
- Found 1 error.
這是因為 this 隱式具有 any 類型,如果沒有指定類型注解,編譯器會提示“"this" 隱式具有類型 "any",因為它沒有類型注釋。”。
解決方法有2種:
- 指定 this 類型,如本代碼中為 HTMLElement 類型:
HTMLElement 接口表示所有的 HTML 元素。一些HTML元素直接實現了 HTMLElement 接口,其它的間接實現HTMLElement接口。
關于 HTMLElement 可查看詳細。
2. 使用 --noImplicitThis 配置項:
在 TS2.0 還增加一個新的編譯選項: --noImplicitThis,表示當 this 表達式值為 any 類型時生成一個錯誤信息。我們設置為 true 后就能正常編譯。
- {
- "compilerOptions": {
- "noImplicitThis": true
- }
- }
七、Webpack/React 中使用示例
1. 配置編譯 ES6 代碼,JSX 文件
創建測試項目 webpack-demo,結構如下:
- webpack-demo/
- |- package.json
- |- tsconfig.json
- |- webpack.config.js
- |- /dist
- |- bundle.js
- |- index.html
- |- /src
- |- index.js
- |- index.ts
- |- /node_modules
安裝 TypeScript 和 ts-loader:
- $ npm install --save-dev typescript ts-loader
配置 tsconfig.json,支持 JSX,并將 TypeScript 編譯為 ES5:
- {
- "compilerOptions": {
- "outDir": "./dist/",
- "noImplicitAny": true,
- + "module": "es6",
- + "target": "es5",
- + "jsx": "react",
- "allowJs": true
- }
- }
還需要配置 webpack.config.js,使其能夠處理 TypeScript 代碼,這里主要在 rules 中添加 ts-loader :
- const path = require('path');
- module.exports = {
- entry: './src/index.ts',
- module: {
- rules: [
- {
- test: /\.tsx?$/,
- use: 'ts-loader',
- exclude: /node_modules/
- }
- ]
- },
- resolve: {
- extensions: [ '.tsx', '.ts', '.js' ]
- },
- output: {
- filename: 'bundle.js',
- path: path.resolve(__dirname, 'dist')
- }
- };
2. 配置 source map
想要啟用 source map,我們必須配置 TypeScript,以將內聯的 source map 輸出到編譯后的 JavaScript 文件中。
只需要在 tsconfig.json 中配置 sourceMap 屬性:
- {
- "compilerOptions": {
- "outDir": "./dist/",
- "sourceMap": true,
- "noImplicitAny": true,
- "module": "commonjs",
- "target": "es5",
- "jsx": "react",
- "allowJs": true
- }
- }
然后配置 webpack.config.js 文件,讓 webpack 提取 source map,并內聯到最終的 bundle 中:
- const path = require('path');
- module.exports = {
- entry: './src/index.ts',
- devtool: 'inline-source-map',
- module: {
- rules: [
- {
- test: /\.tsx?$/,
- use: 'ts-loader',
- exclude: /node_modules/
- }
- ]
- },
- resolve: {
- extensions: [ '.tsx', '.ts', '.js' ]
- },
- output: {
- filename: 'bundle.js',
- path: path.resolve(__dirname, 'dist')
- }
- };
八、總結
本文較全面介紹了 tsconfig.json 文件的知識,從“什么是 tsconfig.js 文件”開始,一步步帶領大家全面認識 tsconfig.json 文件。
文中通過一個簡單 learnTsconfig 項目,讓大家知道項目中如何使用 tsconfig.json 文件。在后續文章中,我們將這么多的配置項進行分類學習。最后通過幾個常見配置示例,解決我們開發中遇到的幾個常見問題。
當然,本文篇幅有限,無法針對每個屬性進行深入介紹,這就需要大家在實際開發中,多去嘗試和使用啦~