圖解 Vue 異步更新原理
本文轉載自微信公眾號「 前端日志」,作者 前端日志。轉載本文請聯系 前端日志公眾號。
本文主要分析 Vue 從 Data 更新,到通知 Watcher 異步更新視圖的流程,也就是下圖中的橙色部分。
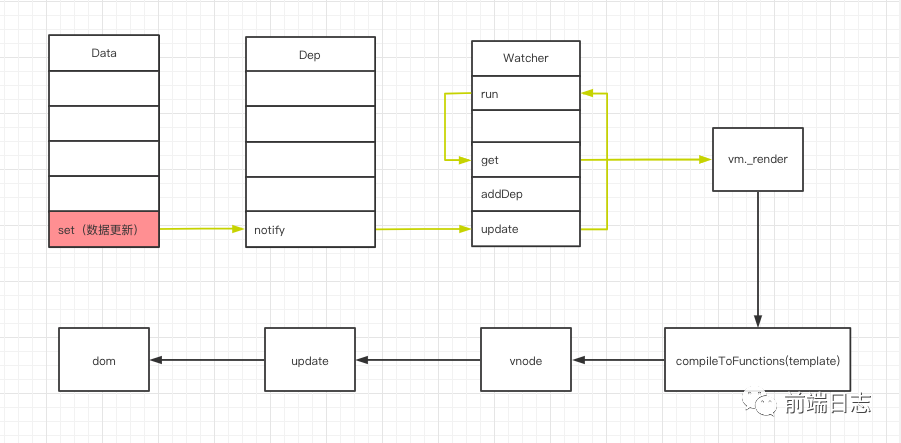
我們先來回顧一下圖中的幾個對象:
- Data 對象:Vue 中的 data 方法中返回的對象。
- Dep 對象:每一個 Data 屬性都會創建一個 Dep,用來搜集所有使用到這個 Data 的 Watcher 對象。
- Watcher 對象:主要用于渲染 DOM。
接下來,我們就開始分析這個流程。
Vue 異步更新 DOM 原理
很多同學都知道,Vue 中的數據更新是異步的,意味著我們在修改完 Data 之后,并不能立刻獲取修改后的 DOM 元素。
例如:
- <template>
- <div>
- <span id="text">{{ message }}</span>
- <button @click="changeData">
- changeData
- </button>
- </div>
- </template>
- <script>
- export default {
- data() {
- return {
- message: "hello",
- };
- },
- methods: {
- changeData() {
- this.message = "hello world";
- const textContent = document.getElementById("text").textContent;
- // 直接獲取,不是最新的
- console.log(textContent === "hello world"); // false
- // $nextTick 回調中,是最新的
- this.$nextTick(() => {
- const textContent = document.getElementById("text").textContent;
- console.warn(textContent === "hello world"); // true
- });
- },
- },
- };
- </script>
什么時候我們才能獲取到真正的 DOM 元素?
答:在 Vue 的 nextTick 回調中。
這一點在 Vue 官網有詳細的介紹,但你是否有想過,為什么 Vue 需要通過 nextTick 方法才能獲取最新的 DOM?
帶著這個疑問,我們直接看一下源碼。
- // 當一個 Data 更新時,會依次執行以下代碼
- // 1. 觸發 Data.set
- // 2. 調用 dep.notify
- // 3. Dep 會遍歷所有相關的 Watcher 執行 update 方法
- class Watcher {
- // 4. 執行更新操作
- update() {
- queueWatcher(this);
- }
- }
- const queue = [];
- function queueWatcher(watcher: Watcher) {
- // 5. 將當前 Watcher 添加到異步隊列
- queue.push(watcher);
- // 6. 執行異步隊列,并傳入回調
- nextTick(flushSchedulerQueue);
- }
- // 更新視圖的具體方法
- function flushSchedulerQueue() {
- let watcher, id;
- // 排序,先渲染父節點,再渲染子節點
- // 這樣可以避免不必要的子節點渲染,如:父節點中 v-if 為 false 的子節點,就不用渲染了
- queue.sort((a, b) => a.id - b.id);
- // 遍歷所有 Watcher 進行批量更新。
- for (index = 0; index < queue.length; index++) {
- watcher = queue[index];
- // 更新 DOM
- watcher.run();
- }
- }
根據上面的代碼,我們可以得出這樣一個流程圖:
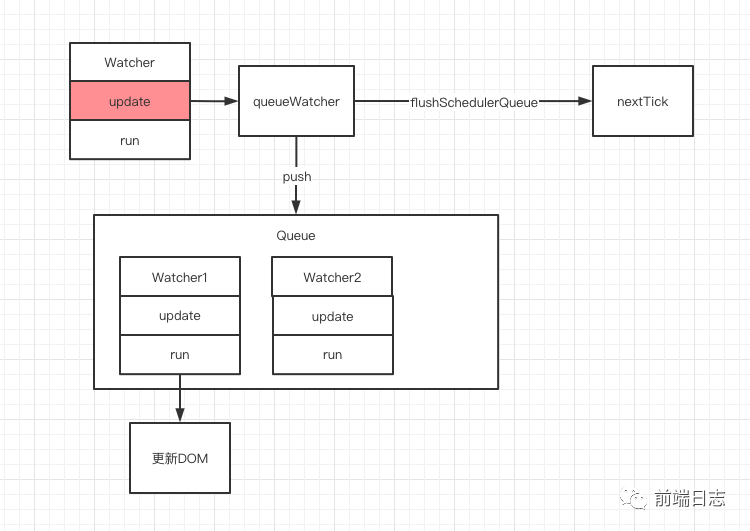
圖中可以看到,Vue 在調用 Watcher 更新視圖時,并不會直接進行更新,而是把需要更新的 Watcher 加入到 Queue 隊列里,然后把具體的更新方法 flushSchedulerQueue 傳給 nextTick 進行調用。
接下來,我們分析一下 nextTick。
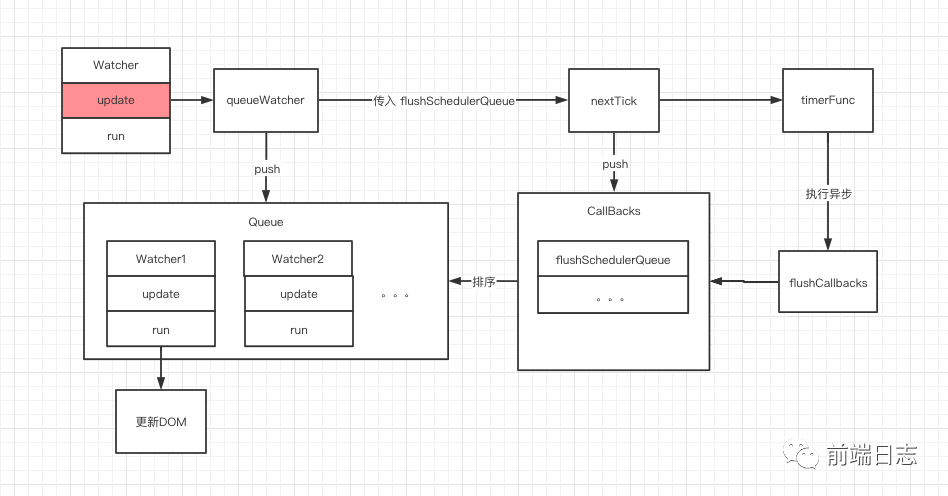
- const callbacks = [];
- let timerFunc;
- function nextTick(cb?: Function, ctx?: Object) {
- let _resolve;
- // 1.將傳入的 flushSchedulerQueue 方法添加到回調數組
- callbacks.push(() => {
- cb.call(ctx);
- });
- // 2.執行異步任務
- // 此方法會根據瀏覽器兼容性,選用不同的異步策略
- timerFunc();
- }
可以看到,nextTick 函數非常簡單,它只是將傳入的 flushSchedulerQueue 添加到 callbacks 數組中,然后執行了 timerFunc 方法。
接下來,我們分析一下 timerFunc 方法。
- let timerFunc;
- // 判斷是否兼容 Promise
- if (typeof Promise !== "undefined") {
- timerFunc = () => {
- Promise.resolve().then(flushCallbacks);
- };
- // 判斷是否兼容 MutationObserver
- // https://developer.mozilla.org/zh-CN/docs/Web/API/MutationObserver
- } else if (typeof MutationObserver !== "undefined") {
- let counter = 1;
- const observer = new MutationObserver(flushCallbacks);
- const textNode = document.createTextNode(String(counter));
- observer.observe(textNode, {
- characterData: true,
- });
- timerFunc = () => {
- counter = (counter + 1) % 2;
- textNode.data = String(counter);
- };
- // 判斷是否兼容 setImmediate
- // 該方法存在一些 IE 瀏覽器中
- } else if (typeof setImmediate !== "undefined") {
- // 這是一個宏任務,但相比 setTimeout 要更好
- timerFunc = () => {
- setImmediate(flushCallbacks);
- };
- } else {
- // 如果以上方法都不知道,使用 setTimeout 0
- timerFunc = () => {
- setTimeout(flushCallbacks, 0);
- };
- }
- // 異步執行完后,執行所有的回調方法,也就是執行 flushSchedulerQueue
- function flushCallbacks() {
- for (let i = 0; i < copies.length; i++) {
- callbacks[i]();
- }
- }
可以看到,timerFunc 是根據瀏覽器兼容性創建的一個異步方法,它執行完成之后,會調用 flushSchedulerQueue 方法進行具體的 DOM 更新。
分析到這里,我們就可以得到一張整體的流程圖了。
接下來,我們來完善一些判斷邏輯。
- 判斷 has 標識,避免在一個 Queue 中添加相同的 Watcher。
- 判斷 waiting 標識,讓所有的 Watcher 都在一個 tick 內進行更新。
- 判斷 flushing 標識,處理 Watcher 渲染時,可能產生的新 Watcher。
如:觸發了 v-if 的條件,新增的 Watcher 渲染。
結合以上判斷,最終的流程圖如下:
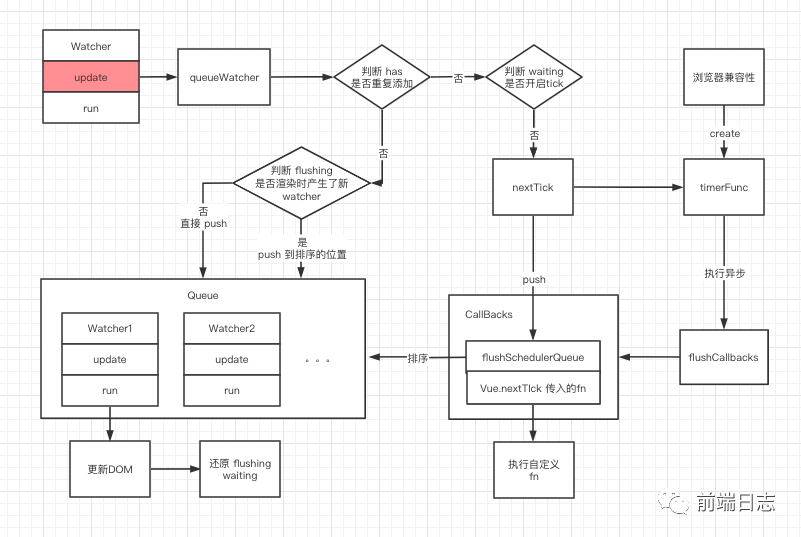
最后,我們分析一下,為什么 this.$nextTick 能夠獲取更新后的 DOM?
- // 我們使用 this.$nextTick 其實就是調用 nextTick 方法
- Vue.prototype.$nextTick = function (fn: Function) {
- return nextTick(fn, this);
- };
可以看到,調用 this.$nextTick 其實就是調用了圖中的 nextTick 方法,在異步隊列中執行回調函數。根據先來后到原則,修改 Data 觸發的更新異步隊列會先得到執行,執行完成后就生成了新的 DOM ,接下來執行 this.$nextTick 的回調函數時,能獲取到更新后的 DOM 元素了。
由于 nextTick 只是單純通過 Promise 、SetTimeout 等方法模擬的異步任務,所以也可以手動執行一個異步任務,來實現和 this.$nextTick 相同的效果。
- this.message = "hello world";
- // 手動執行一個異步任務,也能獲取最新的 DOM
- Promise.resolve().then(() => {
- const textContent = document.getElementById("text").textContent;
- console.log(textContent === "hello world"); // true
- });
- setTimeout(() => {
- const textContent = document.getElementById("text").textContent;
- console.log(textContent === "hello world"); // true
- });
思考與總結
本文從源碼的角度,介紹了 Vue 異步更新的原理,來簡單回顧一下吧。
修改 Vue 中的 Data 時,就會觸發所有和這個 Data 相關的 Watcher 進行更新。
首先,會將所有的 Watcher 加入隊列 Queue。
然后,調用 nextTick 方法,執行異步任務。
在異步任務的回調中,對 Queue 中的 Watcher 進行排序,然后執行對應的 DOM 更新。