使用vue3.0,不需要build也可以
關于 Vue 2版本的原始文章可以在 https://letsdebug.it/post/minimalistic-Vue 網站上找到。下面我們將描述如何使用 Vue 3實現類似的設置
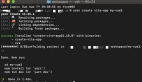
這篇文章的源代碼可以在 https://bitbucket.org/letsdebugit/minimalistic-vue-3中找到,你可以在這里運行這個示例應用程序
應用程序設計
與 Vue 2的例子類似,我們將創建一個帶有頁眉、內容區域和頁腳的單頁面 web 應用程序。在內容區域有一條消息和一個按鈕。當用戶單擊按鈕時,消息將發生變化。UI 由定制 HTML 標記表示的 Vue 組件構成。
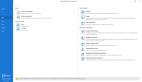
工程項目結構
該項目的結構與 Vue 2版本完全相同:
- index.html
- index.js
- index.css
- header/
- header.js
- header.css
- content/
- content.js
- content.css
- footer/
- footer.js
- footer.css
我們的邏輯 UI 組件清楚地反映在項目的目錄結構中。在組件的代碼中有一些變化,如下所述。
自力更生
當瀏覽器加載 index. html 時,會發生以下情況:
vue3.0庫是從 CDN 倉庫獲取的https://unpkg.com/vue@3.0.0-rc.8
獲取組件樣式
應用程序模塊從index.js開始然后被執行
請注意,在編寫 Vue 3的時候,Vue 3還沒有正式發布。因此,我們在這里使用最新的可用版本3.0.0-rc. 8。當官方發布時,你將不得不相應地改變 URL。
當執行 index.js 時,它導入并注冊包含我們的組件的后續模塊:
- Content from 內容來自/content/content.js
- Header from 標題來自/header/header.js
- Footer from 的頁腳/footer/footer.js
最后,它創建應用程序實例,并將其掛載到index.html內的<main>標記中。
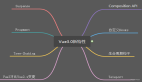
組件
有了這個框架的新版本,我們可以利用新的函數式編程模型,也就是復合 API。我們將使用 setup()函數來代替數據、計算和方法部分,它將連接所有組件的內部。為了確保數據傳播到 UI 并對更改做出反應,我們將使用 composition api 提供的reactive 和 computed。
組件代碼的結構如下:
- const template = `
- <div>
- ...
- </div>
- `
- export default {
- template,
- setup () {
- }
- }
作為一個例子,我們提供了 footer 組件,它在左邊顯示一些文本,在右邊顯示一個滴答作響的時鐘:
- const { reactive, computed } = Vue
- const template = `
- <footer>
- <div class="left">
- <slot></slot>
- </div>
- <div class="middle">
- </div>
- <div class="right">
- Current time: <b>{{ state.nowString }}</b>
- </div>
- </footer>
- `
- export default {
- template,
- setup () {
- const state = reactive({
- now: new Date(),
- nowString: computed(() => state.now.toTimeString().substr(0, 8))
- })
- window.setInterval(() => {
- state.now = new Date()
- }, 1000)
- return { state }
- }
- }
主要的應用程序組件在 index.js 文件中。它的任務是為所有組件分配定制的 HTML 標記,比如 < app-header > 或 < app-footer > 。
- import Header from './header/header.js'
- import Content from './content/content.js'
- import Footer from './footer/footer.js'
- const { createApp } = Vue
- const App = createApp({
- components: {
- 'app-header': Header,
- 'app-content': Content,
- 'app-footer': Footer
- }
- }
- window.addEventListener('load', () => {
- App.mount('main')
- })
然后使用這些自定義標記在 index. html 文件中構建應用程序 UI。我們最終得到了一個簡單易懂的用戶界面:
- <!doctype html>
- <html>
- <head>
- <meta charset="utf-8">
- <title>Minimalistic Vue 3</title>
- <link rel="stylesheet" href="index.css">
- <link rel="stylesheet" href="header/header.css">
- <link rel="stylesheet" href="content/content.css">
- <link rel="stylesheet" href="footer/footer.css">
- <script src="https://unpkg.com/vue@3.0.0-rc.8"></script>
- <script src="index.js" type="module"></script>
- </head>
- <body>
- <main>
- <app-header bg-color="#c5cae2">
- </app-header>
- <app-content>
- </app-content>
- <app-footer>
- (c) Tomasz Waraksa, Dublin, Ireland
- </app-footer>
- </main>
- </body>
- </html>
最后,我們幾乎擁有了 Vue 3的全部功能,包括了不起的 Composition API,而且沒有任何構建過程的復雜性。要部署這個應用程序,我們只需將文件復制到一個 web 服務器。