如何讓你的 Express 飛起來
接下來本文的重心將圍繞 裝飾器 的應用展開,不過在分析裝飾器在 OvernightJS 的應用之前,阿寶哥先來簡單介紹一下 OvernightJS。
一、OvernightJS 簡介
- TypeScript decorators for the ExpressJS Server.
OvernightJS 是一個簡單的庫,用于為要調用 Express 路由的方法添加 TypeScript 裝飾器。此外,該項目還包含了用于管理 json-web-token 和打印日志的包。
1.1 OvernightJS 特性
OvernightJS 并不是為了替代 Express,如果你之前已經掌握了 Express,那你就可以快速地學會它。OvernightJS 為開發者提供了以下特性:
- 使用 @Controller 裝飾器定義基礎路由;
- 提供了把類方法轉化為 Express 路由的裝飾器(比如 @Get,@Put,@Post,@Delete);
- 提供了用于處理中間件的 @Middleware 和 @ClassMiddleware 裝飾器;
- 提供了用于處理異常的 @ErrorMiddleware 裝飾器;
- 提供了 @Wrapper 和 @ClassWrapper 裝飾器用于包裝函數;
- 通過 @ChildControllers 裝飾器支持子控制器。
出于篇幅考慮,阿寶哥只介紹了 OvernightJS 與裝飾器相關的部分特性。了解完這些特性,我們來快速體驗一下 OvernightJS。
1.2 OvernightJS 入門
1.2.1 初始化項目
首先新建一個 overnight-quickstart 項目,然后使用 npm init -y 命令初始化項目,然后在命令行中輸入以下命令來安裝項目依賴包:
- $ npm i @overnightjs/core express -S
在 Express 項目中要集成 TypeScript 很簡單,只需安裝 typescript 這個包就可以了。但為了在開發階段能夠在命令行直接運行使用 TypeScript 開發的服務器,我們還需要安裝 ts-node 這個包。要安裝這兩個包,我們只需在命令行中輸入以下命令:
- $ npm i typescript ts-node -D
1.2.2 為 Node.js 和 Express 安裝聲明文件
聲明文件是預定義的模塊,用于告訴 TypeScript 編譯器的 JavaScript 值的形狀。類型聲明通常包含在擴展名為 .d.ts 的文件中。這些聲明文件可用于所有最初用 JavaScript 而非 TypeScript 編寫的庫。
幸運的是,我們不需要重頭開始為 Node.js 和 Express 定義聲明文件,因為在 Github 上有一個名為 DefinitelyTyped 項目已經為我們提供了現成的聲明文件。
要安裝 Node.js 和 Express 對應的聲明文件,我們只需要在命令行執行以下命令就可以了:
- $ npm i @types/node @types/express -D
該命令成功執行之后,package.json 中的 devDependencies 屬性就會新增 Node.js 和 Express 對應的依賴包版本信息:
- {
- "devDependencies": {
- "@types/express": "^4.17.8",
- "@types/node": "^14.11.2",
- "ts-node": "^9.0.0",
- "typescript": "^4.0.3"
- }
- }
1.2.3 初始化 TypeScript 配置文件
為了能夠靈活地配置 TypeScript 項目,我們還需要為本項目生成 TypeScript 配置文件,在命令行輸入 tsc --init 之后,項目中就會自動創建一個 tsconfig.json 的文件。對于本項目來說,我們將使用以下配置項:
- {
- "compilerOptions": {
- "target": "es6",
- "module": "commonjs",
- "rootDir": "./src",
- "outDir": "./build",
- "esModuleInterop": true,
- "experimentalDecorators": true,
- "strict": true
- }
- }
1.2.4 創建簡單的 Web 服務器
在創建簡單的 Web 服務器之前,我們先來初始化項目的目錄結構。首先在項目的根目錄下創建一個 src 目錄及 controllers 子目錄:
- ├── src
- │ ├── controllers
- │ │ └── UserController.ts
- │ └── index.ts
接著新建 UserController.ts 和 index.ts 這兩個文件并分別輸入以下內容:
UserController.ts
- import { Controller, Get } from "@overnightjs/core";
- import { Request, Response } from "express";
- @Controller("api/users")
- export class UserController {
- @Get("")
- private getAll(req: Request, res: Response) {
- return res.status(200).json({
- message: "成功獲取所有用戶",
- });
- }
- }
index.ts
- import { Server } from "@overnightjs/core";
- import { UserController } from "./controllers/UserController";
- const PORT = 3000;
- export class SampleServer extends Server {
- constructor() {
- super(process.env.NODE_ENV === "development");
- this.setupControllers();
- }
- private setupControllers(): void {
- const userController = new UserController();
- super.addControllers([userController]);
- }
- public start(port: number): void {
- this.app.listen(port, () => {
- console.log(`⚡️[server]: Server is running at http://localhost:${PORT}`);
- });
- }
- }
- const sampleServer = new SampleServer();
- sampleServer.start(PORT);
完成上述步驟之后,我們在項目的 package.json 中添加一個 start 命令來啟動項目:
- {
- "scripts": {
- "start": "ts-node ./src/index.ts"
- },
- }
添加完 start 命令,我們就可以在命令行中通過 npm start 來啟動 Web 服務器了。當服務器成功啟動之后,命令行會輸出以下消息:
- > ts-node ./src/index.ts
- ⚡️[server]: Server is running at http://localhost:3000
接著我們打開瀏覽器訪問 http://localhost:3000/api/users 這個地址,你就會看到 {"message":"成功獲取所有用戶"} 這個信息。
1.2.5 安裝 nodemon
為了方便后續的開發,我們還需要安裝一個第三方包 nodemon。對于寫過 Node.js 應用的小伙伴來說,對 nodemon 這個包應該不會陌生。nodemon 這個包會自動檢測目錄中文件的更改,當發現文件異動時,會自動重啟 Node.js 應用程序。
同樣,我們在命令行執行以下命令來安裝它:
- $ npm i nodemon -D
安裝完成后,我們需要更新一下前面已經創建的 start 命令:
- {
- "scripts": {
- "start": "nodemon ./src/index.ts"
- }
- }
好的,現在我們已經知道如何使用 OvernightJS 來開發一個簡單的 Web 服務器。接下來,阿寶哥將帶大家一起來分析 OvernightJS 是如何使用 TypeScript 裝飾器實現上述的功能。
二、OvernightJS 原理分析
在分析前面示例中 @Controller 和 @Get 裝飾器原理前,我們先來看一下直接使用 Express 如何實現同樣的功能:
- import express, { Router, Request, Response } from "express";
- const app = express();
- const PORT = 3000;
- class UserController {
- public getAll(req: Request, res: Response) {
- return res.status(200).json({
- message: "成功獲取所有用戶",
- });
- }
- }
- const userRouter = Router();
- const userCtrl = new UserController();
- userRouter.get("/", userCtrl.getAll);
- app.use("/api/users", userRouter);
- app.listen(PORT, () => {
- console.log(`⚡️[server]: Server is running at http://localhost:${PORT}`);
- });
在以上代碼中,我們先通過調用 Router 方法創建了一個 userRouter 對象,然后進行相關路由的配置,接著使用 app.use 方法應用 userRouter 路由。下面我們用一張圖來直觀感受一下 OvernightJS 與 Express 在使用上的差異:

通過以上對比可知,利用 OvernightJS 提供的裝飾器,可以讓我們開發起來更加便捷。但大家要記住 OvernightJS 底層還是基于 Express,其內部最終還是通過 Express 提供的 API 來處理路由。
接下來為了能更好理解后續的內容,我們先來簡單回顧一下 TypeScript 裝飾器。
2.1 TypeScript 裝飾器簡介
裝飾器是一個表達式,該表達式執行后,會返回一個函數。在 TypeScript 中裝飾器可以分為以下 4 類:
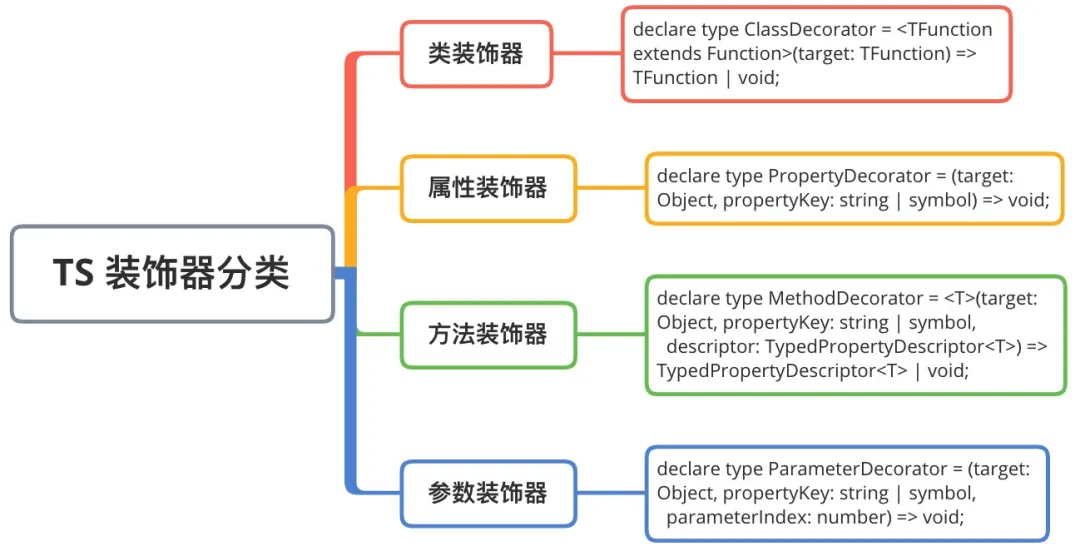
需要注意的是,若要啟用實驗性的裝飾器特性,你必須在命令行或 tsconfig.json 里啟用 experimentalDecorators 編譯器選項:
命令行:
- tsc --target ES5 --experimentalDecorators
tsconfig.json:
- {
- "compilerOptions": {
- "experimentalDecorators": true
- }
- }
了解完 TypeScript 裝飾器的分類,我們來開始分析 OvernightJS 框架中提供的裝飾器。
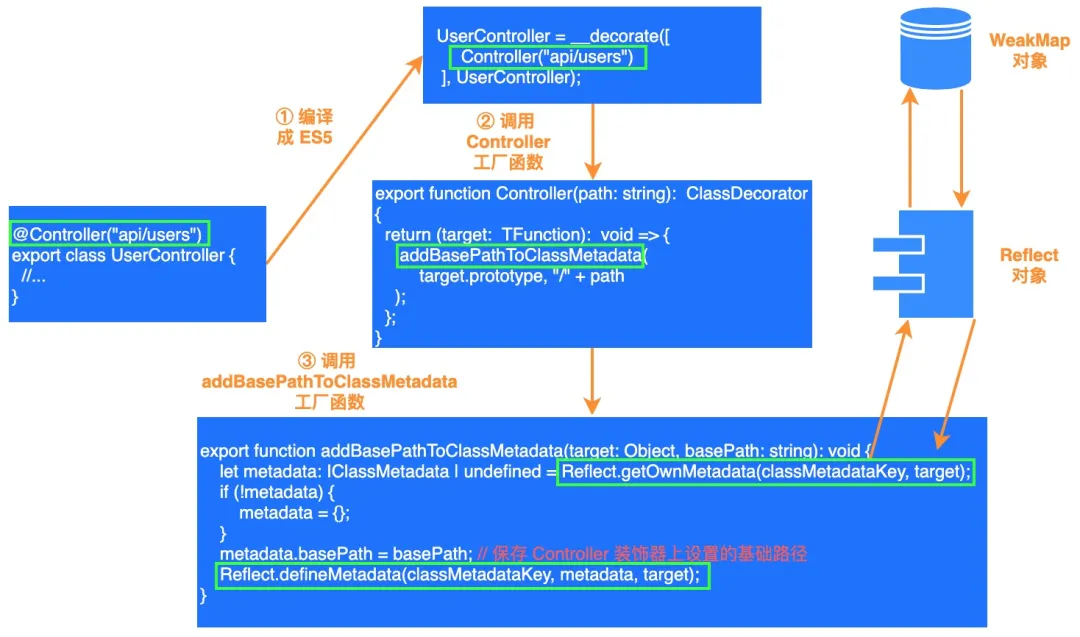
2.2 @Controller 裝飾器
在前面創建的簡單 Web 服務器中,我們通過以下方式來使用 @Controller 裝飾器:
- @Controller("api/users")
- export class UserController {}
很明顯該裝飾器應用在 UserController 類上,它屬于類裝飾器。OvernightJS 的項目結構很簡單,我們可以很容易找到 @Controller 裝飾器的定義:
- // src/core/lib/decorators/class.ts
- export function Controller(path: string): ClassDecorator {
- return <TFunction extends Function>(target: TFunction): void => {
- addBasePathToClassMetadata(target.prototype, "/" + path);
- };
- }
通過觀察以上代碼可知,Controller 函數是一個裝飾器工廠,即調用該工廠方法之后會返回一個 ClassDecorator 對象。在 ClassDecorator 內部,會繼續調用 addBasePathToClassMetadata 方法,把基礎路徑添加到類的元數據中:
- // src/core/lib/decorators/class.ts
- export function addBasePathToClassMetadata(target: Object, basePath: string): void {
- let metadata: IClassMetadata | undefined = Reflect.getOwnMetadata(classMetadataKey, target);
- if (!metadata) {
- metadata = {};
- }
- metadata.basePath = basePath;
- Reflect.defineMetadata(classMetadataKey, metadata, target);
- }
addBasePathToClassMetadata 函數的實現很簡單,主要是利用 Reflect API 實現元數據的存取操作。在以上代碼中,會先獲取 target 對象上已保存的 metadata 對象,如果不存在的話,會創建一個空的對象,然后把參數 basePath 的值添加該對象的 basePath 屬性中,元數據設置完成后,在通過 Reflect.defineMetadata 方法進行元數據的保存。
下面我們用一張圖來說明一下 @Controller 裝飾器的處理流程:
在 OvernightJS 項目中,所使用的 Reflect API 是來自 reflect-metadata 這個第三方庫。該庫提供了很多 API 用于操作元數據,這里我們只簡單介紹幾個常用的 API:
- // define metadata on an object or property
- Reflect.defineMetadata(metadataKey, metadataValue, target);
- Reflect.defineMetadata(metadataKey, metadataValue, target, propertyKey);
- // check for presence of a metadata key on the prototype chain of an object or property
- let result = Reflect.hasMetadata(metadataKey, target);
- let result = Reflect.hasMetadata(metadataKey, target, propertyKey);
- // get metadata value of an own metadata key of an object or property
- let result = Reflect.getOwnMetadata(metadataKey, target);
- let result = Reflect.getOwnMetadata(metadataKey, target, propertyKey);
- // get metadata value of a metadata key on the prototype chain of an object or property
- let result = Reflect.getMetadata(metadataKey, target);
- let result = Reflect.getMetadata(metadataKey, target, propertyKey);
- // delete metadata from an object or property
- let result = Reflect.deleteMetadata(metadataKey, target);
- let result = Reflect.deleteMetadata(metadataKey, target, propertyKey);
相信看到這里,可能有一些小伙伴會有疑問,通過 Reflect API 保存的元數據什么時候使用呢?這里我們先記住這個問題,后面我們再來分析它,接下來我們來開始分析 @Get 裝飾器。
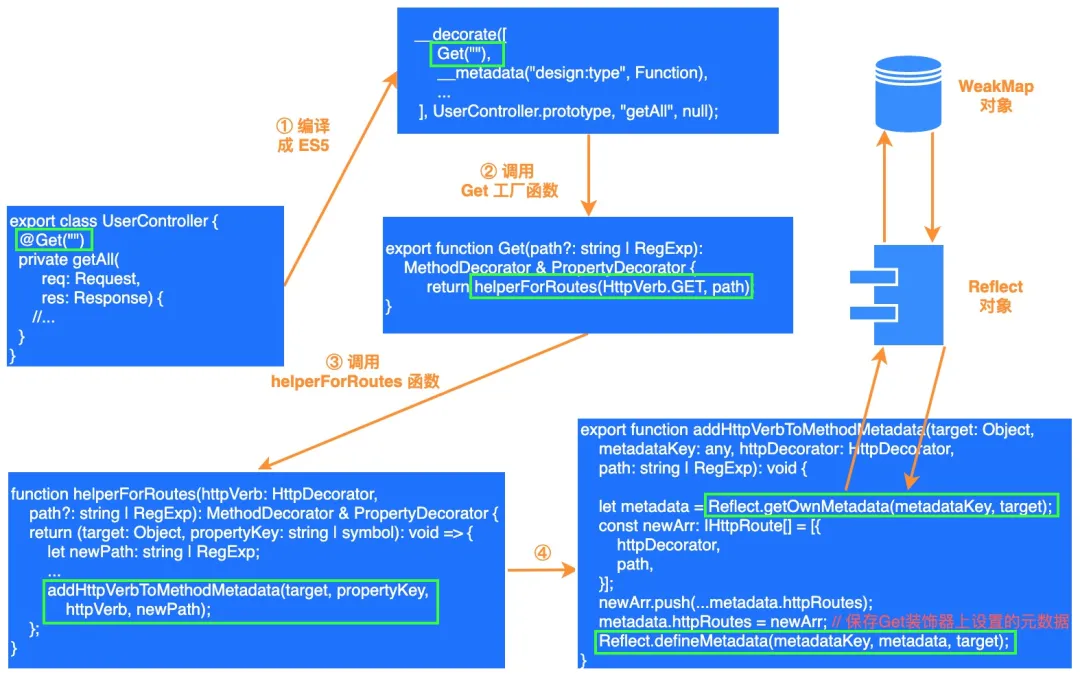
2.3 @Get 裝飾器
在前面創建的簡單 Web 服務器中,我們通過以下方式來使用 @Get 裝飾器,該裝飾器用于配置 Get 請求:
- export class UserController {
- @Get("")
- private getAll(req: Request, res: Response) {
- return res.status(200).json({
- message: "成功獲取所有用戶",
- });
- }
- }
@Get 裝飾器應用在 UserController 類的 getAll 方法上,它屬于方法裝飾器。它的定義如下所示:
- // src/core/lib/decorators/method.ts
- export function Get(path?: string | RegExp): MethodDecorator & PropertyDecorator {
- return helperForRoutes(HttpVerb.GET, path);
- }
與 Controller 函數一樣,Get 函數也是一個裝飾器工廠,調用該函數之后會返回 MethodDecorator & PropertyDecorator 的交叉類型。除了 Get 請求方法之外,常見的 HTTP 請求方法還有 Post、Delete、Put、Patch 和 Head 等。為了統一處理這些請求方法,OvernightJS 內部封裝了一個 helperForRoutes 函數,該函數的具體實現如下:
- // src/core/lib/decorators/method.ts
- function helperForRoutes(httpVerb: HttpDecorator, path?: string | RegExp): MethodDecorator & PropertyDecorator {
- return (target: Object, propertyKey: string | symbol): void => {
- let newPath: string | RegExp;
- if (path === undefined) {
- newPath = '';
- } else if (path instanceof RegExp) {
- newPath = addForwardSlashToFrontOfRegex(path);
- } else { // assert (path instanceof string)
- newPath = '/' + path;
- }
- addHttpVerbToMethodMetadata(target, propertyKey, httpVerb, newPath);
- };
- }
觀察以上代碼可知,在 helperForRoutes 方法內部,會繼續調用 addHttpVerbToMethodMetadata 方法把請求方法和請求路徑這些元數據保存起來。
- // src/core/lib/decorators/method.ts
- export function addHttpVerbToMethodMetadata(target: Object, metadataKey: any,
- httpDecorator: HttpDecorator, path: string | RegExp): void {
- let metadata: IMethodMetadata | undefined = Reflect.getOwnMetadata(metadataKey, target);
- if (!metadata) {
- metadata = {};
- }
- if (!metadata.httpRoutes) {
- metadata.httpRoutes = [];
- }
- const newArr: IHttpRoute[] = [{
- httpDecorator,
- path,
- }];
- newArr.push(...metadata.httpRoutes);
- metadata.httpRoutes = newArr;
- Reflect.defineMetadata(metadataKey, metadata, target);
在 addHttpVerbToMethodMetadata 方法中,會先獲取已保存的元數據,如果 metadata 對象不存在則會創建一個空的對象。然后會繼續判斷該對象上是否含有 httpRoutes 屬性,沒有的話會使用 [] 對象來作為該屬性的屬性值。而請求方法和請求路徑這些元數據會以對象的形式保存到數組中,最終在通過 Reflect.defineMetadata 方法進行元數據的保存。
同樣,我們用一張圖來說明一下 @Get 裝飾器的處理流程:
分析完 @Controller 和 @Get 裝飾器,我們已經知道元數據是如何進行保存的。下面我們來回答 “通過 Reflect API 保存的元數據什么時候使用呢?” 這個問題。
2.4 元數據的使用
要搞清楚通過 Reflect API 保存的元數據什么時候使用,我們就需要來回顧一下前面開發的 SampleServer 服務器:
- export class SampleServer extends Server {
- constructor() {
- super(process.env.NODE_ENV === "development");
- this.setupControllers();
- }
- private setupControllers(): void {
- const userController = new UserController();
- super.addControllers([userController]);
- }
- public start(port: number): void {
- this.app.listen(port, () => {
- console.log(`⚡️[server]: Server is running at http://localhost:${PORT}`);
- });
- }
- }
- const sampleServer = new SampleServer();
- sampleServer.start(PORT);
在以上代碼中 SampleServer 類繼承于 OvernightJS 內置的 Server 類,對應的 UML 類圖如下所示:

此外,在 SampleServer 類中我們定義了 setupControllers 和 start 方法,分別用于初始化控制器和啟動服務器。我們在自定義的控制器上使用了 @Controller 和 @Get 裝飾器,因此接下來我們的重點就是分析 setupControllers 方法。該方法的內部實現很簡單,就是手動創建控制器實例,然后調用父類的 addControllers 方法。
下面我們來分析 addControllers 方法,該方法位于 src/core/lib/Server.ts 文件中,具體實現如下:
- // src/core/lib/Server.ts
- export class Server {
- public addControllers(
- controllers: Controller | Controller[],
- routerLib?: RouterLib,
- globalMiddleware?: RequestHandler,
- ): void {
- controllers = (controllers instanceof Array) ? controllers : [controllers];
- // ① 支持動態設置路由庫
- const routerLibrary: RouterLib = routerLib || Router;
- controllers.forEach((controller: Controller) => {
- if (controller) {
- // ② 為每個控制器創建對應的路由對象
- const routerAndPath: IRouterAndPath | null = this.getRouter(routerLibrary, controller);
- // ③ 注冊路由
- if (routerAndPath) {
- if (globalMiddleware) {
- this.app.use(routerAndPath.basePath, globalMiddleware, routerAndPath.router);
- } else {
- this.app.use(routerAndPath.basePath, routerAndPath.router);
- }
- }
- }
- });
- }
- }
addControllers 方法的整個執行過程還是比較清晰,最核心的部分就是 getRouter 方法。在該方法內部就會處理通過裝飾器保存的元數據。其實 getRouter 方法內部還會處理其他裝飾器保存的元數據,簡單起見我們只考慮與 @Controller 和 @Get 裝飾器相關的處理邏輯。
- // src/core/lib/Server.ts
- export class Server {
- private getRouter(routerLibrary: RouterLib, controller: Controller): IRouterAndPath | null {
- const prototype: any = Object.getPrototypeOf(controller);
- const classMetadata: IClassMetadata | undefined = Reflect.getOwnMetadata(classMetadataKey, prototype);
- // 省略部分代碼
- const { basePath, options, ...}: IClassMetadata = classMetadata;
- // ① 基于配置項創建Router對象
- const router: IRouter = routerLibrary(options);
- // ② 為路由對象添加路徑和請求處理器
- let members: any = Object.getOwnPropertyNames(controller);
- members = members.concat(Object.getOwnPropertyNames(prototype));
- members.forEach((member: any) => {
- // ③ 獲取方法中保存的元數據
- const methodMetadata: IMethodMetadata | undefined = Reflect.getOwnMetadata(member, prototype);
- if (methodMetadata) {
- const { httpRoutes, ...}: IMethodMetadata = methodMetadata;
- let callBack: (...args: any[]) => any = (...args: any[]): any => {
- return controller[member](...args);
- };
- // 省略部分代碼
- if (httpRoutes) { // httpRoutes數組中包含了請求的方法和路徑
- // ④ 處理控制器類中通過@Get、@Post、@Put或@Delete裝飾器保存的元數據
- httpRoutes.forEach((route: IHttpRoute) => {
- const { httpDecorator, path }: IHttpRoute = route;
- // ⑤ 為router對象設置對應的路由信息
- if (middlewares) {
- router[httpDecorator](path, middlewares, callBack);
- } else {
- router[httpDecorator](path, callBack);
- }
- });
- }
- }
- });
- return { basePath, router, };
- }
- }
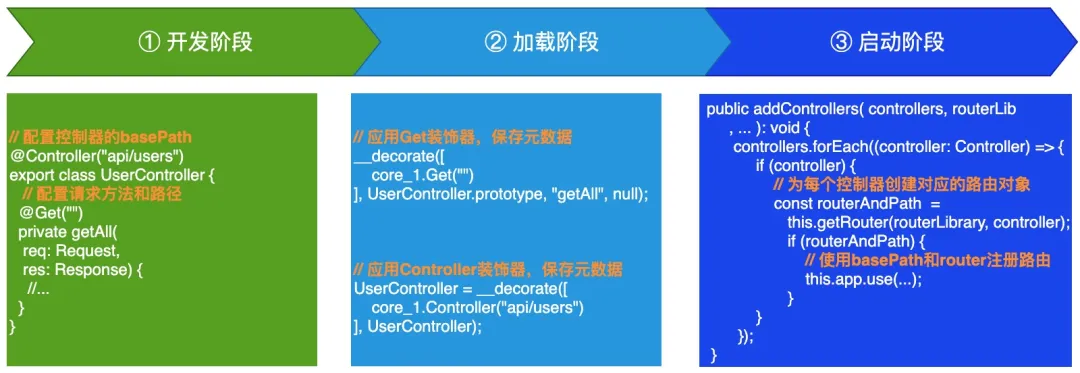
現在我們已經知道 OvernightJS 內部如何利用裝飾器來為控制器類配置路由信息,這里阿寶哥用一張圖來總結 OvernightJS 的工作流程:
在 OvernightJS 內部除了 @Controller、@Get、@Post、@Delete 等裝飾器之外,還提供了用于注冊中間件的 @Middleware 裝飾器及用于設置異常處理中間件的 @ErrorMiddleware 裝飾器。感興趣的小伙伴可以參考一下阿寶哥的學習思路,自行閱讀 OvernightJS 項目的源碼。
希望通過這篇文章,可以讓小伙伴們對裝飾器的應用場景有一些更深刻的理解。如果你還意猶未盡的話,可以閱讀阿寶哥之前寫的 了不起的 IoC 與 DI 這篇文章,該文章介紹了如何利用 TypeScript 裝飾器和 reflect-metadata 這個庫提供的 Reflect API 實現一個 IoC 容器。
三、參考資源
- Github - overnight
- expressjs.com