設計模式系列—橋接模式

本篇和大家一起來學習橋接模式相關內容。
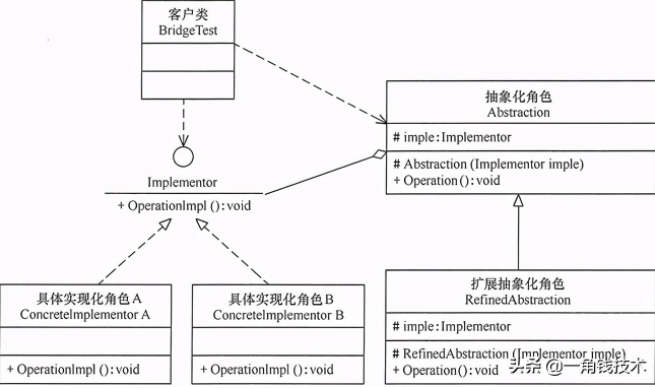
模式定義
將抽象與實現分離,使它們可以獨立變化。它是用組合關系代替繼承關系來實現,從而降低了抽象和實現這兩個可變維度的耦合度。
模式實現如下:
- package com.niuh.designpattern.bridge.v1;
- /**
- * 橋接模式
- */
- public class BridgePattern {
- public static void main(String[] args) {
- Implementor imple=new ConcreteImplementorA();
- Abstraction abs=new RefinedAbstraction(imple);
- abs.Operation();
- }
- }
- //實現化角色
- interface Implementor {
- void OperationImpl();
- }
- //具體實現化角色
- class ConcreteImplementorA implements Implementor {
- public void OperationImpl() {
- System.out.println("具體實現化(Concrete Implementor)角色被訪問");
- }
- }
- //抽象化角色
- abstract class Abstraction {
- protected Implementor imple;
- protected Abstraction(Implementor imple) {
- this.imple = imple;
- }
- public abstract void Operation();
- }
- //擴展抽象化角色
- class RefinedAbstraction extends Abstraction {
- protected RefinedAbstraction(Implementor imple) {
- super(imple);
- }
- public void Operation() {
- System.out.println("擴展抽象化(Refined Abstraction)角色被訪問");
- imple.OperationImpl();
- }
- }
輸出結果如下:
- 擴展抽象化(Refined Abstraction)角色被訪問
- 具體實現化(Concrete Implementor)角色被訪問
解決的問題
在有多種可能會變化的情況下,用繼承會造成類爆炸問題,擴展起來不靈活。
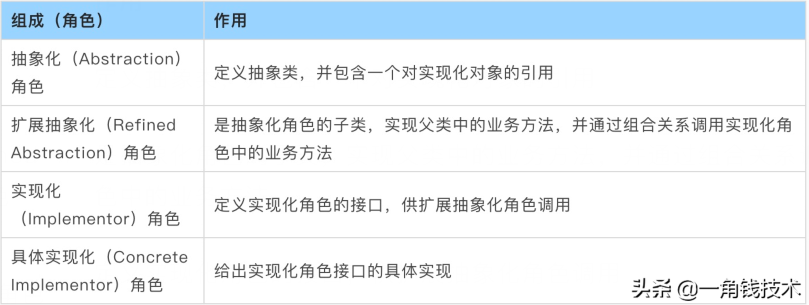
模式組成
可以將抽象化部分與實現化部分分開,取消二者的繼承關系,改用組合關系。
實例說明
實例概況
某公司開發了一個財務管理系統,其中有個報表生成器的工具模塊,客戶可以指定任意一種報表類型,如基本報表,往來報表,資金報表,資產報表等,并且可以指定不同 的報表樣式,如餅圖,柱狀圖等。系統設計人員針對這個報表生成器的結構設計了如下圖所示的類圖。
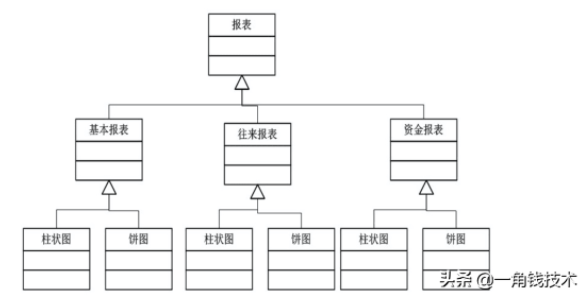
后來在客戶使用過程中,客戶又希望增加一個新的報表和新的線形圖,開發人員這個時候發現維護起來非常麻煩,設計人員經過仔細分析,發現存在嚴重的問題,因為新增加一個報表或者圖,需要增加很多子類。所以,系統分析師最終對這個模塊根據面向對象的設計原則對上面的方案進行了重構,重構后的圖如下所示。
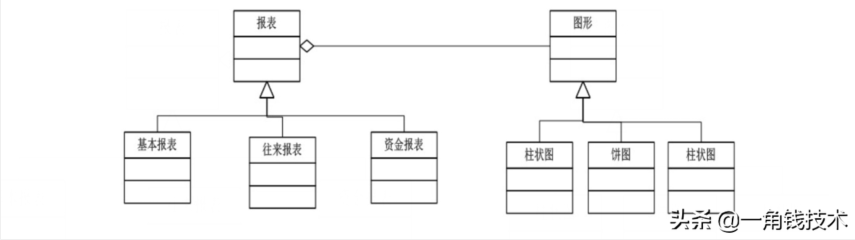
在本重構方案中,將報表和圖形設計成兩個繼承結構,兩者都可以獨立變化,編程的時候可以只針對抽象類編碼,而在運行的時候再將具體的圖形子類對象注入到具體的 報表類中。這樣的話,系統就具有良好的可擴展性和可維護性,并且滿足了面向對象設計原則的開閉原則。
使用步驟
步驟1:定義實現化角色,報表接口
- interface IReport {
- void operationImpl();
- }
步驟2:定義具體實現化角色(基本報表、往來報表、資金報表)
- class BasicReport implements IReport {
- @Override
- public void operationImpl() {
- System.out.println("基本報表被訪問.");
- }
- }
- class IntercourseReport implements IReport {
- @Override
- public void operationImpl() {
- System.out.println("往來報表被訪問.");
- }
- }
- class CapitalReport implements IReport {
- @Override
- public void operationImpl() {
- System.out.println("資金報表被訪問.");
- }
- }
步驟3:定義抽象化角色,圖形
- abstract class AbstractionGraph {
- protected IReport iReport;
- public AbstractionGraph(IReport iReport) {
- this.iReport = iReport;
- }
- abstract void operation();
- }
步驟4:定義擴展抽象化角色(柱狀圖、餅圖)
- class Barchart extends AbstractionGraph {
- public Barchart(IReport iReport) {
- super(iReport);
- }
- @Override
- void operation() {
- System.out.println("柱狀圖被訪問.");
- iReport.operationImpl();
- }
- }
- class Piechart extends AbstractionGraph {
- public Piechart(IReport iReport) {
- super(iReport);
- }
- @Override
- void operation() {
- System.out.println("餅圖被訪問.");
- iReport.operationImpl();
- }
- }
步驟5:測試
- public class BridgePattern {
- public static void main(String[] args) {
- //實現化和抽象化分離
- // 基本報表
- IReport basicReport = new BasicReport();
- // 往來報表
- IReport intercourseReport = new IntercourseReport();
- // 資金報表
- IReport capitalReport = new CapitalReport();
- // 基本報表使用柱狀圖
- AbstractionGraph barchart = new Barchart(basicReport);
- barchart.operation();
- // 基本報表使用餅圖
- AbstractionGraph piechart = new Piechart(basicReport);
- piechart.operation();
- }
- }
輸出結果
- 柱狀圖被訪問.
- 基本報表被訪問.
- 餅圖被訪問.
- 基本報表被訪問.
優點
橋接模式遵循了里氏替換原則和依賴倒置原則,最終實現了開閉原則,對修改關閉,對擴展開放。這里將橋接模式的優缺點總結如下。
橋接(Bridge)模式的優點:
- 抽象與實現分離,擴展能力強
- 符合開閉原則
- 符合合成復用原則
- 其實現細節對客戶透明
缺點
由于聚合關系建立在抽象層,要求開發者針對抽象化進行設計與編程,能正確地識別出系統中兩個獨立變化的維度,這增加了系統的理解與設計難度。
應用場景
當一個類內部具備兩種或多種變化維度時,使用橋接模式可以解耦這些變化的維度,使高層代碼架構穩定。
橋接模式通常適用于以下場景:
- 當一個類存在兩個獨立變化的維度,且這兩個維度都需要進行擴展時;
- 當一個系統不希望使用繼承或因為多層次繼承導致系統類的個數急劇增加時;
- 當一個系統需要在構件的抽象化角色和具體化角色之間增加更多的靈活性時。
橋接模式的一個常見使用場景就是替換繼承。我們知道,繼承擁有很多優點,比如,抽象、封裝、多態等,父類封裝共性,子類實現特性。繼承可以很好的實現代碼復用(封裝)的功能,但這也是繼承的一大缺點。
因為父類擁有的方法,子類也會繼承得到,無論子類需不需要,這說明繼承具備強侵入性(父類代碼侵入子類),同時會導致子類臃腫。因此,在設計模式中,有一個原則為優先使用組合/聚合,而不是繼承。
橋接模式模式的擴展
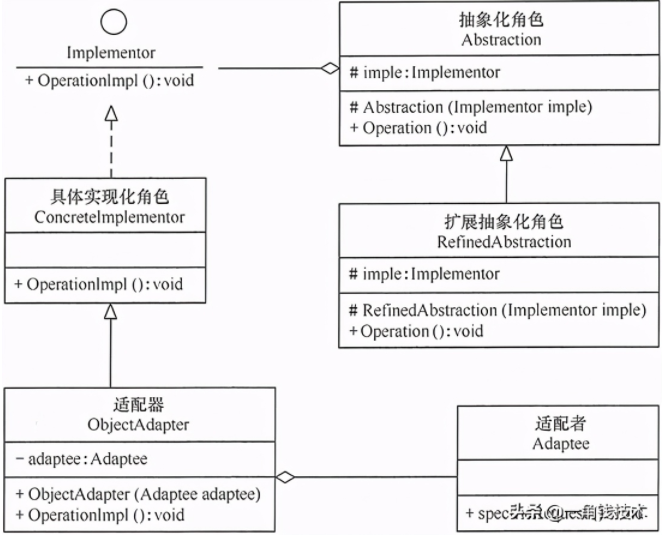
在軟件開發中,有時橋接(Bridge)模式可與適配器模式聯合使用。當橋接(Bridge)模式的實現化角色的接口與現有類的接口不一致時,可以在二者中間定義一個適配器將二者連接起來,其結構圖如下:
源碼中的應用
- JDBC驅動程序
- ......
DriverManager類
DriverManager作為一個抽象化角色,聚合了實現化角色Connection,只不過與標準的橋梁模式不一樣的是,DriverManager類下面沒有子類。
- // Worker method called by the public getConnection() methods.
- private static Connection getConnection(
- String url, java.util.Properties info, Class<?> caller) throws SQLException {
- /*
- * When callerCl is null, we should check the application's
- * (which is invoking this class indirectly)
- * classloader, so that the JDBC driver class outside rt.jar
- * can be loaded from here.
- */
- ClassLoader callerCL = caller != null ? caller.getClassLoader() : null;
- synchronized(DriverManager.class) {
- // synchronize loading of the correct classloader.
- if (callerCL == null) {
- callerCL = Thread.currentThread().getContextClassLoader();
- }
- }
- if(url == null) {
- throw new SQLException("The url cannot be null", "08001");
- }
- println("DriverManager.getConnection(\"" + url + "\")");
- // Walk through the loaded registeredDrivers attempting to make a connection.
- // Remember the first exception that gets raised so we can reraise it.
- SQLException reason = null;
- for(DriverInfo aDriver : registeredDrivers) {
- // If the caller does not have permission to load the driver then
- // skip it.
- if(isDriverAllowed(aDriver.driver, callerCL)) {
- try {
- println(" trying " + aDriver.driver.getClass().getName());
- Connection con = aDriver.driver.connect(url, info);
- if (con != null) {
- // Success!
- println("getConnection returning " + aDriver.driver.getClass().getName());
- return (con);
- }
- } catch (SQLException ex) {
- if (reason == null) {
- reason = ex;
- }
- }
- } else {
- println(" skipping: " + aDriver.getClass().getName());
- }
- }
- // if we got here nobody could connect.
- if (reason != null) {
- println("getConnection failed: " + reason);
- throw reason;
- }
- println("getConnection: no suitable driver found for "+ url);
- throw new SQLException("No suitable driver found for "+ url, "08001");
- }
PS:以上代碼提交在 Github :
https://github.com/Niuh-Study/niuh-designpatterns.git