如何扒開 SqlSession 的外衣
老規矩,先上案例代碼,我們按照這個案例一步一步的搞定Mybatis源碼。
- public class MybatisApplication {
- public static final String URL = "jdbc:mysql://localhost:3306/mblog";
- public static final String USER = "root";
- public static final String PASSWORD = "123456";
- public static void main(String[] args) {
- String resource = "mybatis-config.xml";
- InputStream inputStream = null;
- SqlSession sqlSession = null;
- try {
- inputStream = Resources.getResourceAsStream(resource);
- SqlSessionFactory sqlSessionFactory = new SqlSessionFactoryBuilder().build(inputStream);
- sqlSession = sqlSessionFactory.openSession();
- UserMapper userMapper = sqlSession.getMapper(UserMapper.class);
- System.out.println(userMapper.selectById(1));
- } catch (Exception e) {
- e.printStackTrace();
- } finally {
- try {
- inputStream.close();
- } catch (IOException e) {
- e.printStackTrace();
- }
- sqlSession.close();
- }
- }
由于很多小伙伴在催,說Mybatis源碼系列好像何時才有下文了,為此老田熬夜寫了這篇。
繼續開擼~~
- SqlSession sqlSession = sqlSessionFactory.openSession();
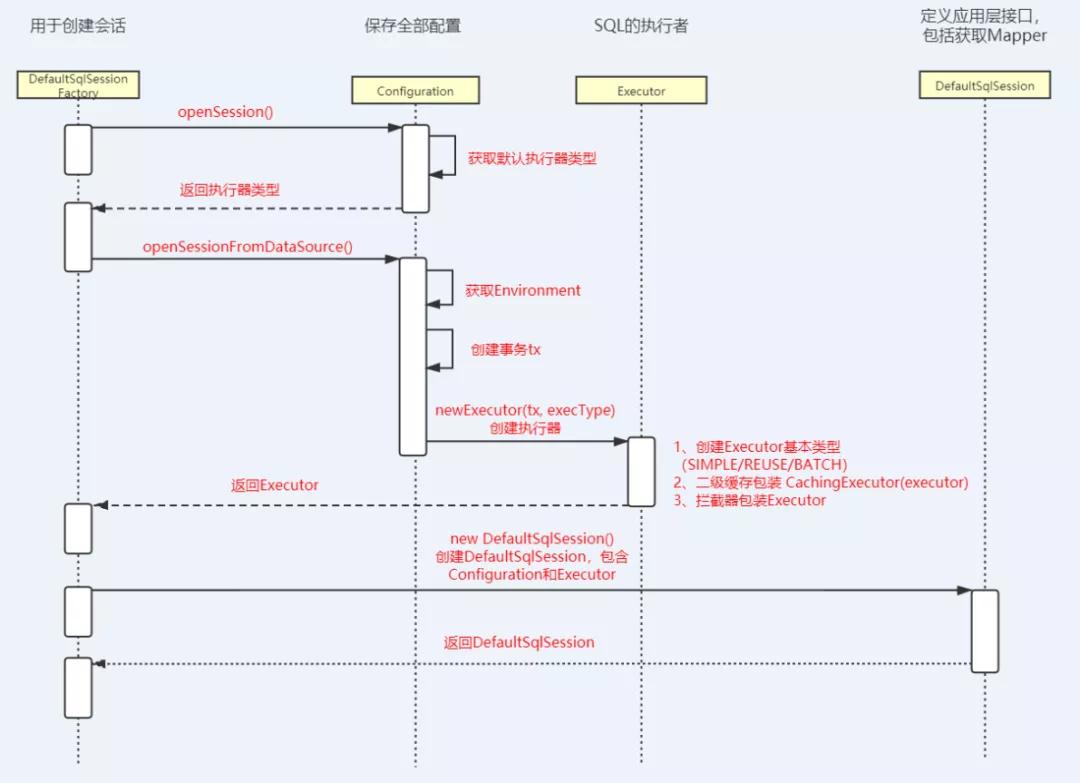
前面那篇文章已經分析了,這里的sqlSessionFactory其實就是DefaultSqlSessionFactory。
所以這里,我們就從DefaultSqlSessionFactory里的openSession方法開始。
- public class DefaultSqlSessionFactory implements SqlSessionFactory {
- private final Configuration configuration;
- public DefaultSqlSessionFactory(Configuration configuration) {
- this.configuration = configuration;
- }
- //創建session,這個方法直接調用本類中的另外一個方法
- @Override
- public SqlSession openSession() {
- return openSessionFromDataSource(configuration.getDefaultExecutorType(), null, false);
- }
- //其實是調用這個方法
- private SqlSession openSessionFromDataSource(ExecutorType execType, TransactionIsolationLevel level, boolean autoCommit) {
- Transaction tx = null;
- try {
- //對應xml標簽<environments> ,這個在配置文件解析的時候就已經存放到configuration中了。
- final Environment environment = configuration.getEnvironment();
- final TransactionFactory transactionFactory = getTransactionFactoryFromEnvironment(environment);
- tx = transactionFactory.newTransaction(environment.getDataSource(), level, autoCommit);
- //創建一個executor來執行SQL
- final Executor executor = configuration.newExecutor(tx, execType);
- //這里也說明了,為什么我們代碼里的SqlSession是DefaultSqlSession
- return new DefaultSqlSession(configuration, executor, autoCommit);
- } catch (Exception e) {
- closeTransaction(tx); // may have fetched a connection so lets call close()
- throw ExceptionFactory.wrapException("Error opening session. Cause: " + e, e);
- } finally {
- ErrorContext.instance().reset();
- }
- }
- private TransactionFactory getTransactionFactoryFromEnvironment(Environment environment) {
- if (environment == null || environment.getTransactionFactory() == null) {
- return new ManagedTransactionFactory();
- }
- return environment.getTransactionFactory();
- }
這個方法中的主要內容有:
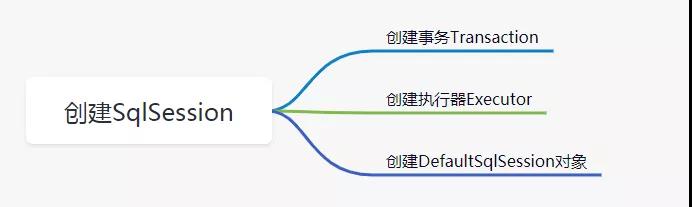
下面我們就來逐個攻破。
創建事務Transaction
事務工廠類型可以配置為JDBC類型或者MANAGED類型。

JdbcTransactionFactory生產JdbcTransaction。
ManagedTransactionFactory生產ManagedTransaction。
如果配置的JDBC,則會使用Connection對象的commit()、rollback()、close()方法來管理事務。
如果我們配置的是MANAGED,會把事務交給容器來管理,比如JBOSS,Weblogic。因為我們是本地跑的程序,如果配置成MANAGED就會不有任何事務。
但是,如果我們項目中是Spring集成Mybatis,則沒有必要配置事務,因為我們會直接在applicationContext.xml里配置數據源和事務管理器,從而覆蓋Mybatis的配置。
創建執行器Executor
調用configuration的newExecutor方法創建Executor。
- final Executor executor = configuration.newExecutor(tx, execType);
- //Configuration中
- public Executor newExecutor(Transaction transaction, ExecutorType executorType) {
- executorType = executorType == null ? defaultExecutorType : executorType;
- executorType = executorType == null ? ExecutorType.SIMPLE : executorType;
- Executor executor;
- //第一步
- if (ExecutorType.BATCH == executorType) {
- executor = new BatchExecutor(this, transaction);
- } else if (ExecutorType.REUSE == executorType) {
- executor = new ReuseExecutor(this, transaction);
- } else {
- executor = new SimpleExecutor(this, transaction);
- }
- //第二步
- if (cacheEnabled) {
- executor = new CachingExecutor(executor);
- }
- //第三步
- executor = (Executor) interceptorChain.pluginAll(executor);
- return executor;
- }
此方法分三個步驟。
第一步:創建執行器
Executor的基本類型有三種:
- public enum ExecutorType {
- SIMPLE, REUSE, BATCH
- }
SIMPLE為默認類型。
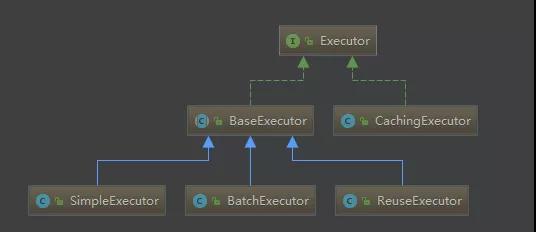
為什么要讓抽象類BaseExecutor實現Executor接口,然后讓具體實現類繼承抽象類呢?
這就是模板方法模式的實現。
模板方法模式就是定義一個算法骨架,并允許子類為一個或者多個步驟提供實現。模板方法是得子類可以再不改變算法結構的情況下,重新定義算法的某些步驟。
抽象方法是在子類匯總實現的,每種執行器自己實現自己的邏輯,BaseExecutor最終會調用到具體的子類中。
抽象方法
- protected abstract int doUpdate(MappedStatement ms, Object parameter) throws SQLException;
- protected abstract List<BatchResult> doFlushStatements(boolean isRollback) throws SQLException;
- protected abstract <E> List<E> doQuery(MappedStatement ms, Object parameter, RowBounds rowBounds, ResultHandler resultHandler, BoundSql boundSql) throws SQLException;
- protected abstract <E> Cursor<E> doQueryCursor(MappedStatement ms, Object parameter, RowBounds rowBounds, BoundSql boundSql) throws SQLException;
第二步:緩存裝飾
在上面代碼中的第二步
- if (cacheEnabled) {
- executor = new CachingExecutor(executor);
- }
如果cacheEnabled=true,會用裝飾器設計模式對Executor進行裝飾。
第三步:插件代理緩存裝飾完后,就會執行
- executor = (Executor) interceptorChain.pluginAll(executor);
這里會對Executor植入插件邏輯。
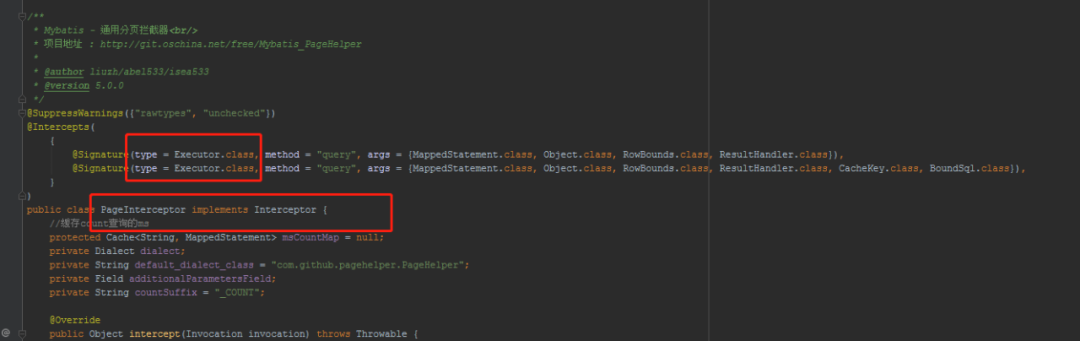
比如:分頁插件中就需要把插件植入的Executor
好了,到此,執行器創建的就搞定了。
創建DefaultSqlSession對象
把前面解析配置文件創建的Configuration對象和創建的執行器Executor賦給DefaultSqlSession中的屬性。
- public DefaultSqlSession(Configuration configuration, Executor executor, boolean autoCommit) {
- this.configuration = configuration;
- this.executor = executor;
- this.dirty = false;
- this.autoCommit = autoCommit;
- }
到這里,SqlSession(DefaultSqlSession)對象就創建完畢。
總結
本文我們講了如何創建SqlSession的幾個步驟,最后我們獲得一個DefaultSqlSession對象,里面包含了執行器Executor和配置對象Configuration。Executor是SQL的實際執行對象。Configuration里保存著配置文件內容。
本文源碼分析的整個流程如下圖:
本文轉載自微信公眾號「Java后端技術全棧」,可以通過以下二維碼關注。轉載本文請聯系Java后端技術全棧公眾號。