詳解Vue中的Computed和Watch
本文轉載自微信公眾號「不知名寶藏程序媛 」,作者小土豆 。轉載本文請聯系不知名寶藏程序媛 公眾號。
1. 前言
作為一名Vue開發者,雖然在項目中頻繁使用過computed和watch,但從來沒有系統的學習過,總覺著對這兩個知識點有些一知半解。
如果你也和我一樣,就一起來回顧和總結一下這兩個知識點吧。
本篇非源碼分析,只是從兩者各自的用法、特性等做一些梳理。
2. Vue中的computed
Vue中的computed又叫做計算屬性,Vue官網中給了下面這樣一個示例。
模板中有一個message數據需要展示:
- <template>
- <div id="app">
- {{message}}
- </div>
- </template>
- <script>
- export default {
- name: 'App',
- data() {
- return {
- message: 'Hello'
- }
- }
- }
- </script>
假如此時有一個需求:對message進行反轉并展示到模板中。
那最簡單的實現方式就是直接在模板中做這樣的轉化:
- <template>
- <div id="app">
- <p>{{message}}</p>
- <p>{{message.split('').reverse().join('')}}</p>
- </div>
- </template>
那這個時候,Vue官方告訴我們:過多的邏輯運算會讓模板變得重且難以維護,而且這種轉化無法復用,并指導我們使用計算屬性-computed來實現這個需求。
- export default {
- name: 'App',
- computed: {
- reverseMessage: function(){
- return this.message.split('').reverse().join('');
- }
- },
- data() {
- return {
- message: 'Hello'
- }
- }
- }
在以上代碼中我們定義了一個計算屬性:reverseMessage,其值為一個函數并返回我們需要的結果。
之后在模板中就可以像使用message一樣使用reverseMessage。
- <template>
- <div id="app">
- <p>{{message}}</p>
- <p>{{reverseMessage}}</p>
- </div>
- </template>
那么此時有人肯定要說了,我用methods也能實現呀。確實使用methods也能實現此種需求,但是在這種情況下我們的計算屬性相較于methods是有很大優勢的,這個優勢就是計算屬性存在緩存。
如果我們使用methods實現前面的需求,當message的反轉結果有多個地方在使用,對應的methods函數會被調用多次,函數內部的邏輯也需要執行多次;而計算屬性因為存在緩存,只要message數據未發生變化,則多次訪問計算屬性對應的函數只會執行一次。
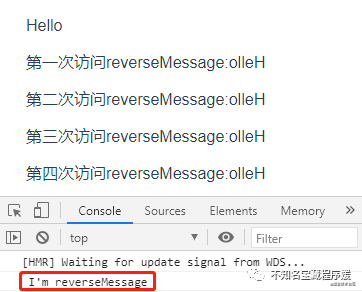
- <template>
- <div id="app">
- <p>{{message}}</p>
- <p>第一次訪問reverseMessage:{{reverseMessage}}</p>
- <p>第二次訪問reverseMessage:{{reverseMessage}}</p>
- <p>第三次訪問reverseMessage:{{reverseMessage}}</p>
- <p>第四次訪問reverseMessage:{{reverseMessage}}</p>
- </div>
- </template>
- <script>
- export default {
- name: 'App',
- computed: {
- reverseMessage: function(value){
- console.log(" I'm reverseMessage" )
- return this.message.split('').reverse().join('');
- }
- },
- data() {
- return {
- message: 'Hello'
- }
- }
- }
- </script>
運行項目,查看結果,會發現計算屬性reverseMessage對應的函數只執行了一次。
3. Vue中的watchVue
中的watch又名為偵聽屬性,它主要用于偵聽數據的變化,在數據發生變化的時候執行一些操作。
- <template>
- <div id="app">
- <p>計數器:{{counter}}</p>
- <el-button type="primary" @click="counter++">
- Click
- </el-button>
- </div>
- </template>
- <script>
- export default {
- name: 'App',
- data() {
- return {
- counter: 0
- }
- },
- watch: {
- /**
- * @name: counter
- * @description:
- * 監聽Vue data中的counter數據
- * 當counter發生變化時會執行對應的偵聽函數
- * @param {*} newValue counter的新值
- * @param {*} oldValue counter的舊值
- * @return {*} None
- */
- counter: function(newValue, oldValue){
- if(this.counter == 10){
- this.counter = 0;
- }
- }
- }
- }
- </script>
我們定義了一個偵聽屬性counter,該屬性偵聽的是Vue data中定義counter數據,整個的邏輯就是點擊按鈕counter加1,當counter等于10的時候,將counter置為0。
上面的代碼運行后的結果如下:
Vue官網很明確的建議我們這樣使用watch偵聽屬性:當需要在數據變化時執行異步或開銷較大的操作時,這個方式是最有用的。
4. computed和watch之間的抉擇
看完以上兩部分內容,關于Vue中computed和watch的基本用法算是掌握了。但實際上不止這些,所以接下來我們在來進階學習一波。
這里我們還原Vue官網中的一個示例,示例實現的功能大致如下:

該功能可以簡單的描述為:在firstName和lastName數據發生變化時,對fullName進行更新,其中fullName的值為firstName和lastName的拼接。
首先我們使用watch來實現該功能:watch偵聽firstName和lastName,當這兩個數據發生變化時更新fullName的值。
- <template>
- <div id="app">
- <p>firstName: <el-input v-model="firstName" placeholder="請輸入firstName"></el-input></p>
- <p>lastName: <el-input v-model="lastName" placeholder="請輸入lastName"></el-input></p>
- <p>fullName: {{fullName}}</p>
- </div>
- </template>
- <script>
- export default {
- name: 'App',
- data() {
- return {
- firstName: '',
- lastName: '',
- fullName: '(空)'
- }
- },
- // 使用watch實現
- watch: {
- firstName: function(newValue) {
- this.fullName = newValue + ' ' + this.lastName;
- },
- lastName: function(newValue){
- this.fullName = this.firstName + ' ' + newValue;
- }
- }
- }
- </script>
接著我們在使用computed來實現:定義計算屬性fullName,將firstName和lastName的值進行拼接并返回。
- <template>
- <div id="app">
- <p>firstName: <el-input v-model="firstName" placeholder="請輸入firstName"></el-input></p>
- <p>lastName: <el-input v-model="lastName" placeholder="請輸入lastName"></el-input></p>
- <p>fullName: {{fullName}}</p>
- </div>
- </template>
- <script>
- export default {
- name: 'App',
- data() {
- return {
- firstName: '',
- lastName: ''
- }
- }
- computed: {
- fullName: function() {
- return this.firstName + ' ' + this.lastName;
- }
- }
- }
- </script>
我們發現computed和watch都可以實現這個功能,但是我們在對比一下這兩種不同的實現方式:
- // 使用computed實現
- computed: {
- fullName: function() {
- return this.firstName + ' ' + this.lastName;
- }
- },
- // 使用watch實現
- watch: {
- firstName: function(newValue) {
- this.fullName = newValue + ' ' + this.lastName;
- },
- lastName: function(newValue){
- this.fullName = this.firstName + ' ' + newValue;
- }
- }
對比之下很明顯的會發現發現computed的實現方式更簡潔高級。
所以在日常項目開發中,對于computed和watch的使用要慎重選擇:
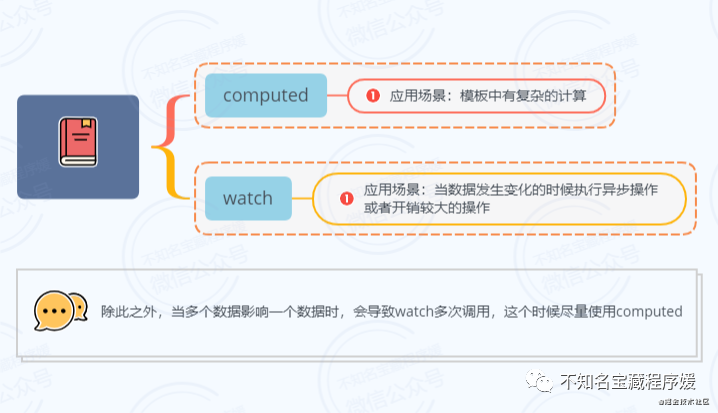
這兩者選擇和使用沒有對錯之分,只是希望能更好的使用,而不是濫用。
5. 計算屬性進階
接下來我們在對計算屬性的內容進行進階學習。
>>> 5.1 計算屬性不能和Vue Data屬性同名
在聲明計算屬性的時候,計算屬性是不能和Vue Data中定義的屬性同名,否則會出現錯誤:The computed property "xxxxx" is already defined in data。
如果有閱讀過Vue源碼的同學對這個原因應該會比較清楚,Vue在初始化的時候會按照:initProps-> initMethods -> initData -> initComputed -> initWatch這樣的順序對數據進行初始化,并且會通過Object.definedProperty將數據定義到vm實例上,在這個過程中同名的屬性會被后面的同名屬性覆蓋。
通過打印組件實例對象,可以很清楚的看到props、methods、data、computed會被定義到vm實例上。
>>> 5.2 計算屬性的set函數
在前面代碼示例中,我們的computed是這么實現的:
- computed: {
- reverseMessage: function(){
- return this.message.split('').reverse().join('');
- }
- },
這種寫法實際上是給reverseMessage提供了一個get方法,所以上面的寫法等同于:
- computed: {
- reverseMessage: {
- // 計算屬性的get方法
- get: function(){
- return this.message.split('').reverse().join('');
- }
- }
- },
除此之外,我們也可以給計算屬性提供一個set方法:
- computed: {
- reverseMessage: {
- // 計算屬性的get方法
- get: function(){
- return this.message.split('').reverse().join('');
- },
- set: function(newValue){
- // set方法的邏輯
- }
- }
- },
只有我們主動修改了計算屬性的值,set方法才會被觸發。
關于計算屬性的set方法在實際的項目開發中暫時還沒有遇到,不過經過一番思考,做出來下面這樣一個示例:
這個示例是分鐘和小時之間的一個轉化,利用計算屬性的set方法就能很好實現:
- <template>
- <div id="app">
- <p>分鐘<el-input v-model="minute" placeholder="請輸入內容"></el-input></p>
- <p>小時<el-input v-model="hours" placeholder="請輸入內容"></el-input></p>
- </div>
- </template>
- <script>
- export default {
- name: 'App',
- data() {
- return {
- minute: 60,
- }
- },
- computed: {
- hours:{
- get: function() {
- return this.minute / 60;
- },
- set: function(newValue) {
- this.minute = newValue * 60;
- }
- }
- }
- }
- </script>
>>> 5.3 計算屬性的緩存
前面我們總結過計算屬性存在緩存,并演示相關的示例。那計算屬性的緩存是如何實現的呢?
關于計算屬性的緩存這個知識點需要我們去閱讀Vue的源碼實現,所以我們一起來看看源碼吧。
相信大家看到源碼這個詞就會有點膽戰心驚,不過不用過分擔心,文章寫到這里的時候考慮到本篇文章的內容和側重點,所以不會詳細去解讀計算屬性的源碼,著重學習計算屬性的緩存實現,并且點到為止。
那如果你沒有仔細解讀過Vue的響應式原理,那建議忽略這一節的內容,等對源碼中的響應式有一定了解之后在來看這一節的內容會更容易理解。(我自己之前也寫過的一篇相關文章:1W字長文+多圖,帶你了解vue2.x的雙向數據綁定源碼實現,點擊文末閱讀原文即可查看)
關于計算屬性的入口源代碼如下:
- /*
- * Vue版本:v2.6.12
- * 代碼位置:/vue/src/core/instance/state.js
- */
- export function initState (vm: Component) {
- // ......省略......
- const opts = vm.$options
- // ......省略......
- if (opts.computed) initComputed(vm, opts.computed)
- // ......省略 ......
- }
接著我們來看看initComputed:
- /*
- * Vue版本:v2.6.12
- * 代碼位置:/vue/src/core/instance/state.js
- * @params: vm vue實例對象
- * @params: computed 所有的計算屬性
- */
- function initComputed (vm: Component, computed: Object) {
- /*
- * Object.create(null):創建一個空對象
- * 定義的const watchers是用于保存所有計算屬性的Watcher實例
- */
- const watchers = vm._computedWatchers = Object.create(null)
- // 遍歷計算屬性
- for (const key in computed) {
- const userDef = computed[key]
- /*
- * 獲取計算屬性的get方法
- * 計算屬性可以是function,默認提供的是get方法
- * 也可以是對象,分別聲明get、set方法
- */
- const getter = typeof userDef === 'function' ? userDef : userDef.get
- /*
- * 給計算屬性創建watcher
- * @params: vm vue實例對象
- * @params: getter 計算屬性的get方法
- * @params: noop
- noop是定義在 /vue/src/shared/util.js中的一個函數
- export function noop (a?: any, b?: any, c?: any) {}
- * @params: computedWatcherOptions
- * computedWatcherOptions是一個對象,定義在本文件的167行
- * const computedWatcherOptions = { lazy: true }
- */
- watchers[key] = new Watcher(
- vm,
- getter || noop,
- noop,
- computedWatcherOptions
- )
- // 函數調用
- defineComputed(vm, key, userDef)
- }
- }
在initComputed這個函數中,主要是遍歷計算屬性,然后在遍歷的過程中做了下面兩件事:
- 第一件:為計算屬性創建watcher,即new Watcher
- 第二件:調用defineComputed方法
那首先我們先來看看new Watcher都做了什么。
為了方便大家看清楚new Watcher的作用,我將Watcher的源碼進行了簡化,保留了一些比較重要的代碼。
同時代碼中重要的部分都添加了注釋,有些注釋描述的可能有點重復或者啰嗦,但主要是想以這種重復的方式讓大家可以反復琢磨并理解源碼中的內容,方便后續的理解 ~
- /*
- * Vue版本:v2.6.12
- * 代碼位置: /vue/src/core/observer/watcher.js
- * 為了看清楚Watcher的作用
- * 將源碼進行簡化,所以下面是一個簡化版的Watcher類
- * 同時部分代碼順序有所調整
- */
- export default class Watcher {
- constructor (
- vm: Component,
- expOrFn: string | Function,
- cb: Function,
- options?: ?Object,
- ) {
- // vm為組件實例
- this.vm = vm
- // expOrFn在new Watcher時傳遞的參數為計算屬性的get方法
- // 將計算屬性的get方法賦值給watcher的getter屬性
- this.getter = expOrFn
- // cb為noop:export function noop (a?: any, b?: any, c?: any) {}
- this.cb = cb
- // option在new Watcher傳遞的參數值為{lazy: true}
- // !!操作符即將options.lazy強轉為boolean類型
- // 賦值之后this.lazy的值為true
- this.lazy = !!options.lazy
- // 賦值之后this.dirty的值true
- this.dirty = this.lazy
- /*
- * 在new Watcher的時候因為this.lazy的值為true
- * 所以this.value的值還是undefined
- */
- this.value = this.lazy ? undefined : this.get()
- }
- get () {
- const vm = this.vm
- /*
- * 在構造函數中,計算屬性的get方法賦值給了watcher的getter屬性
- * 所以該行代碼即調用計算屬性的get方法,獲取計算屬性的值
- */
- value = this.getter.call(vm, vm)
- return value
- }
- evaluate () {
- /*
- * 調用watcher的get方法
- * watcher的get方法邏輯為:調用計算屬性的get方法獲取計算屬性的值并返回
- * 所以evaluate函數也就是獲取計算屬性的值,并賦值給watcher.value
- * 并且將watcher.dirty置為false,這個dirty是實現緩存的關鍵
- */
- this.value = this.get()
- this.dirty = false
- }
- }
看了這個簡化版的Watcher以后,想必我們已經很清楚的知道了Watcher類的實現。
那接下來就是關于緩存的重點了,也就是遍歷計算屬性做的第二件事:調用defineComputed函數:
- /*
- * Vue版本:v2.6.12
- * 代碼位置:/vue/src/core/instance/state.js
- * @params: target vue實例對象
- * @params: key 計算屬性名
- * @params: userDef 計算屬性定義的function或者object
- */
- export function defineComputed (
- target: any,
- key: string,
- userDef: Object | Function
- ) {
- // ......暫時省略有關sharedPropertyDefinition的代碼邏輯......
- /*
- * sharedPropertyDefinition本身是一個對象,定義在本文件31行:
- * const sharedPropertyDefinition = {
- * enumerable: true,
- * configurable: true,
- * get: noop,
- * set: noop
- * }
- * 最后使用Object.defineProperty傳入對應的參數使得計算屬性變得可觀測
- */
- Object.defineProperty(target, key, sharedPropertyDefinition)
- }
defineComputed方法最核心也只有一行代碼,也就是使用Object.defineProperty將計算屬性變得可觀測。
那么接下來我們的關注點就是調用Object.defineProperty函數時傳遞的第三個參數:sharedPropertyDefinition。
sharedPropertyDefinition是定義在當前文件中的一個對象,默認值如下:
- const sharedPropertyDefinition = {
- enumerable: true,
- configurable: true,
- get: noop,
- set: noop
- }
前面貼出來的defineComputed源碼中,我注釋說明省略了一段有關sharedPropertyDefinition的代碼邏輯,那省略的這段源代碼就不展示了,它的主要作用就是在對sharedPropertyDefinition.get和sharedPropertyDefinition.set進行重寫,重寫之后sharedPropertyDefinition的值為:
- const sharedPropertyDefinition = {
- enumerable: true,
- configurable: true,
- get: function(){
- // 獲取計算屬性對應的watcher實例
- const watcher = this._computedWatchers && this._computedWatchers[key]
- if (watcher) {
- if (watcher.dirty) {
- watcher.evaluate()
- }
- if (Dep.target) {
- watcher.depend()
- }
- return watcher.value
- }
- }
- },
- // set對應的值這里寫的是noop
- // 但是我們要知道set真正的值是我們為計算屬性提供的set函數
- // 千萬不要理解錯了哦
- set: noop,
- }
那sharedPropertyDefinition.get函數的邏輯已經非常的清晰了,同時它的邏輯就是計算屬性緩存實現的關鍵邏輯:在sharedPropertyDefinition.get函數中,先獲取到計算屬性對應的watcher實例;然后判斷watcher.dirty的值,如果該值為false,則直接返回watcher.value;否則調用watcher.evaluate()重新獲取計算屬性的值。
關于計算屬性緩存的源碼分析就到這里,相信大家對計算屬性的緩存實現已經有了一定的認識。不過僅僅是了解這些還不夠,我們應該去通讀計算屬性的完整源碼實現,才能對計算屬性有一個更通透的認識。
6. 偵聽屬性進階
>>> 6.1 handler
前面我們是這樣實現偵聽屬性的:
- watch: {
- counter: function(newValue, oldValue){
- if(this.counter == 10){
- this.counter = 0;
- }
- }
- }
那上面的這種寫法等同于給counter提供一個handler函數:
- watch: {
- counter: {
- handler: function(newValue, oldValue){
- if(this.counter == 10){
- this.counter = 0;
- }
- }
- }
- }
>>> 6.2 immediate
正常情況下,偵聽屬性提供的函數是不會立即執行的,只有在對應的vue data發生變化時,偵聽屬性對應的函數才會執行。
那如果我們需要偵聽屬性對應的函數立即執行一次,就可以給偵聽屬性提供一個immediate選項,并設置其值為true。
- watch: {
- counter: {
- handler: function(newValue, oldValue){
- if(this.counter == 10){
- this.counter = 0;
- }
- },
- immediate: true
- }
- }
>>> 6.3 deep
如果我們對一個對象類型的vue data進行偵聽,當這個對象內的屬性發生變化時,默認是不會觸發偵聽函數的。
- <template>
- <div id="app">
- <p><el-input v-model="person.name" placeholder="請輸入姓名"></el-input></p>
- <p><el-input v-model="person.age" placeholder="請輸入年齡"></el-input></p>
- </div>
- </template>
- <script>
- export default {
- name: 'App',
- data() {
- return {
- person: {
- name: 'jack',
- age: 20
- }
- }
- },
- watch: {
- person: function(newValue){
- console.log(newValue.name + ' ' + newValue.age);
- }
- }
- }
- </script>
監聽對象類型的數據,偵聽函數沒有觸發:
通過給偵聽屬性提供deep: true就可以偵聽到對象內部屬性的變化:
- watch: {
- person: {
- handler: function(newValue){
- console.log(newValue.name + ' ' + newValue.age);
- },
- deep: true
- }
- }
不過仔細觀察上面的示例會發現這種方式去監聽Object類型的數據,Object數據內部任一屬性發生變化都會觸發偵聽函數,那如果我們想單獨偵聽對象中的某個屬性,可以使用下面這樣的方式:
- watch: {
- 'person.name': function(newValue, oldValue){
- // 邏輯
- }
- }
7.總結
到此本篇文章就結束了,內容非常的簡單易懂,在此將以上的內容做以總結:

學無止境,除了基礎的內容之外,很多特性的實現原理也是我們應該關注的東西,但是介于本篇文章輸出的初衷,所以對原理實現并沒有完整的分析,后面有機會在總結~
原文鏈接:https://mp.weixin.qq.com/s/frWBXTa-EnhkGFn6c1X5NQ