一套標準的前端代碼工作流
工欲善其事,必先利其器。對于寫代碼而言,也是需要有一套完善的工作流(工具和流程)。
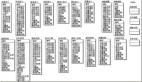
先說下編輯器選擇,在踏入前端行業之前,我最喜歡的代碼編輯器就是 sublime text ,它很簡單,編寫大部分語言都很ok,就比如說寫 python ,下面是我在2017年我在學習 python 時發布過一篇關于 sublime text 的百度經驗:
但是我現在幾乎不再使用它,取而代之的是 VSCode,一款微軟開源的代碼編輯器,它自帶 git , eslint 等工具,讓我們編碼更加的有質量,有效率。
接下來是代碼規范方面,剛寫代碼的前幾年,我毫不關心代碼質量,遵循“能用就行”的原則,隨著項目的迭代,代碼越來越臃腫(好在我之前項目都不需要迭代),我仿佛聽到有人罵罵咧咧的在吐槽我代碼🤣,就像我吐槽別人代碼一樣。現在我們完全可以使用 eslint , prettier , editorConfig 來規范我們的代碼,對于團隊而言,這個至關重要。
再聊聊 git工作流 ,現在管理代碼幾乎都是使用 git 版本管理工具,了解它是必要的,像一些基本的推拉合,解決沖突這些我們就不聊了,主要聊下團隊協作方面使用 git 的工具及使用方法。
下面我將主要圍繞上面三個點來推薦一些工具和使用方法。
ESLint
ESLint 是一款插件化的 JavaScript 代碼靜態檢查工具,其核心是通過對代碼解析得到的 AST(Abstract Syntax Tree,抽象語法樹)進行模式匹配,來分析代碼達到檢查代碼質量和風格問題的能力。
安裝
安裝并初始化 eslint:
- // 全局安裝
- npm install -g eslint
- // cd到項目根目錄下
- // 強制初始化package.json
- npm init -force
- // 初始化ESLint
- eslint --init
使用方式
寫注釋
下面這行注釋表示在當前文件中禁用 console 關鍵字
- /* eslint no-console: "error" */
寫文件
ESLint支持 eslint.js , eslintrc.yaml , eslintrc.json 類型的配置文件。
如 eslint.js 配置文件:
- module.exports = {
- env: {
- // 環境
- browser: true,
- es2021: true,
- },
- extends: [
- // 拓展
- 'eslint:recommended',
- 'plugin:@typescript-eslint/recommended',
- ],
- parser: '@typescript-eslint/parser', // 解析器,本解析器支持Ts
- parserOptions: {
- // 解析器配置選項
- ecmaVersion: 12, // 指定es版本
- sourceType: 'module', // 代碼支持es6,使用module
- },
- plugins: [
- // 插件
- '@typescript-eslint',
- ],
- rules: {
- // 規則
- },
- };
配置項
- parser - 解析器
- parserOptions - 解析器選項
- env 和 globals - 環境和全局變量
- rules - 規則
- off或0,關閉規則
- warn或1,開啟規則
- error或2,開啟規則,并會出錯阻止代碼運行
- plugins - 插件
- extends - 拓展
配置優先級
規則是使用離要檢測的文件最近的 .eslintrc文件作為最高優先級。
- 行內配置
- 命令行選項
- 項目級配置
- IDE環境配置
Prettier
Prettier 是一個代碼格式化的工具。
安裝使用
- npm install --save-dev --save-exact prettier
- // 格式化所有文件,npx命令是使用當前項目下的prettier
- npx prettier --write .
配置文件
Prettier 支持 .prettierrc 為名稱,以 .yaml .yml .json .js 為后綴的的配置文件,當然你也可以使用 package.json 文件中的 Prettier 屬性來配置。
- module.exports = {
- printWidth: 80, //一行的字符數,如果超過會進行換行,默認為80
- tabWidth: 2, //一個tab代表幾個空格數,默認為80
- useTabs: false, //是否使用tab進行縮進,默認為false,表示用空格進行縮減
- singleQuote: false, //字符串是否使用單引號,默認為false,使用雙引號
- semi: true, //行位是否使用分號,默認為true
- trailingComma: 'none', //是否使用尾逗號,有三個可選值"
- }
EditorConfig
EditorConfig有助于維護跨多個編輯器和IDE從事同一項目的多個開發人員的一致編碼風格,團隊必備神器。
.editorconfig文件
- # EditorConfig is awesome: https://EditorConfig.org
- # top-most EditorConfig file 表示是最頂層的配置文件,發現設為true時,才會停止查找.editorconfig文件
- root = true
- # Unix-style newlines with a newline ending every file 對于所有的文件 始終在文件末尾插入一個新行
- [*]
- end_of_line = lf
- insert_final_newline = true
- # Matches multiple files with brace expansion notation
- # Set default charset 對于所有的js,py文件,設置文件字符集為utf-8
- [*.{js,py}]
- charset = utf-8
- # 4 space indentation 控制py文件類型的縮進大小
- [*.py]
- indent_style = space
- indent_size = 4
- # Tab indentation (no size specified) 設置某中文件的縮進風格為tab Makefile未指明
- [Makefile]
- indent_style = tab
- # Indentation override for all JS under lib directory 設置在lib目錄下所有JS的縮進為
- [lib/**.js]
- indent_style = space
- indent_size = 2
- # Matches the exact files either package.json or .travis.yml 設置確切文件 package.json/.travis/.yml的縮進類型
- [{package.json,.travis.yml}]
- indent_style = space
- indent_size = 2
通配符
- * 匹配除/之外的任意字符串
- ** 匹配任意字符串
- ? 匹配任意單個字符
- [name] 匹配name中的任意一個單一字符
- [!name] 匹配不存在name中的任意一個單一字符
- {s1,s2,s3} 匹配給定的字符串中的任意一個(用逗號分隔)
- {num1..num2} 匹配num1到num2之間的任意一個整數, 這里的num1和num2可以為正整數也可以為負整數
屬性
- indent_style 設置縮進風格(tab是硬縮進,space為軟縮進)
- indent_size 用一個整數定義的列數來設置縮進的寬度,如果indent_style為tab,則此屬性默認為tab_width
- tab_width 用一個整數來設置tab縮進的列數。默認是indent_size
- end_of_line 設置換行符,值為lf、cr和crlf
- charset 設置編碼,值為latin1、utf-8、utf-8-bom、utf-16be和utf-16le,不建議使用utf-8-bom
- trim_trailing_whitespace 設為true表示會去除換行行首的任意空白字符。
- insert_final_newline 設為true表示使文件以一個空白行結尾
- root 表示是最頂層的配置文件,發現設為true時,才會停止查找.editorconfig文件
VSCode集成
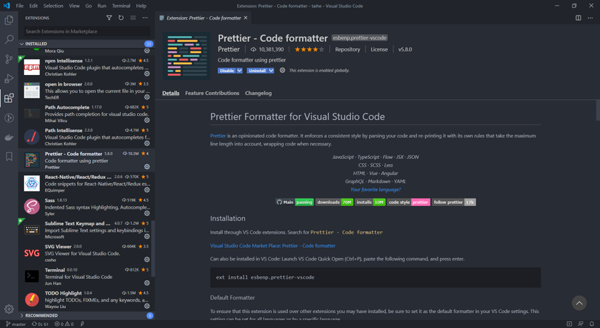
我使用的是 VSCode ,來給它添加魔法,加 EditorConfig , Eslint , Prettier , Git 擴展。
下面是 Prettier 的擴展,我以下安裝好了,大家在擴展中自行搜索安裝就好了。
配置全局工作區 setting.json 文件,在文件中加入下面配置:
- // 設置全部語言在保存時自動格式化
- "editor.formatOnSave": ture,
- // 設置特定語言在保存時自動格式化
- "[javascript]": {
- "editor.formatOnSave": true
- }
prettier配置
- {
- // 設置全部語言的默認格式化程序為prettier
- "editor.defaultFormatter": "esbenp.prettier-vscode",
- // 設置特定語言的默認格式化程序為prettier
- "[javascript]": {
- "editor.defaultFormatter": "esbenp.prettier-vscode"
- }
- }
ESLint配置
- {
- // 保存時自動修復
- "editor.codeActionsOnSave": {
- // For ESLint
- "source.fixAll.eslint": true,
- }
- }
husky/lint-staged
在提交 git 之前,我們需要校驗我們的代碼是否符合規范,如果不符合,則不允許提交代碼。
首先,安裝依賴:
- npm install -D husky
- // lint-staged 可以讓husky只檢驗git工作區的文件,不會導致你一下出現成百上千個錯誤
- npm install -D lint-staged
然后修改 package.json,增加配置:
- "scripts": {
- "precommit": "eslint src/**/*.js"
- }
- "husky": {
- "hooks": {
- "pre-commit": "lint-staged"
- }
- },
- "lint-staged": {
- "src/**/*.{js,vue}": ["prettier --write", "eslint --cache --fix", "git add"]
- }
在 git commit 之前會進入 工作區文件的掃描,執行 prettier 腳本,修改 eslint 問題,然后重要提交到工作區。
Commitizen
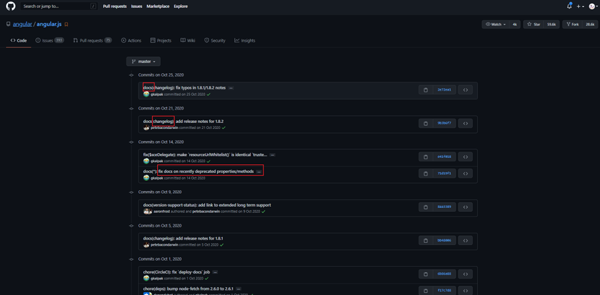
一個格式化commit message的工具,為什么需要這個工具,下面是 angular.js 開源項目的commit message,很清楚明了是不是,幾乎所有大項目和大公司都在使用這種 commit 規范。
好處:
- 提供更多的歷史信息,方便快速瀏覽
- 可以過濾某些commit,便于篩選代碼review
- 可以追蹤commit生成更新日志
- 可以關聯issues
安裝
- npm install -g commitizen
安裝符合AngularJS規范的提交說明,初始化cz-conventional-changelog適配器:
- commitizen init cz-conventional-changelog --save --save-exact
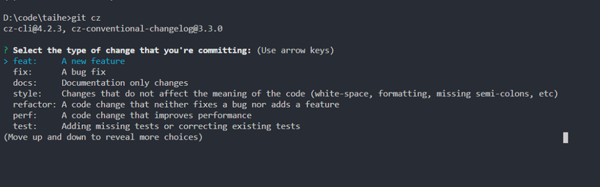
然后使用 git cz 命令 代替 git comit 來提交git說明:
定制化項目提交說明
上面的提交說明都是英文的,如果想自定義,可以試試cz-customizable,先安裝:
- npm install cz-customizable --save-dev
修改package.json文件:
- "config": {
- "commitizen": {
- "path": "node_modules/cz-customizable"
- }
- }
在項目根目錄下創建 .cz.config.js 文件:
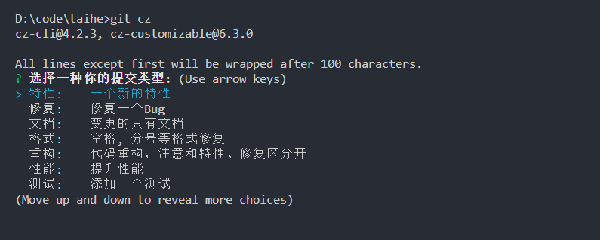
- 'use strict';
- module.exports = {
- types: [
- {value: '特性', name: '特性: 一個新的特性'},
- {value: '修復', name: '修復: 修復一個Bug'},
- {value: '文檔', name: '文檔: 變更的只有文檔'},
- {value: '格式', name: '格式: 空格, 分號等格式修復'},
- {value: '重構', name: '重構: 代碼重構,注意和特性、修復區分開'},
- {value: '性能', name: '性能: 提升性能'},
- {value: '測試', name: '測試: 添加一個測試'},
- {value: '工具', name: '工具: 開發工具變動(構建、腳手架工具等)'},
- {value: '回滾', name: '回滾: 代碼回退'}
- ],
- scopes: [
- {name: '模塊1'},
- {name: '模塊2'},
- {name: '模塊3'},
- {name: '模塊4'}
- ],
- // it needs to match the value for field type. Eg.: 'fix'
- /*
- scopeOverrides: {
- fix: [
- {name: 'merge'},
- {name: 'style'},
- {name: 'e2eTest'},
- {name: 'unitTest'}
- ]
- },
- */
- // override the messages, defaults are as follows
- messages: {
- type: '選擇一種你的提交類型:',
- scope: '選擇一個scope (可選):',
- // used if allowCustomScopes is true
- customScope: 'Denote the SCOPE of this change:',
- subject: '短說明:\n',
- body: '長說明,使用"|"換行(可選):\n',
- breaking: '非兼容性說明 (可選):\n',
- footer: '關聯關閉的issue,例如:#31, #34(可選):\n',
- confirmCommit: '確定提交說明?'
- },
- allowCustomScopes: true,
- allowBreakingChanges: ['特性', '修復'],
- // limit subject length
- subjectLimit: 100
- };
然后運行, git cz :
Commitizen校驗
檢驗提交的說明是否符合規范,不符合則不可以提交
- npm install --save-dev @commitlint/cli
- // 安裝符合Angular風格的校驗規則
- npm install --save-dev @commitlint/config-conventional
在根目錄下創建 commitlint.config.js 并配置檢驗:
- module.exports = {
- extends: ['@commitlint/config-conventional']
- };
然后在 package.json 中配置 husky ,之前我們已經安裝過了,直接添加配置:
- "husky": {
- "hooks": {
- "commit-msg": "commitlint -E HUSKY_GIT_PARAMS"
- }
- }
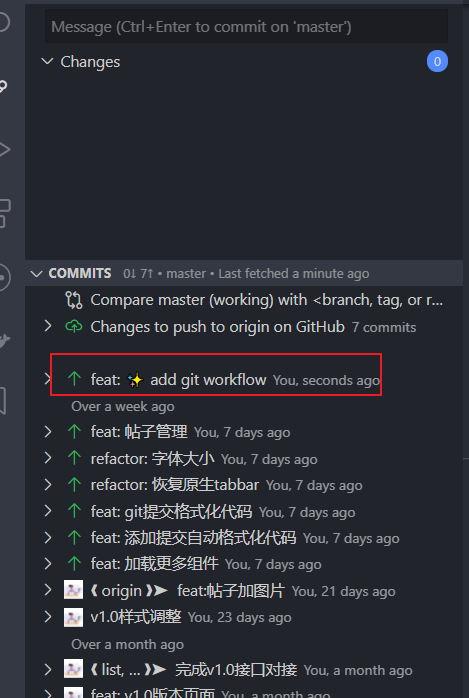
給commit加表情
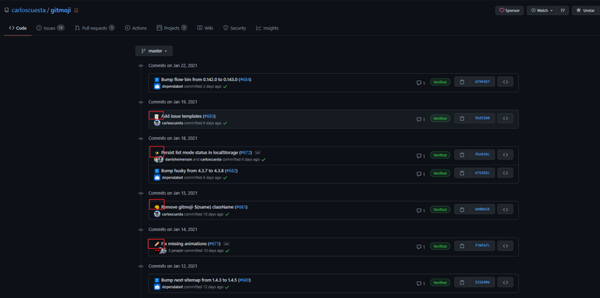
如這樣子的,是不是更加生動形象了,有意思了。
安裝:
- npm i -g gitmoji-cli
使用:你可以在這個 gitmoji 網站找到更多的表情來豐富你的提交記錄,只需要在提交記錄中加上類型 :bug: 的代碼就可以顯示表情了。