RocketMQ的編解碼技術細節
本文轉載自微信公眾號「漫漫技術路」,作者劉蒞。轉載本文請聯系漫漫技術路公眾號。
從上一篇文章中,我們了解的RocketMQ不同組件之間,數據是如何通過網絡傳輸的,總結以下幾點
- RocketMQ的網絡傳輸模塊,在remoting子模塊下,入口可以參考RemotingNettyServer和RemotingNettyClient兩個類。
- RocketMQ是依靠Netty,與各個組件進行數據傳輸。
- RocketMQ序列化、反序列化有兩種方式:一種是將數據通過FastJSON將數據轉化成JSON字符串,然后轉化成byte[]數組進行編解碼。另一種方式是RocketMQ定義了一套自己的編解碼,將每個字段分別進行編解碼。編碼不論采用那種方式,都最終都編碼為byte[]。
今天,我們分析RocketMQ的編解碼細節。在本篇文章中,可以學到:
- RocketMQ網絡協議。
- RocketMQ在傳輸數據時,內存的分配。
- RocketMQ編解碼細節。
編碼流程
首先,我們編碼器org.apache.rocketmq.remoting.netty.NettyEncoder入手
- @ChannelHandler.Sharable
- public class NettyEncoder extends MessageToByteEncoder<RemotingCommand> {
- private static final InternalLogger log = InternalLoggerFactory.getLogger(RemotingHelper.ROCKETMQ_REMOTING);
- @Override
- public void encode(ChannelHandlerContext ctx, RemotingCommand remotingCommand, ByteBuf out)
- throws Exception {
- try {
- ByteBuffer header = remotingCommand.encodeHeader();
- out.writeBytes(header);
- byte[] body = remotingCommand.getBody();
- if (body != null) {
- out.writeBytes(body);
- }
- } catch (Exception e) {
- log.error("encode exception, " + RemotingHelper.parseChannelRemoteAddr(ctx.channel()), e);
- if (remotingCommand != null) {
- log.error(remotingCommand.toString());
- }
- RemotingUtil.closeChannel(ctx.channel());
- }
- }
- }
從上面的代碼,是RocketMQ將RemotingCommand對象編碼成ByteBuf的唯一入口。
我們可以看到,先將header部分編碼成ByteBuf,然后將body部分追加到ByteBuf里。
body部分編碼很容易理解,那么header部分是怎么編碼的呢?
- public ByteBuffer encodeHeader() {
- return encodeHeader(this.body != null ? this.body.length : 0);
- }
- public ByteBuffer encodeHeader(final int bodyLength) {
- // 1> header length size
- int length = 4;
- // 2> header data length
- byte[] headerData;
- headerData = this.headerEncode();
- length += headerData.length;
- // 3> body data length
- length += bodyLength;
- ByteBuffer result = ByteBuffer.allocate(4 + length - bodyLength);
- // length
- result.putInt(length);
- // header length
- result.put(markProtocolType(headerData.length, serializeTypeCurrentRPC));
- // header data
- result.put(headerData);
- result.flip();
- return result;
- }
我們一步一步看,邏輯如下
- 定義變量length,其初始值是4,經過幾步操作,其值是4+header.length+body.length。
- 調用headerEnocde()方法編碼header部分。
- 創建ByteBuffer并申請4+length-body.length大小的內存,其實就是4+4+header.length大小的內存。
- 將數據寫入ByteBuffer,完成header部分的編碼。
我們畫一張圖來表示當前內存都存的什么數據。

我們可以很清楚的看到,每部分數據,分別存儲在ButyBuf的什么位置,這里需要特別強調的是,byte[4]部分存儲的什么,通過源碼,進一步分析。
- result.put(markProtocolType(headerData.length, serializeTypeCurrentRPC));
- public static byte[] markProtocolType(int source, SerializeType type) {
- byte[] result = new byte[4];
- result[0] = type.getCode();
- result[1] = (byte) ((source >> 16) & 0xFF);
- result[2] = (byte) ((source >> 8) & 0xFF);
- result[3] = (byte) (source & 0xFF);
- return result;
- }
- public enum SerializeType {
- JSON((byte) 0),
- ROCKETMQ((byte) 1);
- }
markProtocolType方法,第一個參數source表示header部分的長度,第二個參數type是編碼類型的枚舉,返回值是byte[]。
那么markProtocolType方法是做什么的呢?我們將type字段傳入JSON和ROCKETMQ這兩個枚舉值,分別看一下,返回的是什么。
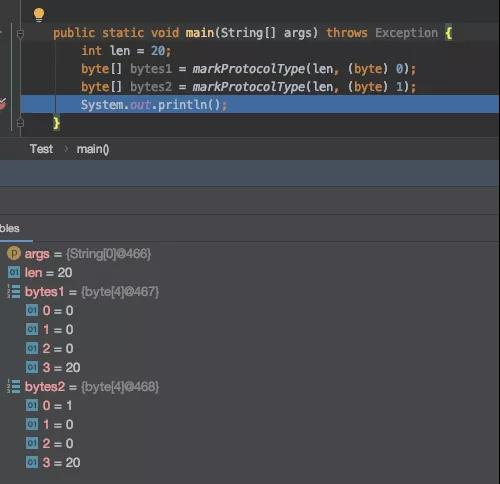
返回值共四個字節,只有第一個字節不同,第四個字節是header部分的長度,前文已經提到過,RocketMQ對header部分,可以采用兩種編解碼方式。
對!!沒錯,第一個字節就是標識編解碼類型的。
解碼流程
接下來我們來看解碼,解碼與編碼稍有不同,解碼器繼承Netty提供的LengthFieldBasedFrameDecoder解碼器,我們來看org.apache.rocketmq.remoting.netty.NettyDecoder的源碼。
- public class NettyDecoder extends LengthFieldBasedFrameDecoder {
- private static final InternalLogger log = InternalLoggerFactory.getLogger(RemotingHelper.ROCKETMQ_REMOTING);
- private static final int FRAME_MAX_LENGTH =
- Integer.parseInt(System.getProperty("com.rocketmq.remoting.frameMaxLength", "16777216"));
- public NettyDecoder() {
- super(FRAME_MAX_LENGTH, 0, 4, 0, 4);
- }
- @Override
- public Object decode(ChannelHandlerContext ctx, ByteBuf in) throws Exception {
- ByteBuf frame = null;
- try {
- frame = (ByteBuf) super.decode(ctx, in);
- if (null == frame) {
- return null;
- }
- ByteBuffer byteBuffer = frame.nioBuffer();
- return RemotingCommand.decode(byteBuffer);
- } catch (Exception e) {
- log.error("decode exception, " + RemotingHelper.parseChannelRemoteAddr(ctx.channel()), e);
- RemotingUtil.closeChannel(ctx.channel());
- } finally {
- if (null != frame) {
- frame.release();
- }
- }
- return null;
- }
- }
其步驟如下:
- 調用LengthFieldBasedFrameDecoder的decode方法,初次解碼。
- 調用RemotingCommand.decode()方法,完成對header、body部分的解碼,并轉化為RemotingCommand對象。
為什么要經過兩次解碼?
熟悉LengthFieldBasedFrameDecoder解碼器的朋友都知道,LengthFieldBasedFrameDecoder解碼器是Netty提供的一種非常靈活的解碼器。
它在RocketMQ的NettyDecoder類中是這樣被構造的。
- public NettyDecoder() {
- super(FRAME_MAX_LENGTH, 0, 4, 0, 4);
- }
LengthFieldBasedFrameDecoder我在這里不詳細解釋,按上面的構造方法,意思是跳過開頭前4個字節。
構造出來LengthFieldBasedFrameDecoder后對RocketMQ協議進行初次解碼,解碼結果如下:
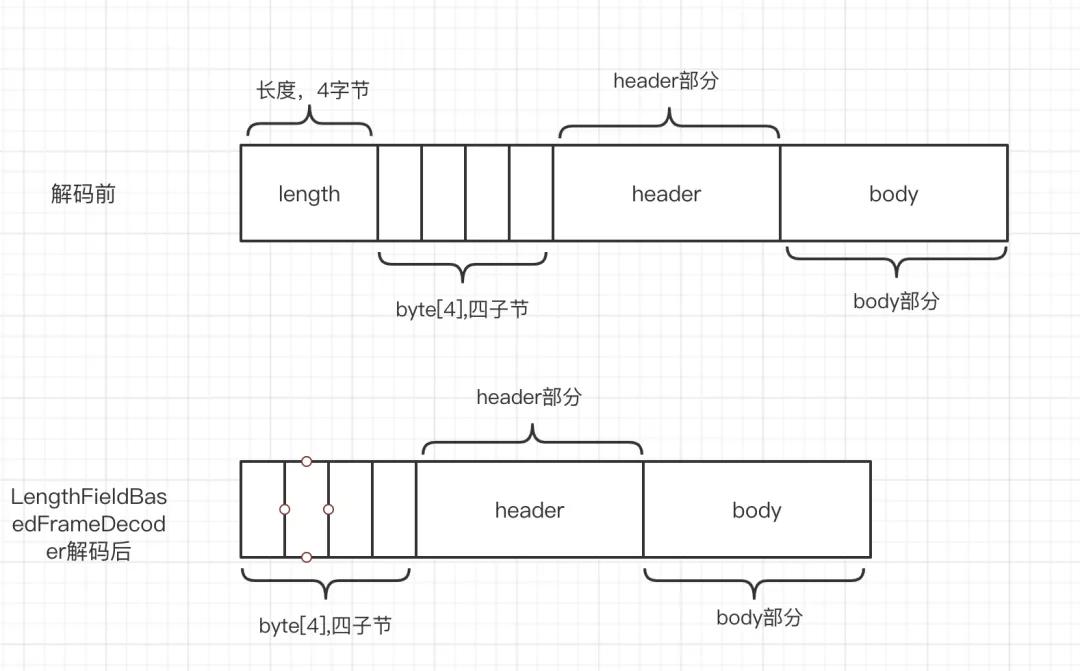
我們可以看到,把前四個字節,也就是把存儲length字段的那部分內存截去了,只剩byte[]+header+body部分。
我們再來看RemotingCommand的解碼邏輯
- public static RemotingCommand decode(final ByteBuffer byteBuffer) {
- int length = byteBuffer.limit();
- int oriHeaderLen = byteBuffer.getInt();
- int headerLength = getHeaderLength(oriHeaderLen);
- byte[] headerData = new byte[headerLength];
- byteBuffer.get(headerData);
- RemotingCommand cmd = headerDecode(headerData, getProtocolType(oriHeaderLen));
- int bodyLength = length - 4 - headerLength;
- byte[] bodyData = null;
- if (bodyLength > 0) {
- bodyData = new byte[bodyLength];
- byteBuffer.get(bodyData);
- }
- cmd.body = bodyData;
- return cmd;
- }
- private static RemotingCommand headerDecode(byte[] headerData, SerializeType type) {
- switch (type) {
- case JSON:
- RemotingCommand resultJson = RemotingSerializable.decode(headerData, RemotingCommand.class);
- resultJson.setSerializeTypeCurrentRPC(type);
- return resultJson;
- case ROCKETMQ:
- RemotingCommand resultRMQ = RocketMQSerializable.rocketMQProtocolDecode(headerData);
- resultRMQ.setSerializeTypeCurrentRPC(type);
- return resultRMQ;
- default:
- break;
- }
- return null;
- }
只剩byte[4]+header+body三個部分,解碼邏輯便很清晰。可以分為以下幾個步驟
- 求出數據的長度、header的長度。
- 根據編碼類型,解碼。比如通過JSON方式編碼,則通過JSON方式解碼。
- 算出body的長度,解碼body。
- 將最終解碼生成的RemotingCommand對象,發送給pipeline的下一個handler處理。