Linux下被遺忘的gpio_keys按鍵驅動
我們新項目硬件設計上使用gpio口做按鍵,所以我就需要搞定這個驅動,本來想自己寫一個gpio口的按鍵驅動,然后看了下內核下面的代碼,已經有現成的了。Linux內核下游很多很多的現成驅動,只要你想得到的,基本都是有現成的,當然了,不包括一些非正常的需求性問題,學會在Linux下找驅動,看驅動和內核代碼,我覺得是一件享受和快樂的事情。
不過我還是在使用這個驅動上遇到了問題。
1. 先說ADC 按鍵
之前的文章有寫過adc按鍵的實現,無非就是為了省點GPIO口。
RK 利用SARADC 來做多個按鍵
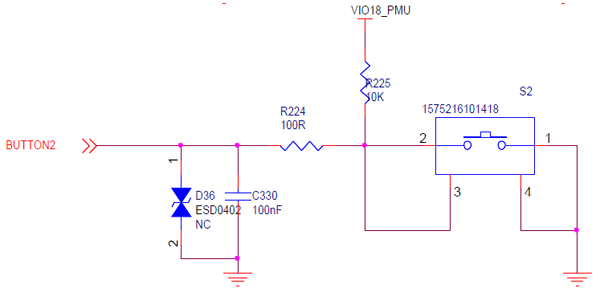
2. GPIO 按鍵硬件原理圖
3. 驅動代碼
- kernel-4.4/drivers/input/keyboard/gpio_keys.c
完整代碼可查看
- https://gitee.com/weiqifa/gpio_key/blob/master/gpio_keys.c
驅動代碼流程,從probe處開始
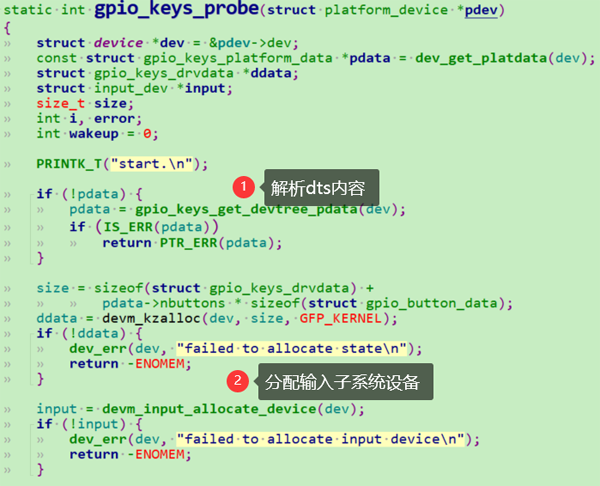
剛開始的時候,我連dts文件都不會寫,因為之前沒有接觸過這個驅動。然后看了gpio_keys_get_devtree_pdata函數,之后又看了內核代碼下其他項目其他平臺的dts文件,才知道怎么寫這個驅動的dts文件。
實話說,這個驅動完成了很多我們需要的功能,比如防抖,比如中斷,比如按鍵label等等。
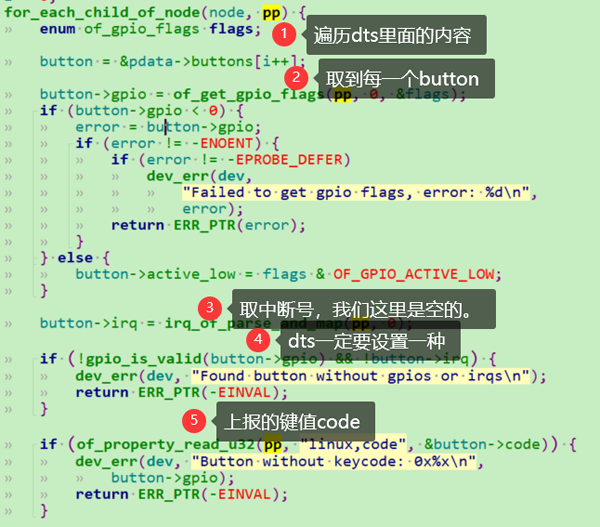
3.1 gpio_keys_get_devtree_pdata 函數解析dts文件
這個文件解析的dts 有兩種方式,一種是直接傳入irq的,一種是只傳入gpio口的。
我們的這個項目,就只傳入了gpio口。
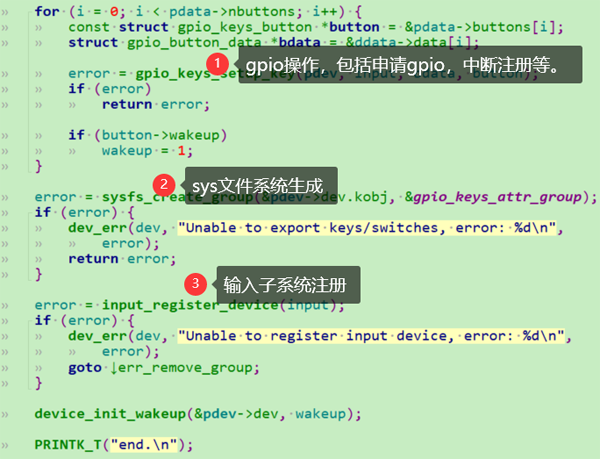
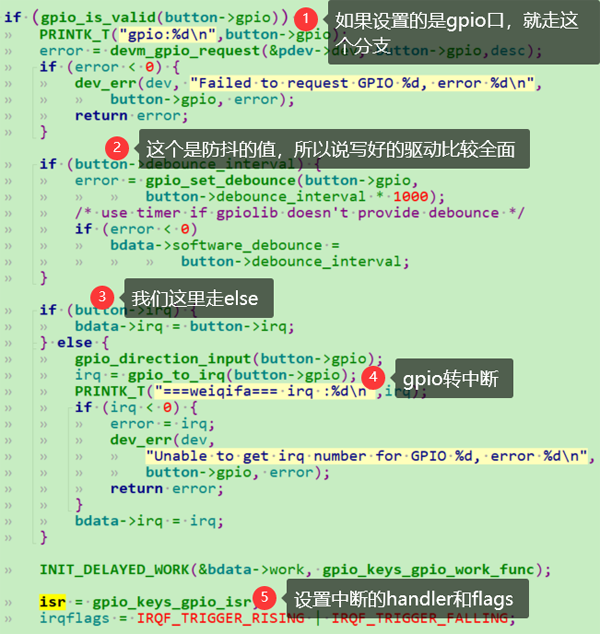
3.2 gpio_keys_setup_key 函數
這個函數用來設置gpio口的中斷的,直接看代碼會比較清楚。

下面這個函數,我還沒有想清楚它的作用,看了回調函數里面的實現,是為了把開啟的工作隊列停止掉。但是我加了打印并沒有打印,我猜測是為了防止誤觸發,就是按鍵按下的時間非常短的時候,才會調用這個。
- /**
- * devm_add_action() - add a custom action to list of managed resources
- * @dev: Device that owns the action
- * @action: Function that should be called
- * @data: Pointer to data passed to @action implementation
- *
- * This adds a custom action to the list of managed resources so that
- * it gets executed as part of standard resource unwinding.
- */
- int devm_add_action(struct device *dev, void (*action)(void *), void *data)
- {
- struct action_devres *devres;
- devres = devres_alloc(devm_action_release,
- sizeof(struct action_devres), GFP_KERNEL);
- if (!devres)
- return -ENOMEM;
- devres->datadata = data;
- devres->actionaction = action;
- devres_add(dev, devres);
- return 0;
- }
3.3 驅動修改
驅動修改的代碼如下
- --- a/kernel-4.4/drivers/input/keyboard/gpio_keys.c
- +++ b/kernel-4.4/drivers/input/keyboard/gpio_keys.c
- @@ -32,6 +32,11 @@
- #include <linux/of_irq.h>
- #include <linux/spinlock.h>
- +
- +#define LOG_TAG "[BUTTON]: %s() line: %d "
- +#define PRINTK_T(fmt, args...) printk(KERN_INFO LOG_TAG fmt, __FUNCTION__, __LINE__, ##args)
- +
- +
- struct gpio_button_data {
- const struct gpio_keys_button *button;
- struct input_dev *input;
- @@ -462,9 +467,8 @@ static int gpio_keys_setup_key(struct platform_device *pdev,
- spin_lock_init(&bdata->lock);
- if (gpio_is_valid(button->gpio)) {
- -
- - error = devm_gpio_request_one(&pdev->dev, button->gpio,
- - GPIOF_IN, desc);
- + PRINTK_T("gpio:%d\n",button->gpio);
- + error = devm_gpio_request(&pdev->dev, button->gpio,desc);
- if (error < 0) {
- dev_err(dev, "Failed to request GPIO %d, error %d\n",
- button->gpio, error);
- @@ -483,7 +487,9 @@ static int gpio_keys_setup_key(struct platform_device *pdev,
- if (button->irq) {
- bdata->irq = button->irq;
- } else {
- + gpio_direction_input(button->gpio);
- irq = gpio_to_irq(button->gpio);
- + PRINTK_T("===weiqifa=== irq :%d\n",irq);
- if (irq < 0) {
- error = irq;
- dev_err(dev,
- @@ -540,8 +546,10 @@ static int gpio_keys_setup_key(struct platform_device *pdev,
- if (!button->can_disable)
- irqflags |= IRQF_SHARED;
- - error = devm_request_any_context_irq(&pdev->dev, bdata->irq,
- - isr, irqflags, desc, bdata);
- + PRINTK_T("===weiqifa=== devm_request_threaded_irq()\n");
- + error = devm_request_threaded_irq(&pdev->dev, bdata->irq,NULL,
- + isr, irqflags| IRQF_ONESHOT, desc, bdata);
- if (error < 0) {
- dev_err(dev, "Unable to claim irq %d; error %d\n",
- bdata->irq, error);
- @@ -709,6 +717,8 @@ static int gpio_keys_probe(struct platform_device *pdev)
- int i, error;
- int wakeup = 0;
- + PRINTK_T("start.\n");
- +
- if (!pdata) {
- pdata = gpio_keys_get_devtree_pdata(dev);
- if (IS_ERR(pdata))
- @@ -779,6 +789,8 @@ static int gpio_keys_probe(struct platform_device *pdev)
- device_init_wakeup(&pdev->dev, wakeup);
- + PRINTK_T("end.\n");
- +
- return 0;
- err_remove_group:
可以確定的是,如果不修改的話,肯定是會出錯的。
你要知道,這個驅動是在2005年就完成編寫了,中間經過了多少次的系統升級,而且很多廠商主推的還是ADC按鍵驅動,GPIO口驅動默認情況下是會被拋棄的,廠商釋放的SDK根本就不會記得修改這個驅動代碼,所以別以為你的手機運行正常里面就沒有bug,bug無處不在,只是我們有了重啟大法而已。
4. dts 代碼
- gpio-keys {
- compatible = "gpio-keys";
- #address-cells = <1>;
- #size-cells = <0>;
- autorepeat;
- //pinctrl-names = "default";
- //pinctrl-0 = <&pwrbtn>;
- button@0 {
- gpios = <&pio 49 IRQ_TYPE_EDGE_BOTH>;
- linux,code = <KEY_F13>;
- label = "GPIO F13 Power";
- linux,input-type = <1>;
- gpio-key,wakeup = <1>;
- debounce-interval = <100>;
- };
- button@1 {
- gpios = <&pio 48 IRQ_TYPE_EDGE_BOTH>;
- linux,code = <KEY_F14>;
- label = "GPIO F14 Power";
- linux,input-type = <1>;
- gpio-key,wakeup = <1>;
- debounce-interval = <100>;
- };
- button@2 {
- gpios = <&pio 51 IRQ_TYPE_EDGE_BOTH>;
- linux,code = <KEY_F15>;
- label = "GPIO F15 Power";
- linux,input-type = <1>;
- gpio-key,wakeup = <1>;
- debounce-interval = <100>;
- };
- };
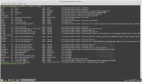
5. 測試驅動
燒錄后按下按鍵,可以看到鍵值上報.